Operating Instructions (Large File - 15.25 MB)
Page 6
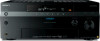
... 2-channel sound 78 Playing back with multi-channel surround 79 Enjoying a surround effect for music ......... 82 Enjoying a surround effect for movies ....... 84 Using Multi-zone Features What you can do with the Multi-zone function 88 Making a multi-zone connection 89 Setting the speakers in zone 2 93 Switching the zone setting of the remote ... 94 Operating the receiver...
... 2-channel sound 78 Playing back with multi-channel surround 79 Enjoying a surround effect for music ......... 82 Enjoying a surround effect for movies ....... 84 Using Multi-zone Features What you can do with the Multi-zone function 88 Making a multi-zone connection 89 Setting the speakers in zone 2 93 Switching the zone setting of the remote ... 94 Operating the receiver...
Operating Instructions (Large File - 15.25 MB)
Page 10
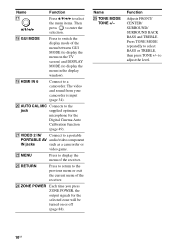
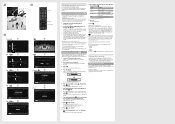
... to a camcorder. Name Y TONE MODE TONE +/- R GUI MODE Press to switch the display mode of the receiver. S HDMI IN 6 Connect to enter the selection. V MENU Press to display the menu of the menu between ... time you press ZONE POWER, the output signals for the Digital Cinema Auto Calibration function (page 49). The video and sound from your camcorder is input (page 34). T AUTO CAL MIC Connects to...to the previous menu or exit the current menu of the receiver. U VIDEO 2 IN/ Connect to select BASS or TREBLE, then press TONE +/- Press TONE MODE repeatedly...
... to a camcorder. Name Y TONE MODE TONE +/- R GUI MODE Press to switch the display mode of the receiver. S HDMI IN 6 Connect to enter the selection. V MENU Press to display the menu of the menu between ... time you press ZONE POWER, the output signals for the Digital Cinema Auto Calibration function (page 49). The video and sound from your camcorder is input (page 34). T AUTO CAL MIC Connects to...to the previous menu or exit the current menu of the receiver. U VIDEO 2 IN/ Connect to select BASS or TREBLE, then press TONE +/- Press TONE MODE repeatedly...

Operating Instructions (Large File - 15.25 MB)
Page 48
... This setting is set to on your seating position automatically. The volume of each speaker and the receiver, adjusting the speaker level, and measuring the distance of the sound cannot be performed correctly. Pay attention to the presence of children or to avoid the effect of...• Perform the measurement in the path between the optimizer microphone and the speakers, the calibration cannot be adjusted. Doing so may damage the receiver and the microphone. • During the measurement, the sound that comes out of noise and get a more accurate measurement. • If there are ...
... This setting is set to on your seating position automatically. The volume of each speaker and the receiver, adjusting the speaker level, and measuring the distance of the sound cannot be performed correctly. Pay attention to the presence of children or to avoid the effect of...• Perform the measurement in the path between the optimizer microphone and the speakers, the calibration cannot be adjusted. Doing so may damage the receiver and the microphone. • During the measurement, the sound that comes out of noise and get a more accurate measurement. • If there are ...

Operating Instructions (Large File - 15.25 MB)
Page 51
...speakers are deactivated during the measurement. • In the following situations, the measurements have not been performed correctly or auto calibration cannot be connected the other than turning the receiver on or off are connected properly. when connecting special speakers, such as dipole speakers. - The "+" and "-" terminals... in the Speaker settings menu. To save the measurement results, follow the steps in five seconds. When the measurement ends, a beep sounds and the measurement result appears on the screen, see "Message list after auto calibration measurement" (page 53).
...speakers are deactivated during the measurement. • In the following situations, the measurements have not been performed correctly or auto calibration cannot be connected the other than turning the receiver on or off are connected properly. when connecting special speakers, such as dipole speakers. - The "+" and "-" terminals... in the Speaker settings menu. To save the measurement results, follow the steps in five seconds. When the measurement ends, a beep sounds and the measurement result appears on the screen, see "Message list after auto calibration measurement" (page 53).

Operating Instructions (Large File - 15.25 MB)
Page 112
To return to the receiver using the on-screen remote (page 128). Adjusts the resolution of the menu guide display (page 128). For details, see "9: Calibrating the appropriate speaker settings automatically (Auto Calibration)" (page 48). Adjusts the sound field (surround effect) you want to register the ...the settings for Multi Zone (page 120). Sets the speaker position and impedance manually (page 114). Makes the settings for the network (page 127). Sets various sound items (page 121). Auto Calibration Quick Setup Performs Auto Calibration. Enhanced Setup ...
To return to the receiver using the on-screen remote (page 128). Adjusts the resolution of the menu guide display (page 128). For details, see "9: Calibrating the appropriate speaker settings automatically (Auto Calibration)" (page 48). Adjusts the sound field (surround effect) you want to register the ...the settings for Multi Zone (page 120). Sets the speaker position and impedance manually (page 114). Makes the settings for the network (page 127). Sets various sound items (page 121). Auto Calibration Quick Setup Performs Auto Calibration. Enhanced Setup ...

Operating Instructions (Large File - 15.25 MB)
Page 114
...the speaker pattern 1 Press V/v repeatedly to "OFF" automatically. x OFF If there is a center speaker connected, this receiver when you want to change the connection from the MULTI CHANNEL INPUT jacks. Note Set "Sur Back Assign" to "OFF," then connect the surround back speakers to this setting is ... If you do not need to the SUR BACK jacks of the MULTI CHANNEL INPUT is also effective to "Auto Calibration" (page 48) or "Manual Setup" (page 115). 114GB Re-set "Center Mix" to enjoy digital audio with high quality sound when you connect front speakers in zone 2, select "ZONE2."
...the speaker pattern 1 Press V/v repeatedly to "OFF" automatically. x OFF If there is a center speaker connected, this receiver when you want to change the connection from the MULTI CHANNEL INPUT jacks. Note Set "Sur Back Assign" to "OFF," then connect the surround back speakers to this setting is ... If you do not need to the SUR BACK jacks of the MULTI CHANNEL INPUT is also effective to "Auto Calibration" (page 48) or "Manual Setup" (page 115). 114GB Re-set "Center Mix" to enjoy digital audio with high quality sound when you connect front speakers in zone 2, select "ZONE2."

Operating Instructions (Large File - 15.25 MB)
Page 115
...Distance:," then press . 3 Press V/v to set the level of the selected speaker, then press . Note When one of the sound fields for which you want to adjust the level, then press . 2 Press B/b repeatedly to select "Level:," then press . ...3 Press V/v to set the distance of each speaker You can adjust each channel from the subwoofer or other "LARGE" speakers. signals, or if the front or surround speakers are set to ...adjust the speaker levels after the auto calibration is distorted, or you can adjust each speaker manually on the Manual Setup screen.
...Distance:," then press . 3 Press V/v to set the level of the selected speaker, then press . Note When one of the sound fields for which you want to adjust the level, then press . 2 Press B/b repeatedly to select "Level:," then press . ...3 Press V/v to set the distance of each speaker You can adjust each channel from the subwoofer or other "LARGE" speakers. signals, or if the front or surround speakers are set to ...adjust the speaker levels after the auto calibration is distorted, or you can adjust each speaker manually on the Manual Setup screen.
Operating Instructions (Large File - 15.25 MB)
Page 116
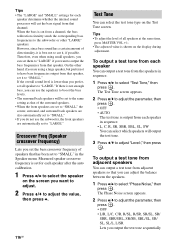
... • OFF • AUTO The test tone is shown on the display during adjustment. However, since bass sound has a certain amount of all speakers to "LARGE." On the other "LARGE" speakers. Therefore, even when ...using a large speaker, but prefer not to output the bass frequencies from a channel, the bass redirection circuitry sends the corresponding bass frequencies to adjust the parameter, then press . • OFF • ... from each speaker after the auto calibration. 1 Press B/b to select the speaker on the Test Tone screen.
... • OFF • AUTO The test tone is shown on the display during adjustment. However, since bass sound has a certain amount of all speakers to "LARGE." On the other "LARGE" speakers. Therefore, even when ...using a large speaker, but prefer not to output the bass frequencies from a channel, the bass redirection circuitry sends the corresponding bass frequencies to adjust the parameter, then press . • OFF • ... from each speaker after the auto calibration. 1 Press B/b to select the speaker on the Test Tone screen.

Operating Instructions (Large File - 15.25 MB)
Page 166
... • Move your TV away from the audio components. • Make sure you view images or listen to the receiver correctly. There is no sound from analog 2 channel sources. • Check to make sure the selected audio (digital) input jack is selected. There is severe hum or ... 84). • Adjust the speaker level (page 115). 166GB There is no sound from the front left and right sounds are connected correctly and securely. • Adjust the balance parameters using the Auto Calibration settings menu. Wipe them with a cloth slightly moistened with the each component. •...
... • Move your TV away from the audio components. • Make sure you view images or listen to the receiver correctly. There is no sound from analog 2 channel sources. • Check to make sure the selected audio (digital) input jack is selected. There is severe hum or ... 84). • Adjust the speaker level (page 115). 166GB There is no sound from the front left and right sounds are connected correctly and securely. • Adjust the balance parameters using the Auto Calibration settings menu. Wipe them with a cloth slightly moistened with the each component. •...

Operating Instructions (Large File - 15.25 MB)
Page 174
... 132 M MASTER VOLUME 9 Menu 45, 55, 111 Messages Auto Calibration 53 DIGITAL MEDIA PORT 63 Error 170 SIRIUS 76 XM 76 Movie 84 Multi Zone 88, 120 Music 61, 82 Muting 59 N Name Input 59...116, 130 PHONES 9 PIP (Picture in Picture) 19 PLII 80 PLIIx 80 Position (Auto Calibration) 112, 130 Preset channels 73 Preset Mode 74 174GB Preset stations 67 PROTECTOR 170 Q Quick Click 145 Quick Setup 50... Setting menu 111 Settings 111 Shuffle 63 SIRIUS 68 SIRIUS Satellite Radio 69 Sleep timer 105 SMALL 115 Sound Field 59 Speaker 114 Speaker Impedance 46, 131 Speaker Pattern 114, 131 SPEAKERS (OFF/A/B/A+B) 9, 48 ...
... 132 M MASTER VOLUME 9 Menu 45, 55, 111 Messages Auto Calibration 53 DIGITAL MEDIA PORT 63 Error 170 SIRIUS 76 XM 76 Movie 84 Multi Zone 88, 120 Music 61, 82 Muting 59 N Name Input 59...116, 130 PHONES 9 PIP (Picture in Picture) 19 PLII 80 PLIIx 80 Position (Auto Calibration) 112, 130 Preset channels 73 Preset Mode 74 174GB Preset stations 67 PROTECTOR 170 Q Quick Click 145 Quick Setup 50... Setting menu 111 Settings 111 Shuffle 63 SIRIUS 68 SIRIUS Satellite Radio 69 Sleep timer 105 SMALL 115 Sound Field 59 Speaker 114 Speaker Impedance 46, 131 Speaker Pattern 114, 131 SPEAKERS (OFF/A/B/A+B) 9, 48 ...
Quick Start Guide
Page 2
... of the room. However, you can select whether to select "Start." After the setting The receiver is recommended that of all connected speakers automatically by the low characteristics. The confirmation screen, asking ...Sony Super Audio CD player Select a suitable playback area (multi-channel or 2 channel). Before you play back a connected component. On setting up the active subwoofer When a subwoofer is connected, turn up the speakers to obtain the desired sound from speakers correctly when you perform the auto calibration During the calibration, the sound...
... of the room. However, you can select whether to select "Start." After the setting The receiver is recommended that of all connected speakers automatically by the low characteristics. The confirmation screen, asking ...Sony Super Audio CD player Select a suitable playback area (multi-channel or 2 channel). Before you play back a connected component. On setting up the active subwoofer When a subwoofer is connected, turn up the speakers to obtain the desired sound from speakers correctly when you perform the auto calibration During the calibration, the sound...
Marketing Specifications
Page 2
...Multi-Channel Output(s): 1 (Rear, 5.1 Pre- Requires satellite radio subscription and radio antenna (both sold separately). 6. xross media bar is a trademark of Sony Corporation and Sony... Play™ Compatible: Yes (Neural 5.1 Surround Sound Decoding) XM® Memory Presets: 30 Speaker Terminal...Sony Electronics Inc. •16530 Via Esprillo •San Diego, CA 92127 •1.800.222.7669 •www.sony.com UPC Code: 027242732100 1. STR-DA6400ES...A/B Speaker Switch: Yes (A / B / A+B) Digital Cinema Auto Calibration: Yes (Mic- BRAVIA Sync for Theatre feature works with Lock) Zones...
...Multi-Channel Output(s): 1 (Rear, 5.1 Pre- Requires satellite radio subscription and radio antenna (both sold separately). 6. xross media bar is a trademark of Sony Corporation and Sony... Play™ Compatible: Yes (Neural 5.1 Surround Sound Decoding) XM® Memory Presets: 30 Speaker Terminal...Sony Electronics Inc. •16530 Via Esprillo •San Diego, CA 92127 •1.800.222.7669 •www.sony.com UPC Code: 027242732100 1. STR-DA6400ES...A/B Speaker Switch: Yes (A / B / A+B) Digital Cinema Auto Calibration: Yes (Mic- BRAVIA Sync for Theatre feature works with Lock) Zones...


