Operating Instructions (Large File - 15.25 MB)
Page 4
...169;2008 SIRIUS Satellite Radio Inc. This manual mainly explains operations using the main remote commander, but most of the same operations can also be registered in some jurisdictions...and controls on the receiver if they have the same or similar names as required by MORISAWA & COMPANY LTD. These names are not specified. Sony Corporation hereby grants the ... Neural-THX Surround. STR-DA6400ES Operating Instructions (this manual) This manual explains the operations of the system itself. You can enjoy multi-channel surround sound. This receiver incorporates Dolby* Digital ...
...169;2008 SIRIUS Satellite Radio Inc. This manual mainly explains operations using the main remote commander, but most of the same operations can also be registered in some jurisdictions...and controls on the receiver if they have the same or similar names as required by MORISAWA & COMPANY LTD. These names are not specified. Sony Corporation hereby grants the ... Neural-THX Surround. STR-DA6400ES Operating Instructions (this manual) This manual explains the operations of the system itself. You can enjoy multi-channel surround sound. This receiver incorporates Dolby* Digital ...
Operating Instructions (Large File - 15.25 MB)
Page 6
... Playing back with multi-channel surround 79 Enjoying a surround effect for music ......... 82 Enjoying a surround effect for movies ....... 84 Using Multi-zone Features What you can do with the Multi-zone function 88 Making a multi-zone connection 89 Setting the speakers in zone 2 93 Switching the zone setting of the remote ... 94 Operating the receiver from another...
... Playing back with multi-channel surround 79 Enjoying a surround effect for music ......... 82 Enjoying a surround effect for movies ....... 84 Using Multi-zone Features What you can do with the Multi-zone function 88 Making a multi-zone connection 89 Setting the speakers in zone 2 93 Switching the zone setting of the remote ... 94 Operating the receiver from another...
Operating Instructions (Large File - 15.25 MB)
Page 7
Adjusting Settings Using the setting menu 111 Auto Calibration 112 Speaker settings 114 Surround settings 118 EQ settings 119 Multi Zone settings 120 Audio settings 121 Video settings 123 HDMI settings 126 Network Settings 127 Quick Click settings 128 System ... sequence automatically (Macro Play 141 Setting remote commander codes that are not stored in the remote 143 Clearing all the contents of the remote's memory 144 Using On-screen Remote (Quick Click) Operating components or lighting connected to the receiver using the on screen remote (Quick Click 145 Preparing Quick Click ...
Adjusting Settings Using the setting menu 111 Auto Calibration 112 Speaker settings 114 Surround settings 118 EQ settings 119 Multi Zone settings 120 Audio settings 121 Video settings 123 HDMI settings 126 Network Settings 127 Quick Click settings 128 System ... sequence automatically (Macro Play 141 Setting remote commander codes that are not stored in the remote 143 Clearing all the contents of the remote's memory 144 Using On-screen Remote (Quick Click) Operating components or lighting connected to the receiver using the on screen remote (Quick Click 145 Preparing Quick Click ...
Operating Instructions (Large File - 15.25 MB)
Page 8
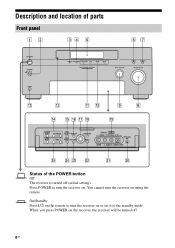
When you press POWER on . On/Standby Press ?/1 on the remote to turn the receiver on or set it to turn the receiver on using the remote. Press POWER to the standby mode. You cannot turn the receiver on the receiver, the receiver will be turned off (initial setting). Description and location of parts Front panel Status of the POWER button Off The receiver is turned off . 8GB
When you press POWER on . On/Standby Press ?/1 on the remote to turn the receiver on or set it to turn the receiver on using the remote. Press POWER to the standby mode. You cannot turn the receiver on the receiver, the receiver will be turned off (initial setting). Description and location of parts Front panel Status of the POWER button Off The receiver is turned off . 8GB
Operating Instructions (Large File - 15.25 MB)
Page 9
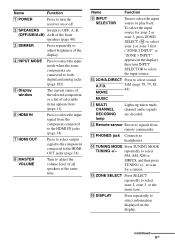
.../ SELECT (qh) to select zone 2 or zone 3 first ("ZONE 2 INPUT" or "ZONE 3 INPUT" appears on the display), then turn the receiver on the display. to select FM, AM, XM or SIRIUS, and then press TUNING +/- Name Function A POWER Press to adjust the volume level of...main zone. L Remote sensor Receives signals from the component connected to adjust brightness of the display. continued 9GB E Display window The current status of the selected component or a list of the front speakers (page 48). MOVIE field (page 78, 79, 82, 84). MUSIC K MULTI CHANNEL DECODING lamp Lights ...
.../ SELECT (qh) to select zone 2 or zone 3 first ("ZONE 2 INPUT" or "ZONE 3 INPUT" appears on the display), then turn the receiver on the display. to select FM, AM, XM or SIRIUS, and then press TUNING +/- Name Function A POWER Press to adjust the volume level of...main zone. L Remote sensor Receives signals from the component connected to adjust brightness of the display. continued 9GB E Display window The current status of the selected component or a list of the front speakers (page 48). MOVIE field (page 78, 79, 82, 84). MUSIC K MULTI CHANNEL DECODING lamp Lights ...
Operating Instructions (Large File - 15.25 MB)
Page 15
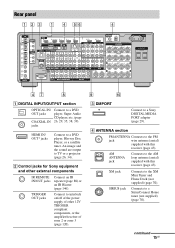
...Sony equipment and other 12V TRIGGER compliant components, or the amplifier/receiver of other external components IR REMOTE IN/OUT jacks Connect an IR repeater (page 88) or an IR Blaster (page 146). D ANTENNA section FM ANTENNA Connects to the FM jack wire antenna (aerial) supplied with this receiver..., or a satellite tuner. TRIGGER OUT jacks Connect to the AM loop antenna (aerial) supplied with this receiver (page 43). SIRIUS jack Connects to a Sony DIGITAL MEDIA PORT adapter (page 29). C DMPORT Connect to a SiriusConnect Home tuner (not supplied) (page...
...Sony equipment and other 12V TRIGGER compliant components, or the amplifier/receiver of other external components IR REMOTE IN/OUT jacks Connect an IR repeater (page 88) or an IR Blaster (page 146). D ANTENNA section FM ANTENNA Connects to the FM jack wire antenna (aerial) supplied with this receiver..., or a satellite tuner. TRIGGER OUT jacks Connect to the AM loop antenna (aerial) supplied with this receiver (page 43). SIRIUS jack Connects to a Sony DIGITAL MEDIA PORT adapter (page 29). C DMPORT Connect to a SiriusConnect Home tuner (not supplied) (page...

Operating Instructions (Large File - 15.25 MB)
Page 17
... turn on . continued 17GB Press one of the AV ?/1 switch changes automatically each time you want to use the supplied remote to operate the receiver and to control the Sony audio/video components that the remote is assigned to operate. You can use . Remote commander You can program the remote to switch the zone 2 or zone 3 operation...
... turn on . continued 17GB Press one of the AV ?/1 switch changes automatically each time you want to use the supplied remote to operate the receiver and to control the Sony audio/video components that the remote is assigned to operate. You can use . Remote commander You can program the remote to switch the zone 2 or zone 3 operation...
Operating Instructions (Large File - 15.25 MB)
Page 18
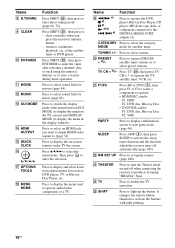
... tuner. SLEEP Press AMP (4), then press SLEEP to activate the sleep timer function and the duration which the receiver turns off when connecting the receiver to light up the remote (page 108). Y SHIFT Press to products featuring "BRAVIA" Sync. TUNING +/- Press SHIFT (wg), then... press ENT/MEM to enter the value after selecting a channel, disc, or track using the numeric buttons, or to operate the TV,...
... tuner. SLEEP Press AMP (4), then press SLEEP to activate the sleep timer function and the duration which the receiver turns off when connecting the receiver to light up the remote (page 108). Y SHIFT Press to products featuring "BRAVIA" Sync. TUNING +/- Press SHIFT (wg), then... press ENT/MEM to enter the value after selecting a channel, disc, or track using the numeric buttons, or to operate the TV,...

Operating Instructions (Large File - 15.25 MB)
Page 20
...3, and any other Sony components (SYSTEM STANDBY). Name Function A AV ?/1 (on/ standby) Press to turn the receiver on or off the receivers in zone 2 or zone 3. Press AV ?/1 (1) at the same time, to turn on or off the receivers in "Programming the remote" (page 137).... (on . You can program the remote to operate (page 137). C ZONE Press to control Sony components (page 95). Press a pink-labeled button after selecting a channel, disc or track using the numeric buttons. E ENTER Press to display the stored favorite channel list of TV. 20GB Press ?/1...
...3, and any other Sony components (SYSTEM STANDBY). Name Function A AV ?/1 (on/ standby) Press to turn the receiver on or off the receivers in zone 2 or zone 3. Press AV ?/1 (1) at the same time, to turn on or off the receivers in "Programming the remote" (page 137).... (on . You can program the remote to operate (page 137). C ZONE Press to control Sony components (page 95). Press a pink-labeled button after selecting a channel, disc or track using the numeric buttons. E ENTER Press to display the stored favorite channel list of TV. 20GB Press ?/1...
Operating Instructions (Large File - 15.25 MB)
Page 21
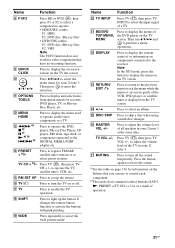
...operate the DVD player, Blu-ray Disc Player, CD player, MD deck, tape deck, or component connected to enter the selection. It changes the remote button function to restore the sound. Name Function T TV INPUT Press TV (qj), then press TV INPUT to select the input signal of operation... the VCR, DVD player, or satellite tuner is attached to select the menu items for receiver, DVD player, TV, or Blu-ray Disc Player, etc. I QUICK CLICK Press to display the on-screen remote on components connected to skip a disc when using a multi-disc changer. Y DISC SKIP Press to the...
...operate the DVD player, Blu-ray Disc Player, CD player, MD deck, tape deck, or component connected to enter the selection. It changes the remote button function to restore the sound. Name Function T TV INPUT Press TV (qj), then press TV INPUT to select the input signal of operation... the VCR, DVD player, or satellite tuner is attached to select the menu items for receiver, DVD player, TV, or Blu-ray Disc Player, etc. I QUICK CLICK Press to display the on-screen remote on components connected to skip a disc when using a multi-disc changer. Y DISC SKIP Press to the...

Operating Instructions (Large File - 15.25 MB)
Page 44
...the connected component only while the receiver is not malfunction. 1 Press POWER to turn on the receiver. 3 Release the TONE MODE and HDMI IN after a few seconds. appears. This procedure can also be connected this outlet. 6: Preparing the receiver and the remote Connecting the AC power cord (...mains lead) Connect the supplied AC power cord (mains lead) to the AC IN terminal on the receiver, then connect the AC power cord (mains lead) to their factory...
...the connected component only while the receiver is not malfunction. 1 Press POWER to turn on the receiver. 3 Release the TONE MODE and HDMI IN after a few seconds. appears. This procedure can also be connected this outlet. 6: Preparing the receiver and the remote Connecting the AC power cord (...mains lead) Connect the supplied AC power cord (mains lead) to the AC IN terminal on the receiver, then connect the AC power cord (mains lead) to their factory...
Operating Instructions (Large File - 15.25 MB)
Page 45
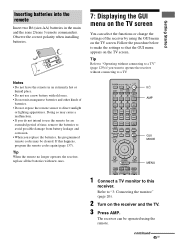
...on the TV screen You can be cleared. Refer to this happens, program the remote codes again (page 137). The receiver can select the functions or change the settings of the receiver by using the remote. If this receiver. Doing so may be operated using the GUI menu on the TV screen. ...continued 45GB Tip When the remote no longer operates the receiver, replace all the batteries with old ones. • Do not mix...
...on the TV screen You can be cleared. Refer to this happens, program the remote codes again (page 137). The receiver can select the functions or change the settings of the receiver by using the remote. If this receiver. Doing so may be operated using the GUI menu on the TV screen. ...continued 45GB Tip When the remote no longer operates the receiver, replace all the batteries with old ones. • Do not mix...
Operating Instructions (Large File - 15.25 MB)
Page 46
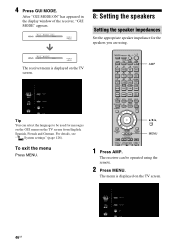
After "GUI MODE ON" has appeared in the display window of the receiver, "GUI MODE" appears. 8: Setting the speakers Setting the speaker impedances Set the appropriate speaker impedance for messages on the GUI menu on the TV screen. ... To exit the menu Press MENU. Tip You can be used for the speakers you are using the remote. 2 Press MENU. V/v/b, MENU 1 Press AMP. The menu is displayed on the TV screen. AMP The receiver menu is displayed on the TV screen from English, Spanish, French and German. For details, see " System...
After "GUI MODE ON" has appeared in the display window of the receiver, "GUI MODE" appears. 8: Setting the speakers Setting the speaker impedances Set the appropriate speaker impedance for messages on the GUI menu on the TV screen. ... To exit the menu Press MENU. Tip You can be used for the speakers you are using the remote. 2 Press MENU. V/v/b, MENU 1 Press AMP. The menu is displayed on the TV screen. AMP The receiver menu is displayed on the TV screen from English, Spanish, French and German. For details, see " System...
Operating Instructions (Large File - 15.25 MB)
Page 50
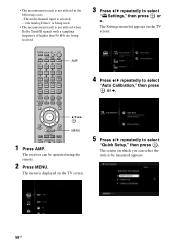
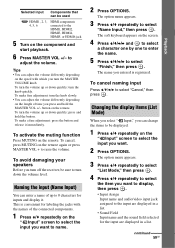
... The menu is not utilized when Dolby TrueHD signals with a sampling frequency of higher than 96 kHz are being received. 3 Press V/v repeatedly to select "Auto Calibration," then press or b. The receiver can select the item to select "Quick Setup," then press . AMP 4 Press V/v repeatedly to select "... TV screen. 5 Press V/v repeatedly to be operated using the remote. 2 Press MENU. The screen on which you can be measured appears. 50GB • The measurement result is not utilized in the following cases. -The multi-channel input is selected. -"2ch Analog Direct" is being used. &#...
... The menu is not utilized when Dolby TrueHD signals with a sampling frequency of higher than 96 kHz are being received. 3 Press V/v repeatedly to select "Auto Calibration," then press or b. The receiver can select the item to select "Quick Setup," then press . AMP 4 Press V/v repeatedly to select "... TV screen. 5 Press V/v repeatedly to be operated using the remote. 2 Press MENU. The screen on which you can be measured appears. 50GB • The measurement result is not utilized in the following cases. -The multi-channel input is selected. -"2ch Analog Direct" is being used. &#...

Operating Instructions (Large File - 15.25 MB)
Page 55
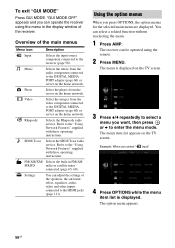
... 55GB The receiver can display the menu of the receiver on the TV screen, make sure that the receiver is displayed on the remote. To return to select the menu you select " Input" RETURN/ EXIT O GUI MODE V/v/b, OPTIONS MENU Using the menu 1 Press AMP. To display the menu of the receiver on the ...appears on the TV screen" (page 45). Example: When you want . Getting Started Guide to on-screen display operation You can be operated using the remote. 2 Press MENU. The menu is in "GUI MODE" following the steps in "7: Displaying the GUI menu on the TV screen. To exit the...
... 55GB The receiver can display the menu of the receiver on the TV screen, make sure that the receiver is displayed on the remote. To return to select the menu you select " Input" RETURN/ EXIT O GUI MODE V/v/b, OPTIONS MENU Using the menu 1 Press AMP. To display the menu of the receiver on the ...appears on the TV screen" (page 45). Example: When you want . Getting Started Guide to on-screen display operation You can be operated using the remote. 2 Press MENU. The menu is in "GUI MODE" following the steps in "7: Displaying the GUI menu on the TV screen. To exit the...
Operating Instructions (Large File - 15.25 MB)
Page 56
... adjust the settings of the main menus Menu icon Description Input Selects the input source component connected to the receiver (page 58). Example: When you select " Input" 4 Press OPTIONS while the menu item list is displayed on the TV screen. 3 Press V/v repeatedly to select ... menu item list appears on the home network. FM/AM/XM/ Selects the built-in the display window of the receiver. The option menu appears. 56GB You can operate the receiver using the remote. 2 Press MENU. Overview of the speakers, the surround effect, equalizer, audio, video and other inputs connected to ...
... adjust the settings of the main menus Menu icon Description Input Selects the input source component connected to the receiver (page 58). Example: When you select " Input" 4 Press OPTIONS while the menu item list is displayed on the TV screen. 3 Press V/v repeatedly to select ... menu item list appears on the home network. FM/AM/XM/ Selects the built-in the display window of the receiver. The option menu appears. 56GB You can operate the receiver using the remote. 2 Press MENU. Overview of the speakers, the surround effect, equalizer, audio, video and other inputs connected to ...
Operating Instructions (Large File - 15.25 MB)
Page 58
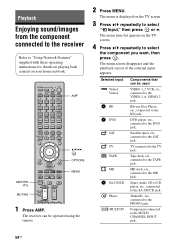
...connected to the SA-CD/CD jack. Playback Enjoying sound/images from the component connected to the receiver Refer to "Using Network Features" supplied with these operating instructions for details on playing back content on...repeatedly to the SAT jack. AMP MASTER VOL MUTING V/v/B/b, OPTIONS MENU 1 Press AMP. The receiver can be operated using the remote. 2 Press MENU. The menu screen disappears and the playback screen of the external input ... TAPE jack. DVD DVD player, etc., connected to the MULTI CHANNEL INPUT jack. 58GB MULTI IN Component connected to the DVD jack.
...connected to the SA-CD/CD jack. Playback Enjoying sound/images from the component connected to the receiver Refer to "Using Network Features" supplied with these operating instructions for details on playing back content on...repeatedly to the SAT jack. AMP MASTER VOL MUTING V/v/B/b, OPTIONS MENU 1 Press AMP. The receiver can be operated using the remote. 2 Press MENU. The menu screen disappears and the playback screen of the external input ... TAPE jack. DVD DVD player, etc., connected to the MULTI CHANNEL INPUT jack. 58GB MULTI IN Component connected to the DVD jack.
Operating Instructions (Large File - 15.25 MB)
Page 59
... and release it . To avoid damaging your speakers Before you entered is convenient for inputs and display it immediately. The name you turn off the receiver, be sure to turn the knob quickly. To cancel, press MUTING on the screen. 4 Press V/v/B/b and to select a character one by one ...volume. Changing the display items (List Mode) When you select " Input," you can change the items to be displayed. 1 Press V/v repeatedly on the remote. To turn the volume up or down quickly: turn down the volume level. To cancel naming input Press V/v/B/b to the input are displayed in a ...
... and release it . To avoid damaging your speakers Before you entered is convenient for inputs and display it immediately. The name you turn off the receiver, be sure to turn the knob quickly. To cancel, press MUTING on the screen. 4 Press V/v/B/b and to select a character one by one ...volume. Changing the display items (List Mode) When you select " Input," you can change the items to be displayed. 1 Press V/v repeatedly on the remote. To turn the volume up or down quickly: turn down the volume level. To cancel naming input Press V/v/B/b to the input are displayed in a ...

Operating Instructions (Large File - 15.25 MB)
Page 60
...PORT adapter. • Before disconnecting the DIGITAL MEDIA PORT adapter, make sure to turn the receiver off using a DIGITAL MEDIA PORT adapter. You can use the following Sony DIGITAL MEDIA PORT adapters: • TDM-BT1 Bluetooth™ Wireless Audio Adapter • ...TDM-NW1/NW10 DIGITAL MEDIA PORT Adapter • TDM-iP1/iP10/iP50 DIGITAL MEDIA PORT Adapter • TPM-MP10 DIGITAL MEDIA PORT Adapter The DIGITAL MEDIA PORT adapter is for details of the receiver without using the remote...
...PORT adapter. • Before disconnecting the DIGITAL MEDIA PORT adapter, make sure to turn the receiver off using a DIGITAL MEDIA PORT adapter. You can use the following Sony DIGITAL MEDIA PORT adapters: • TDM-BT1 Bluetooth™ Wireless Audio Adapter • ...TDM-NW1/NW10 DIGITAL MEDIA PORT Adapter • TDM-iP1/iP10/iP50 DIGITAL MEDIA PORT Adapter • TPM-MP10 DIGITAL MEDIA PORT Adapter The DIGITAL MEDIA PORT adapter is for details of the receiver without using the remote...

Operating Instructions (Large File - 15.25 MB)
Page 61
...component other than one of the following is connected. Walkman The Network Walkman recognized is connected. to the DIGITAL MEDIA PORT adapter is connected. The receiver can be recognized, "DMPORT1" or "DMPORT2" is displayed on the TV screen. Mobile The Mobile Phone Phone recognized is connected. Bluetooth The ...an icon. iPod The iPod model recognized is recognized and "DMPORT1" and "DMPORT2" on the screen will change to play using the remote. 2 Press MENU. The component connected to adjust the volume. 61GB Playback AMP V/v/b, MENU MASTER VOL 1 Press AMP.
...component other than one of the following is connected. Walkman The Network Walkman recognized is connected. to the DIGITAL MEDIA PORT adapter is connected. The receiver can be recognized, "DMPORT1" or "DMPORT2" is displayed on the TV screen. Mobile The Mobile Phone Phone recognized is connected. Bluetooth The ...an icon. iPod The iPod model recognized is recognized and "DMPORT1" and "DMPORT2" on the screen will change to play using the remote. 2 Press MENU. The component connected to adjust the volume. 61GB Playback AMP V/v/b, MENU MASTER VOL 1 Press AMP.


