Operating Instructions (Large File - 17.22 MB)
Page 4
... such marks by Sony Corporation is a registered trademark of their respective holders. This receiver incorporates High-Definition Multimedia Interface (HDMI™) technology. In this manual are those on the supplied simple remote. and any use the controls on the receiver if they have the...of AOL LLC. Other trademarks and trade names are for model STR-DA4600ES (the receiver). Microsoft, Windows, Windows Vista, and Windows Media are of Microsoft Corporation in this manual describe mostly the controls on the remote. ADDITIONAL INFORMATION MAY BE OBTAINED FROM MPEG LA, L.L.C. All...
... such marks by Sony Corporation is a registered trademark of their respective holders. This receiver incorporates High-Definition Multimedia Interface (HDMI™) technology. In this manual are those on the supplied simple remote. and any use the controls on the receiver if they have the...of AOL LLC. Other trademarks and trade names are for model STR-DA4600ES (the receiver). Microsoft, Windows, Windows Vista, and Windows Media are of Microsoft Corporation in this manual describe mostly the controls on the remote. ADDITIONAL INFORMATION MAY BE OBTAINED FROM MPEG LA, L.L.C. All...

Operating Instructions (Large File - 17.22 MB)
Page 6
...listen to a satellite radio .........66 Selecting a channel of the satellite radio ....66 Presetting satellite radio channels 68 Restricting access to specific channels (Parental Lock 68 Enjoying Surround Sound Playing back with 2-channel sound 72 Playing back with multi-channel surround 73 Enjoying a surround effect for music... 90 Making a multi-zone connection 90 Setting the speakers in zone 2 94 Switching the zone setting of the remote ... 95 Operating the receiver from another zone (ZONE 2/ZONE 3 operations 95 Using Other Features Using "BRAVIA" Sync features 97 Switching the ...
...listen to a satellite radio .........66 Selecting a channel of the satellite radio ....66 Presetting satellite radio channels 68 Restricting access to specific channels (Parental Lock 68 Enjoying Surround Sound Playing back with 2-channel sound 72 Playing back with multi-channel surround 73 Enjoying a surround effect for music... 90 Making a multi-zone connection 90 Setting the speakers in zone 2 94 Switching the zone setting of the remote ... 95 Operating the receiver from another zone (ZONE 2/ZONE 3 operations 95 Using Other Features Using "BRAVIA" Sync features 97 Switching the ...

Operating Instructions (Large File - 17.22 MB)
Page 7
...sleep timer 104 Enjoying the surround effect at low volume levels (Night Mode 104 Recording using the receiver 105 Switching the command mode of the receiver and the remote 106 Using a bi-amplifier connection 107 Adjusting Settings Using the setting menu 109 Auto Calibration 110 Speaker...Operating Each Component Using the On-screen Remote (Quick Click) Operating components or lighting connected to the receiver using the on-screen remote (Quick Click 136 Using Quick Click 137 Setting components that are operated by the on-screen remote 142 Performing several commands in sequence ...
...sleep timer 104 Enjoying the surround effect at low volume levels (Night Mode 104 Recording using the receiver 105 Switching the command mode of the receiver and the remote 106 Using a bi-amplifier connection 107 Adjusting Settings Using the setting menu 109 Auto Calibration 110 Speaker...Operating Each Component Using the On-screen Remote (Quick Click) Operating components or lighting connected to the receiver using the on-screen remote (Quick Click 136 Using Quick Click 137 Setting components that are operated by the on-screen remote 142 Performing several commands in sequence ...
Operating Instructions (Large File - 17.22 MB)
Page 8
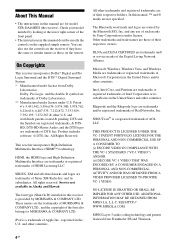
...remote commander. When the power is on, the lamp above the button lights up when multi-channel audio signals are set to "OFF," and the power for HDMI" or "Network Standby" is set to "ON," "A.STNDBY" appears in standby mode. Saving the power in the display window of the receiver while the receiver... is turned off . B TONE MODE, TONE Adjusts FRONT, CENTER, SURROUND/SURROUND BACK, FRONT HIGH BASS and TREBLE. E Display window (page 10) F MULTI CHANNEL DECODING lamp Lights up in standby mode. When "Control for...
...remote commander. When the power is on, the lamp above the button lights up when multi-channel audio signals are set to "OFF," and the power for HDMI" or "Network Standby" is set to "ON," "A.STNDBY" appears in standby mode. Saving the power in the display window of the receiver while the receiver... is turned off . B TONE MODE, TONE Adjusts FRONT, CENTER, SURROUND/SURROUND BACK, FRONT HIGH BASS and TREBLE. E Display window (page 10) F MULTI CHANNEL DECODING lamp Lights up in standby mode. When "Control for...
Operating Instructions (Large File - 17.22 MB)
Page 13
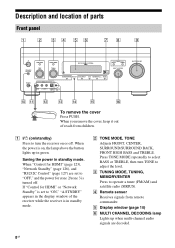
continued 13GB Used for Sony equipment and other external components IR REMOTE IN/OUT jacks (page 38, 90) TRIGGER OUT jacks (page 118) Connect to interlock on/off of the power supply of other 12V TRIGGER compliant components. Rear panel A DIGITAL INPUT/OUTPUT section (page 24, 28, 34) OPTICAL IN/OUT jacks COAXIAL IN jacks HDMI IN/OUT* jacks (page 24, 25) B ANTENNA section FM ANTENNA jack (page 39) AM ANTENNA jack (page 39) SIRIUS jack (page 65) C RS232C port D LAN ports (switching hubs) (page 41) E Control jacks for maintenance and service.
continued 13GB Used for Sony equipment and other external components IR REMOTE IN/OUT jacks (page 38, 90) TRIGGER OUT jacks (page 118) Connect to interlock on/off of the power supply of other 12V TRIGGER compliant components. Rear panel A DIGITAL INPUT/OUTPUT section (page 24, 28, 34) OPTICAL IN/OUT jacks COAXIAL IN jacks HDMI IN/OUT* jacks (page 24, 25) B ANTENNA section FM ANTENNA jack (page 39) AM ANTENNA jack (page 39) SIRIUS jack (page 65) C RS232C port D LAN ports (switching hubs) (page 41) E Control jacks for maintenance and service.
Operating Instructions (Large File - 17.22 MB)
Page 15
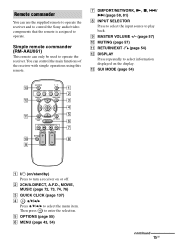
...72, 73, 74, 76) C QUICK CLICK (page 137) D V/v/B/b Press V/v/B/b to operate the receiver. You can use the supplied remote to operate the receiver and to control the Sony audio/video components that the remote is assigned to operate. M GUI MODE (page 54) A ?/1 (on/standby) Press to enter the... selection. Then press to turn a receiver on the display. E OPTIONS (page 55) F MENU (page...
...72, 73, 74, 76) C QUICK CLICK (page 137) D V/v/B/b Press V/v/B/b to operate the receiver. You can use the supplied remote to operate the receiver and to control the Sony audio/video components that the remote is assigned to operate. M GUI MODE (page 54) A ?/1 (on/standby) Press to enter the... selection. Then press to turn a receiver on the display. E OPTIONS (page 55) F MENU (page...

Operating Instructions (Large File - 17.22 MB)
Page 16
...to enter the value after selecting a channel, disc, or track using ?/1. C ZONE (page 90) D AMP Press to store a station during tuner operation. E Input buttons Press one of the buttons to select the component you can program the remote to control non-Sony components following the steps in zone ...If you press any of the tuner. You can turn off the receiver and all other components including an amplifier in "Programming the remote" (page 147). I MEMORY Press SHIFT (wd), then press MEMORY to control Sony components (page 57). The buttons are factory assigned to enter the Memory...
...to enter the value after selecting a channel, disc, or track using ?/1. C ZONE (page 90) D AMP Press to store a station during tuner operation. E Input buttons Press one of the buttons to select the component you can program the remote to control non-Sony components following the steps in zone ...If you press any of the tuner. You can turn off the receiver and all other components including an amplifier in "Programming the remote" (page 147). I MEMORY Press SHIFT (wd), then press MEMORY to control Sony components (page 57). The buttons are factory assigned to enter the Memory...

Operating Instructions (Large File - 17.22 MB)
Page 17
...SET UP (page 106) U THEATER Press to turn the Theater Mode on the display. It changes the remote button function to - X Numeric buttons Press SHIFT (wd), then press to activate the buttons with pink...or DVD (5), then press F1 or F2 to select a component to enable the TV operation. select channel numbers over 10 of the Blu-ray Disc Player, continued 17GB wj HDMI OUTPUT (page 99) wk ...MODE (page 54) wl DISPLAY Press repeatedly to select information displayed on and off when connecting the receiver to light up the button. V TV Press to operate. Press to operate the TV, satellite...
...SET UP (page 106) U THEATER Press to turn the Theater Mode on the display. It changes the remote button function to - X Numeric buttons Press SHIFT (wd), then press to activate the buttons with pink...or DVD (5), then press F1 or F2 to select a component to enable the TV operation. select channel numbers over 10 of the Blu-ray Disc Player, continued 17GB wj HDMI OUTPUT (page 99) wk ...MODE (page 54) wl DISPLAY Press repeatedly to select information displayed on and off when connecting the receiver to light up the button. V TV Press to operate. Press to operate the TV, satellite...
Operating Instructions (Large File - 17.22 MB)
Page 19
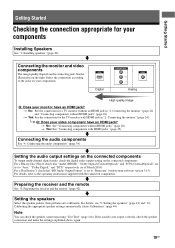
... version 3.15). See the illustration on the connected components. v Setting the audio output settings on the connected components To output multi-channel digital audio, check the digital audio output setting on the right. For a PlayStation 3, check that "Audio (HDMI)," "Dolby Digital...High quality image Q: Does your components Installing Speakers See "1: Installing speakers" (page 20). v Preparing the receiver and the remote See "8: Preparing the receiver and the remote" (page 42). v Connecting the monitor and video components The image quality depends on your video component have...
... version 3.15). See the illustration on the connected components. v Setting the audio output settings on the connected components To output multi-channel digital audio, check the digital audio output setting on the right. For a PlayStation 3, check that "Audio (HDMI)," "Dolby Digital...High quality image Q: Does your components Installing Speakers See "1: Installing speakers" (page 20). v Preparing the receiver and the remote See "8: Preparing the receiver and the remote" (page 42). v Connecting the monitor and video components The image quality depends on your video component have...

Operating Instructions (Large File - 17.22 MB)
Page 38
...). You can control components connected to operate two components with the IR Blaster. Remote sensors on -screen remote control. IR Blaster Remote sensors If the infrared receivers on the left, you want to the receiver via the IR Blaster using the on Sony Recorders and other products are identified by the symbol. After referring to the...
...). You can control components connected to operate two components with the IR Blaster. Remote sensors on -screen remote control. IR Blaster Remote sensors If the infrared receivers on the left, you want to the receiver via the IR Blaster using the on Sony Recorders and other products are identified by the symbol. After referring to the...
Operating Instructions (Large File - 17.22 MB)
Page 42
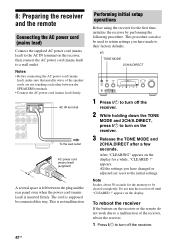
... • Connect the AC power cord (mains lead) firmly. Do not turn the receiver off the receiver. 42GB The cord is supposed be cleared completely. To reboot the receiver If the buttons on the receiver or the remote do not work due to a malfunction of the speaker cords are reset to be connected... holding down the TONE MODE and 2CH/A.DIRECT, press ?/1 to turn on the receiver, then connect the AC power cord (mains lead) to a wall outlet. 8: Preparing the receiver and the remote Connecting the AC power cord (mains lead) Connect the supplied AC power cord (mains lead) to the AC IN...
... • Connect the AC power cord (mains lead) firmly. Do not turn the receiver off the receiver. 42GB The cord is supposed be cleared completely. To reboot the receiver If the buttons on the receiver or the remote do not work due to a malfunction of the speaker cords are reset to be connected... holding down the TONE MODE and 2CH/A.DIRECT, press ?/1 to turn on the receiver, then connect the AC power cord (mains lead) to a wall outlet. 8: Preparing the receiver and the remote Connecting the AC power cord (mains lead) Connect the supplied AC power cord (mains lead) to the AC IN...
Operating Instructions (Large File - 17.22 MB)
Page 43
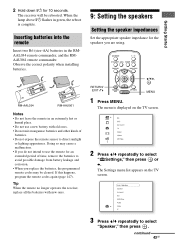
... speaker impedance for an extended period of batteries. • Do not expose the remote sensor to select "Speaker," then press . continued 43GB Tip When the remote no longer operates the receiver, replace all the batteries with old ones. • Do not mix manganese batteries...," then press or b. RM-AAL034 RM-AAU061 Notes • Do not leave the remote in the RMAAL034 remote commander, and the RMAAU061 remote commander. Observe the correct polarity when installing batteries. The receiver will be cleared. Getting Started 2 Hold down ?/1 for 10 seconds. The Settings menu...
... speaker impedance for an extended period of batteries. • Do not expose the remote sensor to select "Speaker," then press . continued 43GB Tip When the remote no longer operates the receiver, replace all the batteries with old ones. • Do not mix manganese batteries...," then press or b. RM-AAL034 RM-AAU061 Notes • Do not leave the remote in the RMAAL034 remote commander, and the RMAAU061 remote commander. Observe the correct polarity when installing batteries. The receiver will be cleared. Getting Started 2 Hold down ?/1 for 10 seconds. The Settings menu...

Operating Instructions (Large File - 17.22 MB)
Page 54
...installation launcher does not start automatically, double-click "SetupLauncher.exe" on the screen. To display the menu of the receiver on the TV screen, make sure that an image of the receiver on the TV screen and select the function you want to display help files. Click " Settings" in "To turn... "GUI MODE" on the screen. The menu is displayed on the remote. Guide to the help files. GUI MODE RETURN/ EXIT O ...
...installation launcher does not start automatically, double-click "SetupLauncher.exe" on the screen. To display the menu of the receiver on the TV screen, make sure that an image of the receiver on the TV screen and select the function you want to display help files. Click " Settings" in "To turn... "GUI MODE" on the screen. The menu is displayed on the remote. Guide to the help files. GUI MODE RETURN/ EXIT O ...

Operating Instructions (Large File - 17.22 MB)
Page 57
...make fine adjustment: turn the MASTER VOLUME knob. DVD DVD player, etc., connected to the MULTI CHANNEL INPUT jack. Selected input Components that can adjust the volume differently depending on the length of the... TV TV connected to the SAT/ CATV jack. To cancel, press MUTING on the remote. Playback Enjoying sound/images from the component connected to the SA-CD/CD jack. SA...-CD/CD Super Audio CD or CD player, etc., connected to the receiver V/v/B/b, OPTIONS MENU MASTER VOLUME MUTING 1 Select " Input," then press or b. to raise the ...
...make fine adjustment: turn the MASTER VOLUME knob. DVD DVD player, etc., connected to the MULTI CHANNEL INPUT jack. Selected input Components that can adjust the volume differently depending on the length of the... TV TV connected to the SAT/ CATV jack. To cancel, press MUTING on the remote. Playback Enjoying sound/images from the component connected to the SA-CD/CD jack. SA...-CD/CD Super Audio CD or CD player, etc., connected to the receiver V/v/B/b, OPTIONS MENU MASTER VOLUME MUTING 1 Select " Input," then press or b. to raise the ...

Operating Instructions (Large File - 17.22 MB)
Page 58
... digital audio input/output jacks" (page 34). You can use the network function of the receiver without using the remote. • Do not connect or disconnect the DIGITAL MEDIA PORT adapter to/from the receiver while the system is convenient for enjoying sound/images from a portable audio source or computer by... MEDIA PORT adapter that uses a network function such as TDM-NC1 Wireless Network Audio Client. You can use the following Sony DIGITAL MEDIA PORT adapters: • TDM-BT1/BT10 Bluetooth™ Wireless Audio Adapter • TDM-NW10 DIGITAL MEDIA PORT Adapter • TDM-iP10/...
... digital audio input/output jacks" (page 34). You can use the network function of the receiver without using the remote. • Do not connect or disconnect the DIGITAL MEDIA PORT adapter to/from the receiver while the system is convenient for enjoying sound/images from a portable audio source or computer by... MEDIA PORT adapter that uses a network function such as TDM-NC1 Wireless Network Audio Client. You can use the following Sony DIGITAL MEDIA PORT adapters: • TDM-BT1/BT10 Bluetooth™ Wireless Audio Adapter • TDM-NW10 DIGITAL MEDIA PORT Adapter • TDM-iP10/...
Operating Instructions (Large File - 17.22 MB)
Page 62
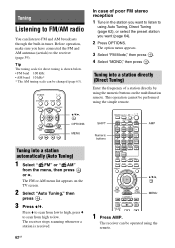
... low to high, press v to scan from the menu, then press or b. This operation cannot be changed (page 63). The receiver can be performed using the simple remote. Tuning Listening to FM/AM radio You can listen to FM and AM broadcasts through the built-in the station you want... band 10 kHz* * The AM tuning scale can be operated using the remote. Tuning into a station automatically (Auto Tuning) 1 Select " FM" or " AM" from high to the receiver (page 39). The FM or AM menu list appears on the multifunction remote. The option menu appears. 3 Select "FM Mode," then press . 4 Select ...
... low to high, press v to scan from the menu, then press or b. This operation cannot be changed (page 63). The receiver can be performed using the simple remote. Tuning Listening to FM/AM radio You can listen to FM and AM broadcasts through the built-in the station you want... band 10 kHz* * The AM tuning scale can be operated using the remote. Tuning into a station automatically (Auto Tuning) 1 Select " FM" or " AM" from high to the receiver (page 39). The FM or AM menu list appears on the multifunction remote. The option menu appears. 3 Select "FM Mode," then press . 4 Select ...
Operating Instructions (Large File - 17.22 MB)
Page 67
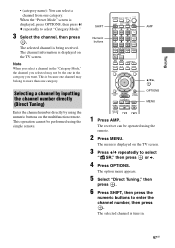
... to select " SR," then press or b. 4 Press OPTIONS. This operation cannot be operated using the remote. 2 Press MENU. SHIFT Numeric buttons AMP V/v/b, OPTIONS MENU 1 Press AMP. The receiver can select a channel from one category. The channel information is being received. When the "Preset Mode" screen is displayed on the TV screen. 3 Press V/v repeatedly to select...
... to select " SR," then press or b. 4 Press OPTIONS. This operation cannot be operated using the remote. 2 Press MENU. SHIFT Numeric buttons AMP V/v/b, OPTIONS MENU 1 Press AMP. The receiver can select a channel from one category. The channel information is being received. When the "Preset Mode" screen is displayed on the TV screen. 3 Press V/v repeatedly to select...
Operating Instructions (Large File - 17.22 MB)
Page 68
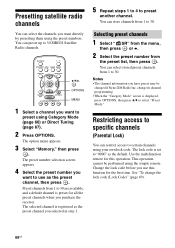
...remote for this function for all the preset channels when you have preset may be performed using Category Mode (page 66) or Direct Tuning (page 67). 2 Press OPTIONS. This operation cannot be changed if Sirius XM Radio Inc. Notes • The channel information you purchase the receiver.... The option menu appears. 3 Select "Memory," then press . See "To change its channel programming. • When the "Category Mode" screen is registered as the default. ...
...remote for this function for all the preset channels when you have preset may be performed using Category Mode (page 66) or Direct Tuning (page 67). 2 Press OPTIONS. This operation cannot be changed if Sirius XM Radio Inc. Notes • The channel information you purchase the receiver.... The option menu appears. 3 Select "Memory," then press . See "To change its channel programming. • When the "Category Mode" screen is registered as the default. ...
Operating Instructions (Large File - 17.22 MB)
Page 81
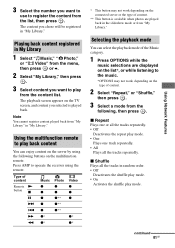
..."My Library," then press . 3 Select content you want to use to register the content from "My Library." Press AMP to operate the receiver using the following , then press . x Repeat Plays one or all the tracks repeatedly. • Off Deactivates the repeat play mode. &#.... continued 81GB Using Network Features The content you chose will be registered in the slideshow mode or from the list, then press . Type of content Remote N button x Music z z Photo z z Video z z X z >z z** z z** .z z** M z* z* m z* z* * This button may not work depending on the type of content. ...
..."My Library," then press . 3 Select content you want to use to register the content from "My Library." Press AMP to operate the receiver using the following , then press . x Repeat Plays one or all the tracks repeatedly. • Off Deactivates the repeat play mode. &#.... continued 81GB Using Network Features The content you chose will be registered in the slideshow mode or from the list, then press . Type of content Remote N button x Music z z Photo z z Video z z X z >z z** z z** .z z** M z* z* m z* z* * This button may not work depending on the type of content. ...
Operating Instructions (Large File - 17.22 MB)
Page 83
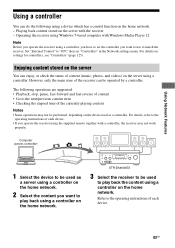
..., see "Controllers" (page 125). For details on the server with the receiver - However, only the main zone of content (music, photos, and videos) on the device used as a controller. STR-DA4600ES 3 Select the receiver to be used to play back using a controller on the home network. ... Computer (server, controller) 1 Select the device to be used as a server using a controller. The following using the supplied remote together with a controller, the receiver may not be performed, depending on the server using a controller on the home network. 2 Select the content you want to ...
..., see "Controllers" (page 125). For details on the server with the receiver - However, only the main zone of content (music, photos, and videos) on the device used as a controller. STR-DA4600ES 3 Select the receiver to be used to play back using a controller on the home network. ... Computer (server, controller) 1 Select the device to be used as a server using a controller. The following using the supplied remote together with a controller, the receiver may not be performed, depending on the server using a controller on the home network. 2 Select the content you want to ...


