
HDMI Control Guide
Page 2
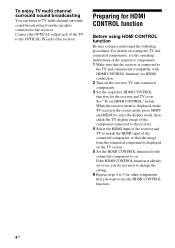
...' and of the component. See the operating instructions of Sony Corporation. are also turned off the TV, the receiver and connected components are trademarks Note Depending on automatically and switch to the appropriate HDMI input. • System Audio Control: While watching TV, you...offers the 'BRAVIA' Theatre Sync function. We recommend that are compatible with the HDMI CONTROL function with Sony's HDMI CONTROL function. • When you connect the receiver to products featuring 'BRAVIA' Theatre Sync. 2GB HDMI CONTROL is a mutual control function standard used by ...
...' and of the component. See the operating instructions of Sony Corporation. are also turned off the TV, the receiver and connected components are trademarks Note Depending on automatically and switch to the appropriate HDMI input. • System Audio Control: While watching TV, you...offers the 'BRAVIA' Theatre Sync function. We recommend that are compatible with the HDMI CONTROL function with Sony's HDMI CONTROL function. • When you connect the receiver to products featuring 'BRAVIA' Theatre Sync. 2GB HDMI CONTROL is a mutual control function standard used by ...
HDMI Control Guide
Page 4
...and MENU to enter the display mode, then check the TV display image of the component connected to the receiver. 4 Select the HDMI input of the receiver and TV to match the HDMI input of the receiver. See "To set to on, you do not need to change the setting. 6 Repeat steps 4 ...4GB If the HDMI CONTROL function is already set HDMI CONTROL" below. To enjoy TV multi channel surround sound broadcasting You can listen to TV multi channel surround sound broadcasting from the connected component is displayed on the TV screen. 5 Set the HDMI CONTROL function for the receiver and TV to on.
...and MENU to enter the display mode, then check the TV display image of the component connected to the receiver. 4 Select the HDMI input of the receiver and TV to match the HDMI input of the receiver. See "To set to on, you do not need to change the setting. 6 Repeat steps 4 ...4GB If the HDMI CONTROL function is already set HDMI CONTROL" below. To enjoy TV multi channel surround sound broadcasting You can listen to TV multi channel surround sound broadcasting from the connected component is displayed on the TV screen. 5 Set the HDMI CONTROL function for the receiver and TV to on.
HDMI Control Guide
Page 6
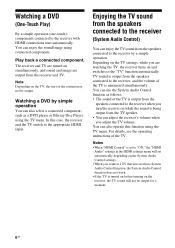
... operating instructions of the content may not be output for a moment. 6GB Enjoying the TV sound from the speakers connected to the receiver (System Audio Control) You can enjoy the TV sound from the TV speaker. • You can use the System Audio Control function...receiver by simple operation You can also select a connected component, such as follows. • The sound of the TV is being output from the speakers connected to the receiver when you adjust the TV volume. You can adjust the receiver's volume when you turn the receiver on and switches to the appropriate HDMI input...
... operating instructions of the content may not be output for a moment. 6GB Enjoying the TV sound from the speakers connected to the receiver (System Audio Control) You can enjoy the TV sound from the TV speaker. • You can use the System Audio Control function...receiver by simple operation You can also select a connected component, such as follows. • The sound of the TV is being output from the speakers connected to the receiver when you adjust the TV volume. You can adjust the receiver's volume when you turn the receiver on and switches to the appropriate HDMI input...

HDMI Control Guide
Page 7
...operating instructions of "Preparing for HDMI CONTROL function" (page 4). See the operating instructions of the receiver to HDMI when you want to watch a program on the receiver. - Change the input of the connected component. • If you change the HDMI connection, connect/disconnect the AC... power failure, repeat the procedures of the TV. • Depending on the TV's remote, the receiver and the connected components turn off automatically. TV AV ?/1 Press TV, then press AV ?/1. For details, see the operating instructions of the connected components. • The location, label of...
...operating instructions of "Preparing for HDMI CONTROL function" (page 4). See the operating instructions of the receiver to HDMI when you want to watch a program on the receiver. - Change the input of the connected component. • If you change the HDMI connection, connect/disconnect the AC... power failure, repeat the procedures of the TV. • Depending on the TV's remote, the receiver and the connected components turn off automatically. TV AV ?/1 Press TV, then press AV ?/1. For details, see the operating instructions of the connected components. • The location, label of...

HDMI Control Guide
Page 8
Refer to the operating instructions of the TV on the component connected to watch a TV broadcast. - Select the component or input you want to watch a program on this operation. 8GB - Change the TV channel when you watch when you want to the TV.
Refer to the operating instructions of the TV on the component connected to watch a TV broadcast. - Select the component or input you want to watch a program on this operation. 8GB - Change the TV channel when you watch when you want to the TV.
Operating Instructions (Large File - 20.21 MB)
Page 4
...audio components ........21 4b: Connecting the video components .......26 5: Connecting the antennas (aerials 36 6: Preparing the receiver and the remote ....37 7: Operating the receiver using the GUI (Graphical User Interface 39 8: Setting the speakers 42 9: Calibrating the appropriate speaker settings automatically... DIGITAL MEDIA PORT adapter 92 Naming inputs 96 Switching between digital and analog audio (INPUT MODE 97 Enjoying the sound/images from other inputs 98 Changing the display 100 Using the sleep timer 104 Recording using the receiver 105 Listening to the sound in another...
...audio components ........21 4b: Connecting the video components .......26 5: Connecting the antennas (aerials 36 6: Preparing the receiver and the remote ....37 7: Operating the receiver using the GUI (Graphical User Interface 39 8: Setting the speakers 42 9: Calibrating the appropriate speaker settings automatically... DIGITAL MEDIA PORT adapter 92 Naming inputs 96 Switching between digital and analog audio (INPUT MODE 97 Enjoying the sound/images from other inputs 98 Changing the display 100 Using the sleep timer 104 Recording using the receiver 105 Listening to the sound in another...
Operating Instructions (Large File - 20.21 MB)
Page 7
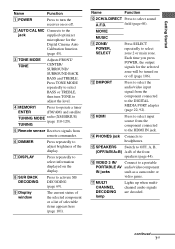
... Digital Cinema Auto Calibration function (page 45). O SPEAKERS Switch to a portable PORTABLE AV audio/video component IN jacks such as a camcorder or video game. C TONE MODE... FRONT/ CENTER/ SURROUND/ SURROUND BACK BASS and TREBLE. TUNING E Remote sensor Receives signals from the component connected to adjust brightness of the display. I Display window...input source from remote commander. D MEMORY/ Press to activate SB DECODING (page 69). H SUR BACK DECODING Press to operate a tuner ENTER (FM/AM) and satellite TUNING MODE radio (XM/SIRIUS) (page 118-120). Q MULTI CHANNEL...
... Digital Cinema Auto Calibration function (page 45). O SPEAKERS Switch to a portable PORTABLE AV audio/video component IN jacks such as a camcorder or video game. C TONE MODE... FRONT/ CENTER/ SURROUND/ SURROUND BACK BASS and TREBLE. TUNING E Remote sensor Receives signals from the component connected to adjust brightness of the display. I Display window...input source from remote commander. D MEMORY/ Press to activate SB DECODING (page 69). H SUR BACK DECODING Press to operate a tuner ENTER (FM/AM) and satellite TUNING MODE radio (XM/SIRIUS) (page 118-120). Q MULTI CHANNEL...

Operating Instructions (Large File - 20.21 MB)
Page 8
Turn to play back. Name R INPUT SELECTOR S MASTER VOLUME Function Turn to select the input source to adjust the volume level of all speakers at the same time. 8GB To select the input source for zone 2, press ZONE/SELECT (qa) to select zone 2 first ("ZONE 2 INPUT" appears on the display), then turn INPUT SELECTOR to select the input source.
Turn to play back. Name R INPUT SELECTOR S MASTER VOLUME Function Turn to select the input source to adjust the volume level of all speakers at the same time. 8GB To select the input source for zone 2, press ZONE/SELECT (qa) to select zone 2 first ("ZONE 2 INPUT" appears on the display), then turn INPUT SELECTOR to select the input source.

Operating Instructions (Large File - 20.21 MB)
Page 9
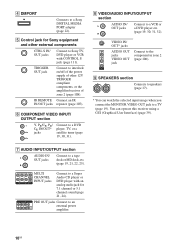
...the XM Mini Tuner and Home Dock (not supplied) (page 84). AM ANTENNA jack Connects to the AM loop antenna (aerial) supplied with this receiver (page 36). continued 9GB XM jack Connects to a DVD player, Blu-ray Disc Player, or a satellite tuner. SIRIUS jack Connects to TV...a SiriusConnect Home tuner (not supplied) (page 84). Rear panel Getting Started A DIGITAL INPUT/OUTPUT section OPTICAL IN/ OUT jacks COAXIAL IN jacks Connect to the FM jack wire antenna (aerial) supplied with this receiver (page 36). B ANTENNA section FM ANTENNA Connects to a DVD player, Super Audio CD...
...the XM Mini Tuner and Home Dock (not supplied) (page 84). AM ANTENNA jack Connects to the AM loop antenna (aerial) supplied with this receiver (page 36). continued 9GB XM jack Connects to a DVD player, Blu-ray Disc Player, or a satellite tuner. SIRIUS jack Connects to TV...a SiriusConnect Home tuner (not supplied) (page 84). Rear panel Getting Started A DIGITAL INPUT/OUTPUT section OPTICAL IN/ OUT jacks COAXIAL IN jacks Connect to the FM jack wire antenna (aerial) supplied with this receiver (page 36). B ANTENNA section FM ANTENNA Connects to a DVD player, Super Audio CD...
Operating Instructions (Large File - 20.21 MB)
Page 10
... the amplifier/receiver of other external components CTRL S IN/ OUT jacks Connect to a Sony DIGITAL MEDIA PORT adapter (page 22). E Control jack for 7.1 channel or 5.1 channel sound (page 21, 24). H VIDEO/AUDIO INPUT/OUTPUT section AUDIO IN/ OUT jacks Connect to a Super Audio CD player or DVD player with CONTROL S jack (page 111). MULTI CHANNEL INPUT jacks Connect...
... the amplifier/receiver of other external components CTRL S IN/ OUT jacks Connect to a Sony DIGITAL MEDIA PORT adapter (page 22). E Control jack for 7.1 channel or 5.1 channel sound (page 21, 24). H VIDEO/AUDIO INPUT/OUTPUT section AUDIO IN/ OUT jacks Connect to a Super Audio CD player or DVD player with CONTROL S jack (page 111). MULTI CHANNEL INPUT jacks Connect...
Operating Instructions (Large File - 20.21 MB)
Page 11
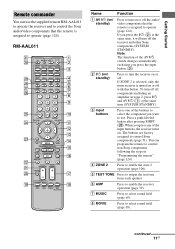
...off with this button. RM-AAL011 Name Function A AV ?/1 (on/ standby) Press to operate (page 124). If ZONE 2 is selected, only the main receiver is assigned to turn the receiver on or off the receiver and other Sony components (SYSTEM STANDBY). When you want to use ... to control Sony components (page 51). H MOVIE Press to select the component you press any of the AV ?/1 switch changes automatically each speaker. Press a pink-labeled button after pressing SHIFT (wk). If you press the input button (C). Note The function of the input buttons, the receiver turns on ...
...off with this button. RM-AAL011 Name Function A AV ?/1 (on/ standby) Press to operate (page 124). If ZONE 2 is selected, only the main receiver is assigned to turn the receiver on or off the receiver and other Sony components (SYSTEM STANDBY). When you want to use ... to control Sony components (page 51). H MOVIE Press to select the component you press any of the AV ?/1 switch changes automatically each speaker. Press a pink-labeled button after pressing SHIFT (wk). If you press the input button (C). Note The function of the input buttons, the receiver turns on ...

Operating Instructions (Large File - 20.21 MB)
Page 12
...Blu-ray Disc Player F2: VHS MACRO1, MACRO2 Press AMP (6), then press MACRO 1 or MACRO 2 to store a station during tuner operation. select channel numbers of the CD player, DVD player, Bluray Disc Player or MD deck. MEMORY Press to set up the macro function (page 127). Name Function... same time to enter the value after selecting a channel, disc or track using the numeric buttons. J ENTER Press to select the input signal (TV input or video input). K AMP MENU Press to display the menu to select the category MODE mode for receiver and DVD player, Blu-ray Disc Player. RESOLUTION ...
...Blu-ray Disc Player F2: VHS MACRO1, MACRO2 Press AMP (6), then press MACRO 1 or MACRO 2 to store a station during tuner operation. select channel numbers of the CD player, DVD player, Bluray Disc Player or MD deck. MEMORY Press to set up the macro function (page 127). Name Function... same time to enter the value after selecting a channel, disc or track using the numeric buttons. J ENTER Press to select the input signal (TV input or video input). K AMP MENU Press to display the menu to select the category MODE mode for receiver and DVD player, Blu-ray Disc Player. RESOLUTION ...

Operating Instructions (Large File - 20.21 MB)
Page 13
...of the selected input to analog signal without any adjustment (page 118). wl SLEEP Press to activate the sleep timer function and the duration which the receiver turns off the ... Press to select information displayed in this section may operate differently than described. 13GB return to - channel numbers of operation. Getting Started Name Function S DVD/ TOP MENU, MENU Press to display the ...same time. It changes the remote button function to skip a disc when using a multi-disc changer. Notes • Some functions explained in the display window, TV screen ...
...of the selected input to analog signal without any adjustment (page 118). wl SLEEP Press to activate the sleep timer function and the duration which the receiver turns off the ... Press to select information displayed in this section may operate differently than described. 13GB return to - channel numbers of operation. Getting Started Name Function S DVD/ TOP MENU, MENU Press to display the ...same time. It changes the remote button function to skip a disc when using a multi-disc changer. Notes • Some functions explained in the display window, TV screen ...

Operating Instructions (Large File - 20.21 MB)
Page 14
... Function E OPTIONS Press to play back. J MUTING Press to switch the display mode of the receiver with simple operations using this remote. x Stops play . H INPUT Press to select the input source SELECTOR to display and select items from option menus. I MASTER Press to select sound field ...(page 60). Press to adjust the volume level. Press to turn a receiver on or off the sound temporarily. ...
... Function E OPTIONS Press to play back. J MUTING Press to switch the display mode of the receiver with simple operations using this remote. x Stops play . H INPUT Press to select the input source SELECTOR to display and select items from option menus. I MASTER Press to select sound field ...(page 60). Press to adjust the volume level. Press to turn a receiver on or off the sound temporarily. ...

Operating Instructions (Large File - 20.21 MB)
Page 18
... both the SPEAKERS terminals and the PRE OUT jacks. ZONE 2 connection You can assign the SUR BACK SPEAKER terminals F and G to the speakers of the input signal to the sound in another zone (ZONE 2 operations)" (page 106) for details on the level of the zone 2.
... both the SPEAKERS terminals and the PRE OUT jacks. ZONE 2 connection You can assign the SUR BACK SPEAKER terminals F and G to the speakers of the input signal to the sound in another zone (ZONE 2 operations)" (page 106) for details on the level of the zone 2.
Operating Instructions (Large File - 20.21 MB)
Page 19
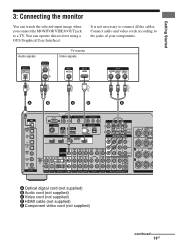
You can watch the selected input image when you connect the MONITOR VIDEO OUT jack to a TV. Connect audio and video cords according to connect all the cables. It is not necessary to the jacks of your components. Audio signals TV monitor Video signals A B C D E A Optical digital cord (not supplied) B Audio cord (not supplied) C Video cord (not supplied) D HDMI cable (not supplied) E Component video cord (not supplied) continued 19GB Getting Started 3: Connecting the monitor You can operate this receiver using a GUI (Graphical User Interface).
You can watch the selected input image when you connect the MONITOR VIDEO OUT jack to a TV. Connect audio and video cords according to connect all the cables. It is not necessary to the jacks of your components. Audio signals TV monitor Video signals A B C D E A Optical digital cord (not supplied) B Audio cord (not supplied) C Video cord (not supplied) D HDMI cable (not supplied) E Component video cord (not supplied) continued 19GB Getting Started 3: Connecting the monitor You can operate this receiver using a GUI (Graphical User Interface).

Operating Instructions (Large File - 20.21 MB)
Page 21
After hooking up your components to this receiver. Digital Analog High quality sound Notes • When connecting optical digital...sampling frequencies. 21GB Component to be connected Super Audio CD player/ CD player With digital audio output With multi-channel audio output With analog audio output only MD player With digital audio output With analog audio output only Tape... deck, Analog disc turntable Page 22 24 25 22 25 25 Audio input/output jacks to be connected" below for the pages which describe how to connect each component. Before...
After hooking up your components to this receiver. Digital Analog High quality sound Notes • When connecting optical digital...sampling frequencies. 21GB Component to be connected Super Audio CD player/ CD player With digital audio output With multi-channel audio output With analog audio output only MD player With digital audio output With analog audio output only Tape... deck, Analog disc turntable Page 22 24 25 22 25 25 Audio input/output jacks to be connected" below for the pages which describe how to connect each component. Before...

Operating Instructions (Large File - 20.21 MB)
Page 22
Connecting components with digital audio input/output jacks The following illustration shows how to disconnect the AC power cord (mains lead). • To disconnect the DIGITAL MEDIA PORT adapter, observe the ...
Connecting components with digital audio input/output jacks The following illustration shows how to disconnect the AC power cord (mains lead). • To disconnect the DIGITAL MEDIA PORT adapter, observe the ...
Operating Instructions (Large File - 20.21 MB)
Page 23
Refer to connect several digital components, but cannot find an unused input See "Enjoying the sound/images from other inputs" (page 98). 23GB If you play a Super Audio CD, connect the player to only the COAXIAL SA-CD/ CD IN jack on this receiver. When you want to the operating instructions supplied with the... Audio CD on a Super Audio CD player • No sound is output when playing a Super Audio CD on a Super Audio CD player connected to the MULTI CHANNEL INPUT or SA-CD/CD IN jacks.
Refer to connect several digital components, but cannot find an unused input See "Enjoying the sound/images from other inputs" (page 98). 23GB If you play a Super Audio CD, connect the player to only the COAXIAL SA-CD/ CD IN jack on this receiver. When you want to the operating instructions supplied with the... Audio CD on a Super Audio CD player • No sound is output when playing a Super Audio CD on a Super Audio CD player connected to the MULTI CHANNEL INPUT or SA-CD/CD IN jacks.
Operating Instructions (Large File - 20.21 MB)
Page 24
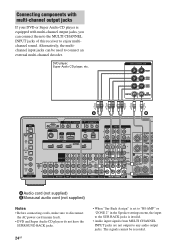
... player, Super Audio CD player, etc. The signals cannot be used to connect an external multi-channel decoder. Alternatively, the multichannel input jacks can connect them to the MULTI CHANNEL INPUT jacks of this receiver to any audio output jacks. Connecting components with multi-channel output jacks If your DVD or Super Audio CD player is invalid. • Audio...
... player, Super Audio CD player, etc. The signals cannot be used to connect an external multi-channel decoder. Alternatively, the multichannel input jacks can connect them to the MULTI CHANNEL INPUT jacks of this receiver to any audio output jacks. Connecting components with multi-channel output jacks If your DVD or Super Audio CD player is invalid. • Audio...


