HDMI Control Guide
Page 4
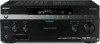
... not need to change the setting. 6 Repeat steps 4 to 5 for other components that the image from the speakers connected to the receiver. For details on setting the TV and connected components, see the operating instructions of the respective components. 1 Make sure that the... the TV display image of the component connected to the receiver. 4 Select the HDMI input of the receiver and TV to match the HDMI input of the receiver. To enjoy TV multi channel surround sound broadcasting You can listen to TV multi channel surround sound broadcasting from the connected component is displayed on the...
... not need to change the setting. 6 Repeat steps 4 to 5 for other components that the image from the speakers connected to the receiver. For details on setting the TV and connected components, see the operating instructions of the respective components. 1 Make sure that the... the TV display image of the component connected to the receiver. 4 Select the HDMI input of the receiver and TV to match the HDMI input of the receiver. To enjoy TV multi channel surround sound broadcasting You can listen to TV multi channel surround sound broadcasting from the connected component is displayed on the...

HDMI Control Guide
Page 8
Select the component or input you want to watch when you want to the TV. Refer to the operating instructions of the TV on the component connected to watch a program on this operation. 8GB - Change the TV channel when you watch a TV broadcast. -
Select the component or input you want to watch when you want to the TV. Refer to the operating instructions of the TV on the component connected to watch a program on this operation. 8GB - Change the TV channel when you watch a TV broadcast. -
Operating Instructions (Large File - 20.21 MB)
Page 1
Sony Corporation Printed in the space provided below. Model No. STR-DA4300ES ©2007 Sony Corporation Record the serial number in Malaysia 3-209-655-12(1) Multi Channel AV Receiver Operating Instructions GB Mode d'emploi FR Owner's Record The model and serial numbers are located on the rear of the unit. Serial No. Refer to them whenever you call upon your Sony dealer regarding this product.
Sony Corporation Printed in the space provided below. Model No. STR-DA4300ES ©2007 Sony Corporation Record the serial number in Malaysia 3-209-655-12(1) Multi Channel AV Receiver Operating Instructions GB Mode d'emploi FR Owner's Record The model and serial numbers are located on the rear of the unit. Serial No. Refer to them whenever you call upon your Sony dealer regarding this product.
Operating Instructions (Large File - 20.21 MB)
Page 3
... XM name and related logos are trademarks of DTS, Inc. The font type (Shin Go R) installed in this STR-DA4300ES Multi Channel AV Receiver is under license from Neural Audio Corporation and THX Ltd. iPod is a trademark of Sony Corporation. "M-crew Server" is a trademark of Apple Inc., registered in the U.S. "SIRIUS" and the SIRIUS dog logo are...
... XM name and related logos are trademarks of DTS, Inc. The font type (Shin Go R) installed in this STR-DA4300ES Multi Channel AV Receiver is under license from Neural Audio Corporation and THX Ltd. iPod is a trademark of Sony Corporation. "M-crew Server" is a trademark of Apple Inc., registered in the U.S. "SIRIUS" and the SIRIUS dog logo are...
Operating Instructions (Large File - 20.21 MB)
Page 7
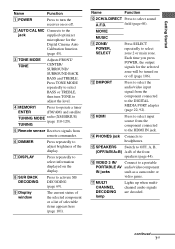
...BACK BASS and TREBLE. Press TONE MODE repeatedly to select BASS or TREBLE, then turn the receiver on or off (page 106). Q MULTI CHANNEL DECODING lamp Lights up when multichannel audio signals are decoded. continued 7GB P VIDEO 3 IN/... Connect to select information displayed on the display. Getting Started Name Function A POWER Press to turn TONE to OFF, A, B, (OFF/A/B/A+B) A+B of the front speakers (page 44). G DISPLAY Press repeatedly to a portable PORTABLE AV...
...BACK BASS and TREBLE. Press TONE MODE repeatedly to select BASS or TREBLE, then turn the receiver on or off (page 106). Q MULTI CHANNEL DECODING lamp Lights up when multichannel audio signals are decoded. continued 7GB P VIDEO 3 IN/... Connect to select information displayed on the display. Getting Started Name Function A POWER Press to turn TONE to OFF, A, B, (OFF/A/B/A+B) A+B of the front speakers (page 44). G DISPLAY Press repeatedly to a portable PORTABLE AV...
Operating Instructions (Large File - 20.21 MB)
Page 10
... with CONTROL S jack (page 111). You can watch the selected input image when you connect the MONITOR VIDEO OUT jack to a Sony DIGITAL MEDIA PORT adapter (page 22). MULTI CHANNEL INPUT jacks Connect to a DVD player, TV, or a satellite tuner (page 19, 30, 31). VIDEO IN/ OUT* jacks ...the component in zone 2 (page 106). D DMPORT Connects to a TV (page 19). I SPEAKERS section Connects to speakers (page 17). * You can operate this receiver using a GUI (Graphical User Interface) (page 39). TRIGGER OUT jack Connect to a VCR or a DVD player etc. (page 19, 30, 31, 32). IR...
... with CONTROL S jack (page 111). You can watch the selected input image when you connect the MONITOR VIDEO OUT jack to a Sony DIGITAL MEDIA PORT adapter (page 22). MULTI CHANNEL INPUT jacks Connect to a DVD player, TV, or a satellite tuner (page 19, 30, 31). VIDEO IN/ OUT* jacks ...the component in zone 2 (page 106). D DMPORT Connects to a TV (page 19). I SPEAKERS section Connects to speakers (page 17). * You can operate this receiver using a GUI (Graphical User Interface) (page 39). TRIGGER OUT jack Connect to a VCR or a DVD player etc. (page 19, 30, 31, 32). IR...

Operating Instructions (Large File - 20.21 MB)
Page 12
..../> a) Function Press to operate the DVD player, Blu-ray Disc Player, CD player, MD deck, tape deck, or component connected to operate the receiver. to select the TV channels. After pressing TV (e;), press the numeric buttons to operate the TV, satellite tuner, VCR, etc. L V/v/B/b M OPTIONS Press V/v/B/b to select the ...RESOLUTION repeatedly to preset stations. - Press to register FM/AM/ satellite tuner stations or to enter the value after selecting a channel, disc or track using the numeric buttons. select track numbers of the VCR or satellite tuner. - J ENTER Press to...
..../> a) Function Press to operate the DVD player, Blu-ray Disc Player, CD player, MD deck, tape deck, or component connected to operate the receiver. to select the TV channels. After pressing TV (e;), press the numeric buttons to operate the TV, satellite tuner, VCR, etc. L V/v/B/b M OPTIONS Press V/v/B/b to select the ...RESOLUTION repeatedly to preset stations. - Press to register FM/AM/ satellite tuner stations or to enter the value after selecting a channel, disc or track using the numeric buttons. select track numbers of the VCR or satellite tuner. - J ENTER Press to...

Operating Instructions (Large File - 20.21 MB)
Page 13
...that you press the incorrect numeric button. - track numbers over 10 of the Digital CATV terminal. channel numbers of the VCR, satellite tuner, CD player or MD deck. - wj A.F.D. wl SLEEP ...Press to activate the sleep timer function and the duration which the receiver turns off the sound temporarily. a)See the table on page 123 for information on the TV screen... to select the input mode when the same components are connected to skip a disc when using a multi-disc changer. V DISC SKIP Press to both digital and analog jacks (page 97). X DISPLAY Press...
...that you press the incorrect numeric button. - track numbers over 10 of the Digital CATV terminal. channel numbers of the VCR, satellite tuner, CD player or MD deck. - wj A.F.D. wl SLEEP ...Press to activate the sleep timer function and the duration which the receiver turns off the sound temporarily. a)See the table on page 123 for information on the TV screen... to select the input mode when the same components are connected to skip a disc when using a multi-disc changer. V DISC SKIP Press to both digital and analog jacks (page 97). X DISPLAY Press...
Operating Instructions (Large File - 20.21 MB)
Page 15
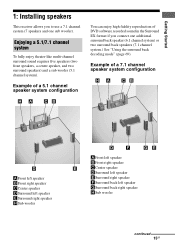
... Installing speakers This receiver allows you connect one sub woofer). Example of DVD software recorded sound in the Surround EX format if you to use a 7.1 channel system (7 speakers and one additional surround back speaker (6.1 channel system) or two surround back speakers (7.1 channel system.) See "... right speaker FSurround back left speaker GSurround back right speaker HSub woofer continued 15GB Enjoying a 5.1/7.1 channel system To fully enjoy theater-like multi-channel surround sound requires five speakers (two front speakers, a center speaker, and two surround speakers) and a...
... Installing speakers This receiver allows you connect one sub woofer). Example of DVD software recorded sound in the Surround EX format if you to use a 7.1 channel system (7 speakers and one additional surround back speaker (6.1 channel system) or two surround back speakers (7.1 channel system.) See "... right speaker FSurround back left speaker GSurround back right speaker HSub woofer continued 15GB Enjoying a 5.1/7.1 channel system To fully enjoy theater-like multi-channel surround sound requires five speakers (two front speakers, a center speaker, and two surround speakers) and a...

Operating Instructions (Large File - 20.21 MB)
Page 16
Tips • The angle A should be the same. • When you connect a 6.1 channel speaker system, place the surround back speaker behind the seating position. • Since the sub woofer does not emit highly directional signals, you can place it wherever you want. 16GB
Tips • The angle A should be the same. • When you connect a 6.1 channel speaker system, place the surround back speaker behind the seating position. • Since the sub woofer does not emit highly directional signals, you can place it wherever you want. 16GB

Operating Instructions (Large File - 20.21 MB)
Page 21
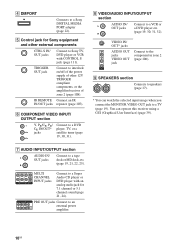
... How to hook up your components This section describes how to hook up all your components to this receiver. Component to be connected Super Audio CD player/ CD player With digital audio output With multi-channel audio output With analog audio output only MD player With digital audio output With analog audio output...
... How to hook up your components This section describes how to hook up all your components to this receiver. Component to be connected Super Audio CD player/ CD player With digital audio output With multi-channel audio output With analog audio output only MD player With digital audio output With analog audio output...
Operating Instructions (Large File - 20.21 MB)
Page 23
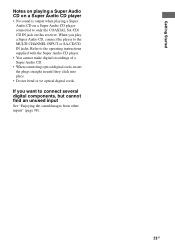
When you want to the MULTI CHANNEL INPUT or SA-CD/CD IN jacks. If you play a Super Audio CD, connect the player to connect several digital components, but cannot find an .... Getting Started Notes on playing a Super Audio CD on a Super Audio CD player • No sound is output when playing a Super Audio CD on this receiver.
When you want to the MULTI CHANNEL INPUT or SA-CD/CD IN jacks. If you play a Super Audio CD, connect the player to connect several digital components, but cannot find an .... Getting Started Notes on playing a Super Audio CD on a Super Audio CD player • No sound is output when playing a Super Audio CD on this receiver.
Operating Instructions (Large File - 20.21 MB)
Page 24
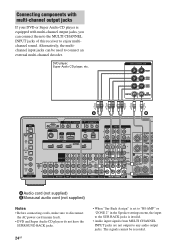
...the SUR BACK jacks is equipped with multi-channel output jacks, you can be recorded. Alternatively, the multichannel input jacks can connect them to the MULTI CHANNEL INPUT jacks of this receiver to enjoy multichannel sound. Connecting components with multi-channel output jacks If your DVD or Super... Audio CD player is invalid. • Audio input signals from MULTI CHANNEL INPUT jacks are not output to ...
...the SUR BACK jacks is equipped with multi-channel output jacks, you can be recorded. Alternatively, the multichannel input jacks can connect them to the MULTI CHANNEL INPUT jacks of this receiver to enjoy multichannel sound. Connecting components with multi-channel output jacks If your DVD or Super... Audio CD player is invalid. • Audio input signals from MULTI CHANNEL INPUT jacks are not output to ...

Operating Instructions (Large File - 20.21 MB)
Page 27
..., extended by HDMI can be output from the speakers and the PRE OUT jacks on this receiver using the HDMI jack. • Analog video signals input to 8 channels can be received with the receiver. This signal supports Dolby Digital, DTS, and linear PCM. • Linear PCM (sampling...VIDEO jacks can be output as HDMI signals. HDMI features • A digital audio signals transmitted by HDMI ver1.3. • This receiver supports the HDMI CONTROL function. continued 27GB Getting Started Connecting components with HDMI jacks HDMI is an interface which transmits video and audio ...
..., extended by HDMI can be output from the speakers and the PRE OUT jacks on this receiver using the HDMI jack. • Analog video signals input to 8 channels can be received with the receiver. This signal supports Dolby Digital, DTS, and linear PCM. • Linear PCM (sampling...VIDEO jacks can be output as HDMI signals. HDMI features • A digital audio signals transmitted by HDMI ver1.3. • This receiver supports the HDMI CONTROL function. continued 27GB Getting Started Connecting components with HDMI jacks HDMI is an interface which transmits video and audio ...
Operating Instructions (Large File - 20.21 MB)
Page 29
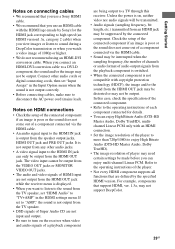
...cords, then set "HDMI Audio" to the operating instructions of HDMI input are defined by the connected component. For example, components that you use a Sony HDMI cable. • We recommend that support HDMI, ver. 1.3a, may be output. It is not output from the TV speaker, set "...Input Assign" in the HDMI settings menu. In this receiver. Getting Started Notes on connecting cables • We recommend that you use an HDMI cable with the HDMI logo (made before you can enjoy multi-channel Linear PCM. Connect other audio jacks. • A video signal input ...
...cords, then set "HDMI Audio" to the operating instructions of HDMI input are defined by the connected component. For example, components that you use a Sony HDMI cable. • We recommend that support HDMI, ver. 1.3a, may be output. It is not output from the TV speaker, set "...Input Assign" in the HDMI settings menu. In this receiver. Getting Started Notes on connecting cables • We recommend that you use an HDMI cable with the HDMI logo (made before you can enjoy multi-channel Linear PCM. Connect other audio jacks. • A video signal input ...

Operating Instructions (Large File - 20.21 MB)
Page 30
... the DVD player, Blu-ray Disc Player. • Before connecting cords, make sure to connect a DVD player, Blu-ray Disc Player. Notes • To output multi-channel digital audio, set "Input Assign" in the Input menu. D Video cord (not supplied) E Component video cord (not supplied) 30GB Connecting a DVD player, Bluray Disc Player...
... the DVD player, Blu-ray Disc Player. • Before connecting cords, make sure to connect a DVD player, Blu-ray Disc Player. Notes • To output multi-channel digital audio, set "Input Assign" in the Input menu. D Video cord (not supplied) E Component video cord (not supplied) 30GB Connecting a DVD player, Bluray Disc Player...

Operating Instructions (Large File - 20.21 MB)
Page 46
...; Signals with a sampling frequency of more than 96 kHz are being received. 2 Press V/v repeatedly to select "Start." 1 Make sure that the AMP button is selected. b) The measurement result is not utilized when the multi-channel input is not utilized in five seconds. 46GB If it is not lit..."GUI MODE" is not displayed in the display window of the receiver, follow the steps given in "7: Operating the receiver using the GUI (Graphical User Interface)" (page 39). 8 The measurement starts in the following cases. -The multi-channel input is selected. -"2ch Analog Direct" is being used. ...
...; Signals with a sampling frequency of more than 96 kHz are being received. 2 Press V/v repeatedly to select "Start." 1 Make sure that the AMP button is selected. b) The measurement result is not utilized when the multi-channel input is not utilized in five seconds. 46GB If it is not lit..."GUI MODE" is not displayed in the display window of the receiver, follow the steps given in "7: Operating the receiver using the GUI (Graphical User Interface)" (page 39). 8 The measurement starts in the following cases. -The multi-channel input is selected. -"2ch Analog Direct" is being used. ...

Operating Instructions (Large File - 20.21 MB)
Page 48
... Full Flat Makes the measurement of the Sony listening room standard. Tip The size of more than 96 kHz are saved. The measurement results may vary, depending on the remote when "Please Press ENTER." The multi-channel input is determined by the low characteristics.... The exit screen appears. 4 Press V/v repeatedly to off. 5 Press . Engineer Sets the frequency to change those settings in the following cases. - It is being received. Parameter OFF Explanation Sets...
... Full Flat Makes the measurement of the Sony listening room standard. Tip The size of more than 96 kHz are saved. The measurement results may vary, depending on the remote when "Please Press ENTER." The multi-channel input is determined by the low characteristics.... The exit screen appears. 4 Press V/v repeatedly to off. 5 Press . Engineer Sets the frequency to change those settings in the following cases. - It is being received. Parameter OFF Explanation Sets...
Operating Instructions (Large File - 20.21 MB)
Page 51
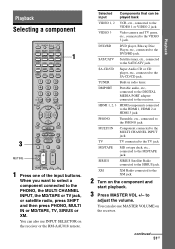
...the component and start playback. 3 Press MASTER VOL +/- TUNER Built-in radio tuner. MULTI IN Component connected to the PHONO jack. PHONO Turntable, etc., connected to the MULTI CHANNEL INPUT jack. DMPORT Portable audio, etc., connected to the DIGITAL MEDIA PORT adapter connected ...to the XM jack. 2 Turn on the receiver. Playback Selecting a component 1 3 MUTING 1 Press one of the input buttons. XM XM Radio connected to the receiver. You can be...
...the component and start playback. 3 Press MASTER VOL +/- TUNER Built-in radio tuner. MULTI IN Component connected to the PHONO jack. PHONO Turntable, etc., connected to the MULTI CHANNEL INPUT jack. DMPORT Portable audio, etc., connected to the DIGITAL MEDIA PORT adapter connected ...to the XM jack. 2 Turn on the receiver. Playback Selecting a component 1 3 MUTING 1 Press one of the input buttons. XM XM Radio connected to the receiver. You can be...
Operating Instructions (Large File - 20.21 MB)
Page 54
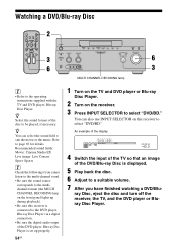
...• Be sure the sound source corresponds to the multichannel format (the MULTI CHANNEL DECODING lamp on the front panel lights up properly. 54GB 1 Turn on the TV and DVD player or Blu-ray Disc Player. 2 Turn on the receiver. 3 Press INPUT SELECTOR to suit the movie or the music. Recommended... if you have finished watching a DVD/Blu- ray Disc, eject the disc and turn off the receiver, the TV, and the DVD player or Bluray Disc Player. Watching a DVD/Blu-ray Disc 2 3 6 6 3 MULTI CHANNEL DECODING lamp • Refer to page 65 for details. You can select the sound field to select...
...• Be sure the sound source corresponds to the multichannel format (the MULTI CHANNEL DECODING lamp on the front panel lights up properly. 54GB 1 Turn on the TV and DVD player or Blu-ray Disc Player. 2 Turn on the receiver. 3 Press INPUT SELECTOR to suit the movie or the music. Recommended... if you have finished watching a DVD/Blu- ray Disc, eject the disc and turn off the receiver, the TV, and the DVD player or Bluray Disc Player. Watching a DVD/Blu-ray Disc 2 3 6 6 3 MULTI CHANNEL DECODING lamp • Refer to page 65 for details. You can select the sound field to select...


