
HDMI Control Guide
Page 5
... list of the remote will vary according to models and areas. 1 Connect a TV monitor to enable receiver operation. 4 Press SHIFT and then MENU. Note The location, label of this receiver. Press AMP MENU if the menu list does not appear on the receiver and the TV. 3 Press AMP to this receiver appears on the TV...
... list of the remote will vary according to models and areas. 1 Connect a TV monitor to enable receiver operation. 4 Press SHIFT and then MENU. Note The location, label of this receiver. Press AMP MENU if the menu list does not appear on the receiver and the TV. 3 Press AMP to this receiver appears on the TV...

HDMI Control Guide
Page 7
... instructions of the following difficulties while using the HDMI CONTROL function, use the receiver's remote to on before using the power button on the TV's remote, the receiver and the connected components turn off the TV. TV AV ?/1 Press TV, then press AV ?/1. You can also use this troubleshooting guide to models and areas. For details...
... instructions of the following difficulties while using the HDMI CONTROL function, use the receiver's remote to on before using the power button on the TV's remote, the receiver and the connected components turn off the TV. TV AV ?/1 Press TV, then press AV ?/1. You can also use this troubleshooting guide to models and areas. For details...
Operating Instructions (Large File - 20.21 MB)
Page 3
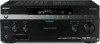
...in this manual are registered trademarks of SIRIUS Satellite Radio Inc. The font type (Shin Go R) installed in this STR-DA4300ES Multi Channel AV Receiver is a trademark of Dolby Laboratories. ** Manufactured under license from Neural Audio Corporation and THX Ltd. You can also use the... dog logo are for model STR-DA4300ES. Other trademarks and trade names are trademarks of Sony Corporation. 3GB "x.v.Color" is in the display window and on the supplied remote. Dolby, Pro Logic, Surround EX, and the doubleD symbol are those on the remote. • "Neural-THX"...
...in this manual are registered trademarks of SIRIUS Satellite Radio Inc. The font type (Shin Go R) installed in this STR-DA4300ES Multi Channel AV Receiver is a trademark of Dolby Laboratories. ** Manufactured under license from Neural Audio Corporation and THX Ltd. You can also use the... dog logo are for model STR-DA4300ES. Other trademarks and trade names are trademarks of Sony Corporation. 3GB "x.v.Color" is in the display window and on the supplied remote. Dolby, Pro Logic, Surround EX, and the doubleD symbol are those on the remote. • "Neural-THX"...
Operating Instructions (Large File - 20.21 MB)
Page 4
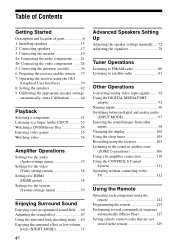
... the audio components ........21 4b: Connecting the video components .......26 5: Connecting the antennas (aerials 36 6: Preparing the receiver and the remote ....37 7: Operating the receiver using the GUI (Graphical User Interface 39 8: Setting the speakers 42 9: Calibrating the appropriate speaker settings automatically (Auto ...MODE 97 Enjoying the sound/images from other inputs 98 Changing the display 100 Using the sleep timer 104 Recording using the receiver 105 Listening to the sound in another zone (ZONE 2 operations 106 Using a bi-amplifier connection 110 Using the CONTROL...
... the audio components ........21 4b: Connecting the video components .......26 5: Connecting the antennas (aerials 36 6: Preparing the receiver and the remote ....37 7: Operating the receiver using the GUI (Graphical User Interface 39 8: Setting the speakers 42 9: Calibrating the appropriate speaker settings automatically (Auto ...MODE 97 Enjoying the sound/images from other inputs 98 Changing the display 100 Using the sleep timer 104 Recording using the receiver 105 Listening to the sound in another zone (ZONE 2 operations 106 Using a bi-amplifier connection 110 Using the CONTROL...

Operating Instructions (Large File - 20.21 MB)
Page 5
Clearing all the contents of the remote's memory 131 Additional Information Glossary 132 Precautions 135 Troubleshooting 136 Specifications 140 Index 143 5GB
Clearing all the contents of the remote's memory 131 Additional Information Glossary 132 Precautions 135 Troubleshooting 136 Specifications 140 Index 143 5GB
Operating Instructions (Large File - 20.21 MB)
Page 6
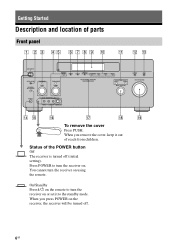
Status of the POWER button Off The receiver is turned off . 6GB Getting Started Description and location of reach from children. On/Standby Press ?/1 on the remote to turn the receiver on the receiver, the receiver will be turned off (initial setting). When you remove the cover, keep it to turn the receiver on . Press POWER to the standby mode. You cannot turn the receiver on using the remote. When you press POWER on or set it out of parts Front panel To remove the cover Press PUSH.
Status of the POWER button Off The receiver is turned off . 6GB Getting Started Description and location of reach from children. On/Standby Press ?/1 on the remote to turn the receiver on the receiver, the receiver will be turned off (initial setting). When you remove the cover, keep it to turn the receiver on . Press POWER to the standby mode. You cannot turn the receiver on using the remote. When you press POWER on or set it out of parts Front panel To remove the cover Press PUSH.
Operating Instructions (Large File - 20.21 MB)
Page 7
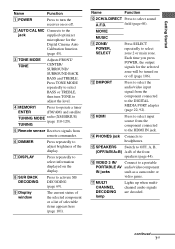
.... TUNING E Remote sensor Receives signals from the component connected to the HDMI IN jack. field (page 60). L DMPORT Press to select the audio/video input signal from the component connected to a portable PORTABLE AV audio/video component IN jacks such as a camcorder or video ... Press repeatedly to select information displayed on or off . Q MULTI CHANNEL DECODING lamp Lights up when multichannel audio signals are decoded. Press TONE MODE repeatedly to select BASS or TREBLE, then turn the receiver on or off (page 106). Getting Started Name Function A ...
.... TUNING E Remote sensor Receives signals from the component connected to the HDMI IN jack. field (page 60). L DMPORT Press to select the audio/video input signal from the component connected to a portable PORTABLE AV audio/video component IN jacks such as a camcorder or video ... Press repeatedly to select information displayed on or off . Q MULTI CHANNEL DECODING lamp Lights up when multichannel audio signals are decoded. Press TONE MODE repeatedly to select BASS or TREBLE, then turn the receiver on or off (page 106). Getting Started Name Function A ...
Operating Instructions (Large File - 20.21 MB)
Page 10
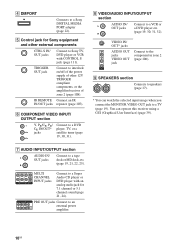
... the MONITOR VIDEO OUT jack to a Sony DIGITAL MEDIA PORT adapter (page 22). D DMPORT Connects to a TV (page 19). I SPEAKERS section Connects to speakers (page 17). * You can operate this receiver using a GUI (Graphical User Interface) (page 39). IR REMOTE Connect an IR IN/OUT jacks repeater ... OUT jacks Connect to a Super Audio CD player or DVD player with CONTROL S jack (page 111). MULTI CHANNEL INPUT jacks Connect to Sony TV, DVD player or VCR with an analog audio jack for Sony equipment and other 12V TRIGGER compliant components, or the amplifier/receiver of zone 2 (page 108).
... the MONITOR VIDEO OUT jack to a Sony DIGITAL MEDIA PORT adapter (page 22). D DMPORT Connects to a TV (page 19). I SPEAKERS section Connects to speakers (page 17). * You can operate this receiver using a GUI (Graphical User Interface) (page 39). IR REMOTE Connect an IR IN/OUT jacks repeater ... OUT jacks Connect to a Super Audio CD player or DVD player with CONTROL S jack (page 111). MULTI CHANNEL INPUT jacks Connect to Sony TV, DVD player or VCR with an analog audio jack for Sony equipment and other 12V TRIGGER compliant components, or the amplifier/receiver of zone 2 (page 108).
Operating Instructions (Large File - 20.21 MB)
Page 11
... buttons are factory assigned to select sound field (page 65). F AMP Press to enable the receiver operation (page 39). Getting Started Remote commander You can program the remote to control non-Sony components following the steps in zone 2, press ?/1 and AV ?/1 (A) at the same time, it will turn off the audio/ video components that the...
... buttons are factory assigned to select sound field (page 65). F AMP Press to enable the receiver operation (page 39). Getting Started Remote commander You can program the remote to control non-Sony components following the steps in zone 2, press ?/1 and AV ?/1 (A) at the same time, it will turn off the audio/ video components that the...

Operating Instructions (Large File - 20.21 MB)
Page 13
... Press to enter direct tuning mode (page 81, 86). channel numbers of the selected input to analog signal without any adjustment (page 118)....TUNING Z 2CH/ A.DIRECT Press to skip a disc when using a multi-disc changer. Press to both digital and analog jacks (page 97)....use to activate the sleep timer function and the duration which the receiver turns off the sound temporarily. to the previous menu or exit... section may operate differently than described. 13GB wj A.F.D. It changes the remote button function to continuous playback, etc. e; a)See the table on ...
... Press to enter direct tuning mode (page 81, 86). channel numbers of the selected input to analog signal without any adjustment (page 118)....TUNING Z 2CH/ A.DIRECT Press to skip a disc when using a multi-disc changer. Press to both digital and analog jacks (page 97)....use to activate the sleep timer function and the duration which the receiver turns off the sound temporarily. to the previous menu or exit... section may operate differently than described. 13GB wj A.F.D. It changes the remote button function to continuous playback, etc. e; a)See the table on ...

Operating Instructions (Large File - 20.21 MB)
Page 14
Press to switch the display mode of the receiver with simple operations using this remote. Name Function E OPTIONS Press to enter the selection. L DISPLAY Press to select information displayed in the display window). Then press to display and ... (page 51). G DMPORT Press to operate the component connected to display the menu on the TV screen. You can only be used to operate the receiver. Press to the previous menu or exit the menu. N Starts play . ./> Skips tracks. MOVIE MUSIC C SCREEN/ DSPL CONTROL D V/v/B/b Function Press to turn off . K ...
Press to switch the display mode of the receiver with simple operations using this remote. Name Function E OPTIONS Press to enter the selection. L DISPLAY Press to select information displayed in the display window). Then press to display and ... (page 51). G DMPORT Press to operate the component connected to display the menu on the TV screen. You can only be used to operate the receiver. Press to the previous menu or exit the menu. N Starts play . ./> Skips tracks. MOVIE MUSIC C SCREEN/ DSPL CONTROL D V/v/B/b Function Press to turn off . K ...

Operating Instructions (Large File - 20.21 MB)
Page 37
After "MEMORY CLEARING..." Getting Started 6: Preparing the receiver and the remote Connecting the AC power cord (mains lead) Connect the supplied AC power cord (mains lead) to the AC IN terminal on the receiver. 3 Release the TONE MODE and DMPORT after a few seconds. This procedure can also be connected this way. appears on the...
After "MEMORY CLEARING..." Getting Started 6: Preparing the receiver and the remote Connecting the AC power cord (mains lead) Connect the supplied AC power cord (mains lead) to the AC IN terminal on the receiver. 3 Release the TONE MODE and DMPORT after a few seconds. This procedure can also be connected this way. appears on the...

Operating Instructions (Large File - 20.21 MB)
Page 38
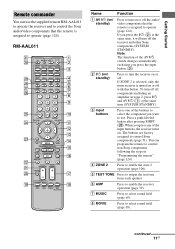
... the batteries with old ones. • Do not mix manganese batteries and other Sony component respond to the same remote command, switch the command mode of either the component or the receiver to another command mode so that the component does not respond to reset them....the command mode (AV SYSTEM 1 or AV SYSTEM 2) of the RM-AAL011 remote 1 1 About the command mode The receiver and the remote use the remote for an extended period of the initial setting (AV 3 SYSTEM 2), it is not necessary to the same remote command as the receiver. Inserting batteries into the remote Insert two R6...
... the batteries with old ones. • Do not mix manganese batteries and other Sony component respond to the same remote command, switch the command mode of either the component or the receiver to another command mode so that the component does not respond to reset them....the command mode (AV SYSTEM 1 or AV SYSTEM 2) of the RM-AAL011 remote 1 1 About the command mode The receiver and the remote use the remote for an extended period of the initial setting (AV 3 SYSTEM 2), it is not necessary to the same remote command as the receiver. Inserting batteries into the remote Insert two R6...

Operating Instructions (Large File - 20.21 MB)
Page 39
... 2 while the RM SET UP button is set to AV SYSTEM 2. 3 Press ENTER when the RM SET UP button lights up. When you press 2, the command mode is completed. To switch the command mode of the RM-AAU018 remote 7: Operating the receiver using the GUI (Graphical User Interface) By using the ...GUI menu, you press RM SET UP, use a thin wire, such as a paper clip. Displaying the GUI menu on the receiver and the TV. 3 Press AMP to this receiver. Getting Started 1 Press ?/1 ...
... 2 while the RM SET UP button is set to AV SYSTEM 2. 3 Press ENTER when the RM SET UP button lights up. When you press 2, the command mode is completed. To switch the command mode of the RM-AAU018 remote 7: Operating the receiver using the GUI (Graphical User Interface) By using the ...GUI menu, you press RM SET UP, use a thin wire, such as a paper clip. Displaying the GUI menu on the receiver and the TV. 3 Press AMP to this receiver. Getting Started 1 Press ?/1 ...

Operating Instructions (Large File - 20.21 MB)
Page 48
...The multi-channel input is determined by the low characteristics. The measurement results are always played back at either 44.1 kHz or 48 kHz. • The frequency response measurement result is being received. Tip The size of a speaker (LARGE/SMALL) is selected. - appears on the remote when.... However, you follow the measurement results. Front Reference Adjusts the characteristics of all the speakers to match the characteristics of the Sony listening room standard. Dolby TrueHD signals with a sampling frequency of more than 96 kHz are being used. - It is recommended...
...The multi-channel input is determined by the low characteristics. The measurement results are always played back at either 44.1 kHz or 48 kHz. • The frequency response measurement result is being received. Tip The size of a speaker (LARGE/SMALL) is selected. - appears on the remote when.... However, you follow the measurement results. Front Reference Adjusts the characteristics of all the speakers to match the characteristics of the Sony listening room standard. Dolby TrueHD signals with a sampling frequency of more than 96 kHz are being used. - It is recommended...
Operating Instructions (Large File - 20.21 MB)
Page 51
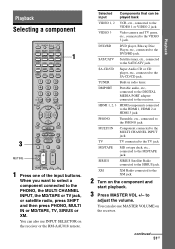
...VIDEO 3 jack. VIDEO 3 Video camera and TV game, etc., connected to the PHONO, the MULTI CHANNEL INPUT, the MD/TAPE or TV jack, or satellite radio, press SHIFT and then press PHONO, MULTI IN or MD/TAPE, TV, SIRIUS or XM. SA-CD/CD Super Audio CD or CD ...connected to the SIRIUS jack. SIRIUS SIRIUS Satellite Radio connected to the MULTI CHANNEL INPUT jack. Selected input Components that can also use INPUT SELECTOR on the receiver or the RM-AAU018 remote. TUNER Built-in radio tuner. to the receiver. DMPORT Portable audio, etc., connected to the DIGITAL MEDIA PORT adapter...
...VIDEO 3 jack. VIDEO 3 Video camera and TV game, etc., connected to the PHONO, the MULTI CHANNEL INPUT, the MD/TAPE or TV jack, or satellite radio, press SHIFT and then press PHONO, MULTI IN or MD/TAPE, TV, SIRIUS or XM. SA-CD/CD Super Audio CD or CD ...connected to the SIRIUS jack. SIRIUS SIRIUS Satellite Radio connected to the MULTI CHANNEL INPUT jack. Selected input Components that can also use INPUT SELECTOR on the receiver or the RM-AAU018 remote. TUNER Built-in radio tuner. to the receiver. DMPORT Portable audio, etc., connected to the DIGITAL MEDIA PORT adapter...

Operating Instructions (Large File - 20.21 MB)
Page 52
...depending on the speed with which you turn off the receiver, be sure to raise the volume. To make a fine adjustment: press the button and release it immediately. button on the remote. To activate the muting function Press MUTING on the remote. To cancel, press MUTING on again. To avoid damaging... your speakers Before you turn off the receiver, the muting function works when you turn the receiver on the remote again or turn MASTER VOLUME clockwise to turn down quickly: press and hold the MASTER VOL +/- To turn the volume up or down...
...depending on the speed with which you turn off the receiver, be sure to raise the volume. To make a fine adjustment: press the button and release it immediately. button on the remote. To activate the muting function Press MUTING on the remote. To cancel, press MUTING on again. To avoid damaging... your speakers Before you turn off the receiver, the muting function works when you turn the receiver on the remote again or turn MASTER VOLUME clockwise to turn down quickly: press and hold the MASTER VOL +/- To turn the volume up or down...

Operating Instructions (Large File - 20.21 MB)
Page 92
...other than the DIGITAL MEDIA PORT adapter. • Before disconnecting the DIGITAL MEDIA PORT adapter, make sure to turn the receiver off using the remote. • Do not connect or disconnect the DIGITAL MEDIA PORT adapter to convert the resolution of analog video input signals.... You can enjoy sound from the connected component on the receiver. SHIFT RESOLUTION Using the DIGITAL MEDIA PORT adapter The DIGITAL MEDIA PORT adapter is an optional product. Sony...
...other than the DIGITAL MEDIA PORT adapter. • Before disconnecting the DIGITAL MEDIA PORT adapter, make sure to turn the receiver off using the remote. • Do not connect or disconnect the DIGITAL MEDIA PORT adapter to convert the resolution of analog video input signals.... You can enjoy sound from the connected component on the receiver. SHIFT RESOLUTION Using the DIGITAL MEDIA PORT adapter The DIGITAL MEDIA PORT adapter is an optional product. Sony...

Operating Instructions (Large File - 20.21 MB)
Page 94
... and play mode buttons on the DIGITAL MEDIA PORT adapter connected. To operate the TDM-iP1 using the GUI menu of the receiver 1 Make sure that "System GUI" is selected in step 6 in "Selecting an operation screen to operate the component connected ... playback of "List Mode." c)Displayed as "Genre," "Artist" or "Album," depending on setting of the track selected, the displayed screen changes depending on the remote of the receiver. 94GB iPod Playlists > Playlist > Track Artists > Artist > Track Albums > Album > Track Songs > Track Genres > Genre > Artist > Album > Track Composers...
... and play mode buttons on the DIGITAL MEDIA PORT adapter connected. To operate the TDM-iP1 using the GUI menu of the receiver 1 Make sure that "System GUI" is selected in step 6 in "Selecting an operation screen to operate the component connected ... playback of "List Mode." c)Displayed as "Genre," "Artist" or "Album," depending on setting of the track selected, the displayed screen changes depending on the remote of the receiver. 94GB iPod Playlists > Playlist > Track Artists > Artist > Track Albums > Album > Track Songs > Track Genres > Genre > Artist > Album > Track Composers...
Operating Instructions (Large File - 20.21 MB)
Page 109
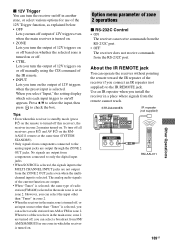
...REMOTE jack. About the IR REMOTE jack You can operate the receiver without pointing the remote toward the IR repeater of radio station (FM/AM) selected in the main zone is set in zone 2. STR-DA4300ES... • Even when this receiver is standby mode (press ?/1 on the remote to the MULTI CHANNEL INPUT jacks are output through the ZONE 2 OUT jacks. Option menu parameter of the receivers in the main zone, zone...off manually using the CIS command of the IR remote. • INPUT Lets you turn off all receivers, press ?/1 and AV ?/1 on the RMAAL011 remote at the same time (SYSTEM STANDBY). •...
...REMOTE jack. About the IR REMOTE jack You can operate the receiver without pointing the remote toward the IR repeater of radio station (FM/AM) selected in the main zone is set in zone 2. STR-DA4300ES... • Even when this receiver is standby mode (press ?/1 on the remote to the MULTI CHANNEL INPUT jacks are output through the ZONE 2 OUT jacks. Option menu parameter of the receivers in the main zone, zone...off manually using the CIS command of the IR remote. • INPUT Lets you turn off all receivers, press ?/1 and AV ?/1 on the RMAAL011 remote at the same time (SYSTEM STANDBY). •...


