Operating Instructions
Page 1
3-289-204-12(1) Multi Channel AV Receiver Operating Instructions STR-DA2400ES ©2008 Sony Corporation
3-289-204-12(1) Multi Channel AV Receiver Operating Instructions STR-DA2400ES ©2008 Sony Corporation
Operating Instructions
Page 2
...or the like. To prevent fire, do not expose this equipment does cause harmful interference to radio or television reception, which the receiver is provided to call upon your authority to operate this product. Note to CATV system installer: This reminder is connected. - Model...event of the following measures: - Record the serial number in a residential installation. Reorient or relocate the receiving antenna. - For customers in this manual could void your Sony dealer regarding this equipment. Owner's Record The model and serial numbers are located on the rear of ...
...or the like. To prevent fire, do not expose this equipment does cause harmful interference to radio or television reception, which the receiver is provided to call upon your authority to operate this product. Note to CATV system installer: This reminder is connected. - Model...event of the following measures: - Record the serial number in a residential installation. Reorient or relocate the receiving antenna. - For customers in this manual could void your Sony dealer regarding this equipment. Owner's Record The model and serial numbers are located on the rear of ...
Operating Instructions
Page 3
...Radio Inc. and other U.S. In this manual are for model STR-DA2400ES. About This Manual • The instructions in this manual, ™ and ® marks are not specified. You can also use of their respective owners. This receiver incorporates Dolby* Digital and Pro Logic Surround and the DTS** ... the font also belongs to this product under USA and foreign patent, patent pending and other trademarks and registered trademarks are owned by Sony Corporation is manufactured under license. The Bluetooth word mark and logos are of such marks by the Bluetooth SIG, Inc. and any...
...Radio Inc. and other U.S. In this manual are for model STR-DA2400ES. About This Manual • The instructions in this manual, ™ and ® marks are not specified. You can also use of their respective owners. This receiver incorporates Dolby* Digital and Pro Logic Surround and the DTS** ... the font also belongs to this product under USA and foreign patent, patent pending and other trademarks and registered trademarks are owned by Sony Corporation is manufactured under license. The Bluetooth word mark and logos are of such marks by the Bluetooth SIG, Inc. and any...

Operating Instructions
Page 4
...4a: Connecting the audio components ........19 4b: Connecting the video components .......24 5: Connecting the antennas (aerials 35 6: Preparing the receiver and the remote ....36 7: Operating the receiver using the GUI (Graphical User Interface 39 8: Setting the speakers 42 9: Calibrating the appropriate speaker settings automatically (Auto Calibration 44 Playback... Control for HDMI function ....... 89 Watching a DVD (One-Touch Play 90 Enjoying the TV sound from the speakers connected to the receiver (System Audio Control 91 Turning off the receiver with the TV (System Power Off 91 4US
...4a: Connecting the audio components ........19 4b: Connecting the video components .......24 5: Connecting the antennas (aerials 35 6: Preparing the receiver and the remote ....36 7: Operating the receiver using the GUI (Graphical User Interface 39 8: Setting the speakers 42 9: Calibrating the appropriate speaker settings automatically (Auto Calibration 44 Playback... Control for HDMI function ....... 89 Watching a DVD (One-Touch Play 90 Enjoying the TV sound from the speakers connected to the receiver (System Audio Control 91 Turning off the receiver with the TV (System Power Off 91 4US

Operating Instructions
Page 5
... analog audio (INPUT MODE 97 Enjoying the sound/images from other inputs 98 Changing the display 100 Using the sleep timer 104 Recording using the receiver 104 Using a bi-amplifier connection 105 Operating without connecting to the TV .. 106 Using the Remote Operating each component using the remote 118 Programming the...
... analog audio (INPUT MODE 97 Enjoying the sound/images from other inputs 98 Changing the display 100 Using the sleep timer 104 Recording using the receiver 104 Using a bi-amplifier connection 105 Operating without connecting to the TV .. 106 Using the Remote Operating each component using the remote 118 Programming the...

Operating Instructions
Page 6
Status of the POWER button x (Off) The receiver is turned off . The ON/STANDBY lamp lights off (initial setting). When you remove the cover, keep it to the standby mode. Press POWER to turn the receiver on or set it out of parts Front panel To remove the cover Press PUSH. You cannot turn the receiver on using the remote. Getting Started Description and location of reach from children. x (On/Standby) Press ?/1 on the remote to turn the receiver on the receiver, the receiver will be turned off. 6US When you press POWER on .
Status of the POWER button x (Off) The receiver is turned off . The ON/STANDBY lamp lights off (initial setting). When you remove the cover, keep it to the standby mode. Press POWER to turn the receiver on or set it out of parts Front panel To remove the cover Press PUSH. You cannot turn the receiver on using the remote. Getting Started Description and location of reach from children. x (On/Standby) Press ?/1 on the remote to turn the receiver on the receiver, the receiver will be turned off. 6US When you press POWER on .

Operating Instructions
Page 7
... lamp Lights up in green when the receiver is set to standby mode. Q VIDEO 2 IN/ Connect to select sound A.F.D. M 2CH/A.DIRECT Press to a portable PORTABLE AV audio/video component IN jacks such as a camcorder or video game. field (page 114, 115). D TUNING +/- L INPUT ... time. MOVIE MUSIC N DIMMER Press repeatedly to select bass or treble level, then turn the receiver on . S PHONES jack Connects to turn TONE +/- Lights up when multi channel audio signals are connected to adjust the volume level of the display. Getting Started Name Function A...
... lamp Lights up in green when the receiver is set to standby mode. Q VIDEO 2 IN/ Connect to select sound A.F.D. M 2CH/A.DIRECT Press to a portable PORTABLE AV audio/video component IN jacks such as a camcorder or video game. field (page 114, 115). D TUNING +/- L INPUT ... time. MOVIE MUSIC N DIMMER Press repeatedly to select bass or treble level, then turn the receiver on . S PHONES jack Connects to turn TONE +/- Lights up when multi channel audio signals are connected to adjust the volume level of the display. Getting Started Name Function A...

Operating Instructions
Page 8
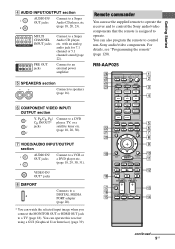
... from a TV or/and speakers connected to a DVD player, Blu-ray Disc Player, or a satellite tuner. HDMI IN/ OUT* jacks Connect to this receiver (page 35). Rear panel A DIGITAL INPUT/OUTPUT section OPTICAL IN/ OUT jacks COAXIAL IN jacks Connect to the XM Mini Tuner and... Home Dock (not supplied) (page 78). XM jack Connects to a DVD player, etc. SIRIUS jack Connects to the AM loop antenna (aerial) supplied with this receiver (page 18, 26). AM ANTENNA jack Connects to a SiriusConnect...
... from a TV or/and speakers connected to a DVD player, Blu-ray Disc Player, or a satellite tuner. HDMI IN/ OUT* jacks Connect to this receiver (page 35). Rear panel A DIGITAL INPUT/OUTPUT section OPTICAL IN/ OUT jacks COAXIAL IN jacks Connect to the XM Mini Tuner and... Home Dock (not supplied) (page 78). XM jack Connects to a DVD player, etc. SIRIUS jack Connects to the AM loop antenna (aerial) supplied with this receiver (page 18, 26). AM ANTENNA jack Connects to a SiriusConnect...
Operating Instructions
Page 9
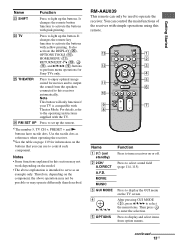
..., 31). For details, see "Programming the remote" (page 120). HOME CATEGORY TUNING CATEGORY MODE TUNING DISC SKIP D.TUNING BD/DVD TOP MENU MENU F1 F2 TV INPUT WIDE continued 9US with an analog audio jack for 7.1 channel or 5.1 channel sound (page 22). PHONO CLEAR/>10 XM 2 VIDEO 2 5 SAT...connect the MONITOR OUT or HDMI OUT jack to control non-Sony audio/video components. You can also program the remote to a TV (page 18). RM-AAP025 THEATER SHIFT TV AMP 1 VIDEO 1 4 DVD 7 MD/ TAPE -/-- You can operate this receiver using a GUI (Graphical User Interface) (page 39). ...
..., 31). For details, see "Programming the remote" (page 120). HOME CATEGORY TUNING CATEGORY MODE TUNING DISC SKIP D.TUNING BD/DVD TOP MENU MENU F1 F2 TV INPUT WIDE continued 9US with an analog audio jack for 7.1 channel or 5.1 channel sound (page 22). PHONO CLEAR/>10 XM 2 VIDEO 2 5 SAT...connect the MONITOR OUT or HDMI OUT jack to control non-Sony audio/video components. You can also program the remote to a TV (page 18). RM-AAP025 THEATER SHIFT TV AMP 1 VIDEO 1 4 DVD 7 MD/ TAPE -/-- You can operate this receiver using a GUI (Graphical User Interface) (page 39). ...

Operating Instructions
Page 10
...AV ?/1 Press to turn on or off the audio/ (on/standby) video components that the remote is set it will turn the receiver on or (on/standby) set to "OFF". Press to (number 5a)) - Name Function Numeric Press SHIFT (W) and then buttons press numeric buttons to enable the receiver operation (page 106). select channel... satellite tuner or DVD player. -/-- CLEAR Press SHIFT (W) and then press CLEAR to control Sony components (page 50). When you want to control non-Sony components following the steps in standby mode. The buttons are factory assigned to - B ?/1...
...AV ?/1 Press to turn on or off the audio/ (on/standby) video components that the remote is set it will turn the receiver on or (on/standby) set to "OFF". Press to (number 5a)) - Name Function Numeric Press SHIFT (W) and then buttons press numeric buttons to enable the receiver operation (page 106). select channel... satellite tuner or DVD player. -/-- CLEAR Press SHIFT (W) and then press CLEAR to control Sony components (page 50). When you want to control non-Sony components following the steps in standby mode. The buttons are factory assigned to - B ?/1...

Operating Instructions
Page 11
select channel numbers of the CD player, VCD player, LD player, MD deck, tape deck, ...V/v/B/b to select the settings, and then press to - Press TV (X) and then press TOOLS to display the menus of the receiver, VCR, DVD player, satellite tuner, Blu-ray disc player, PSX, DVD/VHS COMBO, or DVD/HDD COMBO on the TV... starts recording with components in the forward/ backward direction of Sony TV. Press to activate the Night Mode function (page 66). continued 11US Getting Started After pressing AMP (C), press HOME/MENU (K) for receiver, DVD player, Blu-ray Disc Player, Satellite tuner and ...
select channel numbers of the CD player, VCD player, LD player, MD deck, tape deck, ...V/v/B/b to select the settings, and then press to - Press TV (X) and then press TOOLS to display the menus of the receiver, VCR, DVD player, satellite tuner, Blu-ray disc player, PSX, DVD/VHS COMBO, or DVD/HDD COMBO on the TV... starts recording with components in the forward/ backward direction of Sony TV. Press to activate the Night Mode function (page 66). continued 11US Getting Started After pressing AMP (C), press HOME/MENU (K) for receiver, DVD player, Blu-ray Disc Player, Satellite tuner and ...
Operating Instructions
Page 13
...your TV is intended to serve as references when operating the receiver. Therefore, depending on the component, the above explanation is compatible with Theater Mode. Press to display the GUI menu on / standby)... B 2CH/ A.DIRECT A.F.D. Getting Started Name Function W SHIFT Press to light up the remote. It also activate the DISPLAY (T), OPTIONS TOOLS (J), HOME/MENU (K),...enter the selection. Y THEATER Press to select sound field (page 114, 115). Press to enjoy optimal image suited for Sony TVs only.
...your TV is intended to serve as references when operating the receiver. Therefore, depending on the component, the above explanation is compatible with Theater Mode. Press to display the GUI menu on / standby)... B 2CH/ A.DIRECT A.F.D. Getting Started Name Function W SHIFT Press to light up the remote. It also activate the DISPLAY (T), OPTIONS TOOLS (J), HOME/MENU (K),...enter the selection. Y THEATER Press to select sound field (page 114, 115). Press to enjoy optimal image suited for Sony TVs only.
Operating Instructions
Page 14
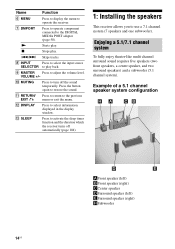
... to adjust the volume level. K RETURN/ EXIT O Press to return to operate the receiver. Enjoying a 5.1/7.1 channel system To fully enjoy theater-like multi channel surround sound requires five speakers (two front speakers, a center speaker, and two surround speakers) and a subwoofer (5.1 channel system). Name Function F MENU Press to display the menu to the previous menu or...
... to adjust the volume level. K RETURN/ EXIT O Press to return to operate the receiver. Enjoying a 5.1/7.1 channel system To fully enjoy theater-like multi channel surround sound requires five speakers (two front speakers, a center speaker, and two surround speakers) and a subwoofer (5.1 channel system). Name Function F MENU Press to display the menu to the previous menu or...

Operating Instructions
Page 18
... you connect the MONITOR OUT or HDMI OUT jack to the jacks of your components. You can watch the selected input image when you use a Sony HDMI cable. 18US Connect audio and video cords according to a TV. 3: Connecting the TV You can operate this...
... you connect the MONITOR OUT or HDMI OUT jack to the jacks of your components. You can watch the selected input image when you use a Sony HDMI cable. 18US Connect audio and video cords according to a TV. 3: Connecting the TV You can operate this...
Operating Instructions
Page 19
...the antenna (aerial), the image on the TV screen may be connected Super Audio CD player, CD player With digital audio output With multi channel audio output With analog audio output only MD deck, Tape deck, With analog audio Analog disc turntable output only DIGITAL MEDIA PORT adapter Page 20... 22 23 23 20 Notes • Before connecting cords, make sure to connect each component. In this receiver. For details, see "Notes on converting video signals" (page 33). • The sound of the TV is not turned on, neither video nor ...
...the antenna (aerial), the image on the TV screen may be connected Super Audio CD player, CD player With digital audio output With multi channel audio output With analog audio output only MD deck, Tape deck, With analog audio Analog disc turntable output only DIGITAL MEDIA PORT adapter Page 20... 22 23 23 20 Notes • Before connecting cords, make sure to connect each component. In this receiver. For details, see "Notes on converting video signals" (page 33). • The sound of the TV is not turned on, neither video nor ...
Operating Instructions
Page 21
Notes on playing a Super Audio CD on a Super Audio CD player • When you want to the MULTI CHANNEL INPUT or SA-CD/CD IN jacks (analog input jack) on this receiver. If you play a Super Audio CD, connect the player to connect several digital components, but cannot find an unused input ...; As the connector of the DIGITAL MEDIA PORT adapter is fragile, be sure to the operating instructions supplied with care when placing or moving the receiver. • To disconnect the DIGITAL MEDIA PORT adapter, squeeze the sides of a Super Audio CD. Refer to handle with the Super Audio CD player. ...
Notes on playing a Super Audio CD on a Super Audio CD player • When you want to the MULTI CHANNEL INPUT or SA-CD/CD IN jacks (analog input jack) on this receiver. If you play a Super Audio CD, connect the player to connect several digital components, but cannot find an unused input ...; As the connector of the DIGITAL MEDIA PORT adapter is fragile, be sure to the operating instructions supplied with care when placing or moving the receiver. • To disconnect the DIGITAL MEDIA PORT adapter, squeeze the sides of a Super Audio CD. Refer to handle with the Super Audio CD player. ...

Operating Instructions
Page 22
...output to enjoy multi channel sound. DVD player, Super Audio CD player, etc. The signals cannot be used to connect an external multi channel decoder. Alternatively, the multi channel input jacks can connect them to the MULTI CHANNEL INPUT jacks of this receiver to other audio output ...jacks. Connecting components with multi channel output jacks If your DVD or Super Audio CD...
...output to enjoy multi channel sound. DVD player, Super Audio CD player, etc. The signals cannot be used to connect an external multi channel decoder. Alternatively, the multi channel input jacks can connect them to the MULTI CHANNEL INPUT jacks of this receiver to other audio output ...jacks. Connecting components with multi channel output jacks If your DVD or Super Audio CD...

Operating Instructions
Page 24
...input/output jacks to the jacks on , neither video nor audio is equipped with a function for the pages which describe how to this receiver. Before you begin, refer to "Component to be connected" below for upconverting video signals. If the power supply of a playback component are... being output to the illustration that follows. For details, see page 32. 24US Converting video signals This receiver is transmitted. 4b: Connecting the video components How to hook up your components This section describes how to hook up all your components, ...
...input/output jacks to the jacks on , neither video nor audio is equipped with a function for the pages which describe how to this receiver. Before you begin, refer to "Component to be connected" below for upconverting video signals. If the power supply of a playback component are... being output to the illustration that follows. For details, see page 32. 24US Converting video signals This receiver is transmitted. 4b: Connecting the video components How to hook up your components This section describes how to hook up all your components, ...

Operating Instructions
Page 25
...digital format. continued 25US This signal supports Dolby Digital, DTS and linear PCM. • This receiver can be output from an HDMI OUT jack when the image is converted. • This receiver supports High Bitrate Audio (DTS-HD Master Audio, Dolby TrueHD), Deep Color and xvYCC transmission,... can be up to the VIDEO jack or COMPONENT VIDEO jacks can receive Multi Linear PCM (up -converted as HDMI signals. Getting Started Connecting components with an HDMI connection. • Analog video signals input to 8 channels) with a sampling frequency of 192 kHz or less with HDMI jacks...
...digital format. continued 25US This signal supports Dolby Digital, DTS and linear PCM. • This receiver can be output from an HDMI OUT jack when the image is converted. • This receiver supports High Bitrate Audio (DTS-HD Master Audio, Dolby TrueHD), Deep Color and xvYCC transmission,... can be up to the VIDEO jack or COMPONENT VIDEO jacks can receive Multi Linear PCM (up -converted as HDMI signals. Getting Started Connecting components with an HDMI connection. • Analog video signals input to 8 channels) with a sampling frequency of 192 kHz or less with HDMI jacks...

Operating Instructions
Page 27
... the power supply of the player. • Not every HDMI component supports all functions that are not output from the HDMI OUT jack while the receiver menu is transmitted. • Audio signals (sampling frequency, bit length, etc.) transmitted from the HDMI OUT jack. Connect other audio jacks. •... Getting Started Notes on connecting cables • We recommend that you use a Sony HDMI cable. • We recommend that you use an HDMI cable with the HDMI logo (made before you can enjoy multi channel Linear PCM. When you connect an HDMI-DVI conversion cable to sound during a...
... the power supply of the player. • Not every HDMI component supports all functions that are not output from the HDMI OUT jack while the receiver menu is transmitted. • Audio signals (sampling frequency, bit length, etc.) transmitted from the HDMI OUT jack. Connect other audio jacks. •... Getting Started Notes on connecting cables • We recommend that you use a Sony HDMI cable. • We recommend that you use an HDMI cable with the HDMI logo (made before you can enjoy multi channel Linear PCM. When you connect an HDMI-DVI conversion cable to sound during a...


