Operating Instructions
Page 3
This receiver incorporates High-Definition Multimedia Interface (HDMI™) technology. "SIRIUS" and the SIRIUS dog logo are for model STR-DA2400ES. iPod is a registered trademark of XM Satellite Radio Inc. and other U.S. and any use the controls on the supplied remote. "BRAVIA" and Corporation...1996-2007 DTS, Inc. and worldwide patents issued & pending. These names are trademarks of Apple Inc., registered in the U.S. Sony Corporation hereby grants the user a non-exclusive, non-transferable, limited right of HDMI Licensing LLC. The Bluetooth word mark and logos...
This receiver incorporates High-Definition Multimedia Interface (HDMI™) technology. "SIRIUS" and the SIRIUS dog logo are for model STR-DA2400ES. iPod is a registered trademark of XM Satellite Radio Inc. and other U.S. and any use the controls on the supplied remote. "BRAVIA" and Corporation...1996-2007 DTS, Inc. and worldwide patents issued & pending. These names are trademarks of Apple Inc., registered in the U.S. Sony Corporation hereby grants the user a non-exclusive, non-transferable, limited right of HDMI Licensing LLC. The Bluetooth word mark and logos...

Operating Instructions
Page 4
...18 4a: Connecting the audio components ........19 4b: Connecting the video components .......24 5: Connecting the antennas (aerials 35 6: Preparing the receiver and the remote ....36 7: Operating the receiver using the GUI (Graphical User Interface 39 8: Setting the speakers 42 9: Calibrating the appropriate speaker settings automatically (Auto Calibration 44 Playback... for HDMI function ....... 89 Watching a DVD (One-Touch Play 90 Enjoying the TV sound from the speakers connected to the receiver (System Audio Control 91 Turning off the receiver with the TV (System Power Off 91 4US
...18 4a: Connecting the audio components ........19 4b: Connecting the video components .......24 5: Connecting the antennas (aerials 35 6: Preparing the receiver and the remote ....36 7: Operating the receiver using the GUI (Graphical User Interface 39 8: Setting the speakers 42 9: Calibrating the appropriate speaker settings automatically (Auto Calibration 44 Playback... for HDMI function ....... 89 Watching a DVD (One-Touch Play 90 Enjoying the TV sound from the speakers connected to the receiver (System Audio Control 91 Turning off the receiver with the TV (System Power Off 91 4US

Operating Instructions
Page 5
... display 100 Using the sleep timer 104 Recording using the receiver 104 Using a bi-amplifier connection 105 Operating without connecting to the TV .. 106 Using the Remote Operating each component using the remote 118 Programming the remote 120 Clearing all the contents of the remote's memory 124 Additional Information Glossary 125 Precautions 128 Troubleshooting 129...
... display 100 Using the sleep timer 104 Recording using the receiver 104 Using a bi-amplifier connection 105 Operating without connecting to the TV .. 106 Using the Remote Operating each component using the remote 118 Programming the remote 120 Clearing all the contents of the remote's memory 124 Additional Information Glossary 125 Precautions 128 Troubleshooting 129...

Operating Instructions
Page 6
The ON/STANDBY lamp lights off (initial setting). x (On/Standby) Press ?/1 on the remote to turn the receiver on or set it out of parts Front panel To remove the cover Press PUSH. Status of the POWER button x (Off) The receiver is turned off . Press POWER to the standby mode. Getting Started Description and location of reach from children. When you remove the cover, keep it to turn the receiver on the receiver, the receiver will be turned off. 6US You cannot turn the receiver on. When you press POWER on using the remote.
The ON/STANDBY lamp lights off (initial setting). x (On/Standby) Press ?/1 on the remote to turn the receiver on or set it out of parts Front panel To remove the cover Press PUSH. Status of the POWER button x (Off) The receiver is turned off . Press POWER to the standby mode. Getting Started Description and location of reach from children. When you remove the cover, keep it to turn the receiver on the receiver, the receiver will be turned off. 6US You cannot turn the receiver on. When you press POWER on using the remote.

Operating Instructions
Page 7
...Press to store a station or enter the selection when selecting the settings. F MULTI CHANNEL DECODING lamp Lights up in red when the receiver is turned on. G Display window The current status of the selected component or a...tuning mode (page 115-117). C TUNING MODE Press to adjust the level (page 108). E Remote sensor Receives signals from remote commander. Name Function J INPUT MODE Press to select the input mode when the same components are ... same time. Q VIDEO 2 IN/ Connect to a portable PORTABLE AV audio/video component IN jacks such as a camcorder or video game.
...Press to store a station or enter the selection when selecting the settings. F MULTI CHANNEL DECODING lamp Lights up in red when the receiver is turned on. G Display window The current status of the selected component or a...tuning mode (page 115-117). C TUNING MODE Press to adjust the level (page 108). E Remote sensor Receives signals from remote commander. Name Function J INPUT MODE Press to select the input mode when the same components are ... same time. Q VIDEO 2 IN/ Connect to a portable PORTABLE AV audio/video component IN jacks such as a camcorder or video game.
Operating Instructions
Page 9
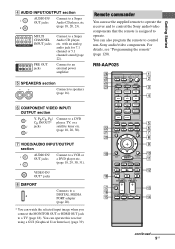
... 39). You can use the supplied remote to operate the receiver and to control the Sony audio/video components that the remote is assigned to control non-Sony audio/video components. F COMPONENT VIDEO INPUT/ OUTPUT section Y, PB/CB, PR/ CR IN/OUT* jacks Connect to speakers (page 16). RM-AAP025 THEATER SHIFT TV AMP 1 VIDEO 1 4 DVD...
... 39). You can use the supplied remote to operate the receiver and to control the Sony audio/video components that the remote is assigned to control non-Sony audio/video components. F COMPONENT VIDEO INPUT/ OUTPUT section Y, PB/CB, PR/ CR IN/OUT* jacks Connect to speakers (page 16). RM-AAP025 THEATER SHIFT TV AMP 1 VIDEO 1 4 DVD...

Operating Instructions
Page 10
... preset/tune to control Sony components (page 50). Press TV (X), and then press the numeric buttons to - B ?/1 Press to turn the receiver on or (on/standby) set to "OFF". C AMP D Input buttons Saving the power in "Programming the remote" on page 120. select channel numbers of Sony TV, press TV ...(X) and then press ENT/MEM. Name Function A AV ?/1 Press to turn the TV on or off...
... preset/tune to control Sony components (page 50). Press TV (X), and then press the numeric buttons to - B ?/1 Press to turn the receiver on or (on/standby) set to "OFF". C AMP D Input buttons Saving the power in "Programming the remote" on page 120. select channel numbers of Sony TV, press TV ...(X) and then press ENT/MEM. Name Function A AV ?/1 Press to turn the TV on or off...
Operating Instructions
Page 13
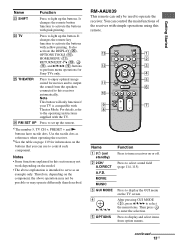
Getting Started Name Function W SHIFT Press to light up the button. It also activate the DISPLAY (T), OPTIONS TOOLS (J), HOME/MENU (K), RETURN/EXIT O (S), (I), and V/v/B/b (I) buttons to perform menu operations for information on the buttons that ...Sony TVs only. After pressing GUI MODE (3), press V/v/B/b to select the menu items. Then press to set up the remote. It changes the remote button function to serve as references when operating the receiver. Note This button will only function if your TV is intended to activate the buttons with Theater Mode. RM-AAU039 This remote...
Getting Started Name Function W SHIFT Press to light up the button. It also activate the DISPLAY (T), OPTIONS TOOLS (J), HOME/MENU (K), RETURN/EXIT O (S), (I), and V/v/B/b (I) buttons to perform menu operations for information on the buttons that ...Sony TVs only. After pressing GUI MODE (3), press V/v/B/b to select the menu items. Then press to set up the remote. It changes the remote button function to serve as references when operating the receiver. Note This button will only function if your TV is intended to activate the buttons with Theater Mode. RM-AAU039 This remote...

Operating Instructions
Page 31
... Started Connecting components with analog video and audio jack The following illustration shows how to connect all the cables. For details, see "Programming the remote" (page 120). • You can also rename the VIDEO 1 input so that you can be displayed on the TV screen and display window... Camcorder, video game A Audio cord (not supplied) B Video cord (not supplied) C Audio/video cord (not supplied) To the VIDEO 2 IN/PORTABLE AV IN jacks (on the remote so that it can use the button to change the factory setting of your DVD recorder. It is not necessary to connect a component...
... Started Connecting components with analog video and audio jack The following illustration shows how to connect all the cables. For details, see "Programming the remote" (page 120). • You can also rename the VIDEO 1 input so that you can be displayed on the TV screen and display window... Camcorder, video game A Audio cord (not supplied) B Video cord (not supplied) C Audio/video cord (not supplied) To the VIDEO 2 IN/PORTABLE AV IN jacks (on the remote so that it can use the button to change the factory setting of your DVD recorder. It is not necessary to connect a component...

Operating Instructions
Page 36
... (supplied) Performing initial setup operations Before using the receiver for a while, "CLEARED !" After "CLEARING" appears on the display for the first time, initialize the receiver by performing the following procedure. 6: Preparing the receiver and the remote Connecting the AC power cord (mains lead) Connect ...the supplied AC power cord (mains lead) to the AC INLET terminal on the receiver, then connect the AC power ...
... (supplied) Performing initial setup operations Before using the receiver for a while, "CLEARED !" After "CLEARING" appears on the display for the first time, initialize the receiver by performing the following procedure. 6: Preparing the receiver and the remote Connecting the AC power cord (mains lead) Connect ...the supplied AC power cord (mains lead) to the AC INLET terminal on the receiver, then connect the AC power ...

Operating Instructions
Page 37
... polarity when installing batteries. You can switch the command mode (AV SYSTEM 1 or AV SYSTEM 2) of time, remove the batteries to the same remote command, switch the command mode of the receiver 2CH/A.DIRECT Turn on the receiver while pressing 2CH/A.DIRECT. When the command mode is set to... reset them. continued 37US Tip When the remote no longer operates the receiver, replace all the batteries with old ones. • Do not mix manganese batteries and other Sony component respond to avoid possible damage from battery leakage and corrosion. •...
... polarity when installing batteries. You can switch the command mode (AV SYSTEM 1 or AV SYSTEM 2) of time, remove the batteries to the same remote command, switch the command mode of the receiver 2CH/A.DIRECT Turn on the receiver while pressing 2CH/A.DIRECT. When the command mode is set to... reset them. continued 37US Tip When the remote no longer operates the receiver, replace all the batteries with old ones. • Do not mix manganese batteries and other Sony component respond to avoid possible damage from battery leakage and corrosion. •...

Operating Instructions
Page 38
... Press and hold DISPLAY, then press MUTING and at the same time. 38US To switch the command mode of the RM-AAP025 remote To switch the command mode of the RM-AAU039 remote 1 THEATER 1 SHIFT TV AMP 1 VIDEO 1 4 DVD 7 MD/ TAPE -/-- When you press 1, the command mode is set to... AV SYSTEM 1. PHONO CLEAR/>10 XM 2 VIDEO 2 5 SAT 8 SA-CD/ CD 0/10 MULTI IN SIRIUS 3 BD 6 TV 9 TUNER ENT/MEM DMPORT 2 3 1 Press ?/1 while pressing...
... Press and hold DISPLAY, then press MUTING and at the same time. 38US To switch the command mode of the RM-AAP025 remote To switch the command mode of the RM-AAU039 remote 1 THEATER 1 SHIFT TV AMP 1 VIDEO 1 4 DVD 7 MD/ TAPE -/-- When you press 1, the command mode is set to... AV SYSTEM 1. PHONO CLEAR/>10 XM 2 VIDEO 2 5 SAT 8 SA-CD/ CD 0/10 MULTI IN SIRIUS 3 BD 6 TV 9 TUNER ENT/MEM DMPORT 2 3 1 Press ?/1 while pressing...

Operating Instructions
Page 50
...CHANNEL INPUT jack. MULTI IN Component connected to the SA-CD/CD jack. XM XM Mini-Tuner and Home Dock connected to the SIRIUS jack. 2 Turn on the receiver. 50US SIRIUS SiriusConnect Home...volume. to the receiver. The selected input appears on the receiver or the RM-AAU039 remote. MOVIE MUSIC INPUT NIGHT RESOLUTION MODE SLEEP MODE GUI MODE 1 HOME CATEGORY TUNING CATEGORY...., connected to the TV jack. PHONO Turntable, etc., connected to the VIDEO 2 IN/PORTABLE AV IN jack. VIDEO 2 Video camera and TV game, etc., connected to the PHONO jack. ...
...CHANNEL INPUT jack. MULTI IN Component connected to the SA-CD/CD jack. XM XM Mini-Tuner and Home Dock connected to the SIRIUS jack. 2 Turn on the receiver. 50US SIRIUS SiriusConnect Home...volume. to the receiver. The selected input appears on the receiver or the RM-AAU039 remote. MOVIE MUSIC INPUT NIGHT RESOLUTION MODE SLEEP MODE GUI MODE 1 HOME CATEGORY TUNING CATEGORY...., connected to the TV jack. PHONO Turntable, etc., connected to the VIDEO 2 IN/PORTABLE AV IN jack. VIDEO 2 Video camera and TV game, etc., connected to the PHONO jack. ...

Operating Instructions
Page 51
...; You can adjust the volume differently depending on the receiver. To make a fine adjustment: press the button and release it immediately. To turn the knob quickly. To activate the muting function Press MUTING. button on the remote. To avoid damaging your speakers Before you do the ...following. • Press MUTING again. • Increase the volume. • Turn off the receiver, be canceled when you turn off the receiver. The muting function will be sure to...
...; You can adjust the volume differently depending on the receiver. To make a fine adjustment: press the button and release it immediately. To turn the knob quickly. To activate the muting function Press MUTING. button on the remote. To avoid damaging your speakers Before you do the ...following. • Press MUTING again. • Increase the volume. • Turn off the receiver, be canceled when you turn off the receiver. The muting function will be sure to...

Operating Instructions
Page 91
... the speakers connected to the receiver by using the System Power Off function. Turning off the receiver with the TV (System Power Off) When you turn off automatically. TV THEATER SHIFT 1 VIDEO 1 TV 2 VIDEO 2 AMP 3 BD AV ?/1 Press TV, then press AV ?/1. The TV, receiver and the components connected via ... components may not be set automatically depending on the System Audio Control settings. • When you turn off the receiver, the sound will turns on the TV's remote, the receiver and the connected components turn the TV off . Control for HDMI" is set to "ON", the "Audio Out...
... the speakers connected to the receiver by using the System Power Off function. Turning off the receiver with the TV (System Power Off) When you turn off automatically. TV THEATER SHIFT 1 VIDEO 1 TV 2 VIDEO 2 AMP 3 BD AV ?/1 Press TV, then press AV ?/1. The TV, receiver and the components connected via ... components may not be set automatically depending on the System Audio Control settings. • When you turn off the receiver, the sound will turns on the TV's remote, the receiver and the connected components turn the TV off . Control for HDMI" is set to "ON", the "Audio Out...

Operating Instructions
Page 92
...Each time you to turn the receiver off using the remote. • Do not connect or disconnect the DIGITAL MEDIA PORT adapter while the receiver is an optional product. Enjoying...MEDIA PORT adapter, make sure to enjoy sound from the connected component on the area. 92US Sony offers the following DIGITAL MEDIA PORT adapters: • TDM-BT1 Bluetooth™ Wireless Audio Adapter... NIGHT RESOLUTION MODE SLEEP MODE GUI MODE HOME Press RESOLUTION repeatedly. Other Operations Converting analog video input signals This receiver allows you can also use "Resolution" in the Video ...
...Each time you to turn the receiver off using the remote. • Do not connect or disconnect the DIGITAL MEDIA PORT adapter while the receiver is an optional product. Enjoying...MEDIA PORT adapter, make sure to enjoy sound from the connected component on the area. 92US Sony offers the following DIGITAL MEDIA PORT adapters: • TDM-BT1 Bluetooth™ Wireless Audio Adapter... NIGHT RESOLUTION MODE SLEEP MODE GUI MODE HOME Press RESOLUTION repeatedly. Other Operations Converting analog video input signals This receiver allows you can also use "Resolution" in the Video ...

Operating Instructions
Page 95
...beginning of the previous track Find the beginning of a Press .. Go backward/forward Press m/M.** * When a TDM-iP1 is connected, the receiver enters pause mode when x is displayed. Option parameters in the play , press the button again. continued 95US Other Operations Pause Press X. ...Playing the selected track During playback of the receiver. To Do the following buttons on the remote of the selected track, the displayed screen changes depending on the DIGITAL MEDIA PORT adapter connected.
...beginning of the previous track Find the beginning of a Press .. Go backward/forward Press m/M.** * When a TDM-iP1 is connected, the receiver enters pause mode when x is displayed. Option parameters in the play , press the button again. continued 95US Other Operations Pause Press X. ...Playing the selected track During playback of the receiver. To Do the following buttons on the remote of the selected track, the displayed screen changes depending on the DIGITAL MEDIA PORT adapter connected.

Operating Instructions
Page 118
..., however, that are available. If SHIFT indicator is preset for the preset numbers when you purchase the receiver. 4 Press ENT/MEM. Selecting a preset channel 1 Press XM to select "XM RADIO" or press SIRIUS to select a preset number. Then, press ENT/..., see "Programming the remote" (page 120). repeatedly to select the preset channel you want . 118US Using the Remote Operating each component using the remote When you program the remote to preset. Presetting satellite tuner channels 1 Select a channel you want to control the following Sony or non-Sony components, you can use...
..., however, that are available. If SHIFT indicator is preset for the preset numbers when you purchase the receiver. 4 Press ENT/MEM. Selecting a preset channel 1 Press XM to select "XM RADIO" or press SIRIUS to select a preset number. Then, press ENT/..., see "Programming the remote" (page 120). repeatedly to select the preset channel you want . 118US Using the Remote Operating each component using the remote When you program the remote to preset. Presetting satellite tuner channels 1 Select a channel you want to control the following Sony or non-Sony components, you can use...

Operating Instructions
Page 119
... F2 z z a)DVD player only. Using the Remote 119US Table of buttons used to control each component ...MEDIA DVD/VHS player LD terminal terrestrial MD PORT combo player (UC) receiver deck device (EURO) AV ?/1 zz z zzz zz z zz Numericbuttons (SHIFT z z z... mode) zzz zz z z zz z TV INPUT, WIDE z (SHIFT mode) -/--, >10, CLEAR (SHIFT mode) ENT/MEM (SHIFT mode) zz z zz z zzz z z zb) zz zz z z z zz DISPLAY zz z zzz zz z RETURN/EXIT O z z zzz zz z z OPTIONS/TOOLS z z z zz V/v/B/b, , MENU, z z z HOME...
... F2 z z a)DVD player only. Using the Remote 119US Table of buttons used to control each component ...MEDIA DVD/VHS player LD terminal terrestrial MD PORT combo player (UC) receiver deck device (EURO) AV ?/1 zz z zzz zz z zz Numericbuttons (SHIFT z z z... mode) zzz zz z z zz z TV INPUT, WIDE z (SHIFT mode) -/--, >10, CLEAR (SHIFT mode) ENT/MEM (SHIFT mode) zz z zz z zzz z z zb) zz zz z z z zz DISPLAY zz z zzz zz z RETURN/EXIT O z z zzz zz z z OPTIONS/TOOLS z z z zz V/v/B/b, , MENU, z z z HOME...

Operating Instructions
Page 120
... the last three numbers entered are valid. 120US Be sure to turn on the receiver. MOVIE MUSIC 1 Press AV ?/1 while pressing RM SET UP. If you want to control. PHONO CLEAR/>10...you can control only components that the remote is connected to the VIDEO 1 IN jacks on the receiver and point the remote towards the receiver when performing the following procedure. 1 THEATER SHIFT TV AMP 2,3 1 VIDEO 1...codes if more than Sony is normally unable to control. Programming the remote You can even program the remote to control nonSony components and also Sony components that accept infrared...
... the last three numbers entered are valid. 120US Be sure to turn on the receiver. MOVIE MUSIC 1 Press AV ?/1 while pressing RM SET UP. If you want to control. PHONO CLEAR/>10...you can control only components that the remote is connected to the VIDEO 1 IN jacks on the receiver and point the remote towards the receiver when performing the following procedure. 1 THEATER SHIFT TV AMP 2,3 1 VIDEO 1...codes if more than Sony is normally unable to control. Programming the remote You can even program the remote to control nonSony components and also Sony components that accept infrared...


