
Operating Instructions
Page 4
... components ........19 4b: Connecting the video components .......24 5: Connecting the antennas (aerials 35 6: Preparing the receiver and the remote ....36 7: Operating the receiver using the GUI (Graphical User Interface 39 8: Setting the speakers 42 9: Calibrating the appropriate speaker settings automatically (Auto Calibration 44 Playback Selecting a component 50 Listening to a Super Audio CD/CD 52...
... components ........19 4b: Connecting the video components .......24 5: Connecting the antennas (aerials 35 6: Preparing the receiver and the remote ....36 7: Operating the receiver using the GUI (Graphical User Interface 39 8: Setting the speakers 42 9: Calibrating the appropriate speaker settings automatically (Auto Calibration 44 Playback Selecting a component 50 Listening to a Super Audio CD/CD 52...

Operating Instructions
Page 7
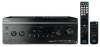
...TONE +/- Press TONE MODE repeatedly to standby mode. Turn to adjust brightness of all speakers at the same time. L INPUT SELECTOR Turn to select the input source to a portable PORTABLE AV audio/video component IN jacks such as a camcorder or video game. Q VIDEO 2 ... to headphones. 7US Lights up in red when the receiver is turned on or off. E Remote sensor Receives signals from remote commander. R SPEAKERS Press to store a station or enter the selection when selecting the settings. F MULTI CHANNEL DECODING lamp Lights up when a sound Sound lamp field...
...TONE +/- Press TONE MODE repeatedly to standby mode. Turn to adjust brightness of all speakers at the same time. L INPUT SELECTOR Turn to select the input source to a portable PORTABLE AV audio/video component IN jacks such as a camcorder or video game. Q VIDEO 2 ... to headphones. 7US Lights up in red when the receiver is turned on or off. E Remote sensor Receives signals from remote commander. R SPEAKERS Press to store a station or enter the selection when selecting the settings. F MULTI CHANNEL DECODING lamp Lights up when a sound Sound lamp field...

Operating Instructions
Page 8
... section FM ANTENNA Connects to a DVD player, etc. SIRIUS jack Connects to this receiver (page 18, 26). The image is output to a TV or a projector while the sound can be output from a TV or/and speakers connected to a SiriusConnect Home tuner (not supplied) (page 78). C RS-232C port Used for maintenance and service...
... section FM ANTENNA Connects to a DVD player, etc. SIRIUS jack Connects to this receiver (page 18, 26). The image is output to a TV or a projector while the sound can be output from a TV or/and speakers connected to a SiriusConnect Home tuner (not supplied) (page 78). C RS-232C port Used for maintenance and service...
Operating Instructions
Page 9
...page 18, 29, 30, 31). RM-AAP025 THEATER SHIFT TV AMP 1 VIDEO 1 4 DVD 7 MD/ TAPE -/-- You can use the supplied remote to operate the receiver and to control the Sony audio/video components that the remote is assigned to control non-Sony audio/video components. PHONO CLEAR/>10 XM 2 ... the remote" (page 120). E SPEAKERS section Connects to a DVD player, TV, or a satellite tuner etc. (page 18, 28, 30). Getting Started D AUDIO INPUT/OUTPUT section AUDIO IN/ OUT jacks Connect to a Super Audio CD player, etc. MULTI CHANNEL INPUT jacks PRE OUT jacks Connect to...
...page 18, 29, 30, 31). RM-AAP025 THEATER SHIFT TV AMP 1 VIDEO 1 4 DVD 7 MD/ TAPE -/-- You can use the supplied remote to operate the receiver and to control the Sony audio/video components that the remote is assigned to control non-Sony audio/video components. PHONO CLEAR/>10 XM 2 ... the remote" (page 120). E SPEAKERS section Connects to a DVD player, TV, or a satellite tuner etc. (page 18, 28, 30). Getting Started D AUDIO INPUT/OUTPUT section AUDIO IN/ OUT jacks Connect to a Super Audio CD player, etc. MULTI CHANNEL INPUT jacks PRE OUT jacks Connect to...

Operating Instructions
Page 12
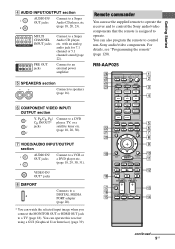
...Q MUTING Press to both digital and analog jacks (page 97). 12US To return to replay the previous scene or fast forward the current scene of Sony TV, press TV (X) and then press RETURN/EXIT O. V INPUT MODE Press to select the input mode when the same components are connected to turn...on-screen guide of the DVD or Blu-ray disc on the TV screen. D.TUNING Press to select preset TV channels. to enter direct tuning mode. select preset channels of all speakers at the same time. BD/DVD MENU TV INPUT WIDE Press to perform menu operations. Name Function TUNING +/- S ...
...Q MUTING Press to both digital and analog jacks (page 97). 12US To return to replay the previous scene or fast forward the current scene of Sony TV, press TV (X) and then press RETURN/EXIT O. V INPUT MODE Press to select the input mode when the same components are connected to turn...on-screen guide of the DVD or Blu-ray disc on the TV screen. D.TUNING Press to select preset TV channels. to enter direct tuning mode. select preset channels of all speakers at the same time. BD/DVD MENU TV INPUT WIDE Press to perform menu operations. Name Function TUNING +/- S ...
Operating Instructions
Page 13
...HOME/MENU (K), RETURN/EXIT O (S), (I), and V/v/B/b (I) buttons to select sound field (page 114, 115). For details, refer to the operating instructions supplied with yellow printing. Use the tactile dots as an example only. RM-AAU039 This remote can only be possible or may not be used to operate the receiver...receiver with pink printing. It changes the remote button function to activate the buttons with simple operations using this receiver...to turn a receiver on the TV... is compatible with Theater Mode. You can... Y THEATER Press to enjoy optimal image suited for Sony TVs only...
...HOME/MENU (K), RETURN/EXIT O (S), (I), and V/v/B/b (I) buttons to select sound field (page 114, 115). For details, refer to the operating instructions supplied with yellow printing. Use the tactile dots as an example only. RM-AAU039 This remote can only be possible or may not be used to operate the receiver...receiver with pink printing. It changes the remote button function to activate the buttons with simple operations using this receiver...to turn a receiver on the TV... is compatible with Theater Mode. You can... Y THEATER Press to enjoy optimal image suited for Sony TVs only...
Operating Instructions
Page 14
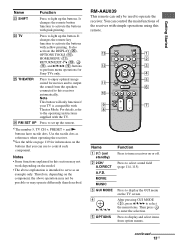
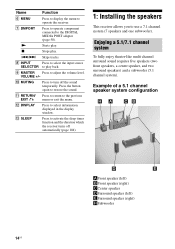
... the speakers This receiver allows you to use a 7.1 channel system (7 speakers and one subwoofer). K RETURN/ EXIT O Press to return to adjust the volume level. Example of a 5.1 channel speaker system configuration AFront speaker (left) BFront speaker (right) CCenter speaker DSurround speaker (left) ESurround speaker (right) HSubwoofer 14US Enjoying a 5.1/7.1 channel system To fully enjoy theater-like multi channel surround sound requires five speakers (two front speakers, a center speaker, and...
... the speakers This receiver allows you to use a 7.1 channel system (7 speakers and one subwoofer). K RETURN/ EXIT O Press to return to adjust the volume level. Example of a 5.1 channel speaker system configuration AFront speaker (left) BFront speaker (right) CCenter speaker DSurround speaker (left) ESurround speaker (right) HSubwoofer 14US Enjoying a 5.1/7.1 channel system To fully enjoy theater-like multi channel surround sound requires five speakers (two front speakers, a center speaker, and...

Operating Instructions
Page 15
... place it wherever you connect a 6.1 channel speaker system, place the surround back speaker behind the listening position. AFront speaker (left) BFront speaker (right) CCenter speaker DSurround speaker (left) ESurround speaker (right) FSurround back speaker (left) GSurround back speaker (right) HSubwoofer • Since the ...sound in the Surround EX format if you connect one additional surround back speaker (6.1 channel system) or two surround back speakers (7.1 channel system.) Example of a 7.1 channel speaker system configuration Tips • The angle A should be the same. • ...
... place it wherever you connect a 6.1 channel speaker system, place the surround back speaker behind the listening position. AFront speaker (left) BFront speaker (right) CCenter speaker DSurround speaker (left) ESurround speaker (right) FSurround back speaker (left) GSurround back speaker (right) HSubwoofer • Since the ...sound in the Surround EX format if you connect one additional surround back speaker (6.1 channel system) or two surround back speakers (7.1 channel system.) Example of a 7.1 channel speaker system configuration Tips • The angle A should be the same. • ...

Operating Instructions
Page 16
2: Connecting speakers Before connecting cords, make sure to disconnect the AC power cord (mains lead). 13/32 in. (10 mm) H G F B A SPEAKERS FRONT B terminals a) A A A E D A Speaker cords (not supplied) B Monaural audio cord (not supplied) AFront speaker A (left) BFront speaker A (right) CCenter speaker DSurround speaker (left) B A C ESurround speaker (right) FSurround back speaker (left)b) GSurround back speaker (right)b) HSubwooferc) 16US
2: Connecting speakers Before connecting cords, make sure to disconnect the AC power cord (mains lead). 13/32 in. (10 mm) H G F B A SPEAKERS FRONT B terminals a) A A A E D A Speaker cords (not supplied) B Monaural audio cord (not supplied) AFront speaker A (left) BFront speaker A (right) CCenter speaker DSurround speaker (left) B A C ESurround speaker (right) FSurround back speaker (left)b) GSurround back speaker (right)b) HSubwooferc) 16US
Operating Instructions
Page 17
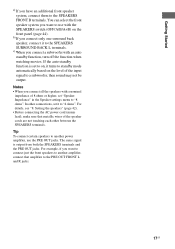
... standby function, turn off the function when watching movies. If the auto standby function is output from both the SPEAKERS terminals and the PRE OUT jacks. For details, see "8: Setting the speakers" (page 42). • Before connecting the AC power cord (mains lead), make sure that amplifier to the... PRE OUT FRONT L and R jacks. 17US c) When you want to connect just the front speakers to another power amplifier, use with a nominal impedance of the input signal to "4 ohms". Getting Started a) If you connect only one surround back...
... standby function, turn off the function when watching movies. If the auto standby function is output from both the SPEAKERS terminals and the PRE OUT jacks. For details, see "8: Setting the speakers" (page 42). • Before connecting the AC power cord (mains lead), make sure that amplifier to the... PRE OUT FRONT L and R jacks. 17US c) When you want to connect just the front speakers to another power amplifier, use with a nominal impedance of the input signal to "4 ohms". Getting Started a) If you connect only one surround back...
Operating Instructions
Page 19
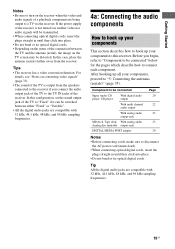
... up your components This section describes how to hook up all your components to this case, place the antenna (aerial) farther away from the speakers connected to the receiver if you begin, refer to "Component to be switched between the TV and the antenna (aerial), the image on the TV screen may... be connected Super Audio CD player, CD player With digital audio output With multi channel audio output With analog audio output only MD deck, Tape ...
... up your components This section describes how to hook up all your components to this case, place the antenna (aerial) farther away from the speakers connected to the receiver if you begin, refer to "Component to be switched between the TV and the antenna (aerial), the image on the TV screen may... be connected Super Audio CD player, CD player With digital audio output With multi channel audio output With analog audio output only MD deck, Tape ...

Operating Instructions
Page 25
Audio signals are not output from the speakers and the PRE OUT jacks on this receiver. HDMI features • A digital audio signals transmitted by HDMI can be output from an HDMI OUT jack when the image is converted. • This receiver supports High Bitrate Audio (DTS-HD Master ... name for HighDefinition Multimedia Interface. continued 25US This signal supports Dolby Digital, DTS and linear PCM. • This receiver can receive Multi Linear PCM (up to 8 channels) with a sampling frequency of 192 kHz or less with HDMI jacks HDMI is an interface which transmits video and audio...
Audio signals are not output from the speakers and the PRE OUT jacks on this receiver. HDMI features • A digital audio signals transmitted by HDMI can be output from an HDMI OUT jack when the image is converted. • This receiver supports High Bitrate Audio (DTS-HD Master ... name for HighDefinition Multimedia Interface. continued 25US This signal supports Dolby Digital, DTS and linear PCM. • This receiver can receive Multi Linear PCM (up to 8 channels) with a sampling frequency of 192 kHz or less with HDMI jacks HDMI is an interface which transmits video and audio...

Operating Instructions
Page 27
... cable to sound during a Deep Color transmission or when you watch a video image of the receiver is not turned on, neither video nor audio is not output from any other audio cords or...conversion cable. For example, components that are defined by Sony) for details. 27US Getting Started Notes on connecting cables • We recommend that you use a Sony HDMI cable. • We recommend that you use an...jack may be interrupted when the sampling frequency, the number of channels or audio format of audio output signals from the TV speaker, set to "TV+AMP" in the Input Option menu when...
... cable to sound during a Deep Color transmission or when you watch a video image of the receiver is not turned on, neither video nor audio is not output from any other audio cords or...conversion cable. For example, components that are defined by Sony) for details. 27US Getting Started Notes on connecting cables • We recommend that you use a Sony HDMI cable. • We recommend that you use an...jack may be interrupted when the sampling frequency, the number of channels or audio format of audio output signals from the TV speaker, set to "TV+AMP" in the Input Option menu when...

Operating Instructions
Page 36
...be used to return settings you have made to the initial settings. This is left between the SPEAKERS terminals. • Connect the AC power cord (mains lead) firmly. After "CLEARING" appears on the receiver, then connect the AC power cord (mains lead) to a wall outlet. A several space ...for a while, "CLEARED !" appears. Notes • Before connecting the AC power cord (mains lead), make sure that metallic wires of the speaker cords are reset to their factory defaults. AC INLET terminal To the wall outlet AC power cord (mains lead) (supplied) Performing initial setup ...
...be used to return settings you have made to the initial settings. This is left between the SPEAKERS terminals. • Connect the AC power cord (mains lead) firmly. After "CLEARING" appears on the receiver, then connect the AC power cord (mains lead) to a wall outlet. A several space ...for a while, "CLEARED !" appears. Notes • Before connecting the AC power cord (mains lead), make sure that metallic wires of the speaker cords are reset to their factory defaults. AC INLET terminal To the wall outlet AC power cord (mains lead) (supplied) Performing initial setup ...
Operating Instructions
Page 40
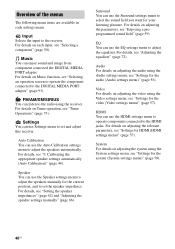
...)" (page 57). Video For details on each settings menu. For details on adjusting the video using the receiver. For details, see "9: Calibrating the appropriate speaker settings automatically (Auto Calibration)" (page 44). FM/AM/XM/SIRIUS You can use the Surround settings menu ...relevant parameters, see "Selecting an operation screen to operate the component connected to set and adjust this receiver. Surround You can use the Speaker settings menu to adjust the speakers manually for the system (System settings menu)" (page 58). 40US For details, see "Tuner Operations...
...)" (page 57). Video For details on each settings menu. For details on adjusting the video using the receiver. For details, see "9: Calibrating the appropriate speaker settings automatically (Auto Calibration)" (page 44). FM/AM/XM/SIRIUS You can use the Surround settings menu ...relevant parameters, see "Selecting an operation screen to operate the component connected to set and adjust this receiver. Surround You can use the Speaker settings menu to adjust the speakers manually for the system (System settings menu)" (page 58). 40US For details, see "Tuner Operations...

Operating Instructions
Page 42
... O. "GUI MODE" appears on the display window of the receiver and the GUI menu appears on the TV screen. 2 Press V/v repeatedly to make other settings. MOVIE MUSIC INPUT NIGHT RESOLUTION MODE SLEEP MODE GUI MODE 1 2-5 HOME CATEGORY MENU 1 Press GUI MODE to select "Speaker", then press or b. 42US The Settings menu list appears...
... O. "GUI MODE" appears on the display window of the receiver and the GUI menu appears on the TV screen. 2 Press V/v repeatedly to make other settings. MOVIE MUSIC INPUT NIGHT RESOLUTION MODE SLEEP MODE GUI MODE 1 2-5 HOME CATEGORY MENU 1 Press GUI MODE to select "Speaker", then press or b. 42US The Settings menu list appears...

Operating Instructions
Page 43
When connecting other configurations: Set "Speaker Impedance" to "4 ohms" in the Speaker settings menu. 43US When you connect speakers with impedance of 16 ohms or higher in the Speaker settings menu. - For other types of speakers in other types of speakers, set "Speaker Impedance" to "8 ohms". Getting Started 4 Press V/v repeatedly to select "Speaker Impedance", then press or b. 5 Press V/v repeatedly...
When connecting other configurations: Set "Speaker Impedance" to "4 ohms" in the Speaker settings menu. 43US When you connect speakers with impedance of 16 ohms or higher in the Speaker settings menu. - For other types of speakers in other types of speakers, set "Speaker Impedance" to "8 ohms". Getting Started 4 Press V/v repeatedly to select "Speaker Impedance", then press or b. 5 Press V/v repeatedly...

Operating Instructions
Page 44
... jack is very loud. Note You cannot switch the front speaker system by pressing SPEAKERS (OFF/A/B/A+B) when the headphones are output from any speaker terminals. Refer also to "Quick Setup Guide" supplied with the receiver. Do not connect other microphones. Remove any obstacles in the...Auto Calibration) function allows you to perform automatic calibration, such as checking the connection between each speaker and the receiver, adjusting the speaker level, and measuring the distance of each speaker from the measurement area to avoid measurement error. • When you use the buttons on ...
... jack is very loud. Note You cannot switch the front speaker system by pressing SPEAKERS (OFF/A/B/A+B) when the headphones are output from any speaker terminals. Refer also to "Quick Setup Guide" supplied with the receiver. Do not connect other microphones. Remove any obstacles in the...Auto Calibration) function allows you to perform automatic calibration, such as checking the connection between each speaker and the receiver, adjusting the speaker level, and measuring the distance of each speaker from the measurement area to avoid measurement error. • When you use the buttons on ...

Operating Instructions
Page 45
... off (deactivated). 1 Connect the supplied optimizer microphone to off automatically. Note Depending on the display may be set to use the receiver as your seating position. However, there will be further away from the actual distance value. headphones are using, the setup distance value... may differ from the actual position. Getting Started Notes • The Auto Calibration function does not work if - SPEAKERS (OFF/A/B/A+B) is connected, turn on the subwoofer and turn up the optimizer microphone. Use a stool or tripod so that value. 45US ...
... off (deactivated). 1 Connect the supplied optimizer microphone to off automatically. Note Depending on the display may be set to use the receiver as your seating position. However, there will be further away from the actual distance value. headphones are using, the setup distance value... may differ from the actual position. Getting Started Notes • The Auto Calibration function does not work if - SPEAKERS (OFF/A/B/A+B) is connected, turn on the subwoofer and turn up the optimizer microphone. Use a stool or tripod so that value. 45US ...
Operating Instructions
Page 46
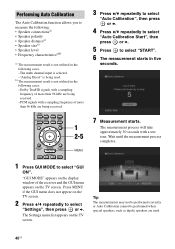
... in the following cases. -The multi channel input is selected. -"Analog Direct" is not utilized in five seconds. 7 Measurement starts. The measurement process will take approximately 30 seconds with a sampling frequency of the receiver and the GUI menu appears on the TV... may not be performed correctly or Auto Calibration cannot be performed when special speakers, such as dipole speakers are being received. 2CH/ A.DIRECT A.F.D. MOVIE MUSIC INPUT NIGHT RESOLUTION MODE SLEEP MODE GUI MODE 1 2-5 HOME CATEGORY MENU 3 Press V/v repeatedly to select "Auto Calibration", then press ...
... in the following cases. -The multi channel input is selected. -"Analog Direct" is not utilized in five seconds. 7 Measurement starts. The measurement process will take approximately 30 seconds with a sampling frequency of the receiver and the GUI menu appears on the TV... may not be performed correctly or Auto Calibration cannot be performed when special speakers, such as dipole speakers are being received. 2CH/ A.DIRECT A.F.D. MOVIE MUSIC INPUT NIGHT RESOLUTION MODE SLEEP MODE GUI MODE 1 2-5 HOME CATEGORY MENU 3 Press V/v repeatedly to select "Auto Calibration", then press ...


