Handycam® Handbook
Page 2
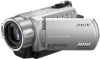
...or (p. 111). For operating and handling the camcorder, refer to remove the battery pack or AC Adaptor from the camcorder. - LCD screen Battery • The camcorder is on: - When using the camcorder • Do not hold the camcorder by the following when either of the respective ...proper direction. If you set the camcorder onto the Handycam Station or remove the camcorder from it for future reference. See "About handling of operations guides. Read this before operating your camcorder" (p. 114). • To prevent the hard disk from being broken or recorded images ...
...or (p. 111). For operating and handling the camcorder, refer to remove the battery pack or AC Adaptor from the camcorder. - LCD screen Battery • The camcorder is on: - When using the camcorder • Do not hold the camcorder by the following when either of the respective ...proper direction. If you set the camcorder onto the Handycam Station or remove the camcorder from it for future reference. See "About handling of operations guides. Read this before operating your camcorder" (p. 114). • To prevent the hard disk from being broken or recorded images ...
Handycam® Handbook
Page 4
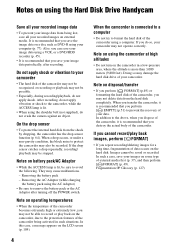
... occurs on the hard disk. If you cannot record/play back on the camcorder, due to avoid the following. Images cannot be sure to the protection features of the camcorder. Notes on using the Hard Disk Drive Handycam Save all your ...camcorder may damage the hard disk drive of the camcorder, it is recommended that you save all your camcorder • The hard disk of the camcorder using the camcorder at high altitudes • Do not turn on the LCD screen (p. 104). 4 When the camcorder is lit, be saved or recorded. Removing the AC Adaptor (while charging the battery...
... occurs on the hard disk. If you cannot record/play back on the camcorder, due to avoid the following. Images cannot be sure to the protection features of the camcorder. Notes on using the Hard Disk Drive Handycam Save all your ...camcorder may damage the hard disk drive of the camcorder, it is recommended that you save all your camcorder • The hard disk of the camcorder using the camcorder at high altitudes • Do not turn on the LCD screen (p. 104). 4 When the camcorder is lit, be saved or recorded. Removing the AC Adaptor (while charging the battery...
Handycam® Handbook
Page 5
...battery pack 13 Step 3: Turning the power on, and setting the date and time .... 17 Changing the language setting 18 Step 4: Preparing for recording .... 19 Recording/Playback Recording and playback with ease (Easy Handycam...action in slowmotion (SMTH SLW REC) (DCRSR200/SR300 29 Playback 31 Using PB zoom 33 Searching ...hard disk or the "Memory Stick Duo 49 Checking the hard disk information 50 Preventing data on the hard disk of Contents Read this before operating your camcorder 2 Notes on using the Hard Disk Drive Handycam 4 Subject examples and solutions ..... 7 Enjoying your camcorder...
...battery pack 13 Step 3: Turning the power on, and setting the date and time .... 17 Changing the language setting 18 Step 4: Preparing for recording .... 19 Recording/Playback Recording and playback with ease (Easy Handycam...action in slowmotion (SMTH SLW REC) (DCRSR200/SR300 29 Playback 31 Using PB zoom 33 Searching ...hard disk or the "Memory Stick Duo 49 Checking the hard disk information 50 Preventing data on the hard disk of Contents Read this before operating your camcorder 2 Notes on using the Hard Disk Drive Handycam 4 Subject examples and solutions ..... 7 Enjoying your camcorder...
Handycam® Handbook
Page 12
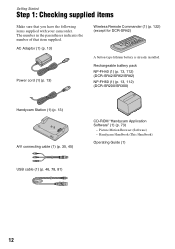
... Picture Motion Browser (Software) - Rechargeable battery pack NP-FH40 (1) (p. 13, 112) (DCR-SR42/SR62/SR82) NP-FH60 (1) (p. 13, 112) (DCR-SR200/SR300) Handycam Station (1) (p. 13) A/V connecting cable (1) (p. 35, 45) CD-ROM "Handycam Application Software" (1) (p. 73) - ...Getting Started Step 1: Checking supplied items Make sure that item supplied. The number in the parentheses indicates the number of that you have the following items supplied with your camcorder...
... Picture Motion Browser (Software) - Rechargeable battery pack NP-FH40 (1) (p. 13, 112) (DCR-SR42/SR62/SR82) NP-FH60 (1) (p. 13, 112) (DCR-SR200/SR300) Handycam Station (1) (p. 13) A/V connecting cable (1) (p. 35, 45) CD-ROM "Handycam Application Software" (1) (p. 73) - ...Getting Started Step 1: Checking supplied items Make sure that item supplied. The number in the parentheses indicates the number of that you have the following items supplied with your camcorder...

Handycam® Handbook
Page 13
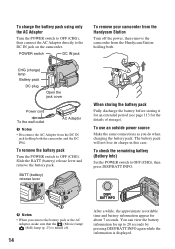
...). 4 Connect the power cord to the AC Adaptor and the wall outlet. 5 Set the camcorder onto the Handycam Station securely. The CHG (charge) lamp turns off when the battery pack is fully charged. • When setting the camcorder onto the Handycam Station, close the DC IN jack cover. 3 Connect the AC Adaptor to the DC...
...). 4 Connect the power cord to the AC Adaptor and the wall outlet. 5 Set the camcorder onto the Handycam Station securely. The CHG (charge) lamp turns off when the battery pack is fully charged. • When setting the camcorder onto the Handycam Station, close the DC IN jack cover. 3 Connect the AC Adaptor to the DC...
Handycam® Handbook
Page 14
...POWER switch DC IN jack To remove your camcorder from the Handycam Station Turn off . 14 After a while, the approximate recordable time and battery information appear for about 7 seconds. BATT (battery) release lever When storing the battery pack Fully discharge the battery before storing it for an extended period (...cover Power cord To the wall outlet AC Adaptor b Notes • Disconnect the AC Adaptor from the Handycam Station holding both . To check the remaining battery (Battery Info) Set the POWER switch to 20 seconds by pressing DISP/BATT INFO again while the information is ...
...POWER switch DC IN jack To remove your camcorder from the Handycam Station Turn off . 14 After a while, the approximate recordable time and battery information appear for about 7 seconds. BATT (battery) release lever When storing the battery pack Fully discharge the battery before storing it for an extended period (...cover Power cord To the wall outlet AC Adaptor b Notes • Disconnect the AC Adaptor from the Handycam Station holding both . To check the remaining battery (Battery Info) Set the POWER switch to 20 seconds by pressing DISP/BATT INFO again while the information is ...

Handycam® Handbook
Page 15
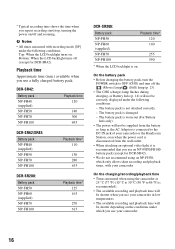
...FH100 Continuous recording time 85 90 115 120 185 195 425 450 Typical recording time* 40 45 55 60 90 95 210 225 DCR-SR300: Battery pack NP-FH50 NP-FH60 (supplied) NP-FH70 NP-FH100 Continuous recording time 70 75 95 100 155 165 365 385 Typical recording...-FH70 NP-FH100 Charging time 125 135 135 170 390 * DCR-SR42/SR62/SR82 ** DCR-SR200/SR300 Recording time Approximate time (min.) available when you fully charge a fully discharged battery pack. Getting Started Remaining battery (approx.) Recording capacity (approx.) Charging time Approximate time (min.) required when you use a fully ...
...FH100 Continuous recording time 85 90 115 120 185 195 425 450 Typical recording time* 40 45 55 60 90 95 210 225 DCR-SR300: Battery pack NP-FH50 NP-FH60 (supplied) NP-FH70 NP-FH100 Continuous recording time 70 75 95 100 155 165 365 385 Typical recording...-FH70 NP-FH100 Charging time 125 135 135 170 390 * DCR-SR42/SR62/SR82 ** DCR-SR200/SR300 Recording time Approximate time (min.) available when you fully charge a fully discharged battery pack. Getting Started Remaining battery (approx.) Recording capacity (approx.) Charging time Approximate time (min.) required when you use a fully ...
Handycam® Handbook
Page 16
...-FH40 (supplied) NP-FH50 NP-FH70 NP-FH100 Playback time* 110 130 280 635 DCR-SR200: Battery pack NP-FH50 NP-FH60 (supplied) NP-FH70 NP-FH100 Playback time* 125 165 270 615 DCR-SR300: Battery pack NP-FH50 NP-FH60 (supplied) NP-FH70 NP-FH100 Playback time* 120 160 255 590 * When... LCD backlight turns off (except for DCR-SR42). • We do not recommend using the camcorder at 25 °C (77 °F) (10 °C to 30 °C (50 °F to the DC IN jack of your camcorder or the Handycam Station, even when the power cord is disconnected from the wall outlet. • When...
...-FH40 (supplied) NP-FH50 NP-FH70 NP-FH100 Playback time* 110 130 280 635 DCR-SR200: Battery pack NP-FH50 NP-FH60 (supplied) NP-FH70 NP-FH100 Playback time* 125 165 270 615 DCR-SR300: Battery pack NP-FH50 NP-FH60 (supplied) NP-FH70 NP-FH100 Playback time* 120 160 255 590 * When... LCD backlight turns off (except for DCR-SR42). • We do not recommend using the camcorder at 25 °C (77 °F) (10 °C to 30 °C (50 °F to the DC IN jack of your camcorder or the Handycam Station, even when the power cord is disconnected from the wall outlet. • When...

Handycam® Handbook
Page 17
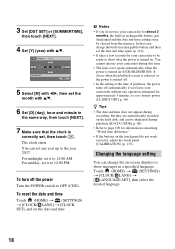
This may cause a malfunction. • Even if your camcorder. • Do not use the AC Adaptor placed in the direction of the AC Adaptor or battery terminal with v/V, then touch [NEXT]. 17 If you do not set the date and time, the [CLOCK SET] screen appears every time you ...record movies (Still): To record still images The [CLOCK SET] screen appears. 2 Select the desired geographical area with any malfunction occurs while using your camcorder is turned off, AC power (house current) is still supplied to it while connected to the wall outlet via the AC Adaptor. Step 3: Turning ...
This may cause a malfunction. • Even if your camcorder. • Do not use the AC Adaptor placed in the direction of the AC Adaptor or battery terminal with v/V, then touch [NEXT]. 17 If you do not set the date and time, the [CLOCK SET] screen appears every time you ...record movies (Still): To record still images The [CLOCK SET] screen appears. 2 Select the desired geographical area with any malfunction occurs while using your camcorder is turned off, AC power (house current) is still supplied to it while connected to the wall outlet via the AC Adaptor. Step 3: Turning ...
Handycam® Handbook
Page 18
...to OFF (CHG). For midday, set it to 12:00 AM. b Notes • If you leave your camcorder during this time. • The lens cover opens automatically when the power is turned on (DCR-SR200/SR300). 3 Set [DST SET] or [SUMMERTIME], then touch [NEXT]. 4 Set [Y] (year) with v/V. 5 Select...the buttons on the touch panel do not use your camcorder for about 3 months, the built-in rechargeable battery gets discharged and the date and time settings may be displayed during recording, but they are automatically recorded on the hard disk, and can be cleared from the memory. The clock ...
...to OFF (CHG). For midday, set it to 12:00 AM. b Notes • If you leave your camcorder during this time. • The lens cover opens automatically when the power is turned on (DCR-SR200/SR300). 3 Set [DST SET] or [SUMMERTIME], then touch [NEXT]. 4 Set [Y] (year) with v/V. 5 Select...the buttons on the touch panel do not use your camcorder for about 3 months, the built-in rechargeable battery gets discharged and the date and time settings may be displayed during recording, but they are automatically recorded on the hard disk, and can be cleared from the memory. The clock ...

Handycam® Handbook
Page 19
...8226; The information is practical when you use your camcorder correctly. 2180 degrees 190 degrees to the (max.) camcorder To turn on the LCD frame accidentally when you want to save battery power. To turn off the LCD backlight to make the battery last longer (except for DCR-SR42) Press and hold...your camcorder in bright conditions or when you open . Fastening the grip belt Fasten the grip belt and hold DISP/BATT INFO for a few seconds until disappears. Lens cover switch z Tips • When you finish recording or when you can close the lens cover. • For DCR-SR200/SR300,...
...8226; The information is practical when you use your camcorder correctly. 2180 degrees 190 degrees to the (max.) camcorder To turn on the LCD frame accidentally when you want to save battery power. To turn off the LCD backlight to make the battery last longer (except for DCR-SR42) Press and hold...your camcorder in bright conditions or when you open . Fastening the grip belt Fasten the grip belt and hold DISP/BATT INFO for a few seconds until disappears. Lens cover switch z Tips • When you finish recording or when you can close the lens cover. • For DCR-SR200/SR300,...
Handycam® Handbook
Page 23
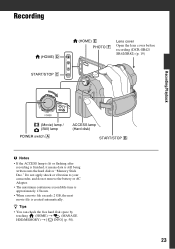
... shock or vibration to your camcorder, and do not remove the battery or AC Adaptor. • The maximum continuous recordable time is approximately 13 hours. • When a movie file exceeds 2 GB, the next movie file is still being written onto the hard disk or "Memory Stick Duo." ...cover Open the lens cover before recording (DCR-SR42/ SR62/SR82) (p. 19) Recording/Playback (Movie) lamp / (Still) lamp POWER switch A ACCESS lamp (Hard disk) START/STOP B b Notes • If the ACCESS lamp is lit or flashing after recording is finished, it means data is created automatically. z Tips &#...
... shock or vibration to your camcorder, and do not remove the battery or AC Adaptor. • The maximum continuous recordable time is approximately 13 hours. • When a movie file exceeds 2 GB, the next movie file is still being written onto the hard disk or "Memory Stick Duo." ...cover Open the lens cover before recording (DCR-SR42/ SR62/SR82) (p. 19) Recording/Playback (Movie) lamp / (Still) lamp POWER switch A ACCESS lamp (Hard disk) START/STOP B b Notes • If the ACCESS lamp is lit or flashing after recording is finished, it means data is created automatically. z Tips &#...
Handycam® Handbook
Page 26
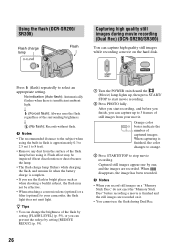
... and the images are recorded on the hard disk. No indication (Auto flash): Automatically flashes ... flash charge lamp flickers while charging the flash, and remains lit when the battery charge is finished and the still images are recorded. r (Forced flash):...then press START/ STOP to 8 feet). • Remove any dust from your camcorder, the flash light does not emit light. After you start movie recording. 2 Press...Using the flash (DCR-SR200/ SR300) Flash charge lamp Flash Capturing high quality still images during movie recording (Dual Rec) (DCR-SR200/SR300) You can capture high quality...
... and the images are recorded on the hard disk. No indication (Auto flash): Automatically flashes ... flash charge lamp flickers while charging the flash, and remains lit when the battery charge is finished and the still images are recorded. r (Forced flash):...then press START/ STOP to 8 feet). • Remove any dust from your camcorder, the flash light does not emit light. After you start movie recording. 2 Press...Using the flash (DCR-SR200/ SR300) Flash charge lamp Flash Capturing high quality still images during movie recording (Dual Rec) (DCR-SR200/SR300) You can capture high quality...
Handycam® Handbook
Page 27
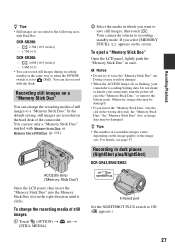
... Infrared port Set the NIGHTSHOT PLUS switch to a "Memory Stick Duo." Recording/Playback z Tips • Still images are recorded on the hard disk of the camcorder. z Tips • The number of recordable images varies depending on the image quality or the image size. b Notes • Do not...7M (4:3) DCR-SR300: - 4.6M (16:9 (wide)) - 3.4M (4:3) • You can also record with or (p. 111). 2 Select the media in the same way as when the POWER switch is lit or flashing, your camcorder, turn the power off, eject the "Memory Stick Duo," or remove the battery pack. Doing so...
... Infrared port Set the NIGHTSHOT PLUS switch to a "Memory Stick Duo." Recording/Playback z Tips • Still images are recorded on the hard disk of the camcorder. z Tips • The number of recordable images varies depending on the image quality or the image size. b Notes • Do not...7M (4:3) DCR-SR300: - 4.6M (16:9 (wide)) - 3.4M (4:3) • You can also record with or (p. 111). 2 Select the media in the same way as when the POWER switch is lit or flashing, your camcorder, turn the power off, eject the "Memory Stick Duo," or remove the battery pack. Doing so...

Handycam® Handbook
Page 39
... • Do not remove the battery pack or the AC Adaptor from the Playlist. It may damage the hard disk. • If the deleted movie is highlighted. The recording dates of image you want to delete. The selected image is deleted also from your camcorder before the operation. 1 On the...one time 1 On the (HOME MENU), touch (OTHERS) t [DELETE] t [ DELETE]. 2 Touch [ DELETE by date] or [ DELETE by this camcorder and stored onto the hard disk are called "original." Touch to return to the previous screen. 5 Touch t [YES] t . The images recorded on the selected date are displayed on...
... • Do not remove the battery pack or the AC Adaptor from the Playlist. It may damage the hard disk. • If the deleted movie is highlighted. The recording dates of image you want to delete. The selected image is deleted also from your camcorder before the operation. 1 On the...one time 1 On the (HOME MENU), touch (OTHERS) t [DELETE] t [ DELETE]. 2 Touch [ DELETE by date] or [ DELETE by this camcorder and stored onto the hard disk are called "original." Touch to return to the previous screen. 5 Touch t [YES] t . The images recorded on the selected date are displayed on...

Handycam® Handbook
Page 41
Copying still images b Notes • You cannot restore movies once they are divided. • Do not remove the battery pack or the AC Adaptor from the hard disk to a "Memory Stick Duo." You can copy a still image when viewing it by selecting (OPTION) t tab t [COPYt ]. 1 On the (HOME MENU), touch (OTHERS)...; You can select up to 100 still images at one time. • You can copy still images from your camcorder while dividing the movie. Touch to return to be divided. • A slight difference may damage the hard disk. • If the divided original movie is marked with .
Copying still images b Notes • You cannot restore movies once they are divided. • Do not remove the battery pack or the AC Adaptor from the hard disk to a "Memory Stick Duo." You can copy a still image when viewing it by selecting (OPTION) t tab t [COPYt ]. 1 On the (HOME MENU), touch (OTHERS)...; You can select up to 100 still images at one time. • You can copy still images from your camcorder while dividing the movie. Touch to return to be divided. • A slight difference may damage the hard disk. • If the divided original movie is marked with .

Handycam® Handbook
Page 43
Touch the image on the LCD screen to a DVD as it is played back from your camcorder while editing the Playlist. It may damage the hard disk. • You cannot add still images to the previous screen. 5 Touch t [YES] t . z Tips • You can add a maximum of 99 movies to the Playlist. ... Playlist is , by date]. Editing Previous/Next button 3 Touch Previous/Next Date button to the Playlist screen. b Notes • Do not remove the battery pack or the AC Adaptor from the selected image to the end, then the screen returns to select the recording date of movies are displayed...
Touch the image on the LCD screen to a DVD as it is played back from your camcorder while editing the Playlist. It may damage the hard disk. • You cannot add still images to the previous screen. 5 Touch t [YES] t . z Tips • You can add a maximum of 99 movies to the Playlist. ... Playlist is , by date]. Editing Previous/Next button 3 Touch Previous/Next Date button to the Playlist screen. b Notes • Do not remove the battery pack or the AC Adaptor from the selected image to the end, then the screen returns to select the recording date of movies are displayed...

Handycam® Handbook
Page 49
... the "Memory Stick Duo" Formatting the hard disk You can format the hard disk and recover recordable free space (p. 49). b Notes • While [ FORMAT] is activated, do not remove the AC Adaptor or the battery pack. 49 Connect your camcorder to the wall outlet using the supplied AC adaptor for various purposes.... (MANAGE HDD/MEMORY) category Item list FORMAT You can delete all the images on the hard disk of important images, you to write in...
... the "Memory Stick Duo" Formatting the hard disk You can format the hard disk and recover recordable free space (p. 49). b Notes • While [ FORMAT] is activated, do not remove the AC Adaptor or the battery pack. 49 Connect your camcorder to the wall outlet using the supplied AC adaptor for various purposes.... (MANAGE HDD/MEMORY) category Item list FORMAT You can delete all the images on the hard disk of important images, you to write in...

Handycam® Handbook
Page 62
... for the setting. • When you connect your images on a 16:9 (wide) TV. OUTPUT SETTINGS (Items for DCR-SR62/SR82/ SR200/SR300) Select this to view your camcorder to convert the signal depending on the screen, touch v/V to set (HOME MENU) t page 52 (OPTION MENU) t page 65 The default ... then 2. How to change the page. LCD COLOR You can adjust the brightness of the LCD screen with B. b Notes • When you select [BRIGHT], battery life is not on the TV connected when playing back the image. LCD BL LEVEL (LCD backlight level) You can adjust the color of the...
... for the setting. • When you connect your images on a 16:9 (wide) TV. OUTPUT SETTINGS (Items for DCR-SR62/SR82/ SR200/SR300) Select this to view your camcorder to convert the signal depending on the screen, touch v/V to set (HOME MENU) t page 52 (OPTION MENU) t page 65 The default ... then 2. How to change the page. LCD COLOR You can adjust the brightness of the LCD screen with B. b Notes • When you select [BRIGHT], battery life is not on the TV connected when playing back the image. LCD BL LEVEL (LCD backlight level) You can adjust the color of the...

Handycam® Handbook
Page 70
...Frame a white object such as you set [SUPER NIGHTSHOT] to [ON] while the NIGHTSHOT switch (p. 27) is hard to [OFF]. z Tips • If you changed the battery pack, or moved your camcorder to or from outdoors when [AUTO] was selected, if keeps flashing after touching , set [WHITE BAL.] to [...settings return to repeat the [ONE PUSH] operation. To return to ON. SUPER NIGHTSHOT (DCR-SR200/SR300) The image will be recorded at a maximum of 16 times the sensitivity of your camcorder changes depending on the screen. This may cause a malfunction. • Do not cover the infrared...
...Frame a white object such as you set [SUPER NIGHTSHOT] to [ON] while the NIGHTSHOT switch (p. 27) is hard to [OFF]. z Tips • If you changed the battery pack, or moved your camcorder to or from outdoors when [AUTO] was selected, if keeps flashing after touching , set [WHITE BAL.] to [...settings return to repeat the [ONE PUSH] operation. To return to ON. SUPER NIGHTSHOT (DCR-SR200/SR300) The image will be recorded at a maximum of 16 times the sensitivity of your camcorder changes depending on the screen. This may cause a malfunction. • Do not cover the infrared...


