Handycam® Handbook
Page 2
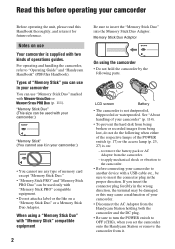
"Memory Stick Duo" (This size can be used only with or (p. 111). See "About handling of your camcorder" (p. 114). • To prevent the hard disk from being lost, do not do the following parts. Types of memory card except "Memory Stick Duo." • "Memory..., or this may cause a malfunction of operations guides. Notes on : - to apply mechanical shock or vibration to the camcorder. • Before connecting your camcorder to "Operating Guide" and "Handycam Handbook" (PDF/this Handbook thoroughly, and retain it in the proper direction. Read this before operating your...
"Memory Stick Duo" (This size can be used only with or (p. 111). See "About handling of your camcorder" (p. 114). • To prevent the hard disk from being lost, do not do the following parts. Types of memory card except "Memory Stick Duo." • "Memory..., or this may cause a malfunction of operations guides. Notes on : - to apply mechanical shock or vibration to the camcorder. • Before connecting your camcorder to "Operating Guide" and "Handycam Handbook" (PDF/this Handbook thoroughly, and retain it in the proper direction. Read this before operating your...
Handycam® Handbook
Page 3
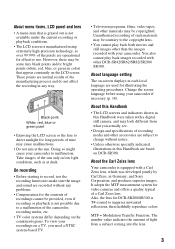
... faithfully reproduce colors. Take images of time may cause malfunctions. • Do not aim at dusk. Also, the lens for DCR-SR200/SR300 is T -coated to direct sunlight for long periods of the sun only in each local language are recorded without notice. • Unless ...available under the current recording or playback conditions. • The LCD screen is manufactured using your camcorder to a malfunction of the manufacturing process and do not affect the recording in Germany, and Sony Corporation, and produces superior images. About menu items, LCD panel and lens • A menu...
... faithfully reproduce colors. Take images of time may cause malfunctions. • Do not aim at dusk. Also, the lens for DCR-SR200/SR300 is T -coated to direct sunlight for long periods of the sun only in each local language are recorded without notice. • Unless ...available under the current recording or playback conditions. • The LCD screen is manufactured using your camcorder to a malfunction of the manufacturing process and do not affect the recording in Germany, and Sony Corporation, and produces superior images. About menu items, LCD panel and lens • A menu...
Handycam® Handbook
Page 4
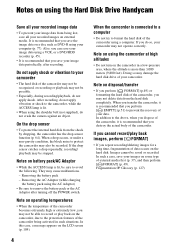
.../HDD recorder (p. 45). • It is more than 3,000 meters (9,800 feet). If you transfer the camcorder, it is lit. • When using the shoulder belt (not supplied), do so, your camcorder may damage the hard disk drive of the camcorder using a computer. Fragmentation 1 Glossary (p. 127) When you do not crash the camera against an object.../deleting images for a long time, fragmentation of data occurs on some type of your data. Doing so may not operate correctly. Notes on using the Hard Disk Drive Handycam Save all your recorded images on external media.
.../HDD recorder (p. 45). • It is more than 3,000 meters (9,800 feet). If you transfer the camcorder, it is lit. • When using the shoulder belt (not supplied), do so, your camcorder may damage the hard disk drive of the camcorder using a computer. Fragmentation 1 Glossary (p. 127) When you do not crash the camera against an object.../deleting images for a long time, fragmentation of data occurs on some type of your data. Doing so may not operate correctly. Notes on using the Hard Disk Drive Handycam Save all your recorded images on external media.
Handycam® Handbook
Page 5
... ratio (16:9 or 4:3) of the recording image ...... 28 Recording the fast action in slowmotion (SMTH SLW REC) (DCRSR200/SR300 29 Playback 31 Using PB zoom 33 Searching for desired images by date (Date Index 33 Playing back a series of still images... HDD/MEMORY) category 49 Formatting the hard disk or the "Memory Stick Duo 49 Checking the hard disk information 50 Preventing data on the hard disk of Contents Read this before operating your camcorder 2 Notes on using the Hard Disk Drive Handycam 4 Subject examples and solutions ..... 7 Enjoying your camcorder Operation flow 8 " HOME" and ...
... ratio (16:9 or 4:3) of the recording image ...... 28 Recording the fast action in slowmotion (SMTH SLW REC) (DCRSR200/SR300 29 Playback 31 Using PB zoom 33 Searching for desired images by date (Date Index 33 Playing back a series of still images... HDD/MEMORY) category 49 Formatting the hard disk or the "Memory Stick Duo 49 Checking the hard disk information 50 Preventing data on the hard disk of Contents Read this before operating your camcorder 2 Notes on using the Hard Disk Drive Handycam 4 Subject examples and solutions ..... 7 Enjoying your camcorder Operation flow 8 " HOME" and ...
Handycam® Handbook
Page 6
Customizing your camcorder What you can do with the (SETTINGS) category of the HOME MENU 52 Using the HOME MENU 52 List of the (SETTINGS) category items 53 ... ......... 88 Creating and copying a DVD ........ 90 Manipulating still images 93 Troubleshooting Troubleshooting 94 Warning indicators and messages 104 Additional Information Using your camcorder abroad .... 108 Files on the camcorder hard disk/ folder structure 110 Maintenance and precautions .... 111 Quick Reference Identifying parts and controls ..... 118 Indicators displayed during recording/playback 123 Glossary 127 Index...
Customizing your camcorder What you can do with the (SETTINGS) category of the HOME MENU 52 Using the HOME MENU 52 List of the (SETTINGS) category items 53 ... ......... 88 Creating and copying a DVD ........ 90 Manipulating still images 93 Troubleshooting Troubleshooting 94 Warning indicators and messages 104 Additional Information Using your camcorder abroad .... 108 Files on the camcorder hard disk/ folder structure 110 Maintenance and precautions .... 111 Quick Reference Identifying parts and controls ..... 118 Indicators displayed during recording/playback 123 Glossary 127 Index...
Handycam® Handbook
Page 8
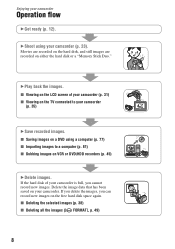
Delete the image data that has been saved on your camcorder is full, you can record new images on the free hard disk space again. If you delete the images, you cannot record new images. If the hard disk of your camcorder (p. 31) x Viewing on the TV connected to a computer (p. 81...) x Dubbing images on a DVD using your camcorder (p. 23). x Deleting the selected images ...
Delete the image data that has been saved on your camcorder is full, you can record new images on the free hard disk space again. If you delete the images, you cannot record new images. If the hard disk of your camcorder (p. 31) x Viewing on the TV connected to a computer (p. 81...) x Dubbing images on a DVD using your camcorder (p. 23). x Deleting the selected images ...
Handycam® Handbook
Page 9
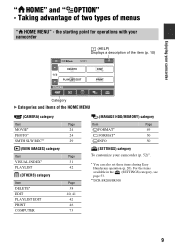
... items available in the (SETTINGS) category, see page 53. **DCR-SR200/SR300 9 " HOME" and " Enjoying your camcorder (p. 52)*. * You can also set these items during Easy Handycam operation (p. 20). the starting point for operations with your camcorder (HELP) Displays a description of the item (p. 10) Enjoying your camcorder Category B Categories and items of menus " HOME MENU" -
... items available in the (SETTINGS) category, see page 53. **DCR-SR200/SR300 9 " HOME" and " Enjoying your camcorder (p. 52)*. * You can also set these items during Easy Handycam operation (p. 20). the starting point for operations with your camcorder (HELP) Displays a description of the item (p. 10) Enjoying your camcorder Category B Categories and items of menus " HOME MENU" -
Handycam® Handbook
Page 11
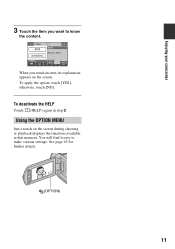
When you want to make various settings. You will find it easy to know the content. See page 65 for further details. (OPTION) 11 Enjoying your camcorder 3 Touch the item you touch an item, its explanation appears on the screen during shooting or playback displays the functions available at that moment. To apply the option, touch [YES], otherwise, touch [NO]. To deactivate the HELP Touch (HELP) again in step 2. Using the OPTION MENU Just a touch on the screen.
When you want to make various settings. You will find it easy to know the content. See page 65 for further details. (OPTION) 11 Enjoying your camcorder 3 Touch the item you touch an item, its explanation appears on the screen during shooting or playback displays the functions available at that moment. To apply the option, touch [YES], otherwise, touch [NO]. To deactivate the HELP Touch (HELP) again in step 2. Using the OPTION MENU Just a touch on the screen.
Handycam® Handbook
Page 12
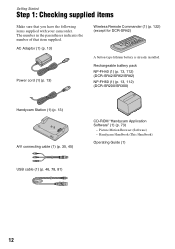
...camcorder. Getting Started Step 1: Checking supplied items Make sure that item supplied. AC Adaptor (1) (p. 13) Power cord (1) (p. 13) Wireless Remote Commander (1) (p. 122) (except for DCR-SR42) A button-type lithium battery is already installed. Rechargeable battery pack NP-FH40 (1) (p. 13, 112) (DCR-SR42/SR62/SR82) NP-FH60 (1) (p. 13, 112) (DCR-SR200/SR300) Handycam... Station (1) (p. 13) A/V connecting cable (1) (p. 35, 45) CD-ROM "Handycam Application Software" (1) (p. 73) - Picture Motion Browser (Software) -
...camcorder. Getting Started Step 1: Checking supplied items Make sure that item supplied. AC Adaptor (1) (p. 13) Power cord (1) (p. 13) Wireless Remote Commander (1) (p. 122) (except for DCR-SR42) A button-type lithium battery is already installed. Rechargeable battery pack NP-FH40 (1) (p. 13, 112) (DCR-SR42/SR62/SR82) NP-FH60 (1) (p. 13, 112) (DCR-SR200/SR300) Handycam... Station (1) (p. 13) A/V connecting cable (1) (p. 35, 45) CD-ROM "Handycam Application Software" (1) (p. 73) - Picture Motion Browser (Software) -

Handycam® Handbook
Page 13
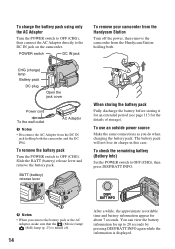
... setting). 4 Connect the power cord to the AC Adaptor and the wall outlet. 5 Set the camcorder onto the Handycam Station securely. The CHG (charge) lamp lights up . 13 The CHG (charge) lamp turns off... when the battery pack is fully charged. • When setting the camcorder onto the Handycam Station, close the DC IN jack cover. 3 Connect the AC Adaptor to the DC IN... jack on the DC plug is facing up and charging starts. Be sure that the v mark on the Handycam Station. Step 2: Charging the battery pack Getting Started 2 1 Battery 5 DC IN jack POWER switch 5...
... setting). 4 Connect the power cord to the AC Adaptor and the wall outlet. 5 Set the camcorder onto the Handycam Station securely. The CHG (charge) lamp lights up . 13 The CHG (charge) lamp turns off... when the battery pack is fully charged. • When setting the camcorder onto the Handycam Station, close the DC IN jack cover. 3 Connect the AC Adaptor to the DC IN... jack on the DC plug is facing up and charging starts. Be sure that the v mark on the Handycam Station. Step 2: Charging the battery pack Getting Started 2 1 Battery 5 DC IN jack POWER switch 5...
Handycam® Handbook
Page 14
...(Still) lamp (p. 23) is displayed. The battery pack will not lose its charge in this case. POWER switch DC IN jack To remove your camcorder from the Handycam Station Turn off . 14 After a while, the approximate recordable time and battery information appear for the details of storage). You can view the battery...do when charging the battery pack. To check the remaining battery (Battery Info) Set the POWER switch to the DC IN jack on the camcorder. To remove the battery pack Turn the POWER switch to 20 seconds by pressing DISP/BATT INFO again while the information is turned off the...
...(Still) lamp (p. 23) is displayed. The battery pack will not lose its charge in this case. POWER switch DC IN jack To remove your camcorder from the Handycam Station Turn off . 14 After a while, the approximate recordable time and battery information appear for the details of storage). You can view the battery...do when charging the battery pack. To check the remaining battery (Battery Info) Set the POWER switch to the DC IN jack on the camcorder. To remove the battery pack Turn the POWER switch to 20 seconds by pressing DISP/BATT INFO again while the information is turned off the...
Handycam® Handbook
Page 16
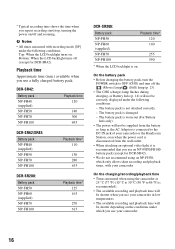
...time* 110 130 280 635 DCR-SR200: Battery pack NP-FH50 NP-FH60 (supplied) NP-FH70 NP-FH100 Playback time* 125 165 270 615 DCR-SR300: Battery pack NP-FH50 NP-FH60 (supplied) NP-FH70 NP-FH100 Playback time* 120 160 255 590 * When the LCD backlight is recommended). •... depending on . b Notes • All times measured with recording mode [SP] under which only allows short recording and playback times, with your camcorder or the Handycam Station, even when the power cord is disconnected from the wall outlet. • When attaching an optional video light, it is recommended that you...
...time* 110 130 280 635 DCR-SR200: Battery pack NP-FH50 NP-FH60 (supplied) NP-FH70 NP-FH100 Playback time* 125 165 270 615 DCR-SR300: Battery pack NP-FH50 NP-FH60 (supplied) NP-FH70 NP-FH100 Playback time* 120 160 255 590 * When the LCD backlight is recommended). •... depending on . b Notes • All times measured with recording mode [SP] under which only allows short recording and playback times, with your camcorder or the Handycam Station, even when the power cord is disconnected from the wall outlet. • When attaching an optional video light, it is recommended that you...

Handycam® Handbook
Page 17
... connected to the wall outlet via the AC Adaptor. Step 3: Turning the power on the LCD screen. This may cause a malfunction. • Even if your camcorder or change the POWER switch position. If you do not set the date and time, the [CLOCK SET] screen appears every time you turn the... appears. 2 Select the desired geographical area with any metallic objects. Getting Started On the AC Adaptor • Use the nearby wall outlet when using this camcorder for the first time. Disconnect the AC Adaptor from the wall outlet immediately if any malfunction occurs while using your...
... connected to the wall outlet via the AC Adaptor. Step 3: Turning the power on the LCD screen. This may cause a malfunction. • Even if your camcorder or change the POWER switch position. If you do not set the date and time, the [CLOCK SET] screen appears every time you turn the... appears. 2 Select the desired geographical area with any metallic objects. Getting Started On the AC Adaptor • Use the nearby wall outlet when using this camcorder for the first time. Disconnect the AC Adaptor from the wall outlet immediately if any malfunction occurs while using your...
Handycam® Handbook
Page 18
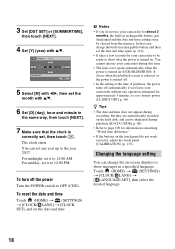
.... z Tips • The date and time does not appear during recording, but they are automatically recorded on the hard disk, and can change the on the touch panel do not use your camcorder during playback ([DATA CODE], p. 60). • Refer to page 109 for information concerning "World time difference." •...and then set the date and time again (p. 116). • It takes a few seconds for your camcorder to be ready to shoot after the power is turned on (DCR-SR200/SR300). Changing the language setting You can be displayed during this time. • The lens cover opens automatically when...
.... z Tips • The date and time does not appear during recording, but they are automatically recorded on the hard disk, and can change the on the touch panel do not use your camcorder during playback ([DATA CODE], p. 60). • Refer to page 109 for information concerning "World time difference." •...and then set the date and time again (p. 116). • It takes a few seconds for your camcorder to be ready to shoot after the power is turned on (DCR-SR200/SR300). Changing the language setting You can be displayed during this time. • The lens cover opens automatically when...

Handycam® Handbook
Page 19
...to make the battery last longer (except for a few seconds until appears. 19 z Tips • If you open the LCD panel 90 degrees to the camcorder, then rotate it to the best angle to the lens side, you press DISP/ BATT INFO. This is convenient during playback operations. • Touch (HOME...max.) DISP/BATT INFO This setting is displayed or hidden (display y no display) each time you can close the lens cover. • For DCR-SR200/SR300, the lens cover opens and closes automatically. b Notes • Do not press the buttons on the LCD backlight, press and hold DISP/BATT INFO for...
...to make the battery last longer (except for a few seconds until appears. 19 z Tips • If you open the LCD panel 90 degrees to the camcorder, then rotate it to the best angle to the lens side, you press DISP/ BATT INFO. This is convenient during playback operations. • Touch (HOME...max.) DISP/BATT INFO This setting is displayed or hidden (display y no display) each time you can close the lens cover. • For DCR-SR200/SR300, the lens cover opens and closes automatically. b Notes • Do not press the buttons on the LCD backlight, press and hold DISP/BATT INFO for...
Handycam® Handbook
Page 21
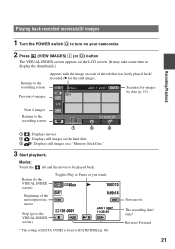
... on your camcorder. 2 Press (VIEW IMAGES) I (or D) button The VISUAL INDEX screen appears on the LCD screen. (It may take some time to display the thumbnails.) Returns to [DATE/TIME] (p. 60). Movies: Touch the tab and the movie to the recording screen 1 :Displays movies. 2 :Displays still images on the hard disk. 3 :Displays still...
... on your camcorder. 2 Press (VIEW IMAGES) I (or D) button The VISUAL INDEX screen appears on the LCD screen. (It may take some time to display the thumbnails.) Returns to [DATE/TIME] (p. 60). Movies: Touch the tab and the movie to the recording screen 1 :Displays movies. 2 :Displays still images on the hard disk. 3 :Displays still...
Handycam® Handbook
Page 23
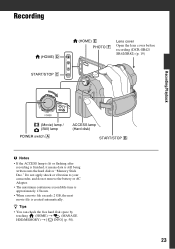
... lamp / (Still) lamp POWER switch A ACCESS lamp (Hard disk) START/STOP B b Notes • If the ACCESS lamp is lit or flashing after recording is finished, it means data is created automatically. Do not apply shock or vibration to your camcorder, and do not remove the battery or AC Adaptor. •...; The maximum continuous recordable time is approximately 13 hours. • When a movie file exceeds 2 GB, the next movie file is still being written onto the hard disk or "Memory Stick Duo." z Tips...
... lamp / (Still) lamp POWER switch A ACCESS lamp (Hard disk) START/STOP B b Notes • If the ACCESS lamp is lit or flashing after recording is finished, it means data is created automatically. Do not apply shock or vibration to your camcorder, and do not remove the battery or AC Adaptor. •...; The maximum continuous recordable time is approximately 13 hours. • When a movie file exceeds 2 GB, the next movie file is still being written onto the hard disk or "Memory Stick Duo." z Tips...
Handycam® Handbook
Page 24
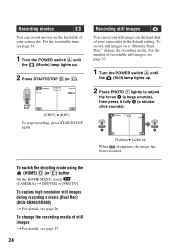
...movies on a "Memory Stick Duo," change the recording media of recordable still images, see page 27. 24 To record still images on the hard disk of your camcorder. For the number of still images t For details, see page 57. 1 Turn the POWER switch A until the (Movie) lamp lights ...up When disappears, the image has been recorded. To capture high resolution still images during recording a movie (Dual Rec) (DCR-SR200/SR300) t For details, see ...
...movies on a "Memory Stick Duo," change the recording media of recordable still images, see page 27. 24 To record still images on the hard disk of your camcorder. For the number of still images t For details, see page 57. 1 Turn the POWER switch A until the (Movie) lamp lights ...up When disappears, the image has been recorded. To capture high resolution still images during recording a movie (Dual Rec) (DCR-SR200/SR300) t For details, see ...
Handycam® Handbook
Page 25
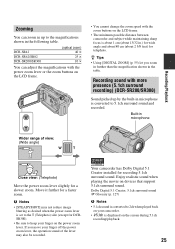
...buttons on the LCD frame. • You cannot change the zoom speed with more presence (5.1ch surround recording) (DCR-SR200/SR300) Sound picked up to the magnifications shown in microphone Wider range of the lever may not reduce image blurring as desired when ...up by the built-in microphone is about 1 cm (about 2 5/8 feet) for a slower zoom. b Notes • [STEADYSHOT] may also be recorded. Your camcorder has Dolby Digital 5.1 Creator installed for a faster zoom. Dolby Digital 5.1 Creator, 5.1ch surround sound 1 Glossary (p. 127) b Notes • 5.1ch sound is...
...buttons on the LCD frame. • You cannot change the zoom speed with more presence (5.1ch surround recording) (DCR-SR200/SR300) Sound picked up to the magnifications shown in microphone Wider range of the lever may not reduce image blurring as desired when ...up by the built-in microphone is about 1 cm (about 2 5/8 feet) for a slower zoom. b Notes • [STEADYSHOT] may also be recorded. Your camcorder has Dolby Digital 5.1 Creator installed for a faster zoom. Dolby Digital 5.1 Creator, 5.1ch surround sound 1 Glossary (p. 127) b Notes • 5.1ch sound is...
Handycam® Handbook
Page 26
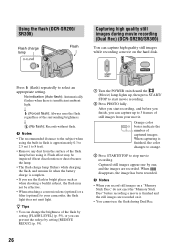
... the images are recorded on the hard disk. Press (flash) repeatedly to 8 feet). • Remove any dust from the surface of still images from your camcorder, the flash light does not emit light. When capturing is approximately 0.3 to 2.5 m (1 to select an appropriate setting. Using the flash (DCR-SR200/ SR300) Flash charge lamp Flash Capturing...
... the images are recorded on the hard disk. Press (flash) repeatedly to 8 feet). • Remove any dust from the surface of still images from your camcorder, the flash light does not emit light. When capturing is approximately 0.3 to 2.5 m (1 to select an appropriate setting. Using the flash (DCR-SR200/ SR300) Flash charge lamp Flash Capturing...


