
Operating Instructions
Page 2
..., do not expose this apparatus to provide reasonable protection against harmful interference in a residential installation. Precautions • The nameplate is no guarantee that the AC power cord can be unplugged from that any interference received, including interference that may cause undesired operation of the device.
..., do not expose this apparatus to provide reasonable protection against harmful interference in a residential installation. Precautions • The nameplate is no guarantee that the AC power cord can be unplugged from that any interference received, including interference that may cause undesired operation of the device.
Operating Instructions
Page 3
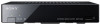
... upon your ears and the speakers may generate heat and cause a malfunction. • Do not drop or apply shock. Refer to use the AC power cord if it may block the ventilation holes. • Do not install this product. Precautions On placement • Place the player in a location ... excessive dust, or mechanical shock. • Do not place the player outdoors, in vehicles, on ships, or on the player, or do , your Sony dealer regarding this player in a confined space, such as doing so may cause a malfunction of the unit. If you call 1-866-9097669. FCC Radiation Exposure...
... upon your ears and the speakers may generate heat and cause a malfunction. • Do not drop or apply shock. Refer to use the AC power cord if it may block the ventilation holes. • Do not install this product. Precautions On placement • Place the player in a location ... excessive dust, or mechanical shock. • Do not place the player outdoors, in vehicles, on ships, or on the player, or do , your Sony dealer regarding this player in a confined space, such as doing so may cause a malfunction of the unit. If you call 1-866-9097669. FCC Radiation Exposure...
Operating Instructions
Page 4
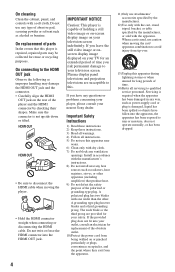
...IMPORTANT NOTICE Caution: This player is damaged, liquid has been spilled or objects have any type of the obsolete outlet. 10)Protect the power cord from being walked on or pinched particularly at plugs, convenience receptacles, and the point where they exit from tip-over. 13)Unplug ...the connector. • Carefully align the HDMI OUT jack on your nearest Sony dealer. Plasma display panel televisions and projection televisions are provided for replacement of abrasive pad, scouring powder or solvent such as power-supply cord or plug is capable of time you have fallen into the ...
...IMPORTANT NOTICE Caution: This player is damaged, liquid has been spilled or objects have any type of the obsolete outlet. 10)Protect the power cord from being walked on or pinched particularly at plugs, convenience receptacles, and the point where they exit from tip-over. 13)Unplug ...the connector. • Carefully align the HDMI OUT jack on your nearest Sony dealer. Plasma display panel televisions and projection televisions are provided for replacement of abrasive pad, scouring powder or solvent such as power-supply cord or plug is capable of time you have fallen into the ...
Operating Instructions
Page 6
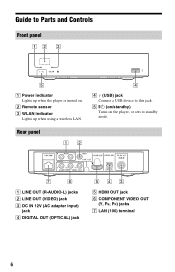
D (USB) jack Connect a USB device to standby mode. Rear panel A LINE OUT (R-AUDIO-L) jacks B LINE OUT (VIDEO) jack C DC IN 12V (AC adapter input) jack D DIGITAL OUT (OPTICAL) jack E HDMI OUT jack F COMPONENT VIDEO OUT (Y, PB, PR) jacks G LAN (100) terminal 6 Guide to Parts and Controls Front panel A Power indicator Lights up when using a wireless LAN. E [/1 (on/standby) Turns on . B Remote sensor C WLAN indicator Lights up when the player is turned on the player, or sets to this jack.
D (USB) jack Connect a USB device to standby mode. Rear panel A LINE OUT (R-AUDIO-L) jacks B LINE OUT (VIDEO) jack C DC IN 12V (AC adapter input) jack D DIGITAL OUT (OPTICAL) jack E HDMI OUT jack F COMPONENT VIDEO OUT (Y, PB, PR) jacks G LAN (100) terminal 6 Guide to Parts and Controls Front panel A Power indicator Lights up when using a wireless LAN. E [/1 (on/standby) Turns on . B Remote sensor C WLAN indicator Lights up when the player is turned on the player, or sets to this jack.
Operating Instructions
Page 9
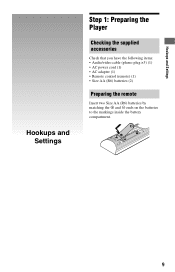
Hookups and Settings Hookups and Settings Step 1: Preparing the Player Checking the supplied accessories Check that you have the following items: • Audio/video cable (phono plug ×3) (1) • AC power cord (1) • AC adapter (1) • Remote control (remote) (1) • Size AA (R6) batteries (2) Preparing the remote Insert two Size AA (R6) batteries by matching the 3 and # ends on the batteries to the markings inside the battery compartment. 9
Hookups and Settings Hookups and Settings Step 1: Preparing the Player Checking the supplied accessories Check that you have the following items: • Audio/video cable (phono plug ×3) (1) • AC power cord (1) • AC adapter (1) • Remote control (remote) (1) • Size AA (R6) batteries (2) Preparing the remote Insert two Size AA (R6) batteries by matching the 3 and # ends on the batteries to the markings inside the battery compartment. 9
Operating Instructions
Page 10
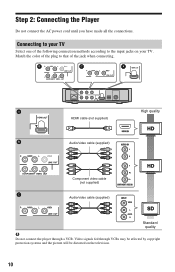
Step 2: Connecting the Player Do not connect the AC power cord until you have made all the connections. Video signals fed through a VCR. HDMI cable (not supplied) Audio/video cable (supplied) High quality Component video ...
Step 2: Connecting the Player Do not connect the AC power cord until you have made all the connections. Video signals fed through a VCR. HDMI cable (not supplied) Audio/video cable (supplied) High quality Component video ...
Operating Instructions
Page 12
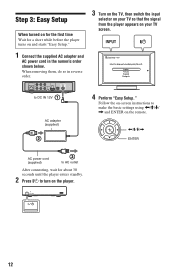
Follow the on your TV screen. When removing them, do so in the numeric order shown below. to make the basic settings using Step 3: Easy Setup When turned on for the first time Wait for a short while before the player turns on and starts "Easy Setup." 1 Connect the supplied AC adapter and AC power cord in reverse order. 3 Turn on the TV, then switch the input selector on your TV so that the signal from the player appears on -screen instructions to DC IN 12V AC adapter (supplied) 4 Perform "Easy Setup."
Follow the on your TV screen. When removing them, do so in the numeric order shown below. to make the basic settings using Step 3: Easy Setup When turned on for the first time Wait for a short while before the player turns on and starts "Easy Setup." 1 Connect the supplied AC adapter and AC power cord in reverse order. 3 Turn on the TV, then switch the input selector on your TV so that the signal from the player appears on -screen instructions to DC IN 12V AC adapter (supplied) 4 Perform "Easy Setup."
Operating Instructions
Page 23
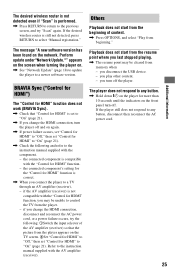
Should any of the connected TV (if you experience any problem persist, consult your nearest Sony dealer. Power The power does not turn on. , Check that does not support copyright protection technology. , For HDMI connections, check the "Output Video Format" settings in the "...the language setting of the following difficulties while using the player, use this troubleshooting guide to a DVI device that the AC adapter and AC power cord are connected securely. Picture There is no picture or the picture is not output correctly. , Check that all the connecting cables are securely...
Should any of the connected TV (if you experience any problem persist, consult your nearest Sony dealer. Power The power does not turn on. , Check that does not support copyright protection technology. , For HDMI connections, check the "Output Video Format" settings in the "...the language setting of the following difficulties while using the player, use this troubleshooting guide to a DVI device that the AC adapter and AC power cord are connected securely. Picture There is no picture or the picture is not output correctly. , Check that all the connecting cables are securely...
Operating Instructions
Page 25
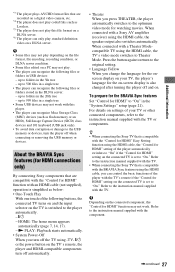
if the AV amplifier (receiver) is set to "On" (page 21). , If you change the HDMI connection, disconnect and reconnect the AC power cord, or a power failure occurs, try "Scan" again. Others Playback does not start from beginning." you disconnect the USB device. - Perform update under "Network Update.""...(page 18) to update the player to any button. , Hold down [/1 on the player for more than 10 seconds until the indicators on again. , If power failure occurs, set "Control for HDMI" to "Off," then set "Control for HDMI" to "On" (page 21). , Check the following : 1Switch the ...
if the AV amplifier (receiver) is set to "On" (page 21). , If you change the HDMI connection, disconnect and reconnect the AC power cord, or a power failure occurs, try "Scan" again. Others Playback does not start from beginning." you disconnect the USB device. - Perform update under "Network Update.""...(page 18) to update the player to any button. , Hold down [/1 on the player for more than 10 seconds until the indicators on again. , If power failure occurs, set "Control for HDMI" to "Off," then set "Control for HDMI" to "On" (page 21). , Check the following : 1Switch the ...

Operating Instructions
Page 26
... V DC Wireless Wireless LAN standard: IEEE802.11b/g/n Frequency range: 2.4 GHz band: Channels 1-11 Modulation: DS-SS Modem and OFDM Modem General Power requirements: AC adapter: 110 - 240 V AC, 50/60 Hz Power consumption (approx.): 14 W Dimensions (approx.): 185 mm × 193 mm × 40 mm (17 3/8 in. × 7 5/8 in. × 1 5/8 in.) (width...
... V DC Wireless Wireless LAN standard: IEEE802.11b/g/n Frequency range: 2.4 GHz band: Channels 1-11 Modulation: DS-SS Modem and OFDM Modem General Power requirements: AC adapter: 110 - 240 V AC, 50/60 Hz Power consumption (approx.): 14 W Dimensions (approx.): 185 mm × 193 mm × 40 mm (17 3/8 in. × 7 5/8 in. × 1 5/8 in.) (width...
Operating Instructions
Page 27
...to the USB memory or devices, turn off automatically. • Theater When you turn off the TV using -TV- [/1 or the power button on the TV's remote, the player and HDMI-compatible components turn the player off and on -screen display is switched to the ... home menu appears automatically (page 7, 14, 17). - N PLAY: Playback starts automatically. • System Power-Off When you press THEATER, the player automatically switches to the instruction manual supplied with a Sony AV amplifier (receiver) using the HDMI cable, the "Control for HDMI" setting of the player automatically switches...
...to the USB memory or devices, turn off automatically. • Theater When you turn off the TV using -TV- [/1 or the power button on the TV's remote, the player and HDMI-compatible components turn the player off and on -screen display is switched to the ... home menu appears automatically (page 7, 14, 17). - N PLAY: Playback starts automatically. • System Power-Off When you press THEATER, the player automatically switches to the instruction manual supplied with a Sony AV amplifier (receiver) using the HDMI cable, the "Control for HDMI" setting of the player automatically switches...
Operating Instructions
Page 30
... Settings" 20 Playable files 26 R Remote 7, 9 "Resetting" 22 Resetting the player 22 Resume 8, 25 S "Screen Settings" 18 "Setup" 17 Software update 18, 21 SUBTITLE 7 System Power-Off 27 "System Settings" 21 T THEATER 8, 27 Troubleshooting 23 "TV Type" 18 U Update 18 USB 15 W WEP 28 WIDE 7 WPA2-PSK (AES) 28 WPA2-PSK...
... Settings" 20 Playable files 26 R Remote 7, 9 "Resetting" 22 Resetting the player 22 Resume 8, 25 S "Screen Settings" 18 "Setup" 17 Software update 18, 21 SUBTITLE 7 System Power-Off 27 "System Settings" 21 T THEATER 8, 27 Troubleshooting 23 "TV Type" 18 U Update 18 USB 15 W WEP 28 WIDE 7 WPA2-PSK (AES) 28 WPA2-PSK...


