Warranty Card
Page 1
... workmanship as fuses or batteries). Please contact Sony at 1-800-VHS-SONY for product information or operation, call : 1-800-488-SONY (7669) Printed in either its original packaging or packaging offering an equal degree of sale or receipted invoice which vary from the Product. This warranty does not cover customer instruction, installation, set up adjustments or signal reception problems. This warranty does not...
... workmanship as fuses or batteries). Please contact Sony at 1-800-VHS-SONY for product information or operation, call : 1-800-488-SONY (7669) Printed in either its original packaging or packaging offering an equal degree of sale or receipted invoice which vary from the Product. This warranty does not cover customer instruction, installation, set up adjustments or signal reception problems. This warranty does not...
Operating Instructions
Page 1
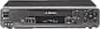
3-868-116-12 (1) Video Cassette Recorder Operating Instructions Owner's record The model and serial numbers are located at the rear of Conformity Trade Name: SONY Model No.: SLV-N80/N70 Responsible Party: Sony Electronics Inc. SLV-N80 SLV-N70 © 2000 Sony Corporation Model No Serial No Declaration of the unit. Operation is subject to them whenever you call upon your Sony dealer regarding this device must accept any interference received, including interference...
3-868-116-12 (1) Video Cassette Recorder Operating Instructions Owner's record The model and serial numbers are located at the rear of Conformity Trade Name: SONY Model No.: SLV-N80/N70 Responsible Party: Sony Electronics Inc. SLV-N80 SLV-N70 © 2000 Sony Corporation Model No Serial No Declaration of the unit. Operation is subject to them whenever you call upon your Sony dealer regarding this device must accept any interference received, including interference...
Operating Instructions
Page 2
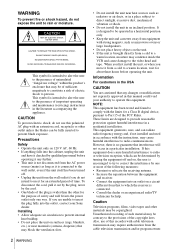
... harmful interference to radio or television reception, which the receiver is brought directly from the cable television transmission and/or program owner. 2 WARNING These limits are cautioned that may be of sufficient magnitude to the video head and tape. WARNING To prevent fire or shock hazard, do not use this polarized AC plug with an extension cord, receptacle or other materials...
... harmful interference to radio or television reception, which the receiver is brought directly from the cable television transmission and/or program owner. 2 WARNING These limits are cautioned that may be of sufficient magnitude to the video head and tape. WARNING To prevent fire or shock hazard, do not use this polarized AC plug with an extension cord, receptacle or other materials...
Operating Instructions
Page 3
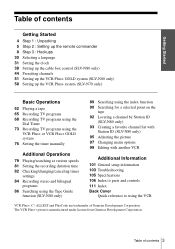
... remote commander 8 Step 3 : Hookups 30 Selecting a language 31 Setting the clock 38 Setting up the cable box control (SLV-N80 only) 44 Presetting channels 51 Setting up the VCR Plus+ GOLD system (SLV-N80 only) 58 Setting up the VCR Plus+ system (SLV-N70 only) Basic Operations 62 Playing a tape 65 Recording TV programs 68 Recording TV programs using the Dial Timer 73 Recording TV programs using the VCR Plus+ or VCR Plus+ GOLD system 76 Setting the timer manually Additional Operations 79 Playing/searching at various speeds 81 Setting the recording duration time...
... remote commander 8 Step 3 : Hookups 30 Selecting a language 31 Setting the clock 38 Setting up the cable box control (SLV-N80 only) 44 Presetting channels 51 Setting up the VCR Plus+ GOLD system (SLV-N80 only) 58 Setting up the VCR Plus+ system (SLV-N70 only) Basic Operations 62 Playing a tape 65 Recording TV programs 68 Recording TV programs using the Dial Timer 73 Recording TV programs using the VCR Plus+ or VCR Plus+ GOLD system 76 Setting the timer manually Additional Operations 79 Playing/searching at various speeds 81 Setting the recording duration time...
Operating Instructions
Page 8
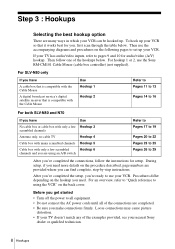
... through the table below . Loose connections may cause picture distortion. • If your TV doesn't match any of the examples provided, see your TV has audio/video inputs, refer to pages 9 and 10 for setup. Then follow the instructions for audio/video (A/V) hookup. After you've completed the setup, you're ready to use the Sony RM-CM101 Cable Mouse (cable box controller) (not supplied). For an...
... through the table below . Loose connections may cause picture distortion. • If your TV doesn't match any of the examples provided, see your TV has audio/video inputs, refer to pages 9 and 10 for setup. Then follow the instructions for audio/video (A/V) hookup. After you've completed the setup, you're ready to use the Sony RM-CM101 Cable Mouse (cable box controller) (not supplied). For an...
Operating Instructions
Page 9
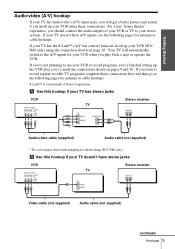
... VCR to record programs, you're finished setting up the VCR after you've made the connections shown on page 10. If you're not planning to use your stereo system. For a true "home theater" experience, you should connect the audio outputs of Sony Corporation. Your TV will get a better picture and sound if you hook up your VCR when you play back a tape or operate the VCR. Getting Started Audio/video (A/V) hookup...
... VCR to record programs, you're finished setting up the VCR after you've made the connections shown on page 10. If you're not planning to use your stereo system. For a true "home theater" experience, you should connect the audio outputs of Sony Corporation. Your TV will get a better picture and sound if you hook up your VCR when you play back a tape or operate the VCR. Getting Started Audio/video (A/V) hookup...
Operating Instructions
Page 16
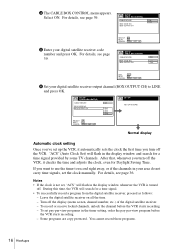
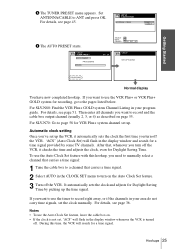
... -view program before the VCR starts recording. - To record or receive locked channels, unlock the channel before the VCR starts recording. - Some programs are copy protected. 4 The CABLE BOX CONTROL menu appears. BOX OUTPUT CH ON CH2 CH3 CH4 LINE SET UP SET UP IS DONE SELECT : NEXT : OK CANCEL : EASY SET UP Normal display Automatic clock setting Once you turn off the display (menu screen, channel number, etc.) of the digital satellite receiver. - After that, whenever you 've set the clock manually. SET UP CABLE BOX CONTROL CABLE MOUSE BOX CODE...
... -view program before the VCR starts recording. - To record or receive locked channels, unlock the channel before the VCR starts recording. - Some programs are copy protected. 4 The CABLE BOX CONTROL menu appears. BOX OUTPUT CH ON CH2 CH3 CH4 LINE SET UP SET UP IS DONE SELECT : NEXT : OK CANCEL : EASY SET UP Normal display Automatic clock setting Once you turn off the display (menu screen, channel number, etc.) of the digital satellite receiver. - After that, whenever you 've set the clock manually. SET UP CABLE BOX CONTROL CABLE MOUSE BOX CODE...
Operating Instructions
Page 25
... menu appears. For SLV-N80: Find the VCR Plus+ GOLD system Channel Listing in the display window whenever the VCR is turned off the VCR. After that, whenever you turn off the VCR, it automatically sets the clock the first time you need to manually select a channel that carries a time signal: 1 Tune the cable box to a channel that carries a time signal. 2 Select AUTO in your program guide. For details, see page 51. Notes • To use the Auto Clock Set feature...
... menu appears. For SLV-N80: Find the VCR Plus+ GOLD system Channel Listing in the display window whenever the VCR is turned off the VCR. After that, whenever you turn off the VCR, it automatically sets the clock the first time you need to manually select a channel that carries a time signal: 1 Tune the cable box to a channel that carries a time signal. 2 Select AUTO in your program guide. For details, see page 51. Notes • To use the Auto Clock Set feature...

Operating Instructions
Page 38
... brands of cable boxes or digital satellite receivers at the time this VCR was manufactured. You can also use cable box control, you are using the EASY SET UP procedure, skip steps 1 and 2. SETTINGS When using Hookup 3, 4, 5, or 6.) Your VCR includes a cable box control feature that new cable boxes may be controlled with this VCR, contact your cable operator -- TUNER PRESET SET VCR Plus+ CHANNELS CABLE BOX CONTROL CLOCK SET LANGUAGE RETURN PLAY OK SELECT : SET : OK QUIT : MENU 38 Setting up the cable box control (SLV-N80 only) (Skip this section if you need...
... brands of cable boxes or digital satellite receivers at the time this VCR was manufactured. You can also use cable box control, you are using the EASY SET UP procedure, skip steps 1 and 2. SETTINGS When using Hookup 3, 4, 5, or 6.) Your VCR includes a cable box control feature that new cable boxes may be controlled with this VCR, contact your cable operator -- TUNER PRESET SET VCR Plus+ CHANNELS CABLE BOX CONTROL CLOCK SET LANGUAGE RETURN PLAY OK SELECT : SET : OK QUIT : MENU 38 Setting up the cable box control (SLV-N80 only) (Skip this section if you need...

Operating Instructions
Page 71
... ADVANCED OPTIONS menu (page 97). • To check, change the tape speed, press SP/EP before you complete the setting in step 9. • When you are recording a program in the SP mode and the remaining tape becomes shorter than the recording time, the tape speed is recorded in the display window. 5 Turn and press DIAL TIMER to set AUTO TAPE SPEED to keep the tape speed, set the day and then the year. Basic Operations To lock the VCR after setting...
... ADVANCED OPTIONS menu (page 97). • To check, change the tape speed, press SP/EP before you complete the setting in step 9. • When you are recording a program in the SP mode and the remaining tape becomes shorter than the recording time, the tape speed is recorded in the display window. 5 Turn and press DIAL TIMER to set AUTO TAPE SPEED to keep the tape speed, set the day and then the year. Basic Operations To lock the VCR after setting...
Operating Instructions
Page 72
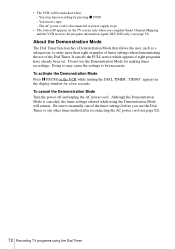
... manually cancel the timer settings before you complete Smart Channel Mapping and the VCR receives the program information signal (SLV-N80 only) (see page 82). 72 Recording TV programs using the Demonstration Mode will be inaccurate. Although the Demonstration Mode is disconnected or power supply stops. • The station ID appears on the VCR while turning the DIAL TIMER. • The VCR will remain. The AC power cord is...
... manually cancel the timer settings before you complete Smart Channel Mapping and the VCR receives the program information signal (SLV-N80 only) (see page 82). 72 Recording TV programs using the Demonstration Mode will be inaccurate. Although the Demonstration Mode is disconnected or power supply stops. • The station ID appears on the VCR while turning the DIAL TIMER. • The VCR will remain. The AC power cord is...

Operating Instructions
Page 73
... : VCR Plus+ continued Recording TV programs using a cable box, turn it to eight programs together with its safety tab in the TV program guide. The date, time and channel number of that the VCR clock is longer than the total recording time. 123 456 789 0 ?/1 SP/EP CLEAR VCR Plus+ Number buttons ENTER Basic Operations ?/1 POWER M/m x STOP 1 VCR Plus+ Press VCR Plus+. Make sure the tape is set to the correct time. • Turn on . • Insert a tape with the DIAL TIMER and manual timer settings at one time. VCR Plus+ PlusCode...
... : VCR Plus+ continued Recording TV programs using a cable box, turn it to eight programs together with its safety tab in the TV program guide. The date, time and channel number of that the VCR clock is longer than the total recording time. 123 456 789 0 ?/1 SP/EP CLEAR VCR Plus+ Number buttons ENTER Basic Operations ?/1 POWER M/m x STOP 1 VCR Plus+ Press VCR Plus+. Make sure the tape is set to the correct time. • Turn on . • Insert a tape with the DIAL TIMER and manual timer settings at one time. VCR Plus+ PlusCode...

Operating Instructions
Page 74
... the display window and the VCR stands by for SLV-N80 only), and tape speed appear on . SP / EP SP USE : ONCE DAILY WEEKLY CONFIRM : E N T E R CANCEL : C L E A R QUIT : VCR Plus+ 4 Press M/m to Friday DAILY Once a week WEEKLY SET TIMER : P O W E R CANCEL : CLEAR CLEAR The date, start and stop the VCR while recording, press x STOP. 74 Recording TV programs using a cable box, leave it on the TV screen. When using the VCR Plus+ or VCR Plus+ GOLD...
... the display window and the VCR stands by for SLV-N80 only), and tape speed appear on . SP / EP SP USE : ONCE DAILY WEEKLY CONFIRM : E N T E R CANCEL : C L E A R QUIT : VCR Plus+ 4 Press M/m to Friday DAILY Once a week WEEKLY SET TIMER : P O W E R CANCEL : CLEAR CLEAR The date, start and stop the VCR while recording, press x STOP. 74 Recording TV programs using a cable box, leave it on the TV screen. When using the VCR Plus+ or VCR Plus+ GOLD...

Operating Instructions
Page 75
... tape speed is turned on, hold down ?/1 POWER on . To lock the VCR after using the VCR Plus+ or VCR Plus+ GOLD system 75 If you complete Smart Channel Mapping and the VCR receives the program information signal (SLV-N80 only) (see "Checking/changing/canceling timer settings" (page 82). • When you are recording a program in the ADVANCED OPTIONS menu (page 97). Remember to press ?/1 to reset the VCR to the timer recording standby mode after setting the timer...
... tape speed is turned on, hold down ?/1 POWER on . To lock the VCR after using the VCR Plus+ or VCR Plus+ GOLD system 75 If you complete Smart Channel Mapping and the VCR receives the program information signal (SLV-N80 only) (see "Checking/changing/canceling timer settings" (page 82). • When you are recording a program in the ADVANCED OPTIONS menu (page 97). Remember to press ?/1 to reset the VCR to the timer recording standby mode after setting the timer...

Operating Instructions
Page 97
To adjust the sharpness, press ADVANCED OPTIONS AUTO ANT SELECT AUTO STEREO TUNER AUDIO APC TAPE SELECT AUTO TAPE SPEED FAVORITE CH SHARPNESS RETURN SELECT : SET : OK QUIT : MENU 2 Press M/m to highlight the option to change, then press OK. 3 Press M/m to change the setting, then press OK. Additional Operations Changing menu options 1 Press MENU, then select ADVANCED OPTIONS and press OK.
To adjust the sharpness, press ADVANCED OPTIONS AUTO ANT SELECT AUTO STEREO TUNER AUDIO APC TAPE SELECT AUTO TAPE SPEED FAVORITE CH SHARPNESS RETURN SELECT : SET : OK QUIT : MENU 2 Press M/m to highlight the option to change, then press OK. 3 Press M/m to change the setting, then press OK. Additional Operations Changing menu options 1 Press MENU, then select ADVANCED OPTIONS and press OK.

Operating Instructions
Page 103
.... • Adjust the tracking with the INPUT SELECT or CH +/- Nothing happens when you are using the Sony T-25CLD, T-25CLDR, or T-25CLW video head cleaning cassette. The picture is ejected when you made A/V connections, check the audio cable connection. Select a channel number when recording TV programs; Reset the clock (and timer). The power is • The safety tab has been removed. If these cleaning cassettes are dirty (see the last page of "Troubleshooting"). The tape starts playing as soon...
.... • Adjust the tracking with the INPUT SELECT or CH +/- Nothing happens when you are using the Sony T-25CLD, T-25CLDR, or T-25CLW video head cleaning cassette. The picture is ejected when you made A/V connections, check the audio cable connection. Select a channel number when recording TV programs; Reset the clock (and timer). The power is • The safety tab has been removed. If these cleaning cassettes are dirty (see the last page of "Troubleshooting"). The tape starts playing as soon...

Operating Instructions
Page 104
... tracking cannot be cleaned. The code number may change when you are not using S-Link™, make sure the CABLE BOX CONTROL option is set to ON. • Turn the power off and unplug the AC power cord. • Check that a tape isn't already in the tape compartment. • Make sure you are weak. • Make sure the [TV] / [VIDEO] switch is set to be adjusted. • Set your timer settings are past the current time...
... tracking cannot be cleaned. The code number may change when you are not using S-Link™, make sure the CABLE BOX CONTROL option is set to ON. • Turn the power off and unplug the AC power cord. • Check that a tape isn't already in the tape compartment. • Make sure you are weak. • Make sure the [TV] / [VIDEO] switch is set to be adjusted. • Set your timer settings are past the current time...
Operating Instructions
Page 105
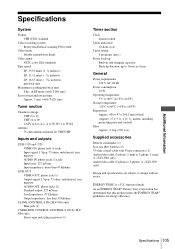
... negative AUDIO OUT, phono jacks (2) Standard output: 327 mVrms Load impedance: 47 kilohms Output impedance: less than 10 kilohms S-LINK (CONTROL S IN) (SLV-N80 only) Mini jack (1) CABLE BOX CONTROL (CONTROL S OUT) (SLVN80 only) Stereo mini jack (plug in power) (1) Timer section Clock Quartz locked Timer indication 12-hour cycle Timer setting 8 programs (max.) Power back-up Built-in EP mode (with T-160 tape) Fast-forward and rewind time Approx. 3 min. (with T-120 tape) Tuner section Channel...
... negative AUDIO OUT, phono jacks (2) Standard output: 327 mVrms Load impedance: 47 kilohms Output impedance: less than 10 kilohms S-LINK (CONTROL S IN) (SLV-N80 only) Mini jack (1) CABLE BOX CONTROL (CONTROL S OUT) (SLVN80 only) Stereo mini jack (plug in power) (1) Timer section Clock Quartz locked Timer indication 12-hour cycle Timer setting 8 programs (max.) Power back-up Built-in EP mode (with T-160 tape) Fast-forward and rewind time Approx. 3 min. (with T-120 tape) Tuner section Channel...

Operating Instructions
Page 111
... hookup 20 APC (Adaptive Picture Control) 96 Audio track 85 Audio/video (A/V) hookup 9 Auto Clock Set 31 Auto Tape Speed 97 C Cable box control cable box code number chart 40 setting 38 Cable hookup 8 Cable Mouse 11, 14 Channel line-up 51 recording 73 Index 111 see Adjusting Tuner presetting 44 V VCR Plus+ channel set up 58 recording 73 VCR Plus+ GOLD channel set up chart 51, 58 Child Lock 71 Cleaning the video heads 103 Clock setting 31 Connecting cable TV 11 external antenna connector 102 UHF/VHF band mixer 102 Counter 63 D Demonstration Mode 72 Dial Timer 68 Digital...
... hookup 20 APC (Adaptive Picture Control) 96 Audio track 85 Audio/video (A/V) hookup 9 Auto Clock Set 31 Auto Tape Speed 97 C Cable box control cable box code number chart 40 setting 38 Cable hookup 8 Cable Mouse 11, 14 Channel line-up 51 recording 73 Index 111 see Adjusting Tuner presetting 44 V VCR Plus+ channel set up 58 recording 73 VCR Plus+ GOLD channel set up chart 51, 58 Child Lock 71 Cleaning the video heads 103 Clock setting 31 Connecting cable TV 11 external antenna connector 102 UHF/VHF band mixer 102 Counter 63 D Demonstration Mode 72 Dial Timer 68 Digital...
Operating Instructions
Page 112
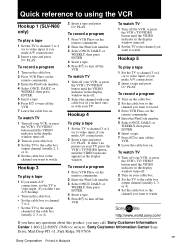
... H PLAY. Quick reference to using the VCR Hookup 1 (SLV-N80 only) To play a tape 1 Set the TV to channel 3 or 4 (or to watch. Hookup 3 To play a tape 1 Set the TV to channel 3 or 4 (or to video input. Hookup 4 To play a tape 1 If you made A/V connections). 2 Insert a tape and press H PLAY. To watch TV 1 Turn off . 2 Select the channel with your VCR, or press the VCR's TV/VIDEO button until the VIDEO indicator in the display window. To record a program 1 Turn on the cable box. 2 Press VCR Plus...
... H PLAY. Quick reference to using the VCR Hookup 1 (SLV-N80 only) To play a tape 1 Set the TV to channel 3 or 4 (or to watch. Hookup 3 To play a tape 1 Set the TV to channel 3 or 4 (or to video input. Hookup 4 To play a tape 1 If you made A/V connections). 2 Insert a tape and press H PLAY. To watch TV 1 Turn off . 2 Select the channel with your VCR, or press the VCR's TV/VIDEO button until the VIDEO indicator in the display window. To record a program 1 Turn on the cable box. 2 Press VCR Plus...

