Operating Instructions
Page 1
Myers, FL 33913 SLV-D281P © 2007 Sony Corporation Or write to: Sony Customer Information Center 12451 Gateway Boulevard Ft. For all other Sony product questions, please call Sony Customer Information Center at 1-800-222-SONY (7669). 3-093-965-11 (1) DVD Player/ Video Cassette Recorder Operating Instructions US Manual de instrucciones ES For customers in the USA If you have any questions about your Sony DVD-VCR, you may call Sony Customer Information Center at 1-800-VHS-SONY (847-7669).
Myers, FL 33913 SLV-D281P © 2007 Sony Corporation Or write to: Sony Customer Information Center 12451 Gateway Boulevard Ft. For all other Sony product questions, please call Sony Customer Information Center at 1-800-222-SONY (7669). 3-093-965-11 (1) DVD Player/ Video Cassette Recorder Operating Instructions US Manual de instrucciones ES For customers in the USA If you have any questions about your Sony DVD-VCR, you may call Sony Customer Information Center at 1-800-VHS-SONY (847-7669).
Operating Instructions
Page 2
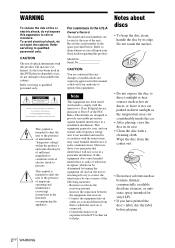
...eyes, do not attempt to provide reasonable protection against harmful interference in the U.S.A Owner's Record The model and serial numbers are designed to disassemble the cabinet. For customers in a ...presence of important operating and maintenance (servicing) instructions in this manual could void your Sony dealer regarding this apparatus to radio communications. These limits are located at the rear ...technician for vinyl LPs. • If you call upon your authority to operate this DVD player is intended to alert the user to them whenever you have printed the disc's label...
...eyes, do not attempt to provide reasonable protection against harmful interference in the U.S.A Owner's Record The model and serial numbers are designed to disassemble the cabinet. For customers in a ...presence of important operating and maintenance (servicing) instructions in this manual could void your Sony dealer regarding this apparatus to radio communications. These limits are located at the rear ...technician for vinyl LPs. • If you call upon your authority to operate this DVD player is intended to alert the user to them whenever you have printed the disc's label...
Operating Instructions
Page 5
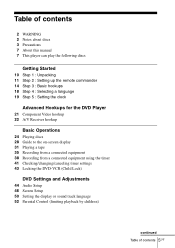
... Step 4 : Selecting a language 19 Step 5 : Setting the clock Advanced Hookups for the DVD Player 21 Component Video hookup 22 A/V Receiver hookup Basic Operations 24 Playing discs 28 Guide to the on-screen display 31 Playing a tape 35 Recording from a connected equipment 38 Recording from a connected equipment using the timer 41 Checking/changing/canceling timer settings...
... Step 4 : Selecting a language 19 Step 5 : Setting the clock Advanced Hookups for the DVD Player 21 Component Video hookup 22 A/V Receiver hookup Basic Operations 24 Playing discs 28 Guide to the on-screen display 31 Playing a tape 35 Recording from a connected equipment 38 Recording from a connected equipment using the timer 41 Checking/changing/canceling timer settings...
Operating Instructions
Page 12
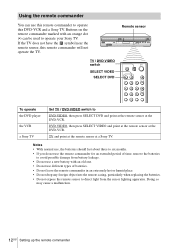
... not operate the TV. Remote sensor TV / DVD·VIDEO switch SELECT VIDEO SELECT DVD To operate the DVD player the VCR a Sony TV Set TV / DVD·VIDEO switch to DVD·VIDEO, then press SELECT DVD and point at the remote sensor at the DVD-VCR. TV and point at the remote sensor at a Sony TV. Doing so may cause a malfunction. 12US...
... not operate the TV. Remote sensor TV / DVD·VIDEO switch SELECT VIDEO SELECT DVD To operate the DVD player the VCR a Sony TV Set TV / DVD·VIDEO switch to DVD·VIDEO, then press SELECT DVD and point at the remote sensor at the DVD-VCR. TV and point at the remote sensor at a Sony TV. Doing so may cause a malfunction. 12US...
Operating Instructions
Page 15
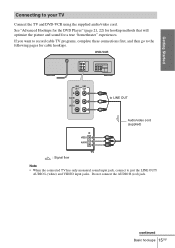
If you want to record cable TV programs, complete these connections first, and then go to the following pages for a true "hometheater" experiences. Do not connect the AUDIO R (red) jack. continued Basic hookups 15US See "Advanced Hookups for the DVD Player" (page 21, 22) for hookup methods that... will optimize the picture and sound for cable hookups. DVD-VCR to LINE OUT Audio/video cord (supplied) TV : Signal flow Note • When the connected TV ...
If you want to record cable TV programs, complete these connections first, and then go to the following pages for a true "hometheater" experiences. Do not connect the AUDIO R (red) jack. continued Basic hookups 15US See "Advanced Hookups for the DVD Player" (page 21, 22) for hookup methods that... will optimize the picture and sound for cable hookups. DVD-VCR to LINE OUT Audio/video cord (supplied) TV : Signal flow Note • When the connected TV ...
Operating Instructions
Page 18
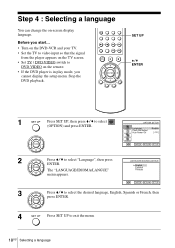
... The "LANGUAGE/IDIOMA/LANGUE" menu appears. 3 Press V/v to select the desired language, English, Spanish or French, then press ENTER. 4 Press SET UP to DVD·VIDEO on the remote. • If the DVD player is in play mode, you cannot display the setup menu. Before you start... • Turn on the... DVD-VCR and your TV. • Set the TV to video input so that the signal from the player appears on -screen display language. SET UP V/v ENTER 1 Press ...
... The "LANGUAGE/IDIOMA/LANGUE" menu appears. 3 Press V/v to select the desired language, English, Spanish or French, then press ENTER. 4 Press SET UP to DVD·VIDEO on the remote. • If the DVD player is in play mode, you cannot display the setup menu. Before you start... • Turn on the... DVD-VCR and your TV. • Set the TV to video input so that the signal from the player appears on -screen display language. SET UP V/v ENTER 1 Press ...
Operating Instructions
Page 19
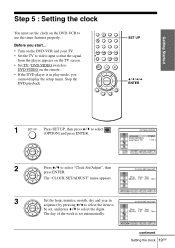
... year in play mode, you start... • Turn on the DVD-VCR and your TV. • Set the TV to video input so that the signal from the player appears on the TV screen. • Set TV / DVD·VIDEO switch to DVD·VIDEO on the DVD-VCR to use the timer features properly. The day of... the week is in sequence by pressing B/b to select the item to be set the clock on the remote. • If the DVD player is set automatically. Before you cannot...
... year in play mode, you start... • Turn on the DVD-VCR and your TV. • Set the TV to video input so that the signal from the player appears on the TV screen. • Set TV / DVD·VIDEO switch to DVD·VIDEO on the DVD-VCR to use the timer features properly. The day of... the week is in sequence by pressing B/b to select the item to be set the clock on the remote. • If the DVD player is set automatically. Before you cannot...
Operating Instructions
Page 21
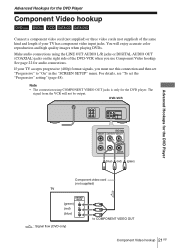
Advanced Hookups for the DVD Player Component Video hookup Connect a component video cord (not supplied) or three video cords (not supplied) of the DVD-VCR when you must use Component Video hookup. Make audio connections using COMPONENT VIDEO OUT jacks is only for the DVD player. See page 22 for the DVD Player (blue) (red) (green) Component video cord (not supplied) TV (green) (red...
Advanced Hookups for the DVD Player Component Video hookup Connect a component video cord (not supplied) or three video cords (not supplied) of the DVD-VCR when you must use Component Video hookup. Make audio connections using COMPONENT VIDEO OUT jacks is only for the DVD player. See page 22 for the DVD Player (blue) (red) (green) Component video cord (not supplied) TV (green) (red...
Operating Instructions
Page 22
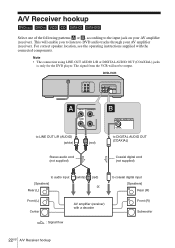
...with the connected components. Note • The connection using LINE OUT AUDIO L/R or DIGITAL AUDIO OUT (COAXIAL) jacks is only for the DVD player. For correct speaker location, see the operating instructions supplied with a decoder Front (R) Subwoofer : Signal flow 22US A/V Receiver hookup The signal ...from the VCR will enable you to listen to DVD audio tracks through your AV amplifier (receiver). This will not be output. A/V Receiver hookup Select one of the following patterns A or ...
...with the connected components. Note • The connection using LINE OUT AUDIO L/R or DIGITAL AUDIO OUT (COAXIAL) jacks is only for the DVD player. For correct speaker location, see the operating instructions supplied with a decoder Front (R) Subwoofer : Signal flow 22US A/V Receiver hookup The signal ...from the VCR will enable you to listen to DVD audio tracks through your AV amplifier (receiver). This will not be output. A/V Receiver hookup Select one of the following patterns A or ...
Operating Instructions
Page 23
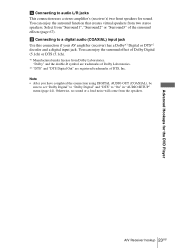
... (page 67). You can enjoy the surround effect of Dolby Digital (5.1ch) or DTS (5.1ch). *1 Manufactured under license from the speakers. Advanced Hookups for the DVD Player A Connecting to a digital audio (COAXIAL) input jack Use this connection if your AV amplifier (receiver) has a Dolby*1 Digital or DTS*2 decoder and a digital input jack...
... (page 67). You can enjoy the surround effect of Dolby Digital (5.1ch) or DTS (5.1ch). *1 Manufactured under license from the speakers. Advanced Hookups for the DVD Player A Connecting to a digital audio (COAXIAL) input jack Use this connection if your AV amplifier (receiver) has a Dolby*1 Digital or DTS*2 decoder and a digital input jack...

Operating Instructions
Page 24
Basic Operations Playing discs Depending on the disc tray. with your TV. • Set the TV to video input so that the signal from the player appears on the DVD-VCR and your disc. Before you start ... • Turn on the TV screen. Z SELECT DVD / m/M y ./ > X PAUSE x STOP H PLAY 1 Press SELECT DVD to control the DVD player. 2 Press Z to the operating instructions supplied with the playback side facing down 24US Playing discs Refer to open the disc tray and place a disc on the disc, some operations may be different or restricted.
Basic Operations Playing discs Depending on the disc tray. with your TV. • Set the TV to video input so that the signal from the player appears on the DVD-VCR and your disc. Before you start ... • Turn on the TV screen. Z SELECT DVD / m/M y ./ > X PAUSE x STOP H PLAY 1 Press SELECT DVD to control the DVD player. 2 Press Z to the operating instructions supplied with the playback side facing down 24US Playing discs Refer to open the disc tray and place a disc on the disc, some operations may be different or restricted.

Operating Instructions
Page 25
... player cannot play a DVD or VIDEO CD that has been recorded in pause mode REPLAY Go to the previous chapter, track, . The display window shows the playback time*. PREV on the remote or m on page 46). • Stop VIDEO playback while playing back a disc. • If you pause the DVD player for more than 5 minutes, the DVD player will...
... player cannot play a DVD or VIDEO CD that has been recorded in pause mode REPLAY Go to the previous chapter, track, . The display window shows the playback time*. PREV on the remote or m on page 46). • Stop VIDEO playback while playing back a disc. • If you pause the DVD player for more than 5 minutes, the DVD player will...
Operating Instructions
Page 27
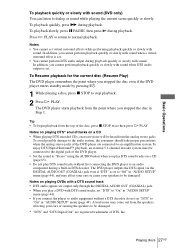
... come out from the analog stereo jacks. To avoid possible damage to dialog or sound while playing the current scene quickly or slowly. The DVD player outputs the DTS signal via the DIGITAL AUDIO OUT (COAXIAL) jack even if "DTS" is set. • You cannot perform DTS audio...• To begin playback from the point where you connect the player to audio equipment without first connecting the DVD player to "On" in DTS decoder. To playback quickly, press M during playback. The DVD player starts playback from the top of the DVD player. • Set the sound to "Stereo" using the AUDIO ...
... come out from the analog stereo jacks. To avoid possible damage to dialog or sound while playing the current scene quickly or slowly. The DVD player outputs the DTS signal via the DIGITAL AUDIO OUT (COAXIAL) jack even if "DTS" is set. • You cannot perform DTS audio...• To begin playback from the point where you connect the player to audio equipment without first connecting the DVD player to "On" in DTS decoder. To playback quickly, press M during playback. The DVD player starts playback from the top of the DVD player. • Set the sound to "Stereo" using the AUDIO ...
Operating Instructions
Page 37
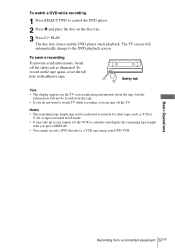
... appears on the TV screen indicating information about the tape, but the information will automatically change to the DVD playback screen. To watch a DVD while recording 1 Press SELECT DVD to control the DVD player. 2 Press Z and place the disc on the tape. • If you do not want to...minute for short tapes such as illustrated. Basic Operations Recording from a connected equipment 37US To record on the tape again, cover the tab hole with adhesive tape. The disc tray closes and the DVD player starts playback. To save a recording To prevent accidental erasure, break off the TV....
... appears on the TV screen indicating information about the tape, but the information will automatically change to the DVD playback screen. To watch a DVD while recording 1 Press SELECT DVD to control the DVD player. 2 Press Z and place the disc on the tape. • If you do not want to...minute for short tapes such as illustrated. Basic Operations Recording from a connected equipment 37US To record on the tape again, cover the tab hole with adhesive tape. The disc tray closes and the DVD player starts playback. To save a recording To prevent accidental erasure, break off the TV....
Operating Instructions
Page 38
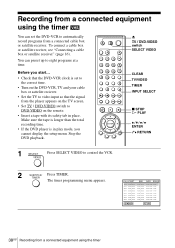
... recording time. • If the DVD player is set the DVD-VCR to automatically record programs from a connected cable box or satellite receiver. Z TV / DVD·VIDEO switch SELECT VIDEO CLEAR TV/VIDEO TIMER INPUT SELECT x STOP H PLAY V/v/B/b ENTER O RETURN 1 Press SELECT VIDEO to eight programs at a time. Recording...16). Before you cannot display the setup menu. The timer programming menu appears. 38US Recording from the player appears on the TV screen. • Set TV / DVD·VIDEO switch to DVD·VIDEO on the remote. • Insert a tape with its safety tab in play ...
... recording time. • If the DVD player is set the DVD-VCR to automatically record programs from a connected cable box or satellite receiver. Z TV / DVD·VIDEO switch SELECT VIDEO CLEAR TV/VIDEO TIMER INPUT SELECT x STOP H PLAY V/v/B/b ENTER O RETURN 1 Press SELECT VIDEO to eight programs at a time. Recording...16). Before you cannot display the setup menu. The timer programming menu appears. 38US Recording from the player appears on the TV screen. • Set TV / DVD·VIDEO switch to DVD·VIDEO on the remote. • Insert a tape with its safety tab in play ...
Operating Instructions
Page 40
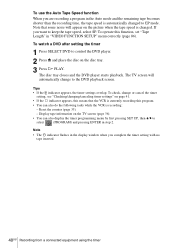
... appears, the timer settings overlap. If you complete the timer setting with no tape inserted. 40US Recording from a connected equipment using the timer The disc tray closes and the DVD player starts playback. To operate this program. • You can also display the timer programming menu by.... To watch a DVD after setting the timer 1 Press SELECT DVD to control the DVD player. 2 Press Z and place the disc on the TV screen (page 36). • You can also do the following tasks while the VCR is currently recording this function, set "Tape Length" in "VIDEO FUNCTION SETUP" menu ...
... appears, the timer settings overlap. If you complete the timer setting with no tape inserted. 40US Recording from a connected equipment using the timer The disc tray closes and the DVD player starts playback. To operate this program. • You can also display the timer programming menu by.... To watch a DVD after setting the timer 1 Press SELECT DVD to control the DVD player. 2 Press Z and place the disc on the TV screen (page 36). • You can also do the following tasks while the VCR is currently recording this function, set "Tape Length" in "VIDEO FUNCTION SETUP" menu ...
Operating Instructions
Page 41
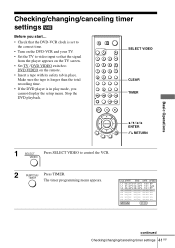
...mode, you start... • Check that the DVD-VCR clock is in place. Basic Operations continued Checking/changing/canceling timer settings 41US The timer programming menu appears. Make sure the tape is longer than the total recording time. • If the DVD player is set to the correct time. • ...Turn on the DVD-VCR and your TV. • Set the TV to video input so that the signal from the player appears on the TV screen. • Set TV / DVD·VIDEO switch to control the...
...mode, you start... • Check that the DVD-VCR clock is in place. Basic Operations continued Checking/changing/canceling timer settings 41US The timer programming menu appears. Make sure the tape is longer than the total recording time. • If the DVD player is set to the correct time. • ...Turn on the DVD-VCR and your TV. • Set the TV to video input so that the signal from the player appears on the TV screen. • Set TV / DVD·VIDEO switch to control the...
Operating Instructions
Page 44
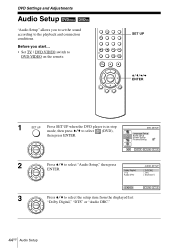
SET UP V/v/B/b ENTER 1 Press SET UP when the DVD player is in stop mode, then press V/v to select (DVD), then press ENTER. 2 Press V/v to select "Audio Setup," then press ENTER. 3 Press V/v to DVD·VIDEO on the remote. Before you to set the sound according to the playback and connection conditions. DVD Settings and Adjustments Audio Setup "Audio Setup" allows you start... • Set TV / DVD·VIDEO switch to select the setup item from the displayed list: "Dolby Digital," "DTS" or "Audio DRC." 44US Audio Setup
SET UP V/v/B/b ENTER 1 Press SET UP when the DVD player is in stop mode, then press V/v to select (DVD), then press ENTER. 2 Press V/v to select "Audio Setup," then press ENTER. 3 Press V/v to DVD·VIDEO on the remote. Before you to set the sound according to the playback and connection conditions. DVD Settings and Adjustments Audio Setup "Audio Setup" allows you start... • Set TV / DVD·VIDEO switch to select the setup item from the displayed list: "Dolby Digital," "DTS" or "Audio DRC." 44US Audio Setup
Operating Instructions
Page 46
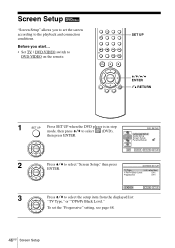
To set the screen according to DVD·VIDEO on the remote. Screen Setup "Screen Setup" allows you start... • Set TV / DVD·VIDEO switch to the playback and connection conditions. Before you to set the "Progressive" setting, see page 48. 46US Screen Setup SET UP V/v/B/b ENTER O RETURN 1 Press SET UP when the DVD player is in stop mode, then press V/v to select (DVD), then press ENTER. 2 Press V/v to select "Screen Setup," then press ENTER. 3 Press V/v to select the setup item from the displayed list: "TV Type," or "Y/Pb/Pr Black Level."
To set the screen according to DVD·VIDEO on the remote. Screen Setup "Screen Setup" allows you start... • Set TV / DVD·VIDEO switch to the playback and connection conditions. Before you to set the "Progressive" setting, see page 48. 46US Screen Setup SET UP V/v/B/b ENTER O RETURN 1 Press SET UP when the DVD player is in stop mode, then press V/v to select (DVD), then press ENTER. 2 Press V/v to select "Screen Setup," then press ENTER. 3 Press V/v to select the setup item from the displayed list: "TV Type," or "Y/Pb/Pr Black Level."
Operating Instructions
Page 49
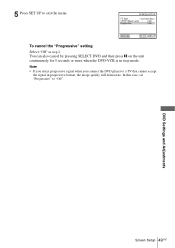
Note • If you select progressive signal when you connect the DVD player to "Off". You can also cancel by pressing SELECT DVD and then press X on the unit continuously for 5 seconds or more when the DVD-VCR is in step 2. Screen Setup 49US In this case, set "Progressive" to a TV that cannot accept the signal in progressive format, the image quality will deteriorate. DVD Settings and Adjustments 5 Press SET UP to exit the menu. To cancel the "Progressive" setting Select "Off" in stop mode.
Note • If you select progressive signal when you connect the DVD player to "Off". You can also cancel by pressing SELECT DVD and then press X on the unit continuously for 5 seconds or more when the DVD-VCR is in step 2. Screen Setup 49US In this case, set "Progressive" to a TV that cannot accept the signal in progressive format, the image quality will deteriorate. DVD Settings and Adjustments 5 Press SET UP to exit the menu. To cancel the "Progressive" setting Select "Off" in stop mode.


