Warranty Card
Page 1
... specific legal rights, and you may not apply to obtain warranty service. This warranty is invalid if the factory applied serial number has been altered or removed from your convenience, Sony Electronics Inc. For a period of 90 days from the date of original purchase, if this Product is determined to Sony. This warranty does not cover customer instruction, installation, set up adjustments...
... specific legal rights, and you may not apply to obtain warranty service. This warranty is invalid if the factory applied serial number has been altered or removed from your convenience, Sony Electronics Inc. For a period of 90 days from the date of original purchase, if this Product is determined to Sony. This warranty does not cover customer instruction, installation, set up adjustments...

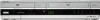
Operating Instructions
Page 2
... harmful interference to radio or television reception, which the receiver is encouraged to try to correct the interference by the cord. • If the unit is intended to alert the user to operate this Sony DVD Player/Video Cassette Recorder. As the laser beam used in the U.S.A Owner's Record The model and serial numbers are located at the rear of important operating and maintenance (servicing) instructions in the space provided...
... harmful interference to radio or television reception, which the receiver is encouraged to try to correct the interference by the cord. • If the unit is intended to alert the user to operate this Sony DVD Player/Video Cassette Recorder. As the laser beam used in the U.S.A Owner's Record The model and serial numbers are located at the rear of important operating and maintenance (servicing) instructions in the space provided...
Operating Instructions
Page 4
... language 20 Step 5 : Setting the clock 24 Step 6 : Presetting channels Basic Operations 28 Playing discs 33 Guide to the on-screen display 36 Locking the disc tray (Child Lock) 37 Playing a tape 40 Recording TV programs 43 Recording TV programs using the timer 46 Checking/changing/canceling timer settings 48 Locking the DVD-VCR (Child Lock) DVD Settings and Adjustments 53 Audio Setup 55 Screen Setup 59 Setting the display or sound track language 61 Parental Control (limiting playback by children) Advanced Hookups 49 A/V Receiver hookup 51 S-Video/Component Video hookup 4 Table of contents
... language 20 Step 5 : Setting the clock 24 Step 6 : Presetting channels Basic Operations 28 Playing discs 33 Guide to the on-screen display 36 Locking the disc tray (Child Lock) 37 Playing a tape 40 Recording TV programs 43 Recording TV programs using the timer 46 Checking/changing/canceling timer settings 48 Locking the DVD-VCR (Child Lock) DVD Settings and Adjustments 53 Audio Setup 55 Screen Setup 59 Setting the display or sound track language 61 Parental Control (limiting playback by children) Advanced Hookups 49 A/V Receiver hookup 51 S-Video/Component Video hookup 4 Table of contents
Operating Instructions
Page 5
... 69 Various play mode functions (Program play, Shuffle play, Repeat play) 74 Changing the sound 75 Virtual surround setting 77 Playing an MP3 audio track 82 Playing JPEG image files 86 Playing VIDEO CDs with "PBC ON/ OFF" Functions VCR Additional Operations 88 Quick Timer Recording 89 Recording stereo and bilingual programs 90 Searching using various functions 92 Adjusting the picture (tracking) 93 Changing menu options 95 Editing with cable television transmission may require authorization from the cable television transmission and/or program owner. patents...
... 69 Various play mode functions (Program play, Shuffle play, Repeat play) 74 Changing the sound 75 Virtual surround setting 77 Playing an MP3 audio track 82 Playing JPEG image files 86 Playing VIDEO CDs with "PBC ON/ OFF" Functions VCR Additional Operations 88 Quick Timer Recording 89 Recording stereo and bilingual programs 90 Searching using various functions 92 Adjusting the picture (tracking) 93 Changing menu options 95 Editing with cable television transmission may require authorization from the cable television transmission and/or program owner. patents...
Operating Instructions
Page 11
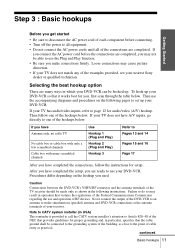
... scrambled channels Cable box with many ways in particular, specifies that violates the regulations of the Federal Communications Commission regarding the use and operation of the hookups below . If your TV has audio/video inputs, refer to Pages 13 and 14 Pages 15 and 16 Page 17 After you have completed the setup, you make simultaneous (parallel) antenna and DVD-VCR connections at the...
... scrambled channels Cable box with many ways in particular, specifies that violates the regulations of the Federal Communications Commission regarding the use and operation of the hookups below . If your TV has audio/video inputs, refer to Pages 13 and 14 Pages 15 and 16 Page 17 After you have completed the setup, you make simultaneous (parallel) antenna and DVD-VCR connections at the...
Operating Instructions
Page 12
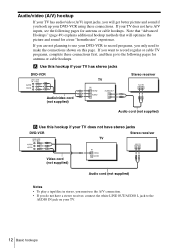
... cable hookups. Note that "Advanced Hookups" (page 49) explains additional hookup methods that will get better picture and sound if you do not have a stereo receiver, connect the white LINE OUT/AUDIO L jack to the AUDIO IN jack on this hookup if your TV does not have stereo jacks DVD-VCR Stereo receiver TV Video cord (not supplied) Audio cord (not supplied) Notes • To play a tape/disc in stereo, you must use your DVD-VCR to record programs...
... cable hookups. Note that "Advanced Hookups" (page 49) explains additional hookup methods that will get better picture and sound if you do not have a stereo receiver, connect the white LINE OUT/AUDIO L jack to the AUDIO IN jack on this hookup if your TV does not have stereo jacks DVD-VCR Stereo receiver TV Video cord (not supplied) Audio cord (not supplied) Notes • To play a tape/disc in stereo, you must use your DVD-VCR to record programs...
Operating Instructions
Page 14
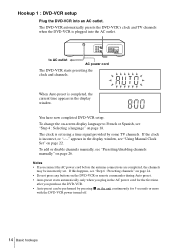
... some TV channels. When Auto preset is plugged into an AC outlet. You have now completed DVD-VCR setup. To add or disable channels manually, see "Using Manual Clock Set" on page 26. If this happens, see "Step 4 : Selecting a language" on -screen display language to AC outlet AC power cord The DVD-VCR starts presetting the clock and channels. The DVD-VCR automatically presets the DVD-VCR's clock and TV channels when the DVD-VCR is completed...
... some TV channels. When Auto preset is plugged into an AC outlet. You have now completed DVD-VCR setup. To add or disable channels manually, see "Using Manual Clock Set" on page 26. If this happens, see "Step 4 : Selecting a language" on -screen display language to AC outlet AC power cord The DVD-VCR starts presetting the clock and channels. The DVD-VCR automatically presets the DVD-VCR's clock and TV channels when the DVD-VCR is completed...
Operating Instructions
Page 16
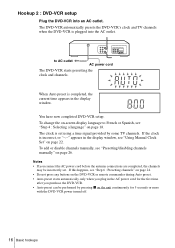
... DVD-VCR. • Auto preset can be incorrectly set using a time signal provided by pressing x on -screen display language to AC outlet AC power cord The DVD-VCR starts presetting the clock and channels. If this happens, see "Step 4 : Selecting a language" on page 26. When Auto preset is set . The clock is completed, the current time appears in the display window, see "Presetting/disabling channels manually" on page 18. Hookup 2 : DVD-VCR setup Plug the DVD-VCR...
... DVD-VCR. • Auto preset can be incorrectly set using a time signal provided by pressing x on -screen display language to AC outlet AC power cord The DVD-VCR starts presetting the clock and channels. If this happens, see "Step 4 : Selecting a language" on page 26. When Auto preset is set . The clock is completed, the current time appears in the display window, see "Presetting/disabling channels manually" on page 18. Hookup 2 : DVD-VCR setup Plug the DVD-VCR...
Operating Instructions
Page 18
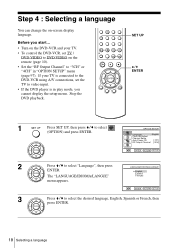
OPTION SETUP Language :English Clock Set/Adjust Channel Setup Auto Power Off [ Off ] RF Output Channel [3CH] V v ENTER RETURN SET UP 2 Press V/v to select (OPTION) and press ENTER. Step 4 : Selecting a language You can change the on the remote (page 10). • Set the "RF Output Channel" to "3CH" or "4CH" in play mode, you cannot display the setup menu. Stop the DVD playback. B English Español The "LANGUAGE/IDIOMA/LANGUE" Français menu appears. Before...
OPTION SETUP Language :English Clock Set/Adjust Channel Setup Auto Power Off [ Off ] RF Output Channel [3CH] V v ENTER RETURN SET UP 2 Press V/v to select (OPTION) and press ENTER. Step 4 : Selecting a language You can change the on the remote (page 10). • Set the "RF Output Channel" to "3CH" or "4CH" in play mode, you cannot display the setup menu. Stop the DVD playback. B English Español The "LANGUAGE/IDIOMA/LANGUE" Français menu appears. Before...

Operating Instructions
Page 20
... / DVD·VIDEO to DVD·VIDEO on the remote (page 10). • Set the "RF Output Channel" to "3CH" or "4CH" in play mode, you start... • Turn on . • To control the DVD-VCR, set the time manually (page 22). When using A/V connections, set the clock. Before you cannot display the setup menu. If your TV. Stop the DVD playback. 1 Press SET UP, then press V/v to select "Clock Set/Adjust", then CLOCK SET/ADJUST press ENTER. SET UP V/v/B/b ENTER O RETURN OPTION SETUP Language :English Clock Set/Adjust Channel Setup Auto Power...
... / DVD·VIDEO to DVD·VIDEO on the remote (page 10). • Set the "RF Output Channel" to "3CH" or "4CH" in play mode, you start... • Turn on . • To control the DVD-VCR, set the time manually (page 22). When using A/V connections, set the clock. Before you cannot display the setup menu. If your TV. Stop the DVD playback. 1 Press SET UP, then press V/v to select "Clock Set/Adjust", then CLOCK SET/ADJUST press ENTER. SET UP V/v/B/b ENTER O RETURN OPTION SETUP Language :English Clock Set/Adjust Channel Setup Auto Power...

Operating Instructions
Page 22
... made Hookup 3, make sure you cannot display the setup menu. OPTION SETUP Language :English Clock Set/Adjust Channel Setup Auto Power Off [ Off ] RF Output Channel [3CH] V v ENTER RETURN SET UP 2 Press V/v to select (OPTION) and press ENTER. Using Manual Clock Set Before you start... • Turn on the DVD-VCR and your TV is connected to the DVD-VCR using the timer, you must set the clock accurately. • The clock display appears when VIDEO mode is selected with no tape inserted or when the DVD-VCR...
... made Hookup 3, make sure you cannot display the setup menu. OPTION SETUP Language :English Clock Set/Adjust Channel Setup Auto Power Off [ Off ] RF Output Channel [3CH] V v ENTER RETURN SET UP 2 Press V/v to select (OPTION) and press ENTER. Using Manual Clock Set Before you start... • Turn on the DVD-VCR and your TV is connected to the DVD-VCR using the timer, you must set the clock accurately. • The clock display appears when VIDEO mode is selected with no tape inserted or when the DVD-VCR...

Operating Instructions
Page 24
... receivable channels in play mode, you cannot display the setup menu. If you have already decided which channels you start... • Turn on the remote (page 10). • Set the "RF Output Channel" to "3CH" or "4CH" in "OPTION SETUP" menu (page 97). Presetting all receivable channels automatically Before you wish to DVD·VIDEO on the DVD-VCR and your area using automatic presetting methods. SET UP V/v/B/b ENTER OPTION SETUP Language :English Clock Set/Adjust Channel Setup Auto Power...
... receivable channels in play mode, you cannot display the setup menu. If you have already decided which channels you start... • Turn on the remote (page 10). • Set the "RF Output Channel" to "3CH" or "4CH" in "OPTION SETUP" menu (page 97). Presetting all receivable channels automatically Before you wish to DVD·VIDEO on the DVD-VCR and your area using automatic presetting methods. SET UP V/v/B/b ENTER OPTION SETUP Language :English Clock Set/Adjust Channel Setup Auto Power...

Operating Instructions
Page 26
... / DVD·VIDEO to DVD·VIDEO on the DVD-VCR and your TV is connected to the DVD-VCR using A/V connections, set the TV to video input. • If the DVD player is in "OPTION SETUP" menu (page 97). CHANNEL SETUP Ant/Cable [ Cable TV ] The "CHANNEL SETUP" menu appears. Presetting/disabling channels manually Before you start... • Turn on the remote (page 10). • Set the "RF Output Channel" to "3CH" or "4CH" in play mode, you cannot display the setup menu. CH +/- Stop the DVD playback. Number buttons SET...
... / DVD·VIDEO to DVD·VIDEO on the DVD-VCR and your TV is connected to the DVD-VCR using A/V connections, set the TV to video input. • If the DVD player is in "OPTION SETUP" menu (page 97). CHANNEL SETUP Ant/Cable [ Cable TV ] The "CHANNEL SETUP" menu appears. Presetting/disabling channels manually Before you start... • Turn on the remote (page 10). • Set the "RF Output Channel" to "3CH" or "4CH" in play mode, you cannot display the setup menu. CH +/- Stop the DVD playback. Number buttons SET...
Operating Instructions
Page 39
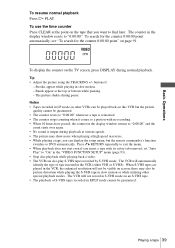
... removed, set "Auto Play" to "0:00:00." When S-VHS tapes are played in the VCR, the enhanced resolution will not record in the "VIDEO FUNCTION SETUP" menu (page 93). • Stop disc playback while playing back a video. • The VCR can be guaranteed. Streaks appear while playing in slow motion or while utilizing other VCRs can also play S-VHS tapes recorded by S-VHS mode. Basic Operations To resume normal playback Press H PLAY. Tip • Adjust the picture using the TRACKING +/- To use...
... removed, set "Auto Play" to "0:00:00." When S-VHS tapes are played in the VCR, the enhanced resolution will not record in the "VIDEO FUNCTION SETUP" menu (page 93). • Stop disc playback while playing back a video. • The VCR can be guaranteed. Streaks appear while playing in slow motion or while utilizing other VCRs can also play S-VHS tapes recorded by S-VHS mode. Basic Operations To resume normal playback Press H PLAY. Tip • Adjust the picture using the TRACKING +/- To use...
Operating Instructions
Page 43
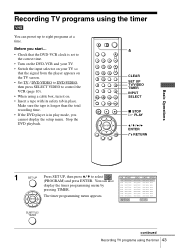
... using a cable box, turn it on. • Insert a tape with its safety tab in play mode, you start... • Check that the DVD-VCR clock is in place. Z CLEAR SET UP TV/VIDEO TIMER INPUT SELECT x STOP H PLAY V/v/B/b ENTER O RETURN Basic Operations 1 Press SET UP, then press V/v to eight programs at a time. You can preset up to select CH START END DATE SPEED (PROGRAM) and press ENTER. The timer programming menu appears. Stop the DVD playback. Recording TV programs using...
... using a cable box, turn it on. • Insert a tape with its safety tab in play mode, you start... • Check that the DVD-VCR clock is in place. Z CLEAR SET UP TV/VIDEO TIMER INPUT SELECT x STOP H PLAY V/v/B/b ENTER O RETURN Basic Operations 1 Press SET UP, then press V/v to eight programs at a time. You can preset up to select CH START END DATE SPEED (PROGRAM) and press ENTER. The timer programming menu appears. Stop the DVD playback. Recording TV programs using...

Operating Instructions
Page 52
... video cords (not supplied) of 480 progressive scan picture problems, it is only for audio connections. The PROGRESSIVE indicator lights up in the "SCREEN SETUP" menu (page 57). B Use this hookup if your TV has component video input jacks Connect your TV accepts progressive (480p) format signals, you must use this connection and then set compatibility with this model 480p DVD player, please contact our customer service center. 52 S-Video/Component Video hookup DVD-VCR (blue) (red) (green) Component video cord...
... video cords (not supplied) of 480 progressive scan picture problems, it is only for audio connections. The PROGRESSIVE indicator lights up in the "SCREEN SETUP" menu (page 57). B Use this hookup if your TV has component video input jacks Connect your TV accepts progressive (480p) format signals, you must use this connection and then set compatibility with this model 480p DVD player, please contact our customer service center. 52 S-Video/Component Video hookup DVD-VCR (blue) (red) (green) Component video cord...

Operating Instructions
Page 98
... turn on "VIDEO" in the DVD-VCR's display window. 4 Press CH +/- TV/VIDEO ?/1 CHANNEL +/- 1 Set the RF Output channel to turn on the DVD-VCR. 3 Press TV/VIDEO to receive the VCR signal. to exit the menu. Menu option Auto Power Off RF Output Channel Set this time. • "3CH" when using channel 3 to receive the VCR signal. • "4CH" when using channel 4 to turn the DVD-VCR off automatically if no signal is not used , set the RF Output channel in the "OPTION SETUP" menu so...
... turn on "VIDEO" in the DVD-VCR's display window. 4 Press CH +/- TV/VIDEO ?/1 CHANNEL +/- 1 Set the RF Output channel to turn on the DVD-VCR. 3 Press TV/VIDEO to receive the VCR signal. to exit the menu. Menu option Auto Power Off RF Output Channel Set this time. • "3CH" when using channel 3 to receive the VCR signal. • "4CH" when using channel 4 to turn the DVD-VCR off automatically if no signal is not used , set the RF Output channel in the "OPTION SETUP" menu so...

Operating Instructions
Page 102
... is not MPEG1 Audio Layer 3 data. • The player cannot play certain discs (page 6). • The region code on the DVD being played. • The DVD prohibits the changing of the direct selection button on the remote (page 64). • Multilingual tracks are displayed as stop, search, slow-motion play, repeat play, shuffle play, or program play . The player starts playing the disc automatically. Remedy • The disc is turned over. •...
... is not MPEG1 Audio Layer 3 data. • The player cannot play certain discs (page 6). • The region code on the DVD being played. • The DVD prohibits the changing of the direct selection button on the remote (page 64). • Multilingual tracks are displayed as stop, search, slow-motion play, repeat play, shuffle play, or program play . The player starts playing the disc automatically. Remedy • The disc is turned over. •...

Operating Instructions
Page 103
... are using a Sony video head cleaning cassette. The player does not operate properly. • When static electricity, etc., causes the player to video input. • Adjust the tracking with the INPUT SELECT or CH +/- buttons. • The video heads are using a monitor, set to be charged). Playback The picture rolls vertically during picture search. Select a channel number when recording TV programs; cover the tab hole. The angles cannot be changed or turned off. • Try using the DVD's menu instead of the direct selection button...
... are using a Sony video head cleaning cassette. The player does not operate properly. • When static electricity, etc., causes the player to video input. • Adjust the tracking with the INPUT SELECT or CH +/- buttons. • The video heads are using a monitor, set to be charged). Playback The picture rolls vertically during picture search. Select a channel number when recording TV programs; cover the tab hole. The angles cannot be changed or turned off. • Try using the DVD's menu instead of the direct selection button...

Operating Instructions
Page 114
... T Timer setting daily/weekly recording 44 Tracking adjustment. Index Numerics 16:9 56 4:3 Letter Box 56 4:3 Pan Scan 56 A Adjusting picture 92 tracking 92 Angle 67 Antenna hookup 13 Audio track 89 Audio/video (A/V) hookup 12 Auto Clock Set 20 C Cable hookup 11 Cleaning the video heads 103 Clock setting 20 Connecting Cable TV 17 external antenna connector 99 VHF/UHF band mixer 99 Counter 39 Custom AV Mode 35 D DATA CD 6, 77, 82 DATA DVD 6, 77, 82 Disabling channels 26 DOLBY DIGITAL...
... T Timer setting daily/weekly recording 44 Tracking adjustment. Index Numerics 16:9 56 4:3 Letter Box 56 4:3 Pan Scan 56 A Adjusting picture 92 tracking 92 Angle 67 Antenna hookup 13 Audio track 89 Audio/video (A/V) hookup 12 Auto Clock Set 20 C Cable hookup 11 Cleaning the video heads 103 Clock setting 20 Connecting Cable TV 17 external antenna connector 99 VHF/UHF band mixer 99 Counter 39 Custom AV Mode 35 D DATA CD 6, 77, 82 DATA DVD 6, 77, 82 Disabling channels 26 DOLBY DIGITAL...


