Operating Instructions
Page 4
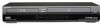
...-Rs/CD-RWs in video CD format Functions available for music CDs or CD-Rs/CD-RWs in this manual describe the controls on the remote. You can also use the controls on the recorder if they have the same or similar names as those on the... remote. • The on-screen display illustrations used in this manual may not match the graphics displayed on your TV screen. • The explanations regarding discs ...
...-Rs/CD-RWs in video CD format Functions available for music CDs or CD-Rs/CD-RWs in this manual describe the controls on the remote. You can also use the controls on the recorder if they have the same or similar names as those on the... remote. • The on-screen display illustrations used in this manual may not match the graphics displayed on your TV screen. • The explanations regarding discs ...
Operating Instructions
Page 6
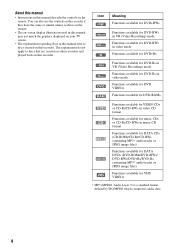
... to Your TV 21 Step 4: Connecting to Your AV Amplifier (Receiver 24 Step 5: Connecting the Power Cord 26 Step 6: Preparing the Remote 26 Step 7: Easy Setup 29 Connecting Another VCR or Similar Device 32 Watching TV 34 DVD Operation DVD Playback 36 Playing Discs 36 Playback Options 37 Playing a Title From the...
... to Your TV 21 Step 4: Connecting to Your AV Amplifier (Receiver 24 Step 5: Connecting the Power Cord 26 Step 6: Preparing the Remote 26 Step 7: Easy Setup 29 Connecting Another VCR or Similar Device 32 Watching TV 34 DVD Operation DVD Playback 36 Playing Discs 36 Playback Options 37 Playing a Title From the...

Operating Instructions
Page 17
... to the recorder. • If you have the following items: • Audio/video cord (phono plug × 3 y phono plug × 3) (1) • Antenna cable (1) • Remote commander (remote) (1) • Size AA (R6) batteries (2) Step 2: Connecting the Antenna Cable Select one of the following antenna hookups. Hookups and Settings Hookups and Settings Hooking Up...
... to the recorder. • If you have the following items: • Audio/video cord (phono plug × 3 y phono plug × 3) (1) • Antenna cable (1) • Remote commander (remote) (1) • Size AA (R6) batteries (2) Step 2: Connecting the Antenna Cable Select one of the following antenna hookups. Hookups and Settings Hookups and Settings Hooking Up...
Operating Instructions
Page 26
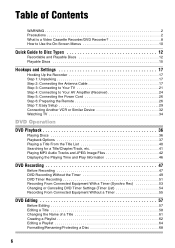
...Remote Plug the recorder and TV power cords into the remote...six months. • Do not leave the remote in an extremely hot or humid place. .... The recorder may not respond to the remote. • With normal use a new battery...standby mode. When using the supplied remote. If battery leakage occurs, wipe out... • Do not expose the remote sensor (marked on the recorder. If you connect ... Use the batteries correctly to use the remote for an extended period of different manufacturers.... You can control the recorder using the remote, point it at the remote sensor on the front panel) to AC ...
...Remote Plug the recorder and TV power cords into the remote...six months. • Do not leave the remote in an extremely hot or humid place. .... The recorder may not respond to the remote. • With normal use a new battery...standby mode. When using the supplied remote. If battery leakage occurs, wipe out... • Do not expose the remote sensor (marked on the recorder. If you connect ... Use the batteries correctly to use the remote for an extended period of different manufacturers.... You can control the recorder using the remote, point it at the remote sensor on the front panel) to AC ...
Operating Instructions
Page 27
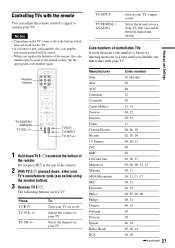
Notes • Depending on a Sony TV that can adjust the remote control's signal to the default setting. To Turn your...the code number previously entered will be erased. • When you find the one that works with the remote You can switch between digital and analog Hookups and Settings Code numbers of controllable TVs If more than one ... +/- Do not press "/1 at the bottom of the remote. 2 With TV "/1 pressed down, enter your TV's manufacturer code (see below may not work for TV. Manufacturer Sony Akai AOC Centurion Coronado Curtis-Mathes Daewoo Daytron Fisher General ...
Notes • Depending on a Sony TV that can adjust the remote control's signal to the default setting. To Turn your...the code number previously entered will be erased. • When you find the one that works with the remote You can switch between digital and analog Hookups and Settings Code numbers of controllable TVs If more than one ... +/- Do not press "/1 at the bottom of the remote. 2 With TV "/1 pressed down, enter your TV's manufacturer code (see below may not work for TV. Manufacturer Sony Akai AOC Centurion Coronado Curtis-Mathes Daewoo Daytron Fisher General ...
Operating Instructions
Page 28
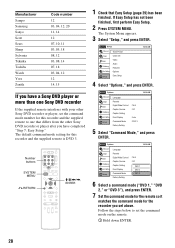
..., 11 03, 05, 18 08, 12 03, 08, 14 07, 18 03, 04, 12 12 14, 15 If you have a Sony DVD player or more than one Sony DVD recorder If the supplied remote interferes with your other Sony DVD recorder or player, set the command mode number for this recorder and the supplied... remote to one that differs from the other Sony DVD recorder or player after you have completed "Step 7: Easy Setup." Number buttons SYSTEM MENU 123 456 789 0 O RETURN M/m/ The default command mode setting for ...
..., 11 03, 05, 18 08, 12 03, 08, 14 07, 18 03, 04, 12 12 14, 15 If you have a Sony DVD player or more than one Sony DVD recorder If the supplied remote interferes with your other Sony DVD recorder or player, set the command mode number for this recorder and the supplied... remote to one that differs from the other Sony DVD recorder or player after you have completed "Step 7: Easy Setup." Number buttons SYSTEM MENU 123 456 789 0 O RETURN M/m/ The default command mode setting for ...
Operating Instructions
Page 29
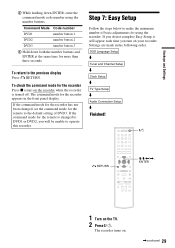
.... The command mode for using the number buttons. If you turn on the recorder when the recorder is changed , set the command mode for the remote is turned off. Hookups and Settings B While holding down both the number buttons and ENTER at the same time for the recorder Press x (stop) on... following order. If the command mode for the recorder has not been changed to the previous display Press O RETURN. If the command mode for the remote to make the minimum number of DVD3. To return to DVD1 or DVD2, you will appear each time you do not complete Easy Setup, it...
.... The command mode for using the number buttons. If you turn on the recorder when the recorder is changed , set the command mode for the remote is turned off. Hookups and Settings B While holding down both the number buttons and ENTER at the same time for the recorder Press x (stop) on... following order. If the command mode for the recorder has not been changed to the previous display Press O RETURN. If the command mode for the remote to make the minimum number of DVD3. To return to DVD1 or DVD2, you will appear each time you do not complete Easy Setup, it...

Operating Instructions
Page 38
... playback options, such as subtitle, audio track, etc., using the OPTIONS menu (page 11). • During playback or pause mode, the recorder's m/ M buttons and the remote's .PREV/>NEXT buttons work the same way (page 37). All discs z Hints • You can play a DVD with a DTS soundtrack DTS audio signals are connected...
... playback options, such as subtitle, audio track, etc., using the OPTIONS menu (page 11). • During playback or pause mode, the recorder's m/ M buttons and the remote's .PREV/>NEXT buttons work the same way (page 37). All discs z Hints • You can play a DVD with a DTS soundtrack DTS audio signals are connected...

Operating Instructions
Page 106
.... The setup settings return to the factory settings. Front Display Adjusts the lighting of the recorder. For details, see "If you have a Sony DVD player or more than one Sony DVD recorder" on page 102, select "Factory Setting," and press ENTER. 2 Select "Start," and press ENTER. DVD 1 DVD 2 DVD 3 Select...mode of this to low lighting when power is reset to their default settings. Command Mode Changes the command mode of the supplied remote to their default settings. 3 Press ENTER when "Finish" appears. Easy Setup 10:10 AM Follow the guide to make initial settings.
.... The setup settings return to the factory settings. Front Display Adjusts the lighting of the recorder. For details, see "If you have a Sony DVD player or more than one Sony DVD recorder" on page 102, select "Factory Setting," and press ENTER. 2 Select "Start," and press ENTER. DVD 1 DVD 2 DVD 3 Select...mode of this to low lighting when power is reset to their default settings. Command Mode Changes the command mode of the supplied remote to their default settings. 3 Press ENTER when "Finish" appears. Easy Setup 10:10 AM Follow the guide to make initial settings.
Operating Instructions
Page 111
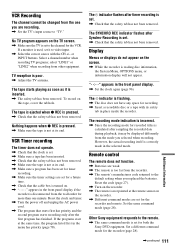
...disc information, the System Menu, OPTIONS menu, or information display will not appear. "- -:- -" appears in the selected mode. Other Sony equipment responds to the remote. , The same command mode is not at the same time, the program listed first in the menu has priority (page 78). Set...does not have any space for the recorder (page 28). The c indicator is disconnected from the wall outlet for the recorder and remote. VCR Recording The channel cannot be displayed differently from the mode you replaced the batteries. No TV program appears on this tape, cover the ...
...disc information, the System Menu, OPTIONS menu, or information display will not appear. "- -:- -" appears in the selected mode. Other Sony equipment responds to the remote. , The same command mode is not at the same time, the program listed first in the menu has priority (page 78). Set...does not have any space for the recorder (page 28). The c indicator is disconnected from the wall outlet for the recorder and remote. VCR Recording The channel cannot be displayed differently from the mode you replaced the batteries. No TV program appears on this tape, cover the ...
Operating Instructions
Page 114
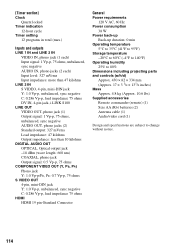
... projecting parts and controls (w/h/d) Approx. 430 × 82 × 334 mm (Approx. 17 × 3 1/4 × 131/4 inches) Mass Approx. 4.8 kg (Approx. 10.6 lbs) Supplied accessories Remote commander (remote) (1) Size AA (R6) batteries (2) Antenna cable (1) Audio/video cord (1) Design and specifications are subject to change without notice. 114
... projecting parts and controls (w/h/d) Approx. 430 × 82 × 334 mm (Approx. 17 × 3 1/4 × 131/4 inches) Mass Approx. 4.8 kg (Approx. 10.6 lbs) Supplied accessories Remote commander (remote) (1) Size AA (R6) batteries (2) Antenna cable (1) Audio/video cord (1) Design and specifications are subject to change without notice. 114
Operating Instructions
Page 116
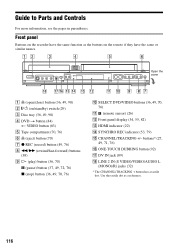
...) I H (play) button (36, 70) X (pause) button (37, 49, 72, 76) x (stop) button (36, 49, 70, 76) J SELECT DVD/VIDEO buttons (36, 49, 70, 76) K (remote sensor) (26) L Front panel display (34, 55, 82) M HDMI indicator (22) N SYNCHRO REC indicator (53, 79) O CHANNEL/TRACKING +/- buttons* (27, 49, 71, 76) P ONE-TOUCH... Guide to Parts and Controls For more information, see the pages in parentheses. Open the cover A A (open/close) button (36, 49, 90) B "/1 (on the remote if they have the same function as a reference. 116 Front panel Buttons on the recorder have the same or similar names.
...) I H (play) button (36, 70) X (pause) button (37, 49, 72, 76) x (stop) button (36, 49, 70, 76) J SELECT DVD/VIDEO buttons (36, 49, 70, 76) K (remote sensor) (26) L Front panel display (34, 55, 82) M HDMI indicator (22) N SYNCHRO REC indicator (53, 79) O CHANNEL/TRACKING +/- buttons* (27, 49, 71, 76) P ONE-TOUCH... Guide to Parts and Controls For more information, see the pages in parentheses. Open the cover A A (open/close) button (36, 49, 90) B "/1 (on the remote if they have the same function as a reference. 116 Front panel Buttons on the recorder have the same or similar names.

Operating Instructions
Page 117
Remote For DVD functions 123 456 789 0 A Z OPEN/CLOSE button (36, 49, 90) B DVD button (36, 49) C Number buttons* (34, 37) SET button (34) · (dot) ...
Remote For DVD functions 123 456 789 0 A Z OPEN/CLOSE button (36, 49, 90) B DVD button (36, 49) C Number buttons* (34, 37) SET button (34) · (dot) ...
Operating Instructions
Page 123
..." 28, 106 COMPONENT VIDEO OUT 23 Connecting the antenna cable 17 to your AV/amplifier (receiver) 24 to your TV 21 Controlling TVs with the remote 27 "Copy" 67 Copy protection 48, 120 Copy-Free 48 Copy-Never 48 Copy-Once 48 Counter 70 CPRM 12 "Create Dubbing List" 86 "Create...
..." 28, 106 COMPONENT VIDEO OUT 23 Connecting the antenna cable 17 to your AV/amplifier (receiver) 24 to your TV 21 Controlling TVs with the remote 27 "Copy" 67 Copy protection 48, 120 Copy-Free 48 Copy-Never 48 Copy-Once 48 Counter 70 CPRM 12 "Create Dubbing List" 86 "Create...
Operating Instructions
Page 124
... 12 recording format 12 recording mode 47 tape speed 75 Recording mode 47, 75 Recording time 47, 50 Region code 16 Remaining time 46, 77 Remote 26, 117 REPLAY 37, 72 Resetting 106 Resume Play 39 Rotate 44 S Safety tab 75 SAP (Second Audio Program) 48, 75 Satellite receiver 18 "Scan... adjustment 71 Troubleshooting 107 "Tuner Audio" 99 Tuner Preset 30 Tuner Preset settings 94 TV INPUT 27 "TV Type" 97 U "Unfinalize" 88 Unrecordable pictures 48 V "VCR Function" 102 "Video (HDMI)" 97 VIDEO CD 15 Video mode 12 Video settings 97 VR mode 12 Z Zoom 44
... 12 recording format 12 recording mode 47 tape speed 75 Recording mode 47, 75 Recording time 47, 50 Region code 16 Remaining time 46, 77 Remote 26, 117 REPLAY 37, 72 Resetting 106 Resume Play 39 Rotate 44 S Safety tab 75 SAP (Second Audio Program) 48, 75 Satellite receiver 18 "Scan... adjustment 71 Troubleshooting 107 "Tuner Audio" 99 Tuner Preset 30 Tuner Preset settings 94 TV INPUT 27 "TV Type" 97 U "Unfinalize" 88 Unrecordable pictures 48 V "VCR Function" 102 "Video (HDMI)" 97 VIDEO CD 15 Video mode 12 Video settings 97 VR mode 12 Z Zoom 44

