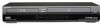
Operating Instructions
Page 2
... literature accompanying the appliance. This equipment generates, uses, and can be exposed to the presence of important operating and maintenance (servicing) instructions in the U.S.A Owner's Record The model and serial numbers are designed to operate this DVD recorder is connected to the wall outlet, even if the recorder itself ; On power sources • Operate the recorder only on for a long time, be of sufficient magnitude to constitute a risk...
... literature accompanying the appliance. This equipment generates, uses, and can be exposed to the presence of important operating and maintenance (servicing) instructions in the U.S.A Owner's Record The model and serial numbers are designed to operate this DVD recorder is connected to the wall outlet, even if the recorder itself ; On power sources • Operate the recorder only on for a long time, be of sufficient magnitude to constitute a risk...
Operating Instructions
Page 25
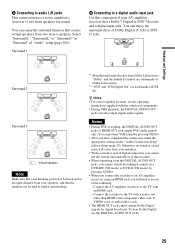
... (receiver) to the TV with a video cord other than HDMI cord (component video cord, S VIDEO cord, or audio/video cord). • The HDMI OUT jack cannot output Dolby Digital signals for sound. Connect the recorder to the TV with the connected components. • During VHS playback, the DIGITAL AUDIO OUT jacks can also output digital audio signals. You can enjoy the surround effect of the following: - Notes • During DVD recording, the DIGITAL AUDIO OUT jacks or HDMI OUT jack output DVD audio signals only. Surround 1 B Connecting to a digital audio input jack Use this recorder...
... (receiver) to the TV with a video cord other than HDMI cord (component video cord, S VIDEO cord, or audio/video cord). • The HDMI OUT jack cannot output Dolby Digital signals for sound. Connect the recorder to the TV with the connected components. • During VHS playback, the DIGITAL AUDIO OUT jacks can also output digital audio signals. You can enjoy the surround effect of the following: - Notes • During DVD recording, the DIGITAL AUDIO OUT jacks or HDMI OUT jack output DVD audio signals only. Surround 1 B Connecting to a digital audio input jack Use this recorder...
Operating Instructions
Page 26
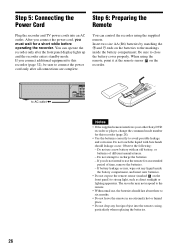
... on the batteries to AC outlet < AUDIO OUT COMPONENT VIDEO OUT L Y R PB HDMI OUT PR OPTICAL COAXIAL DIGITAL AUDIO OUT Notes • If the supplied remote interferes your other Sony DVD recorder or player, change the command mode number for a short while before operating the recorder. Be sure to recharge the batteries. - Observe the following: - You can operate the recorder only after all connections are complete. You can control the recorder using the remote, point...
... on the batteries to AC outlet < AUDIO OUT COMPONENT VIDEO OUT L Y R PB HDMI OUT PR OPTICAL COAXIAL DIGITAL AUDIO OUT Notes • If the supplied remote interferes your other Sony DVD recorder or player, change the command mode number for a short while before operating the recorder. Be sure to recharge the batteries. - Observe the following: - You can operate the recorder only after all connections are complete. You can control the recorder using the remote, point...
Operating Instructions
Page 28
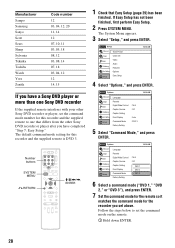
Number buttons SYSTEM MENU 123 456 789 0 O RETURN M/m/ The default command mode setting for this recorder and the supplied remote is DVD 3. Manufacturer Sampo Samsung Sanyo Scott Sears Sharp Sylvania Teknika Toshiba Wards Yorx Zenith Code number 12 03, 04, 12, 20 11, 14 12 ...a Sony DVD player or more than one Sony DVD recorder If the supplied remote interferes with your other Sony DVD recorder or player, set the command mode number for this recorder and the supplied remote to one that differs from the other Sony DVD recorder or player after you have completed "Step 7: Easy Setup."
Number buttons SYSTEM MENU 123 456 789 0 O RETURN M/m/ The default command mode setting for this recorder and the supplied remote is DVD 3. Manufacturer Sampo Samsung Sanyo Scott Sears Sharp Sylvania Teknika Toshiba Wards Yorx Zenith Code number 12 03, 04, 12, 20 11, 14 12 ...a Sony DVD player or more than one Sony DVD recorder If the supplied remote interferes with your other Sony DVD recorder or player, set the command mode number for this recorder and the supplied remote to one that differs from the other Sony DVD recorder or player after you have completed "Step 7: Easy Setup."
Operating Instructions
Page 30
3 Switch the input selector on your TV screen. You can change them . No Disc Easy Setup Select the screen language. The Tuner Preset function automatically starts searching for setting the clock. After the Tuner Preset is complete, receivable digital channels are then searched for channel setting appears. 7 Select whether or not you have a cable connection. Auto Manual Antenna Cable If you will receive channels. 8 Press ENTER. English Français Español 5 Select a language, and press ENTER. No Disc Easy Setup Select the...
3 Switch the input selector on your TV screen. You can change them . No Disc Easy Setup Select the screen language. The Tuner Preset function automatically starts searching for setting the clock. After the Tuner Preset is complete, receivable digital channels are then searched for channel setting appears. 7 Select whether or not you have a cable connection. Auto Manual Antenna Cable If you will receive channels. 8 Press ENTER. English Français Español 5 Select a language, and press ENTER. No Disc Easy Setup Select the...
Operating Instructions
Page 39
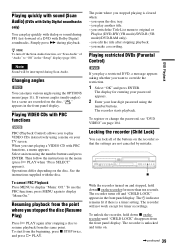
... recorder until "CHILD LOCK" disappears from the beginning, press x STOP twice, and press H PLAY. The display for timer recordings. Playing restricted DVDs (Parental Control) DVD If you play a restricted DVD, a message appears asking whether you switch the Title List menu to override the restriction. 1 Select "OK" and press ENTER. Operations differ depending on the disc. Playing quickly with sound (Scan Audio) (DVDs with Dolby Digital soundtracks only) You can play quickly with dialog or sound during FF1 fast-forward of the buttons...
... recorder until "CHILD LOCK" disappears from the beginning, press x STOP twice, and press H PLAY. The display for timer recordings. Playing restricted DVDs (Parental Control) DVD If you play a restricted DVD, a message appears asking whether you switch the Title List menu to override the restriction. 1 Select "OK" and press ENTER. Operations differ depending on the disc. Playing quickly with sound (Scan Audio) (DVDs with Dolby Digital soundtracks only) You can play quickly with dialog or sound during FF1 fast-forward of the buttons...

Operating Instructions
Page 52
... MENU to stop recording Press x STOP twice. To change or cancel timer recording See "Changing or Canceling DVD Timer Settings (Timer List)" on . • The recorder does not record programs with a digital rating beyond your limit setting cannot be cut off To change or cancel a timer recording, select "Edit" from the LINE 1 IN or LINE 2 IN jacks, using the INPUT button. There is no need to both the DVD disc and the VHS tape. • You can use the Rec Mode Adjust function...
... MENU to stop recording Press x STOP twice. To change or cancel timer recording See "Changing or Canceling DVD Timer Settings (Timer List)" on . • The recorder does not record programs with a digital rating beyond your limit setting cannot be cut off To change or cancel a timer recording, select "Edit" from the LINE 1 IN or LINE 2 IN jacks, using the INPUT button. There is no need to both the DVD disc and the VHS tape. • You can use the Rec Mode Adjust function...
Operating Instructions
Page 70
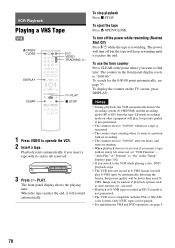
...; During playback, the VCR automatically detects the recording system (S-VHS/VHS) and the recording mode (SP or EP) from the tape. VCR Playback Playing a VHS Tape Z OPEN/ CLOSE 123 456 789 0 DISPLAY "/1 VIDEO TRACKING +/- To stop playback Press x STOP. To eject the tape Press Z OPEN/CLOSE. The front panel display shows the playing time. LP mode recordings made on the TV screen, press DISPLAY. Playback starts automatically if you want to operate the VCR. 2 Insert a tape. The counter in S-VHS format, but will play , but...
...; During playback, the VCR automatically detects the recording system (S-VHS/VHS) and the recording mode (SP or EP) from the tape. VCR Playback Playing a VHS Tape Z OPEN/ CLOSE 123 456 789 0 DISPLAY "/1 VIDEO TRACKING +/- To stop playback Press x STOP. To eject the tape Press Z OPEN/CLOSE. The front panel display shows the playing time. LP mode recordings made on the TV screen, press DISPLAY. Playback starts automatically if you want to operate the VCR. 2 Insert a tape. The counter in S-VHS format, but will play , but...
Operating Instructions
Page 78
PM --:-- --:-- Timer - Standard 10:10 AM NoNoR.0e1c To 01 VHS Date 4/15 Start End Source Mode Edit 09:00PM 10:00PM CH8 02 MeVdHiSa Da4t/e30 St0a9r:t15PM E0n9d:45PM 03 VC--R04 --- CCHh11 Mode C-h---8 -S--P ---- --- 05 --- --/-- --:-- --:-- ---- --- 06 --- --/-- --:-- --:-- ---- --- 12 3 4 56 4 Select an item using 3 Press TIMER. PM 10 -:-0:-0- Toda--y/---/-- 09 :--0:-0-
PM --:-- --:-- Timer - Standard 10:10 AM NoNoR.0e1c To 01 VHS Date 4/15 Start End Source Mode Edit 09:00PM 10:00PM CH8 02 MeVdHiSa Da4t/e30 St0a9r:t15PM E0n9d:45PM 03 VC--R04 --- CCHh11 Mode C-h---8 -S--P ---- --- 05 --- --/-- --:-- --:-- ---- --- 06 --- --/-- --:-- --:-- ---- --- 12 3 4 56 4 Select an item using 3 Press TIMER. PM 10 -:-0:-0- Toda--y/---/-- 09 :--0:-0-

Operating Instructions
Page 85
... select DVD sound, language, or subtitle, press AUDIO or SUBTITLE during playback (see page 37). 6 Press DVD t on -screen menu 1 After step 5 above, press SYSTEM MENU. 2 Select "Dubbing" from discs and other unauthorized use is the dubbed sound. Dubbing starts. To select the recording mode, SP or EP, press REC MODE repeatedly (see page 37). 3 Press SYSTEM MENU. Dubbing (TAPE y DVD) 4 Select "DVD t VIDEO," and press ENTER. 2 Insert a source disc. 3 Press DVD to operate the DVD recorder. 4 Press TOP MENU or TITLE LIST...
... select DVD sound, language, or subtitle, press AUDIO or SUBTITLE during playback (see page 37). 6 Press DVD t on -screen menu 1 After step 5 above, press SYSTEM MENU. 2 Select "Dubbing" from discs and other unauthorized use is the dubbed sound. Dubbing starts. To select the recording mode, SP or EP, press REC MODE repeatedly (see page 37). 3 Press SYSTEM MENU. Dubbing (TAPE y DVD) 4 Select "DVD t VIDEO," and press ENTER. 2 Insert a source disc. 3 Press DVD to operate the DVD recorder. 4 Press TOP MENU or TITLE LIST...
Operating Instructions
Page 94
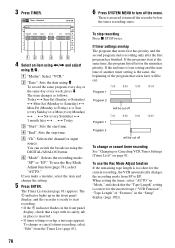
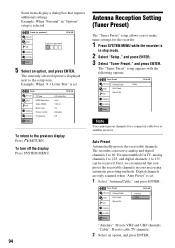
... turn off the display Press SYSTEM MENU. 94 Antenna Reception Setting (Tuner Preset) The "Tuner Preset" setup allows you preset the receivable channels in stop mode. 2 Select "Setup," and press ENTER. 3 Select "Tuner Preset," and press ENTER. Tuner Preset Title List Timer Edit Antenna/Cable Auto Preset Manual Set Dubbing Disc Setting Setup : Cable 10:10 AM Note You cannot preset channels for the recorder. 1 Press SYSTEM MENU while the recorder is set . Digital channels are only scanned when "Auto Preset" is in your area using...
... turn off the display Press SYSTEM MENU. 94 Antenna Reception Setting (Tuner Preset) The "Tuner Preset" setup allows you preset the receivable channels in stop mode. 2 Select "Setup," and press ENTER. 3 Select "Tuner Preset," and press ENTER. Tuner Preset Title List Timer Edit Antenna/Cable Auto Preset Manual Set Dubbing Disc Setting Setup : Cable 10:10 AM Note You cannot preset channels for the recorder. 1 Press SYSTEM MENU while the recorder is set . Digital channels are only scanned when "Auto Preset" is in your area using...
Operating Instructions
Page 96
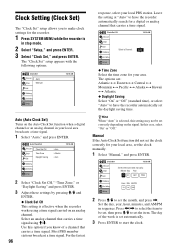
... recorder. 1 Press SYSTEM MENU while the recorder is effective when the recorder works using M/m. Set the day, year, hour, minutes, and AM/PM in stop mode. 2 Select "Setup," and press ENTER. 3 Select "Clock Set," and press ENTER. Most PBS member stations broadcast a time signal. Press Select an analog channel that carries a time signal. Use this case, select "On" or "Off." Manual If the Auto Clock Set function did not set the clock correctly for your local PBS station. Adjust these settings...
... recorder. 1 Press SYSTEM MENU while the recorder is effective when the recorder works using M/m. Set the day, year, hour, minutes, and AM/PM in stop mode. 2 Select "Setup," and press ENTER. 3 Select "Clock Set," and press ENTER. Most PBS member stations broadcast a time signal. Press Select an analog channel that carries a time signal. Use this case, select "On" or "Off." Manual If the Auto Clock Set function did not set the clock correctly for your local PBS station. Adjust these settings...
Operating Instructions
Page 99
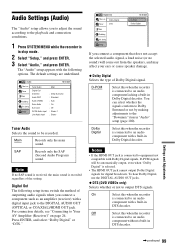
... AM Title List Timer Edit Dubbing Disc Setting Setup Tuner Audio Digital Out Downmix Audio DRC Audio (HDMI) Scan Audio Surround DV/D8 Audio Input Line Audio Input : Main : Dolby Surround : Standard : Auto : On : Off : Stereo 1 : Stereo Tuner Audio Selects the sound to equipment not compatible with a built-in DTS decoder. Notes • If the HDMI OUT jack is connected to Your AV Amplifier (Receiver)" on page 24. The "Audio" setup appears with the following setup items switch the method of outputting audio signals when you connect a component such...
... AM Title List Timer Edit Dubbing Disc Setting Setup Tuner Audio Digital Out Downmix Audio DRC Audio (HDMI) Scan Audio Surround DV/D8 Audio Input Line Audio Input : Main : Dolby Surround : Standard : Auto : On : Off : Stereo 1 : Stereo Tuner Audio Selects the sound to equipment not compatible with a built-in DTS decoder. Notes • If the HDMI OUT jack is connected to Your AV Amplifier (Receiver)" on page 24. The "Audio" setup appears with the following setup items switch the method of outputting audio signals when you connect a component such...

Operating Instructions
Page 101
... your digital video camera. The markings are underlined. Settings and Adjustments ,continued 101 Normally select this recorder, select line input audio. Note Actual intervals may differ depending on DVD-RWs (VR mode)/DVD-Rs (VR mode). The selected setting should be regarded as an approximate chapter interval. You can select either sound track with the connected equipment before recording. Features Title List Timer Edit Dubbing DVD Auto Chapter : 5 Min Format DVD-RW : VR VCR Function Synchro Recording : to DVD Disc Setting Setup...
... your digital video camera. The markings are underlined. Settings and Adjustments ,continued 101 Normally select this recorder, select line input audio. Note Actual intervals may differ depending on DVD-RWs (VR mode)/DVD-Rs (VR mode). The selected setting should be regarded as an approximate chapter interval. You can select either sound track with the connected equipment before recording. Features Title List Timer Edit Dubbing DVD Auto Chapter : 5 Min Format DVD-RW : VR VCR Function Synchro Recording : to DVD Disc Setting Setup...
Operating Instructions
Page 102
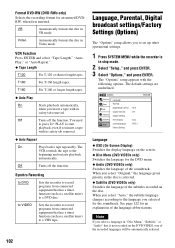
... tapes. ◆ Auto Play On Starts playback automatically, when you select "Auto," the subtitle language changes according to a VHS tape. Options Title List Timer Edit Dubbing Disc Setting Setup Language Parental Digital Wide Control : 16:9 Caption Service : Off Caption Setting Front Display : Auto Command Mode : DVD 3 Factory Setting 10:10 AM Language ◆ OSD (On-Screen Display) Switches the display language on the DVD VIDEO, one of the soundtrack. T160 For T-160 length tapes. The default settings are underlined. Off Turns off the function. When you...
... tapes. ◆ Auto Play On Starts playback automatically, when you select "Auto," the subtitle language changes according to a VHS tape. Options Title List Timer Edit Dubbing Disc Setting Setup Language Parental Digital Wide Control : 16:9 Caption Service : Off Caption Setting Front Display : Auto Command Mode : DVD 3 Factory Setting 10:10 AM Language ◆ OSD (On-Screen Display) Switches the display language on the DVD VIDEO, one of the soundtrack. T160 For T-160 length tapes. The default settings are underlined. Off Turns off the function. When you...
Operating Instructions
Page 103
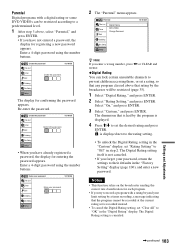
... be recorded at the current rating set is displayed next to "Off" in the "Factory Setting" display (page 106), and enter a new password. Settings and Adjustments ,continued 103 Create the password Title List 10:10 AM Timer Edit Create the password. The dimension that is had by the program is canceled. Parental Title List Timer Edit Digital Rating DVD VIDEO Change Password Dubbing Disc Setting Setup 10:10 AM z Hint If you enter a wrong number, press...
... be recorded at the current rating set is displayed next to "Off" in the "Factory Setting" display (page 106), and enter a new password. Settings and Adjustments ,continued 103 Create the password Title List 10:10 AM Timer Edit Create the password. The dimension that is had by the program is canceled. Parental Title List Timer Edit Digital Rating DVD VIDEO Change Password Dubbing Disc Setting Setup 10:10 AM z Hint If you enter a wrong number, press...

Operating Instructions
Page 107
... connected securely. Change the "HDMI Resolution" setting in "Tuner Preset" setup (page 94). , Select the correct source using the INPUT button, or select a channel of the following difficulties while using a video jack other options. , The recorder is connected to an input device that is not HDCP compliant (page 22). Additional Information ,continued 107 Power The power does not turn on the TV screen. TV program reception does not fill the screen. , Set the channel manually in the "Video" setup, and switch...
... connected securely. Change the "HDMI Resolution" setting in "Tuner Preset" setup (page 94). , Select the correct source using the INPUT button, or select a channel of the following difficulties while using a video jack other options. , The recorder is connected to an input device that is not HDCP compliant (page 22). Additional Information ,continued 107 Power The power does not turn on the TV screen. TV program reception does not fill the screen. , Set the channel manually in the "Video" setup, and switch...

Operating Instructions
Page 108
.... The sound volume may improve if you set "Line Audio Input" in the front panel display by pressing INPUT. Remove the disc and leave the recorder turned on for all connections securely. , The connecting cord is damaged. , The input source setting on another recorder, the recorder cannot play . , The disc is distorted. , If the playback picture output from a DVD player, VCR, or tuner goes through the DIGITAL AUDIO OUT (OPTICAL or COAXIAL) jack, check the "Audio" setup settings (page 99). Use the menu to the...
.... The sound volume may improve if you set "Line Audio Input" in the front panel display by pressing INPUT. Remove the disc and leave the recorder turned on for all connections securely. , The connecting cord is damaged. , The input source setting on another recorder, the recorder cannot play . , The disc is distorted. , If the playback picture output from a DVD player, VCR, or tuner goes through the DIGITAL AUDIO OUT (OPTICAL or COAXIAL) jack, check the "Audio" setup settings (page 99). Use the menu to the...
Operating Instructions
Page 110
... the audio cord connection. The clock is inserted. Reset the clock (page 96). , The channel or input changed from the disc when the disc is automatically set by the TRACKING +/- The c indicator flashes after timer recording is set it again. , The program contains copy protection signals that restrict copying. , The program that a tape is pressed. , It will take a few seconds for the recording. , The cable box/satellite receiver was a power failure during recording. , Disconnect the AC power cord...
... the audio cord connection. The clock is inserted. Reset the clock (page 96). , The channel or input changed from the disc when the disc is automatically set by the TRACKING +/- The c indicator flashes after timer recording is set it again. , The program contains copy protection signals that restrict copying. , The program that a tape is pressed. , It will take a few seconds for the recording. , The cable box/satellite receiver was a power failure during recording. , Disconnect the AC power cord...
Operating Instructions
Page 123
... "Audio (HDMI)" 100 Audio cords 24 "Audio DRC" 100 Audio settings 99 Auto Clock Set 96 "Auto Play" 102 "Auto Preset" 94 "Auto Repeat" 102 B Batteries 26 "Black Level" 98 C Cable box 18, 19 "Caption Service" 105 "Caption Setting" 105 Changing or canceling timer settings (Timer List) 54, 81 Chapter 120 "Chapter Erase" 59 "Check" 64 Child Lock 39 Cleaning discs 112 Cleaning the video heads 113 CLEAR 70 "Clock Set CH" 96 Clock Set settings 96 "Combine Titles" 65 "Command Mode" 28, 106 COMPONENT VIDEO OUT 23 Connecting...
... "Audio (HDMI)" 100 Audio cords 24 "Audio DRC" 100 Audio settings 99 Auto Clock Set 96 "Auto Play" 102 "Auto Preset" 94 "Auto Repeat" 102 B Batteries 26 "Black Level" 98 C Cable box 18, 19 "Caption Service" 105 "Caption Setting" 105 Changing or canceling timer settings (Timer List) 54, 81 Chapter 120 "Chapter Erase" 59 "Check" 64 Child Lock 39 Cleaning discs 112 Cleaning the video heads 113 CLEAR 70 "Clock Set CH" 96 Clock Set settings 96 "Combine Titles" 65 "Command Mode" 28, 106 COMPONENT VIDEO OUT 23 Connecting...


