Operating Instructions
Page 4
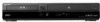
You can also use the controls on the recorder if they have the same or similar names as those on the remote. • The on-screen display illustrations used in this manual may not match the graphics displayed on your TV screen. • The explanations regarding discs ...in this manual describe the controls on the remote. About this manual • Instructions in this manual refer to discs that are created on other recorders and played back on this recorder. Icon +RW...
You can also use the controls on the recorder if they have the same or similar names as those on the remote. • The on-screen display illustrations used in this manual may not match the graphics displayed on your TV screen. • The explanations regarding discs ...in this manual describe the controls on the remote. About this manual • Instructions in this manual refer to discs that are created on other recorders and played back on this recorder. Icon +RW...
Operating Instructions
Page 6
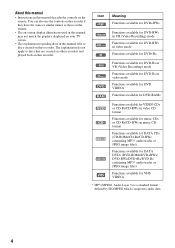
... Step 4: Connecting to Your AV Amplifier (Receiver 18 Step 5: Connecting the Power Cord 20 Step 6: Preparing the Remote 21 Step 7: Easy Setup 23 Connecting Another VCR or Similar Device 27 Quick Guide to Disc Types 30 Recordable and Playable Discs 30 Playable Discs 33 DVD Operation DVD... Equipment 49 Recording From Connected Equipment With a Timer (Synchro Rec 51 Changing or Canceling DVD Timer Settings (Timer List 53 Recording From Another VCR or Similar Device 54 DVD Editing 56 Before Editing 56 Editing a Title 57 Changing the Name of a Title 60 Creating a Playlist 61 ...
... Step 4: Connecting to Your AV Amplifier (Receiver 18 Step 5: Connecting the Power Cord 20 Step 6: Preparing the Remote 21 Step 7: Easy Setup 23 Connecting Another VCR or Similar Device 27 Quick Guide to Disc Types 30 Recordable and Playable Discs 30 Playable Discs 33 DVD Operation DVD... Equipment 49 Recording From Connected Equipment With a Timer (Synchro Rec 51 Changing or Canceling DVD Timer Settings (Timer List 53 Recording From Another VCR or Similar Device 54 DVD Editing 56 Before Editing 56 Editing a Title 57 Changing the Name of a Title 60 Creating a Playlist 61 ...
Operating Instructions
Page 12
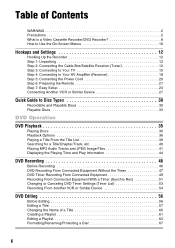
...cable box or satellite receiver (page 26). 12 Connect the set top box controller. After setting up and adjust the settings of your VCR using your VCR connected to an antenna, connect this recorder to a tuner that you have a video input jack. • Be sure to : -... the recorder's input that does not have the following items: • Audio/video cord (phono plug × 3 y phono plug × 3) (1) • Remote commander (remote) (1) • Set top box controller (1) • Size AA (R6) batteries (2) • HDMI cord (1) Step 2: Connecting the Cable Box/Satellite Receiver (Tuner...
...cable box or satellite receiver (page 26). 12 Connect the set top box controller. After setting up and adjust the settings of your VCR using your VCR connected to an antenna, connect this recorder to a tuner that you have a video input jack. • Be sure to : -... the recorder's input that does not have the following items: • Audio/video cord (phono plug × 3 y phono plug × 3) (1) • Remote commander (remote) (1) • Set top box controller (1) • Size AA (R6) batteries (2) • HDMI cord (1) Step 2: Connecting the Cable Box/Satellite Receiver (Tuner...
Operating Instructions
Page 13
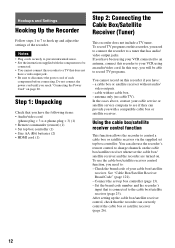
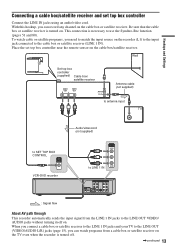
... ANT IN TO TV Antenna cable (not supplied) to antenna input TV Audio/video cord (not supplied) to SET TOP BOX CONTROL SETTOP BOX CONTROL VCR-DVD recorder LINE 1 IN VIDEO to LINE 1 IN AUDIO AUDIO OUT COMPONENT VIDEO OUT S VIDEO OUT LINE 1 IN LINE OUT VIDEO VIDEO L Y R PB SETTOP HDMI... to use the Synchro-Rec function (pages 51 and 80). Hookups and Settings Connecting a cable box/satellite receiver and set top box controller near the remote sensor on . This connection is turned on the cable box/satellite receiver.
... ANT IN TO TV Antenna cable (not supplied) to antenna input TV Audio/video cord (not supplied) to SET TOP BOX CONTROL SETTOP BOX CONTROL VCR-DVD recorder LINE 1 IN VIDEO to LINE 1 IN AUDIO AUDIO OUT COMPONENT VIDEO OUT S VIDEO OUT LINE 1 IN LINE OUT VIDEO VIDEO L Y R PB SETTOP HDMI... to use the Synchro-Rec function (pages 51 and 80). Hookups and Settings Connecting a cable box/satellite receiver and set top box controller near the remote sensor on . This connection is turned on the cable box/satellite receiver.
Operating Instructions
Page 21
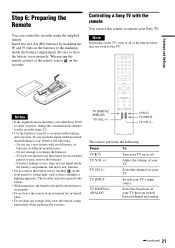
... the markings inside the battery compartment, and insert new batteries. • Do not expose the remote sensor (marked on the batteries to operate your Sony TV. When using the supplied remote. Select the channel on your TV TV INPUT Switch your TV's input source TV DIGITAL/ ANALOG Select the broadcast ...on your TV on the TV, some or all of the buttons below may not respond to the remote. • With normal use the remote for an extended period of your other Sony DVD recorder or player, change the command mode number for the TV. 123 456 789 0 Notes •...
... the markings inside the battery compartment, and insert new batteries. • Do not expose the remote sensor (marked on the batteries to operate your Sony TV. When using the supplied remote. Select the channel on your TV TV INPUT Switch your TV's input source TV DIGITAL/ ANALOG Select the broadcast ...on your TV on the TV, some or all of the buttons below may not respond to the remote. • With normal use the remote for an extended period of your other Sony DVD recorder or player, change the command mode number for the TV. 123 456 789 0 Notes •...

Operating Instructions
Page 22
SYSTEM MENU 123 456 789 0 O RETURN M/m/ The default command mode setting for this recorder and the supplied remote is DVD 3. If you have a Sony DVD player or more than one Sony DVD recorder If the supplied remote interferes with your other Sony DVD recorder or player, set the command mode number for this recorder and the supplied remote to one that differs from the other Sony DVD recorder or player, after you have completed "Step 7: Easy Setup."
SYSTEM MENU 123 456 789 0 O RETURN M/m/ The default command mode setting for this recorder and the supplied remote is DVD 3. If you have a Sony DVD player or more than one Sony DVD recorder If the supplied remote interferes with your other Sony DVD recorder or player, set the command mode number for this recorder and the supplied remote to one that differs from the other Sony DVD recorder or player, after you have completed "Step 7: Easy Setup."
Operating Instructions
Page 23
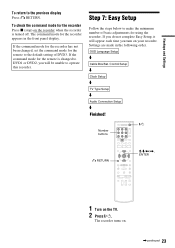
...TV Type Setup m Audio Connection Setup m Finished! The command mode for the recorder appears in the following order. If the command mode for the remote to DVD1 or DVD2, you turn on the recorder when the recorder is changed to the default setting of basic adjustments for the recorder Press... O RETURN M/m/ OSD Language Setup m Cable Box/Sat. If the command mode for the recorder has not been changed, set the command mode for the remote is turned off. If you do not complete Easy Setup, it will appear each time you will be unable to the previous display Press O RETURN...
...TV Type Setup m Audio Connection Setup m Finished! The command mode for the recorder appears in the following order. If the command mode for the remote to DVD1 or DVD2, you turn on the recorder when the recorder is changed to the default setting of basic adjustments for the recorder Press... O RETURN M/m/ OSD Language Setup m Cable Box/Sat. If the command mode for the recorder has not been changed, set the command mode for the remote is turned off. If you do not complete Easy Setup, it will appear each time you will be unable to the previous display Press O RETURN...
Operating Instructions
Page 26
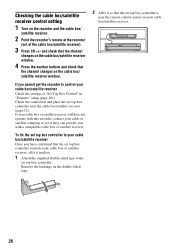
Check the connection and place the set top box controller. To fix the set top box controller to the set top box controller near the remote control sensor on your cable box/satellite receiver. 26 If your cable box or satellite receiver still does not operate with a compatible cable ... (page 12). Checking the cable box/satellite receiver control setting 1 Turn on the recorder and the cable box/ satellite receiver. 2 Point the recorder's remote at the recorder (not at "Set Top Box Control" in place. 1 Attach the supplied double-sided tape to your cable box/satellite receiver Once you...
Check the connection and place the set top box controller. To fix the set top box controller to the set top box controller near the remote control sensor on your cable box/satellite receiver. 26 If your cable box or satellite receiver still does not operate with a compatible cable ... (page 12). Checking the cable box/satellite receiver control setting 1 Turn on the recorder and the cable box/ satellite receiver. 2 Point the recorder's remote at the recorder (not at "Set Top Box Control" in place. 1 Attach the supplied double-sided tape to your cable box/satellite receiver Once you...
Operating Instructions
Page 37
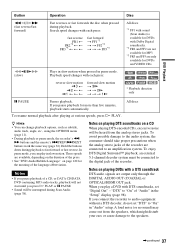
... options, such as subtitle, audio track, angle, etc., using the OPTIONS menu (page 11). • During playback or pause mode, the recorder's m/ M buttons and the remote's .PREV/>NEXT buttons work the same way (page 36). All discs z Hints • You can play a DVD with each press: reverse slow motion T T T T T T forward slow...
... options, such as subtitle, audio track, angle, etc., using the OPTIONS menu (page 11). • During playback or pause mode, the recorder's m/ M buttons and the remote's .PREV/>NEXT buttons work the same way (page 36). All discs z Hints • You can play a DVD with each press: reverse slow motion T T T T T T forward slow...

Operating Instructions
Page 48
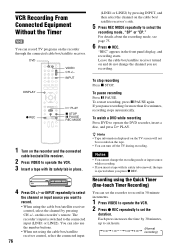
...recorder to stop the recording or the disc is switched to select the recording mode. z Hints • To play a disc recorded with this recorder's remote. To stop recording Press x STOP twice. To restart recording, press X PAUSE again. Each press increases the time by 30 minutes, up to eight.... 1 Press DVD to operate the DVD recorder. 2 Press z REC repeatedly to record in the front panel display. The recorder returns to operate the VCR, insert a tape, then press H PLAY. To watch a VHS tape while recording Press VIDEO to normal recording mode. To cancel the Quick Timer Press...
...recorder to stop the recording or the disc is switched to select the recording mode. z Hints • To play a disc recorded with this recorder's remote. To stop recording Press x STOP twice. To restart recording, press X PAUSE again. Each press increases the time by 30 minutes, up to eight.... 1 Press DVD to operate the DVD recorder. 2 Press z REC repeatedly to record in the front panel display. The recorder returns to operate the VCR, insert a tape, then press H PLAY. To watch a VHS tape while recording Press VIDEO to normal recording mode. To cancel the Quick Timer Press...
Operating Instructions
Page 76
... 789 0 VIDEO CH +/- Leave the cable box/satellite receiver turned on the recorder and the connected cable box/satellite receiver. 2 Press VIDEO to operate the VCR. 3 Insert a tape with its safety tab in the front panel display, and recording starts. To restart recording, press X PAUSE again. INPUT DISPLAY z REC H...the connected input (LINE1 or LINE2). z Hints • Tape information displayed on the TV screen will not be recorded on this recorder's remote. Notes • You cannot change the channel you pause recording for more than five minutes, recording stops automatically.
... 789 0 VIDEO CH +/- Leave the cable box/satellite receiver turned on the recorder and the connected cable box/satellite receiver. 2 Press VIDEO to operate the VCR. 3 Insert a tape with its safety tab in the front panel display, and recording starts. To restart recording, press X PAUSE again. INPUT DISPLAY z REC H...the connected input (LINE1 or LINE2). z Hints • Tape information displayed on the TV screen will not be recorded on this recorder's remote. Notes • You cannot change the channel you pause recording for more than five minutes, recording stops automatically.
Operating Instructions
Page 104
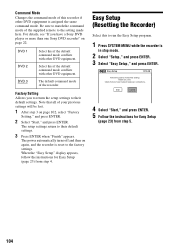
Command Mode Changes the command mode of the recorder. For details, see "If you start, Check that all of the supplied remote to the factory settings. The default command mode of this if the default command mode conflicts with other DVD equipment. Before you have ...appears. When the "Easy Setup" display appears, follow the instructions for Easy Setup (page 23) from step 4. Factory Setting Allows you have a Sony DVD player or more than one Sony DVD recorder" on again, and the recorder is in stop mode. 2 Select "Setup," and press ENTER. 3 Select "Easy Setup," and press...
Command Mode Changes the command mode of the recorder. For details, see "If you start, Check that all of the supplied remote to the factory settings. The default command mode of this if the default command mode conflicts with other DVD equipment. Before you have ...appears. When the "Easy Setup" display appears, follow the instructions for Easy Setup (page 23) from step 4. Factory Setting Allows you have a Sony DVD player or more than one Sony DVD recorder" on again, and the recorder is in stop mode. 2 Select "Setup," and press ENTER. 3 Select "Easy Setup," and press...
Operating Instructions
Page 109
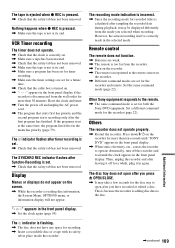
...power cord. , The program that the safety tab has not been removed. However, the actual recording itself is set for both the Sony DVD equipment. Other Sony equipment responds to the remote. , The same command mode is correctly made in the selected mode. Set a different command mode for a while, plug it ... the same command mode (page 22). Press down "/1 on the recorder for more than ten seconds until the clock appears in the front panel display. VCR Timer recording The timer does not operate. , Check that the clock is correctly set. , Make sure a tape has been inserted. , Check that ...
...power cord. , The program that the safety tab has not been removed. However, the actual recording itself is set for both the Sony DVD equipment. Other Sony equipment responds to the remote. , The same command mode is correctly made in the selected mode. Set a different command mode for a while, plug it ... the same command mode (page 22). Press down "/1 on the recorder for more than ten seconds until the clock appears in the front panel display. VCR Timer recording The timer does not operate. , Check that the clock is correctly set. , Make sure a tape has been inserted. , Check that ...
Operating Instructions
Page 112
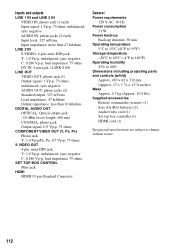
... projecting parts and controls (w/h/d) Approx. 430 × 82 × 332 mm (Approx. 17 × 3 1/4 × 131/8 inches) Mass Approx. 4.7 kg (Approx. 10.4 lbs) Supplied accessories Remote commander (remote) (1) Size AA (R6) batteries (2) Audio/video cord (1) Set top box controller (1) HDMI cord (1) Design and specifications are subject to change without notice. 112
... projecting parts and controls (w/h/d) Approx. 430 × 82 × 332 mm (Approx. 17 × 3 1/4 × 131/8 inches) Mass Approx. 4.7 kg (Approx. 10.4 lbs) Supplied accessories Remote commander (remote) (1) Size AA (R6) batteries (2) Audio/video cord (1) Set top box controller (1) HDMI cord (1) Design and specifications are subject to change without notice. 112
Operating Instructions
Page 114
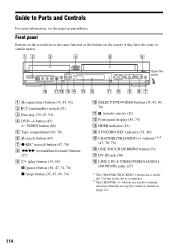
... LINE 2 IN (S VIDEO/VIDEO/AUDIO L (MONO)/R) jacks (27) *1 The CHANNEL/TRACKING + button has a tactile dot. Front panel Buttons on the remote if they have the same function as a reference. *2 The CHANNEL +/- Guide to Parts and Controls For more information, see the pages in parentheses. buttons ...(35, 69) X (pause) button (36, 47, 71, 76) x (stop) button (35, 47, 69, 76) J SELECT DVD/VIDEO buttons (35, 47, 69, 76) K (remote sensor) (21) L Front panel display (45, 73) M HDMI indicator (16) N SYNCHRO REC indicator (51, 80) O CHANNEL/TRACKING +/- Open the cover A A (open/close) button (...
... LINE 2 IN (S VIDEO/VIDEO/AUDIO L (MONO)/R) jacks (27) *1 The CHANNEL/TRACKING + button has a tactile dot. Front panel Buttons on the remote if they have the same function as a reference. *2 The CHANNEL +/- Guide to Parts and Controls For more information, see the pages in parentheses. buttons ...(35, 69) X (pause) button (36, 47, 71, 76) x (stop) button (35, 47, 69, 76) J SELECT DVD/VIDEO buttons (35, 47, 69, 76) K (remote sensor) (21) L Front panel display (45, 73) M HDMI indicator (16) N SYNCHRO REC indicator (51, 80) O CHANNEL/TRACKING +/- Open the cover A A (open/close) button (...
Operating Instructions
Page 115
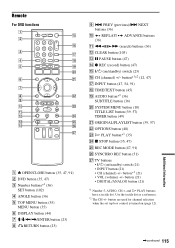
...) switch (23) P CH (channel) +/- button (21) • DIGITAL/ANALOG button (21) *1 Number 5, AUDIO, CH +, and H PLAY buttons have a tactile dot. button*1 (21) • VOL (volume) +/- Remote For DVD functions 123 456 789 0 A Z OPEN/CLOSE button (35, 47, 91) B DVD button (35, 47) C Number buttons*1 (36) SET button (102) D ANGLE button (36...
...) switch (23) P CH (channel) +/- button (21) • DIGITAL/ANALOG button (21) *1 Number 5, AUDIO, CH +, and H PLAY buttons have a tactile dot. button*1 (21) • VOL (volume) +/- Remote For DVD functions 123 456 789 0 A Z OPEN/CLOSE button (35, 47, 91) B DVD button (35, 47) C Number buttons*1 (36) SET button (102) D ANGLE button (36...
Operating Instructions
Page 126
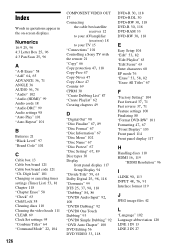
... VIDEO OUT 17 Connecting the cable box/satellite receiver 12 to your AV/amplifier (receiver) 18 to your TV 15 "Connections" 101 Controlling a Sony TV with the remote 21 "Copy" 66 Copy protection 47, 118 Copy-Free 47 Copy-Never 47 Copy-Once 47 Counter 69 CPRM 30 "Create Dubbing List" 87...
... VIDEO OUT 17 Connecting the cable box/satellite receiver 12 to your AV/amplifier (receiver) 18 to your TV 15 "Connections" 101 Controlling a Sony TV with the remote 21 "Copy" 66 Copy protection 47, 118 Copy-Free 47 Copy-Never 47 Copy-Once 47 Counter 69 CPRM 30 "Create Dubbing List" 87...
Operating Instructions
Page 127
... 30 recording format 30 recording mode 46 tape speed 75 Recording mode 46, 75 Recording time 46, 49 Region code 34 Remaining time 44, 77 Remote 21, 115 REPLAY 36, 71 Resetting 104 Resume Play 38 Rotate 42 S Safety tab 75 Satellite receiver 13 Satellite receiver brand code 124 "Scan Audio... 39 "Title Name" 58, 63 TOP MENU 35 Track 119 TRACKING 70 Tracking adjustment 70 Troubleshooting 105 "TV Type" 96 U "Unfinalize" 89 Unrecordable pictures 47 V "VCR Function" 101 "Video (HDMI)" 96 VIDEO CD 33 Video mode 30 Video settings 96 VR mode 30 Z Zoom 42 127
... 30 recording format 30 recording mode 46 tape speed 75 Recording mode 46, 75 Recording time 46, 49 Region code 34 Remaining time 44, 77 Remote 21, 115 REPLAY 36, 71 Resetting 104 Resume Play 38 Rotate 42 S Safety tab 75 Satellite receiver 13 Satellite receiver brand code 124 "Scan Audio... 39 "Title Name" 58, 63 TOP MENU 35 Track 119 TRACKING 70 Tracking adjustment 70 Troubleshooting 105 "TV Type" 96 U "Unfinalize" 89 Unrecordable pictures 47 V "VCR Function" 101 "Video (HDMI)" 96 VIDEO CD 33 Video mode 30 Video settings 96 VR mode 30 Z Zoom 42 127


