Limited Warranty
Page 1
...or packaging af fording an equal degree of incidental or consequential damages, or allow limitations on your responsibility to commercial use ; Only) Sony Electronics Inc. ("Sony") warrants this Limited Warranty will , at its option, repair or replace with respect to any software products whether or not contained ... FOR A PARTICULAR PURPOSE ON THIS PRODUCT IS LIMITED IN DURATION TO THE DURATION OF THIS WARRANTY. 3-084-930-02 ® DVD Recorder BD Player LIMITED WARRANTY (U.S. Instructions: To obtain warranty service, you may not apply to any product or parts determined to state.
...or packaging af fording an equal degree of incidental or consequential damages, or allow limitations on your responsibility to commercial use ; Only) Sony Electronics Inc. ("Sony") warrants this Limited Warranty will , at its option, repair or replace with respect to any software products whether or not contained ... FOR A PARTICULAR PURPOSE ON THIS PRODUCT IS LIMITED IN DURATION TO THE DURATION OF THIS WARRANTY. 3-084-930-02 ® DVD Recorder BD Player LIMITED WARRANTY (U.S. Instructions: To obtain warranty service, you may not apply to any product or parts determined to state.

Operating Instructions
Page 1
2-637-174-12(1) DVD Recorder Operating Instructions RDR-GX315 For customers in the U.S.A Owner's Record The model and serial numbers are located at : Customer Information Service 115 Gordon Baker Road, Toronto, Ontario, M2H 3R6 © 2005 Sony Corporation RDR-GX315 Serial No For customers in the space provided below. Refer to us at the rear of Mind...
2-637-174-12(1) DVD Recorder Operating Instructions RDR-GX315 For customers in the U.S.A Owner's Record The model and serial numbers are located at : Customer Information Service 115 Gordon Baker Road, Toronto, Ontario, M2H 3R6 © 2005 Sony Corporation RDR-GX315 Serial No For customers in the space provided below. Refer to us at the rear of Mind...
Operating Instructions
Page 2
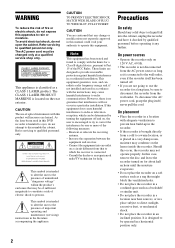
... recorder itself ; Should this case, remove the disc and leave the recorder turned on the rear exterior. To avoid electrical shock, do not expose this DVD recorder is intended to alert the user to disassemble the cabinet. As the laser beam used in accordance with this product will not occur in...
... recorder itself ; Should this case, remove the disc and leave the recorder turned on the rear exterior. To avoid electrical shock, do not expose this DVD recorder is intended to alert the user to disassemble the cabinet. As the laser beam used in accordance with this product will not occur in...
Operating Instructions
Page 4
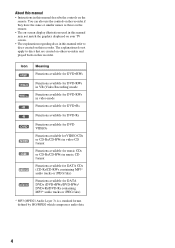
... -RWVR -RWVideo +R -R DVD VCD CD DATA CD DATA DVD Meaning Functions available for DVD+RWs Functions available for DVD-RWs in VR (Video Recording) mode Functions available for DVD-RWs in video mode Functions available for DVD+Rs Functions available for DVD-Rs Functions available for DVD VIDEOs Functions available for VIDEO...CD format Functions available for DATA CDs (CD-Rs/CD-RWs containing MP3* audio tracks or JPEG files) Functions available for DATA DVDs (DVD+RWs/DVD-RWs/ DVD+Rs/DVD-Rs containing MP3* audio tracks or JPEG files) * MP3 (MPEG1 Audio Layer 3) is a standard format defined by ISO/...
... -RWVR -RWVideo +R -R DVD VCD CD DATA CD DATA DVD Meaning Functions available for DVD+RWs Functions available for DVD-RWs in VR (Video Recording) mode Functions available for DVD-RWs in video mode Functions available for DVD+Rs Functions available for DVD-Rs Functions available for DVD VIDEOs Functions available for VIDEO...CD format Functions available for DATA CDs (CD-Rs/CD-RWs containing MP3* audio tracks or JPEG files) Functions available for DATA DVDs (DVD+RWs/DVD-RWs/ DVD+Rs/DVD-Rs containing MP3* audio tracks or JPEG files) * MP3 (MPEG1 Audio Layer 3) is a standard format defined by ISO/...
Operating Instructions
Page 5
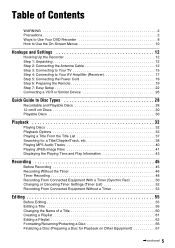
Table of Contents WARNING 2 Precautions 2 Ways to Use Your DVD Recorder 8 How to Use the On-Screen Menus 10 Hookups and Settings 12 Hooking Up the Recorder 12 Step 1: Unpacking 12 Step 2: Connecting the Antenna ...
Table of Contents WARNING 2 Precautions 2 Ways to Use Your DVD Recorder 8 How to Use the On-Screen Menus 10 Hookups and Settings 12 Hooking Up the Recorder 12 Step 1: Unpacking 12 Step 2: Connecting the Antenna ...

Operating Instructions
Page 6
... Before DV/D8 Dubbing 69 Connecting a Digital Video Camera to the DV IN Jack 69 Dubbing From a DV/D8 Format Tape to a DVD 70 Settings and Adjustments 73 Using the Setup Displays 73 Antenna Reception Setting (Tuner Preset 74 Clock Setting (Clock Set 75 Video Settings (Video 76 ... Recorder 83 Additional Information 84 Troubleshooting 84 Notes About This Recorder 88 Specifications 89 About i.LINK 90 Guide to Parts and Controls 91 Glossary 95 DVD Audio/Subtitle Language 96 Index 98 6
... Before DV/D8 Dubbing 69 Connecting a Digital Video Camera to the DV IN Jack 69 Dubbing From a DV/D8 Format Tape to a DVD 70 Settings and Adjustments 73 Using the Setup Displays 73 Antenna Reception Setting (Tuner Preset 74 Clock Setting (Clock Set 75 Video Settings (Video 76 ... Recorder 83 Additional Information 84 Troubleshooting 84 Notes About This Recorder 88 Specifications 89 About i.LINK 90 Guide to Parts and Controls 91 Glossary 95 DVD Audio/Subtitle Language 96 Index 98 6
Operating Instructions
Page 8
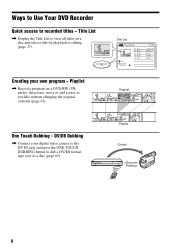
... camera to the DV IN jack and press the ONE TOUCH DUBBING button to dub a DV/D8 format tape over to view all titles on a DVD-RW (VR mode), then erase, move or add scenes as you like without changing the original contents (page 61). Ways to Use Your...
... camera to the DV IN jack and press the ONE TOUCH DUBBING button to dub a DV/D8 format tape over to view all titles on a DVD-RW (VR mode), then erase, move or add scenes as you like without changing the original contents (page 61). Ways to Use Your...

Operating Instructions
Page 9
... pictures with progressive signals, you can enjoy accurate color reproduction and high quality images in JPEG format to a DATA CD (CD-RW/CD-R) or DATA DVD (DVD+RW/DVD-RW/ DVD+R/DVD-R) on a PC. Progressive playback , If your TV screen.
... pictures with progressive signals, you can enjoy accurate color reproduction and high quality images in JPEG format to a DATA CD (CD-RW/CD-R) or DATA DVD (DVD+RW/DVD-RW/ DVD+R/DVD-R) on a PC. Progressive playback , If your TV screen.

Operating Instructions
Page 10
SYSTEM MENU O RETURN M/m/ Once you become familiar with the basic operations, you will find the recorder easy to operate this recorder. How to Use the On-Screen Menus The following three displays are mainly used to use.
SYSTEM MENU O RETURN M/m/ Once you become familiar with the basic operations, you will find the recorder easy to operate this recorder. How to Use the On-Screen Menus The following three displays are mainly used to use.

Operating Instructions
Page 11
The displayed options differ depending on the media type. TOOLS The TOOLS menu appears when you press TOOLS. Press M/m to select an option, press You can search for a title/chapter/track, check the playing and remaining time, or change audio and repeat settings.
The displayed options differ depending on the media type. TOOLS The TOOLS menu appears when you press TOOLS. Press M/m to select an option, press You can search for a title/chapter/track, check the playing and remaining time, or change audio and repeat settings.
Operating Instructions
Page 13
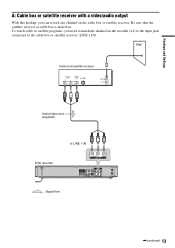
Wall Cable box/satellite receiver AUDIO OUT R L VIDEO OUT S VIDEO ANT IN TO TV Audio/video cord (supplied) to the cable box or satellite receiver (LINE 1 IN). To watch cable or satellite programs, you can record any channel on the cable box or satellite receiver. Be sure that the satellite receiver or cable box is turned on. Hookups and Settings A: Cable box or satellite receiver with a video/audio output With this hookup, you need to match the channel on the recorder (L1) to the input jack connected to LINE 1 IN DVD recorder : Signal flow ,continued 13
Wall Cable box/satellite receiver AUDIO OUT R L VIDEO OUT S VIDEO ANT IN TO TV Audio/video cord (supplied) to the cable box or satellite receiver (LINE 1 IN). To watch cable or satellite programs, you can record any channel on the cable box or satellite receiver. Be sure that the satellite receiver or cable box is turned on. Hookups and Settings A: Cable box or satellite receiver with a video/audio output With this hookup, you need to match the channel on the recorder (L1) to the input jack connected to LINE 1 IN DVD recorder : Signal flow ,continued 13

Operating Instructions
Page 14
... the recorder. Also use this hookup if you watch cable programs, you need to match the channel on the satellite receiver or cable box. Wall DVD recorder : Signal flow 14 to the antenna output channel on the cable box (2ch, 3ch or 4ch). To watch cable channels without cable box, or... can record any channel on the recorder (2ch, 3ch or 4ch) to VHF/UHF IN Wall Cable box ANT IN TO TV Antenna cable (supplied) DVD recorder to VHF/UHF IN : Signal flow C: Cable without a cable box.
... the recorder. Also use this hookup if you watch cable programs, you need to match the channel on the satellite receiver or cable box. Wall DVD recorder : Signal flow 14 to the antenna output channel on the cable box (2ch, 3ch or 4ch). To watch cable channels without cable box, or... can record any channel on the recorder (2ch, 3ch or 4ch) to VHF/UHF IN Wall Cable box ANT IN TO TV Antenna cable (supplied) DVD recorder to VHF/UHF IN : Signal flow C: Cable without a cable box.
Operating Instructions
Page 15
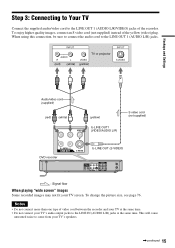
.... To change the picture size, see page 76. INPUT AUDIO R L (red) (white) TV or projector VIDEO (yellow) INPUT S VIDEO Audio/video cord (supplied) (red) (white) DVD recorder (yellow) to LINE OUT1 (VIDEO/AUDIO L/R) S video cord (not supplied) to the LINE IN (AUDIO L/R) jacks at the same time. • Do not connect...
.... To change the picture size, see page 76. INPUT AUDIO R L (red) (white) TV or projector VIDEO (yellow) INPUT S VIDEO Audio/video cord (supplied) (red) (white) DVD recorder (yellow) to LINE OUT1 (VIDEO/AUDIO L/R) S video cord (not supplied) to the LINE IN (AUDIO L/R) jacks at the same time. • Do not connect...
Operating Instructions
Page 16
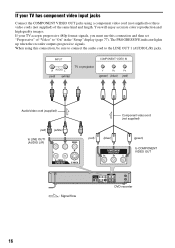
... your TV accepts progressive 480p format signals, you must use this connection, be sure to connect the audio cord to COMPONENT VIDEO OUT : Signal flow DVD recorder 16 If your TV has component video input jacks Connect the COMPONENT VIDEO OUT jacks using this connection and then set "Progressive" of the...
... your TV accepts progressive 480p format signals, you must use this connection, be sure to connect the audio cord to COMPONENT VIDEO OUT : Signal flow DVD recorder 16 If your TV has component video input jacks Connect the COMPONENT VIDEO OUT jacks using this connection and then set "Progressive" of the...
Operating Instructions
Page 17
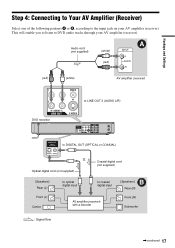
...Hookups and Settings Step 4: Connecting to Your AV Amplifier (Receiver) Select one of the following patterns A or B, according to DVD audio tracks through your AV amplifier (receiver). This will enable you to listen to the input jack on your AV amplifier (receiver...). Audio cord (not supplied) (white) (red) A INPUT L AUDIO R (red) (white) AV amplifier (receiver) DVD recorder to LINE OUT 2 (AUDIO L/R) to DIGITAL OUT (OPTICAL or COAXIAL) or Optical digital cord (not supplied) Coaxial digital cord (not supplied) [Speakers] Rear (L)...
...Hookups and Settings Step 4: Connecting to Your AV Amplifier (Receiver) Select one of the following patterns A or B, according to DVD audio tracks through your AV amplifier (receiver). This will enable you to listen to the input jack on your AV amplifier (receiver...). Audio cord (not supplied) (white) (red) A INPUT L AUDIO R (red) (white) AV amplifier (receiver) DVD recorder to LINE OUT 2 (AUDIO L/R) to DIGITAL OUT (OPTICAL or COAXIAL) or Optical digital cord (not supplied) Coaxial digital cord (not supplied) [Speakers] Rear (L)...

Operating Instructions
Page 18
... (page 22). Surround 1 Surround 2 *2 "DTS" and "DTS Digital Out" are trademarks of Dolby Laboratories. 18 Notes • After you cannot switch the bilingual sounds on a DVD-RW (VR mode) by pressing AUDIO. Otherwise, no sound or a loud noise will come from your AV amplifier (receiver) has a Dolby*1 Digital or DTS*2 decoder...
... (page 22). Surround 1 Surround 2 *2 "DTS" and "DTS Digital Out" are trademarks of Dolby Laboratories. 18 Notes • After you cannot switch the bilingual sounds on a DVD-RW (VR mode) by pressing AUDIO. Otherwise, no sound or a loud noise will come from your AV amplifier (receiver) has a Dolby*1 Digital or DTS*2 decoder...
Operating Instructions
Page 19
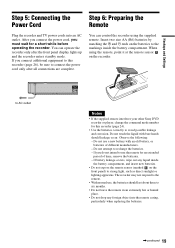
... not intend to use the remote for this recorder (page 26), be sure to AC outlet Notes • If the supplied remote interferes your other Sony DVD recorder or player, change the command mode number for an extended period of different manufacturers. - Do not use , the batteries should leakage occur. Hookups and...
... not intend to use the remote for this recorder (page 26), be sure to AC outlet Notes • If the supplied remote interferes your other Sony DVD recorder or player, change the command mode number for an extended period of different manufacturers. - Do not use , the batteries should leakage occur. Hookups and...
Operating Instructions
Page 20
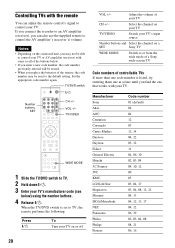
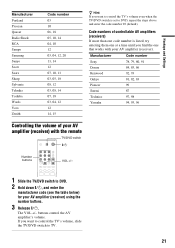
... your TV's input source Number buttons and Select the channel on a SET Sony TV WIDE MODE Switch to the default setting. Controlling TVs with your TV. TV/DVD switch "/1 Number buttons, SET CH +/- When the TV/DVD switch is listed, try entering them one at a time until you can .... Adjust the volume of controllable TVs If more than one code number is set to control your TV on or off VOL +/- Manufacturer Sony Akai AOC Centurion Coronado Curtis-Mathes Daewoo Daytron Fisher General Electric Hitachi J.C.Penney JVC KMC LG/Gold Star Magnavox Marantz MGA/Mitsubishi NEC Panasonic Philco...
... your TV's input source Number buttons and Select the channel on a SET Sony TV WIDE MODE Switch to the default setting. Controlling TVs with your TV. TV/DVD switch "/1 Number buttons, SET CH +/- When the TV/DVD switch is listed, try entering them one at a time until you can .... Adjust the volume of controllable TVs If more than one code number is set to control your TV on or off VOL +/- Manufacturer Sony Akai AOC Centurion Coronado Curtis-Mathes Daewoo Daytron Fisher General Electric Hitachi J.C.Penney JVC KMC LG/Gold Star Magnavox Marantz MGA/Mitsubishi NEC Panasonic Philco...
Operating Instructions
Page 21
... is listed, try entering them one at a time until you want to control the TV's volume, slide the TV/DVD switch to TV. 21 Manufacturer Code number Sony 78, 79, 80, 91 Denon 84, 85, 86 Kenwood 92, 93 Onkyo 81, 82, 83 Pioneer 99 Sansui 87 Technics 97, 98 Yamaha 94..., 95, 96 Controlling the volume of controllable AV amplifiers (receivers) If more than one code number is set to DVD, repeat the steps...
... is listed, try entering them one at a time until you want to control the TV's volume, slide the TV/DVD switch to TV. 21 Manufacturer Code number Sony 78, 79, 80, 91 Denon 84, 85, 86 Kenwood 92, 93 Onkyo 81, 82, 83 Pioneer 99 Sansui 87 Technics 97, 98 Yamaha 94..., 95, 96 Controlling the volume of controllable AV amplifiers (receivers) If more than one code number is set to DVD, repeat the steps...
Operating Instructions
Page 22
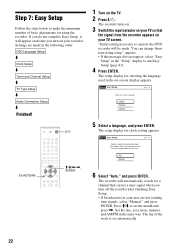
Settings are made in the following order. OSD Language Setup m Clock Setup m Tuner and Channel Setup m TV Type Setup m Audio Connection Setup m Finished! "/1 O RETURN M/m/ Step 7: Easy Setup Follow the steps below to make the minimum number of basic adjustments for using the recorder. If you do not complete Easy Setup, it will appear each time you turn on your recorder.
Settings are made in the following order. OSD Language Setup m Clock Setup m Tuner and Channel Setup m TV Type Setup m Audio Connection Setup m Finished! "/1 O RETURN M/m/ Step 7: Easy Setup Follow the steps below to make the minimum number of basic adjustments for using the recorder. If you do not complete Easy Setup, it will appear each time you turn on your recorder.


