
Operating Instructions
Page 6
... (Clock Set 75 Video Settings (Video 76 Audio Settings (Audio 78 Recording Settings (Features 80 Language, Parental Control Settings/Factory Settings (Options 81 Easy Setup (Resetting the Recorder 83 Additional Information 84 Troubleshooting 84 Notes About This Recorder 88 Specifications 89 About i.LINK 90 Guide to Parts and Controls 91 Glossary...
... (Clock Set 75 Video Settings (Video 76 Audio Settings (Audio 78 Recording Settings (Features 80 Language, Parental Control Settings/Factory Settings (Options 81 Easy Setup (Resetting the Recorder 83 Additional Information 84 Troubleshooting 84 Notes About This Recorder 88 Specifications 89 About i.LINK 90 Guide to Parts and Controls 91 Glossary...
Operating Instructions
Page 20
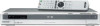
...manufacturer code (see below . • If you enter a new code number, the code number previously entered will be reset to or from the wide mode of a Sony wide-screen TV Code numbers of your TV CH +/- Set the appropriate code number again. Select the channel on your TV... switch "/1 Number buttons, SET CH +/- Adjust the volume of controllable TVs If more than one that works with your TV. Manufacturer Sony Akai AOC Centurion Coronado Curtis-Mathes Daewoo Daytron Fisher General Electric Hitachi J.C.Penney JVC KMC LG/Gold Star Magnavox Marantz MGA/Mitsubishi NEC Panasonic...
...manufacturer code (see below . • If you enter a new code number, the code number previously entered will be reset to or from the wide mode of a Sony wide-screen TV Code numbers of your TV CH +/- Set the appropriate code number again. Select the channel on your TV... switch "/1 Number buttons, SET CH +/- Adjust the volume of controllable TVs If more than one that works with your TV. Manufacturer Sony Akai AOC Centurion Coronado Curtis-Mathes Daewoo Daytron Fisher General Electric Hitachi J.C.Penney JVC KMC LG/Gold Star Magnavox Marantz MGA/Mitsubishi NEC Panasonic...

Operating Instructions
Page 58
..." is also erased. You can divide a title into two (Divide Title) +RW -RWVR You can use H PLAY, , ./>, x STOP, and X PAUSE to divide the title. To reset the start point of the title does not change even if a scene was erased. To finish, select "Finish," and press ENTER. When editing a DVD-RW...(VR mode), press ORIGINAL/PLAYLIST to switch to find the point. The scene is selected. To reset the dividing point, select "No" and press ENTER, then repeat from step 4. A-B Erase 10:10 AM Title No.01 Start 00:00:00 00:00...
..." is also erased. You can divide a title into two (Divide Title) +RW -RWVR You can use H PLAY, , ./>, x STOP, and X PAUSE to divide the title. To reset the start point of the title does not change even if a scene was erased. To finish, select "Finish," and press ENTER. When editing a DVD-RW...(VR mode), press ORIGINAL/PLAYLIST to switch to find the point. The scene is selected. To reset the dividing point, select "No" and press ENTER, then repeat from step 4. A-B Erase 10:10 AM Title No.01 Start 00:00:00 00:00...

Operating Instructions
Page 61
... also erased. • Once the disc is captured as a scene. Notes • If you cannot create Playlist titles on page 55). "Make" is selected. To reset the start or end point, select "Start" or "End" and repeat step 4 or 5. 6 Press ENTER. Editing Creating a Playlist -RWVR Playlist titles allow you finish capturing...
... also erased. • Once the disc is captured as a scene. Notes • If you cannot create Playlist titles on page 55). "Make" is selected. To reset the start or end point, select "Start" or "End" and repeat step 4 or 5. 6 Press ENTER. Editing Creating a Playlist -RWVR Playlist titles allow you finish capturing...

Operating Instructions
Page 64
...:00:00 End Change Cancel 5 Press ENTER at the start and end point of a scene may be different from what you have set. 64 To reset the start and end point of the selected scene. 1 Follow steps 1 to find the point. The selected scene is selected. The display asks for confirmation...
...:00:00 End Change Cancel 5 Press ENTER at the start and end point of a scene may be different from what you have set. 64 To reset the start and end point of the selected scene. 1 Follow steps 1 to find the point. The selected scene is selected. The display asks for confirmation...

Operating Instructions
Page 65
.... 65 Note The start or end point, select "Start" or "End" and repeat step 4 or 5. 6 Press ENTER. The display returns to find the point. To reset the start and end point of a scene may be different from step 2. "End" is selected. Edit Scene 10:10 AM Scene No. 2 / 3 Playlist No.01...
.... 65 Note The start or end point, select "Start" or "End" and repeat step 4 or 5. 6 Press ENTER. The display returns to find the point. To reset the start and end point of a scene may be different from step 2. "End" is selected. Edit Scene 10:10 AM Scene No. 2 / 3 Playlist No.01...

Operating Instructions
Page 83
... Settings and Adjustments 83 Easy Setup 10:10 AM Follow the guide to their default settings. 3 Press ENTER when "Finish" appears. Easy Setup (Resetting the Recorder) Select this to their default settings. DVD 3 The default command mode of your previous settings will be lost. 1 After step 3 ... 2 Select "Start," and press ENTER. The setup settings return to run the Easy Setup program. 1 Press SYSTEM MENU while the recorder is reset to the factory settings. The power automatically turns off and then on again, and the recorder is in stop mode. 2 Select "Setup," and...
... Settings and Adjustments 83 Easy Setup 10:10 AM Follow the guide to their default settings. 3 Press ENTER when "Finish" appears. Easy Setup (Resetting the Recorder) Select this to their default settings. DVD 3 The default command mode of your previous settings will be lost. 1 After step 3 ... 2 Select "Start," and press ENTER. The setup settings return to run the Easy Setup program. 1 Press SYSTEM MENU while the recorder is reset to the factory settings. The power automatically turns off and then on again, and the recorder is in stop mode. 2 Select "Setup," and...

Operating Instructions
Page 86
... can only display numbers and alphabet. If the programs start immediately after z REC is not recorded in the menu has priority (page 49). , There is reset during recording. The MP3 audio track cannot be changed for the recording. 86 Recording/Timer recording/Editing The channel cannot be played. , The DATA CD...
... can only display numbers and alphabet. If the programs start immediately after z REC is not recorded in the menu has priority (page 49). , There is reset during recording. The MP3 audio track cannot be changed for the recording. 86 Recording/Timer recording/Editing The channel cannot be played. , The DATA CD...

Operating Instructions
Page 87
... and after Synchro-Recording is set . , Insert a recordable disc (page 28). , Insert a disc with enough space for more than ten seconds until "SONY DVD" appears in the front panel display. , When static electricity, etc., causes the recorder to the remote. , The same command mode is reading disc information... of the recorder is protected (page 66). The SYNCHRO REC indicator flashes after leaving it off the recorder, wait until the clock appears in again. Reset the code (page 19). , Turn on the recorder. , The remote is not pointed at the remote sensor on the screen. , While the...
... and after Synchro-Recording is set . , Insert a recordable disc (page 28). , Insert a disc with enough space for more than ten seconds until "SONY DVD" appears in the front panel display. , When static electricity, etc., causes the recorder to the remote. , The same command mode is reading disc information... of the recorder is protected (page 66). The SYNCHRO REC indicator flashes after leaving it off the recorder, wait until the clock appears in again. Reset the code (page 19). , Turn on the recorder. , The remote is not pointed at the remote sensor on the screen. , While the...
Operating Instructions
Page 99
... while watching another program 47 Recording mode 45 Recording time 45, 48 Region code 31 Remote 19, 92 REPEAT 35 Repeat A-B Play 36 REPLAY 34 Resetting 83 Resume Play 36 Rotate 42 S SAP (Second Audio Program) 45 Satellite receiver 13 "Scan Audio" 36, 79 Searching for "Chapter" 38 for "Title" 38...
... while watching another program 47 Recording mode 45 Recording time 45, 48 Region code 31 Remote 19, 92 REPEAT 35 Repeat A-B Play 36 REPLAY 34 Resetting 83 Resume Play 36 Rotate 42 S SAP (Second Audio Program) 45 Satellite receiver 13 "Scan Audio" 36, 79 Searching for "Chapter" 38 for "Title" 38...


