
Quick Start Guide
Page 12
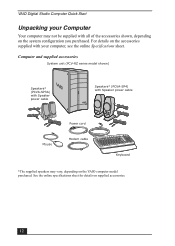
... unit (PCV-RZ series model shown) Speakers* (PCVA-SP3A) with Speaker power cable Speakers* (PCVA-SP4) with all of the accessories shown, depending on the VAIO computer model purchased. VAIO Digital Studio Computer Quick Start Unpacking your computer, see the online Specifications sheet. See the online specifications sheet for details on the accessories supplied with your Computer Your computer may...
... unit (PCV-RZ series model shown) Speakers* (PCVA-SP3A) with Speaker power cable Speakers* (PCVA-SP4) with all of the accessories shown, depending on the VAIO computer model purchased. VAIO Digital Studio Computer Quick Start Unpacking your computer, see the online Specifications sheet. See the online specifications sheet for details on the accessories supplied with your Computer Your computer may...
Quick Start Guide
Page 20
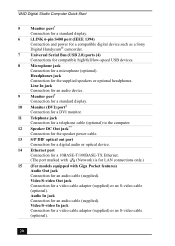
... Connection for an audio cable (supplied). Audio In jack Connection for an audio cable (supplied). Video/S-video In jack Connection for a microphone (optional). VAIO Digital Studio Computer Quick Start 5 Monitor port* Connection for a standard display. 6 i.LINK 6-pin S400 port (IEEE 1394) Connection and power for a compatible digital device such as a Sony Digital Handycam® camcorder. 7 Universal...
... Connection for an audio cable (supplied). Audio In jack Connection for an audio cable (supplied). Video/S-video In jack Connection for a microphone (optional). VAIO Digital Studio Computer Quick Start 5 Monitor port* Connection for a standard display. 6 i.LINK 6-pin S400 port (IEEE 1394) Connection and power for a compatible digital device such as a Sony Digital Handycam® camcorder. 7 Universal...
Quick Start Guide
Page 44
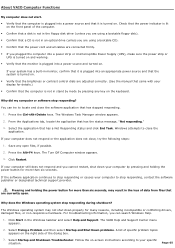
...is turned on the keyboard. VAIO Digital Studio Computer Quick Start About VAIO Computer Functions My computer does not start. ❑ Verify that the computer is plugged into a power source and that it is plugged into an appropriate power source and that the system is...power strip or Uninterruptible Power Supply (UPS), make sure the power strip or UPS is turned on and working. ❑ Verify that has stopped responding. 1 Press the Ctrl+Alt+Delete keys. You can purchase a floppy disk drive separately. 44 Windows attempts to locate and close the application. * Certain VAIO computers...
...is turned on the keyboard. VAIO Digital Studio Computer Quick Start About VAIO Computer Functions My computer does not start. ❑ Verify that the computer is plugged into a power source and that it is plugged into an appropriate power source and that the system is...power strip or Uninterruptible Power Supply (UPS), make sure the power strip or UPS is turned on and working. ❑ Verify that has stopped responding. 1 Press the Ctrl+Alt+Delete keys. You can purchase a floppy disk drive separately. 44 Windows attempts to locate and close the application. * Certain VAIO computers...
Quick Start Guide
Page 58
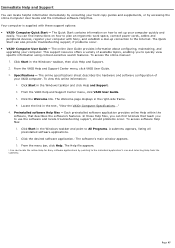
... if problems occur. ❑ VAIO® Computer User Guide - The Quick Start contains information on how to plan an ergonomic work space, connect power cords, cables and peripheral devices, register your computer with these support options: ❑ VAIO® Computer Quick Start - This support resource...® taskbar, then click Help and Support. 2 From the VAIO Help and Support Center menu, click VAIO User Guide. ❑ Specifications - Your computer is supplied with Sony, and establish a dial-up your computer. You can find instructions on how to set up connection to quickly...
... if problems occur. ❑ VAIO® Computer User Guide - The Quick Start contains information on how to plan an ergonomic work space, connect power cords, cables and peripheral devices, register your computer with these support options: ❑ VAIO® Computer Quick Start - This support resource...® taskbar, then click Help and Support. 2 From the VAIO Help and Support Center menu, click VAIO User Guide. ❑ Specifications - Your computer is supplied with Sony, and establish a dial-up your computer. You can find instructions on how to set up connection to quickly...
System Reference Manual
Page 12
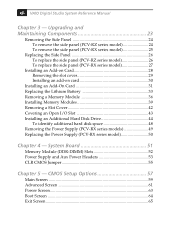
...59 Advanced Screen 61 Power Screen 63 Boot Screen 64 Exit Screen 65 xii VAIO Digital Studio System Reference Manual Chapter 3 - Upgrading and Maintaining Components 23 Removing the Side Panel 24 To remove the side panel (PCV-RZ series model 24 To remove the side panel (PCV-RX series model ...Cover 42 Covering an Open I/O Slot 43 Installing an Additional Hard Disk Drive 44 To identify additional hard disk space 48 Removing the Power Supply (PCV-RX series models 49 Replacing the Power Supply (PCV-RX series model 50 Chapter 4 - System Board 51 Memory Module (DDR-DIMM) Slots 52...
...59 Advanced Screen 61 Power Screen 63 Boot Screen 64 Exit Screen 65 xii VAIO Digital Studio System Reference Manual Chapter 3 - Upgrading and Maintaining Components 23 Removing the Side Panel 24 To remove the side panel (PCV-RZ series model 24 To remove the side panel (PCV-RX series model ...Cover 42 Covering an Open I/O Slot 43 Installing an Additional Hard Disk Drive 44 To identify additional hard disk space 48 Removing the Power Supply (PCV-RX series models 49 Replacing the Power Supply (PCV-RX series model 50 Chapter 4 - System Board 51 Memory Module (DDR-DIMM) Slots 52...

System Reference Manual
Page 20
...i.LINK connector. Connects to the device if the device also has a 6-pin i.LINK port. A 6-pin i.LINK cable can supply power from the computer to a video cable (supplied). 6 VAIO Digital Studio System Reference Manual Connectors (Models Equipped with Giga Pocket Features) Audio R In jack Audio L In jack Video In ...device, use the 6-pin i.LINK port on models equipped with Giga Pocket™ features. † To connect to an audio cable (supplied). Connects to compatible high/full/low-speed USB devices. * The audio and video connections are available only on the back of the system...
...i.LINK connector. Connects to the device if the device also has a 6-pin i.LINK port. A 6-pin i.LINK cable can supply power from the computer to a video cable (supplied). 6 VAIO Digital Studio System Reference Manual Connectors (Models Equipped with Giga Pocket Features) Audio R In jack Audio L In jack Video In ...device, use the 6-pin i.LINK port on models equipped with Giga Pocket™ features. † To connect to an audio cable (supplied). Connects to compatible high/full/low-speed USB devices. * The audio and video connections are available only on the back of the system...
System Reference Manual
Page 38
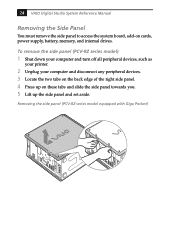
...24 VAIO Digital Studio System Reference Manual Removing the Side Panel You must remove the side panel to access the system board, add-on these tabs and slide the side panel towards you. 5 Lift up on cards, power supply, battery, memory, and internal drives. Removing the side panel (PCV-RZ... series model equipped with Giga Pocket) To remove the side panel (PCV-RZ series model) 1 Shut down your computer and turn off all peripheral devices, such as your printer....
...24 VAIO Digital Studio System Reference Manual Removing the Side Panel You must remove the side panel to access the system board, add-on these tabs and slide the side panel towards you. 5 Lift up on cards, power supply, battery, memory, and internal drives. Removing the side panel (PCV-RZ... series model equipped with Giga Pocket) To remove the side panel (PCV-RZ series model) 1 Shut down your computer and turn off all peripheral devices, such as your printer....

System Reference Manual
Page 44
See "Replacing the Side Panel" on page 26. 3 Reconnect all peripheral devices and the power cord, and then turn on card. 2 Replace the side panel. See the instructions supplied with the add-on the computer. 30 VAIO Digital Studio System Reference Manual Installing an add-on card 1 Attach any internal cables that the card requires.
See "Replacing the Side Panel" on page 26. 3 Reconnect all peripheral devices and the power cord, and then turn on card. 2 Replace the side panel. See the instructions supplied with the add-on the computer. 30 VAIO Digital Studio System Reference Manual Installing an add-on card 1 Attach any internal cables that the card requires.
System Reference Manual
Page 50
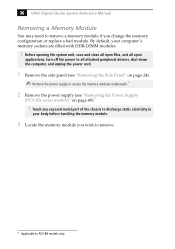
... discharge static electricity in your computer's memory sockets are filled with DDR-DIMM modules. ! 36 VAIO Digital Studio System Reference Manual Removing a Memory Module You may need to remove a memory module if you wish to remove. * Applicable to PCV-RX models only. By default... off the power to all attached peripheral devices, shut down the computer, and unplug the power cord. 1 Remove the side panel (see "Removing the Side Panel" on page 24). ✍ Remove the power supply to access the memory modules underneath.* 2 Remove the power supply (see "Removing the Power Supply (PCV-RX series...
... discharge static electricity in your computer's memory sockets are filled with DDR-DIMM modules. ! 36 VAIO Digital Studio System Reference Manual Removing a Memory Module You may need to remove a memory module if you wish to remove. * Applicable to PCV-RX models only. By default... off the power to all attached peripheral devices, shut down the computer, and unplug the power cord. 1 Remove the side panel (see "Removing the Side Panel" on page 24). ✍ Remove the power supply to access the memory modules underneath.* 2 Remove the power supply (see "Removing the Power Supply (PCV-RX series...
System Reference Manual
Page 52
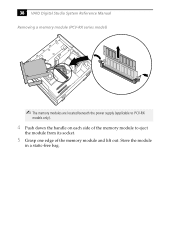
Store the module in a static-free bag. 38 VAIO Digital Studio System Reference Manual Removing a memory module (PCV-RX series model) ✍ The memory modules are located beneath the power supply (applicable to PCV-RX models only). 4 Push down the handle on each side of the memory module to eject the module from its socket. 5 Grasp one edge of the memory module and lift out.
Store the module in a static-free bag. 38 VAIO Digital Studio System Reference Manual Removing a memory module (PCV-RX series model) ✍ The memory modules are located beneath the power supply (applicable to PCV-RX models only). 4 Push down the handle on each side of the memory module to eject the module from its socket. 5 Grasp one edge of the memory module and lift out.

System Reference Manual
Page 64
50 VAIO Digital Studio System Reference Manual Replacing the Power Supply (PCV-RX series model) 1 Rotate the power supply down and slide it down along the rails on each side of the chassis opening. 2 Replace the screw that secures the power supply to the rear of the chassis.
50 VAIO Digital Studio System Reference Manual Replacing the Power Supply (PCV-RX series model) 1 Rotate the power supply down and slide it down along the rails on each side of the chassis opening. 2 Replace the screw that secures the power supply to the rear of the chassis.
System Reference Manual
Page 68
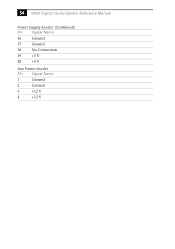
54 VAIO Digital Studio System Reference Manual Power Supply header (Continued) Pin Signal Name 16 Ground 17 Ground 18 No Connection 19 +5 V 20 +5 V Aux Power header Pin Signal Name 1 Ground 2 Ground 3 +12 V 4 +12 V
54 VAIO Digital Studio System Reference Manual Power Supply header (Continued) Pin Signal Name 16 Ground 17 Ground 18 No Connection 19 +5 V 20 +5 V Aux Power header Pin Signal Name 1 Ground 2 Ground 3 +12 V 4 +12 V

Online Help Center (VAIO User Guide)
Page 36
... purchased from Sony VAIO Direct through the Web site at http://vaio.sonystyle.com or the toll-free number, 1-888-315-7669. The following i.LINK 400 Mbps cables are available and recommended for information on installation and use with a 4-pin and/or a 6-pin i.LINK port, depending on your computer. Sony computer supplies, accessories, and peripherals can supply power (10V...
... purchased from Sony VAIO Direct through the Web site at http://vaio.sonystyle.com or the toll-free number, 1-888-315-7669. The following i.LINK 400 Mbps cables are available and recommended for information on installation and use with a 4-pin and/or a 6-pin i.LINK port, depending on your computer. Sony computer supplies, accessories, and peripherals can supply power (10V...
Online Help Center (VAIO User Guide)
Page 65
... the software publisher or designated technical support provider. Page 65 About VAIO Computer Functions My computer does not start. Verify that the computer is plugged into a power source and that it is plugged into an appropriate power source and that the system is turned on. Verify ...adjusted correctly. (See the manual that came with your display for details.) Confirm that the computer is plugged into a power strip or Uninterruptible Power Supply (UPS), make sure the power strip or UPS is turned on and working. Verify that the monitor is not in stand...
... the software publisher or designated technical support provider. Page 65 About VAIO Computer Functions My computer does not start. Verify that the computer is plugged into a power source and that it is plugged into an appropriate power source and that the system is turned on. Verify ...adjusted correctly. (See the manual that came with your display for details.) Confirm that the computer is plugged into a power strip or Uninterruptible Power Supply (UPS), make sure the power strip or UPS is turned on and working. Verify that the monitor is not in stand...
Online Help Center (VAIO User Guide)
Page 85
...features. Your computer is supplied with Sony, and establish a dial-up your computer with these Help files, you to plan an ergonomic work space, connect power cords, cables and peripheral devices, register your computer quickly and ...easily. Click the desired software application.1 The software's main window appears. 3. From the VAIO Help and Support Center menu, click VAIO...
...features. Your computer is supplied with Sony, and establish a dial-up your computer with these Help files, you to plan an ergonomic work space, connect power cords, cables and peripheral devices, register your computer quickly and ...easily. Click the desired software application.1 The software's main window appears. 3. From the VAIO Help and Support Center menu, click VAIO...
Marketing Specifications
Page 1
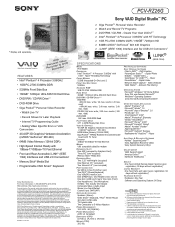
...SUPPLIED ACCESSORIES Speakers (Stereo) VAIO Smart™ Keyboard / PS/2® Wheel Mouse 4pin-4pin i.LINK cable TV Coaxial cable Two Composite to the performance of the hardware and software in U.S.A. 1/03 PCV-RZ26G Sony VAIO...in this product with respect to S-Video Adapters POWER REQUIREMENTS 100-120V -3A (50/60Hz) POWER MANAGEMENT ACPI 1.0 Compliant DIMENSIONS (CPU) 8.0"(W) ...http://www.sony.com/vaio Computer Interface: The computer industry lacks standards, and therefore, there are trademarks of Microsoft Corporation. Simulated graphic shown on the Sony Desktop Computer are ...
...SUPPLIED ACCESSORIES Speakers (Stereo) VAIO Smart™ Keyboard / PS/2® Wheel Mouse 4pin-4pin i.LINK cable TV Coaxial cable Two Composite to the performance of the hardware and software in U.S.A. 1/03 PCV-RZ26G Sony VAIO...in this product with respect to S-Video Adapters POWER REQUIREMENTS 100-120V -3A (50/60Hz) POWER MANAGEMENT ACPI 1.0 Compliant DIMENSIONS (CPU) 8.0"(W) ...http://www.sony.com/vaio Computer Interface: The computer industry lacks standards, and therefore, there are trademarks of Microsoft Corporation. Simulated graphic shown on the Sony Desktop Computer are ...


