Online Help Center
Page 3
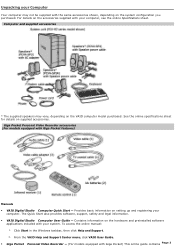
... setting up and registering your system. Contains information on the system configuration you purchased. The Quick Start also provides software, support, safety and legal information. VAIO Digital Studio Com puter User Guide - Unpacking your computer, see the online Specifications sheet. To access the online manual: 1. Com puter and supplied accessories * The supplied speakers may not be supplied with the same accessories shown, depending on the hardware...
... setting up and registering your system. Contains information on the system configuration you purchased. The Quick Start also provides software, support, safety and legal information. VAIO Digital Studio Com puter User Guide - Unpacking your computer, see the online Specifications sheet. To access the online manual: 1. Com puter and supplied accessories * The supplied speakers may not be supplied with the same accessories shown, depending on the hardware...
Online Help Center
Page 12
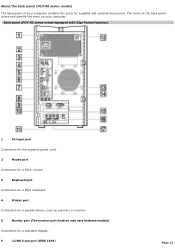
... computer contains the ports for a standard display. 6 i.LINK 6-pin port (IEEE 1394) Page 12 About the back panel (PCV-RZ series model) The back panel of your computer. Back panel (PCV- RZ series m odel equipped with Giga Pocket features) 1 AC Input port Connection for the supplied power cord. 2 Mouse port Connection for a PS/2® mouse. 3 Keyboard port Connection for a PS/2 keyboard. 4 Printer port Connection for a parallel device, such as a printer or scanner. 5 Monitor port (The monitor port location may vary between models) Connection for supplied and optional...
... computer contains the ports for a standard display. 6 i.LINK 6-pin port (IEEE 1394) Page 12 About the back panel (PCV-RZ series model) The back panel of your computer. Back panel (PCV- RZ series m odel equipped with Giga Pocket features) 1 AC Input port Connection for the supplied power cord. 2 Mouse port Connection for a PS/2® mouse. 3 Keyboard port Connection for a PS/2 keyboard. 4 Printer port Connection for a parallel device, such as a printer or scanner. 5 Monitor port (The monitor port location may vary between models) Connection for supplied and optional...
Online Help Center
Page 15
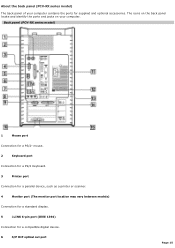
...on your computer contains the ports for a compatible digital device. 6 S/P DIF optical out port Page 15 About the back panel (PCV-RX series model) The back panel of your computer. RX series m odel) 1 Mouse port Connection for a PS/2® mouse. 2 Keyboard port Connection for a PS/2 Keyboard. 3 Printer port Connection for a parallel device, such as a printer or scanner. 4 Monitor port (The monitor port location may vary between models) Connection for a standard display. 5 i.LINK 6-pin port (IEEE 1394) Connection for supplied and optional accessories. Back panel (PCV-
...on your computer contains the ports for a compatible digital device. 6 S/P DIF optical out port Page 15 About the back panel (PCV-RX series model) The back panel of your computer. RX series m odel) 1 Mouse port Connection for a PS/2® mouse. 2 Keyboard port Connection for a PS/2 Keyboard. 3 Printer port Connection for a parallel device, such as a printer or scanner. 4 Monitor port (The monitor port location may vary between models) Connection for a standard display. 5 i.LINK 6-pin port (IEEE 1394) Connection for supplied and optional accessories. Back panel (PCV-
Online Help Center
Page 16
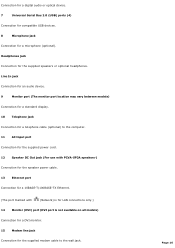
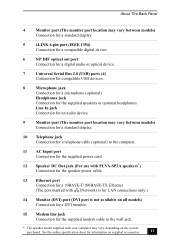
... Ethernet. (The port marked with (Network) is for LAN connections only.) 14 Monitor (DVI) port (DVI port is not available on all models) Connection for a DVI monitor. 15 Modem line jack Connection for the supplied speakers or optional headphones. Line In jack Connection for an audio device. 9 Monitor port (The monitor port location may vary between models) Connection for a standard display. 10 Telephone jack Connection for a telephone cable (optional) to the wall jack. Connection for a digital audio or optical device. 7 Universal Serial Bus 2.0 (USB) ports (4) Connection...
... Ethernet. (The port marked with (Network) is for LAN connections only.) 14 Monitor (DVI) port (DVI port is not available on all models) Connection for a DVI monitor. 15 Modem line jack Connection for the supplied speakers or optional headphones. Line In jack Connection for an audio device. 9 Monitor port (The monitor port location may vary between models) Connection for a standard display. 10 Telephone jack Connection for a telephone cable (optional) to the wall jack. Connection for a digital audio or optical device. 7 Universal Serial Bus 2.0 (USB) ports (4) Connection...
Online Help Center
Page 54
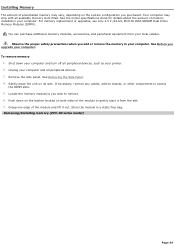
... the system configuration you upgrade your computer. If necessary, remove any cables, add-on both sides of memory installed in your computer. Locate the memory module(s) you add or remove the memory in your local retailer. Remove the side panel. For memory replacement or upgrades, use only 2.5 V, 64-bit, PC2100 DDR-SDRAM Dual Inline Memory Modules (DIMM). Grasp one edge of preinstalled memory may ship with all peripheral devices. 3. See the online specifications sheet for...
... the system configuration you upgrade your computer. If necessary, remove any cables, add-on both sides of memory installed in your computer. Locate the memory module(s) you add or remove the memory in your local retailer. Remove the side panel. For memory replacement or upgrades, use only 2.5 V, 64-bit, PC2100 DDR-SDRAM Dual Inline Memory Modules (DIMM). Grasp one edge of preinstalled memory may ship with all peripheral devices. 3. See the online specifications sheet for...
Online Help Center
Page 57
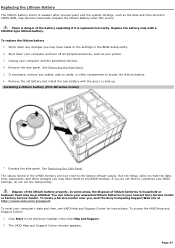
... battery 1. Remove the side panel. Remove the old battery and install the new battery with a CR2032-type lithium battery. Click Start in the CMOS memory are now reset to the factory default values. Replacing the Lithium Battery The lithium battery starts to weaken after several years and the system settings, such as your computer's date and time, see VAIO Help and Support Center for instructions. In some areas, the disposal of lithium batteries in the BIOS Setup utility. 2. To access the VAIO...
... battery 1. Remove the side panel. Remove the old battery and install the new battery with a CR2032-type lithium battery. Click Start in the CMOS memory are now reset to the factory default values. Replacing the Lithium Battery The lithium battery starts to weaken after several years and the system settings, such as your computer's date and time, see VAIO Help and Support Center for instructions. In some areas, the disposal of lithium batteries in the BIOS Setup utility. 2. To access the VAIO...
Online Help Center
Page 58
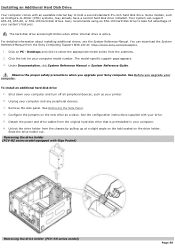
... drive holder. The model-specific support page appears. 3. See Before you upgrade your drive. 5. Unlock the drive holder from the original hard disk drive that is active. Desktops and click to -Order (CTO) systems, may already have a second hard disk drive installed. Unplug your computer model number. Detach the power and drive cables from the chassis by pulling up at : http://www.sony.com/pcsupport. 1. Click on the new drive as a slave. See the configuration instructions supplied...
... drive holder. The model-specific support page appears. 3. See Before you upgrade your drive. 5. Unlock the drive holder from the original hard disk drive that is active. Desktops and click to -Order (CTO) systems, may already have a second hard disk drive installed. Unplug your computer model number. Detach the power and drive cables from the chassis by pulling up at : http://www.sony.com/pcsupport. 1. Click on the new drive as a slave. See the configuration instructions supplied...

Online Help Center
Page 68
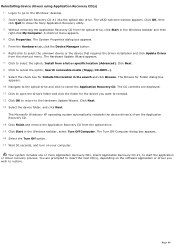
... Hardware Update Wizard appears. 5. A shortcut menu appears. 2. A devic e that requires the driver installation and click Update Driver from the shortcut menu. From the Hardware tab, click the Device Manager button. 4. If Windows XP does not reinstall the device driver(s), follow the steps in the Windows taskbar, then right-click My Computer. The System Properties dialog box appears. 3. Follow the on-screen instructions to reinstall the device driver(s) using the Application Recovery CD(s). 1. Click Start in...
... Hardware Update Wizard appears. 5. A shortcut menu appears. 2. A devic e that requires the driver installation and click Update Driver from the shortcut menu. From the Hardware tab, click the Device Manager button. 4. If Windows XP does not reinstall the device driver(s), follow the steps in the Windows taskbar, then right-click My Computer. The System Properties dialog box appears. 3. Follow the on-screen instructions to reinstall the device driver(s) using the Application Recovery CD(s). 1. Click Start in...
Online Help Center
Page 69
... to start the application or driver recovery process. Click to cancel the option, Search removable media (floppy, CD-ROM...). 9. The Browse for Folder dialog box appears. 10. The CD contents are prompted to the Hardware Update Wizard. Reinstalling device drivers using Application Recovery CD(s) 1. Insert Application Recovery CD #1 into the optical disc drive. The VAIO welcome window appears. From the Hardware tab, click the Device Manager button. 6. Click to select the option, Install from a list or specific location...
... to start the application or driver recovery process. Click to cancel the option, Search removable media (floppy, CD-ROM...). 9. The Browse for Folder dialog box appears. 10. The CD contents are prompted to the Hardware Update Wizard. Reinstalling device drivers using Application Recovery CD(s) 1. Insert Application Recovery CD #1 into the optical disc drive. The VAIO welcome window appears. From the Hardware tab, click the Device Manager button. 6. Click to select the option, Install from a list or specific location...

Online Help Center
Page 106
... Disk, enter the appropriate path for specific emulation information. Refer to print a test page and complete printer installation. Some printers do I install a printer? If your printer has a USB, IEEE 1394, or infrared connection, contact the printer manufacturer for information or updates that may emulate. Place a check mark in the Windows taskbar, then click Control Panel. 2. Select the appropriate printer manufacturer and model...
... Disk, enter the appropriate path for specific emulation information. Refer to print a test page and complete printer installation. Some printers do I install a printer? If your printer has a USB, IEEE 1394, or infrared connection, contact the printer manufacturer for information or updates that may emulate. Place a check mark in the Windows taskbar, then click Control Panel. 2. Select the appropriate printer manufacturer and model...
Online Help Center
Page 116
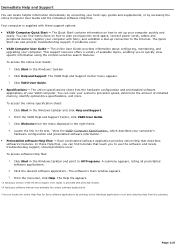
... Start can view your computer. From the VAIO Help and Support Center, click VAIO User Guide. 3. Each preinstalled software application provides online Help that teach you can find instructions on how to set up connection to plan an ergonomic work space, connect power cords, cables and peripheral devices, register your computer with Sony, and establish a dial-up your computer's hardware configuration and preinstalled software information." Preinstalled software Help files2 - The online specifications sheet lists the hardware configuration...
... Start can view your computer. From the VAIO Help and Support Center, click VAIO User Guide. 3. Each preinstalled software application provides online Help that teach you can find instructions on how to set up connection to plan an ergonomic work space, connect power cords, cables and peripheral devices, register your computer with Sony, and establish a dial-up your computer's hardware configuration and preinstalled software information." Preinstalled software Help files2 - The online specifications sheet lists the hardware configuration...
Quick Start Guide
Page 3
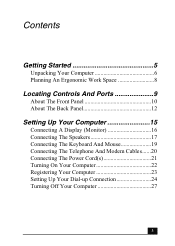
Contents Getting Started 5 Unpacking Your Computer 6 Planning An Ergonomic Work Space 8 Locating Controls And Ports 9 About The Front Panel 10 About The Back Panel 12 Setting Up Your Computer 15 Connecting A Display (Monitor 16 Connecting The Speakers 17 Connecting The Keyboard And Mouse 19 Connecting The Telephone And Modem Cables......20 Connecting The Power Cord(s 21 Turning On Your Computer 22 Registering Your Computer 23 Setting Up Your Dial-up Connection 24 Turning Off Your Computer 27 3
Contents Getting Started 5 Unpacking Your Computer 6 Planning An Ergonomic Work Space 8 Locating Controls And Ports 9 About The Front Panel 10 About The Back Panel 12 Setting Up Your Computer 15 Connecting A Display (Monitor 16 Connecting The Speakers 17 Connecting The Keyboard And Mouse 19 Connecting The Telephone And Modem Cables......20 Connecting The Power Cord(s 21 Turning On Your Computer 22 Registering Your Computer 23 Setting Up Your Dial-up Connection 24 Turning Off Your Computer 27 3
Quick Start Guide
Page 6
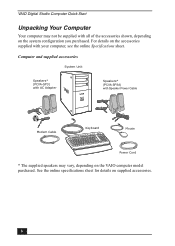
Computer and supplied accessories System Unit Speakers* (PCVA-SP3) with AC Adapter Speakers* (PCVA-SP3A) with Speaker Power Cable Modem Cable Keyboard Mouse Power Cord * The supplied speakers may not be supplied with all of the accessories shown, depending on the VAIO computer model purchased. VAIO Digital Studio Computer Quick Start Unpacking Your Computer Your computer may vary, depending on the system configuration you purchased. See the online specifications sheet for details on the accessories supplied with...
Computer and supplied accessories System Unit Speakers* (PCVA-SP3) with AC Adapter Speakers* (PCVA-SP3A) with Speaker Power Cable Modem Cable Keyboard Mouse Power Cord * The supplied speakers may not be supplied with all of the accessories shown, depending on the VAIO computer model purchased. VAIO Digital Studio Computer Quick Start Unpacking Your Computer Your computer may vary, depending on the system configuration you purchased. See the online specifications sheet for details on the accessories supplied with...
Quick Start Guide
Page 13
... Ethernet. (The port marked with (Network) is for LAN connections only.) 14 Monitor (DVI) port (DVI port is not available on all models) Connection for a DVI monitor. 15 Modem line jack Connection for the supplied modem cable to the wall jack. * The speaker model supplied with your computer may vary between models) Connection for a standard display. 5 i.LINK 6-pin port (IEEE 1394) Connection for a compatible digital device. 6 S/P DIF optical out port Connection for a digital audio or optical device. 7 Universal Serial Bus 2.0 (USB) ports (4) Connection for compatible USB devices...
... Ethernet. (The port marked with (Network) is for LAN connections only.) 14 Monitor (DVI) port (DVI port is not available on all models) Connection for a DVI monitor. 15 Modem line jack Connection for the supplied modem cable to the wall jack. * The speaker model supplied with your computer may vary between models) Connection for a standard display. 5 i.LINK 6-pin port (IEEE 1394) Connection for a compatible digital device. 6 S/P DIF optical out port Connection for a digital audio or optical device. 7 Universal Serial Bus 2.0 (USB) ports (4) Connection for compatible USB devices...
Quick Start Guide
Page 34
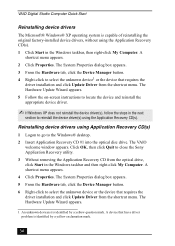
... requires the driver installation and click Update Driver from the optical drive, click Start in the Windows taskbar, then right-click My Computer. VAIO Digital Studio Computer Quick Start Reinstalling device drivers The Microsoft® Windows® XP operating system is capable of reinstalling the original factory-installed device drivers, without using the Application Recovery CD(s). The Hardware Update Wizard appears. 5 Follow the on-screen instructions to locate the device and reinstall the appropriate device driver. ✍ If Windows XP does...
... requires the driver installation and click Update Driver from the optical drive, click Start in the Windows taskbar, then right-click My Computer. VAIO Digital Studio Computer Quick Start Reinstalling device drivers The Microsoft® Windows® XP operating system is capable of reinstalling the original factory-installed device drivers, without using the Application Recovery CD(s). The Hardware Update Wizard appears. 5 Follow the on-screen instructions to locate the device and reinstall the appropriate device driver. ✍ If Windows XP does...
Quick Start Guide
Page 47
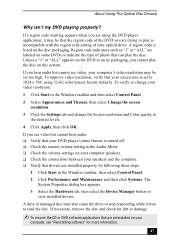
... then select Control Panel. 2 Select Appearances and Themes, then select Change the screen resolution. 3 Click the Settings tab and change your speakers and the computer. ❑ Verify that your DVD player's mute feature is listed on your computer speakers. ❑ Check the connections between your video resolution: 1 Click Start in the Audio Mixer. ❑ Check the volume settings on the disc packaging. If you are preinstalled on your optical drive.
... then select Control Panel. 2 Select Appearances and Themes, then select Change the screen resolution. 3 Click the Settings tab and change your speakers and the computer. ❑ Verify that your DVD player's mute feature is listed on your computer speakers. ❑ Check the connections between your video resolution: 1 Click Start in the Audio Mixer. ❑ Check the volume settings on the disc packaging. If you are preinstalled on your optical drive.
Quick Start Guide
Page 56
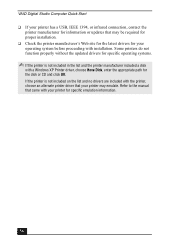
... for proper installation. ❑ Check the printer manufacturer's Web site for the latest drivers for your printer for specific emulation information. 56 Refer to the manual that may emulate. VAIO Digital Studio Computer Quick Start ❑ If your printer has a USB, IEEE 1394, or infrared connection, contact the printer manufacturer for information or updates that came with your operating system before...
... for proper installation. ❑ Check the printer manufacturer's Web site for the latest drivers for your printer for specific emulation information. 56 Refer to the manual that may emulate. VAIO Digital Studio Computer Quick Start ❑ If your printer has a USB, IEEE 1394, or infrared connection, contact the printer manufacturer for information or updates that came with your operating system before...
Quick Start Guide
Page 58
... Support Center, click VAIO User Guide. 3 Click Welcome from the menu displayed in the right frame. 4 Locate the link in the Windows® taskbar 2 Click Help and Support. The online specifications sheet lists the hardware configuration and preinstalled software applications of your system's processor speed, determine the amount of available topics, enabling you to set up connection to plan an ergonomic work space, connect power cords, cables and peripheral devices, register your computer's hardware configuration and preinstalled software information." * A hard...
... Support Center, click VAIO User Guide. 3 Click Welcome from the menu displayed in the right frame. 4 Locate the link in the Windows® taskbar 2 Click Help and Support. The online specifications sheet lists the hardware configuration and preinstalled software applications of your system's processor speed, determine the amount of available topics, enabling you to set up connection to plan an ergonomic work space, connect power cords, cables and peripheral devices, register your computer's hardware configuration and preinstalled software information." * A hard...

Quick Start Guide
Page 74
... Modem 50 Mouse 53 Optical Disk Drive(s) 46 Preinstalled software 49 Speakers 49 Using peripheral devices 55 Floppy disk drive 10 Front Panel 10 H Headphones jack 13 Help and support 57 I i.LINK (4-pin) port 11 (6-pin) port 13 Internet connecting to 24 K keyboard connecting 19 port 12 troubleshooting 54 L left-hand settings for the mouse 54 Lighting workspace planning 8 Limited warranty 23 Line In jack 13 lithium battery disposal 71 safety precautions 71 M Memory Stick slot 11 Microphone...
... Modem 50 Mouse 53 Optical Disk Drive(s) 46 Preinstalled software 49 Speakers 49 Using peripheral devices 55 Floppy disk drive 10 Front Panel 10 H Headphones jack 13 Help and support 57 I i.LINK (4-pin) port 11 (6-pin) port 13 Internet connecting to 24 K keyboard connecting 19 port 12 troubleshooting 54 L left-hand settings for the mouse 54 Lighting workspace planning 8 Limited warranty 23 Line In jack 13 lithium battery disposal 71 safety precautions 71 M Memory Stick slot 11 Microphone...

Marketing Specifications
Page 1
...; (Mouse/Keyboard) One VGA monitor port One Parallel One 6pin i.LINK port (rear) One 4pin i.LINK port (front) One Headphone / One Microphone One Line In SUPPLIED ACCESSORIES Speakers (Stereo) VAIO Smart™ Keyboard PS/2® Wheel Mouse RJ-11 Phone Cord POWER REQUIREMENTS 100-120V -3A (50/60Hz) POWER MANAGEMENT ACPI 1.0 Compliant DIMENSIONS (CPU) 8.0"(W) x 14.2"(H) x 14.6"(D) WEIGHT (CPU) 28.5 lbs. rewrite / 40X max. read) DVD-ROM DRIVE 16X max. PRE-INSTALLED SOFTWARE: SONY ORIGINAL SOFTWARE...
...; (Mouse/Keyboard) One VGA monitor port One Parallel One 6pin i.LINK port (rear) One 4pin i.LINK port (front) One Headphone / One Microphone One Line In SUPPLIED ACCESSORIES Speakers (Stereo) VAIO Smart™ Keyboard PS/2® Wheel Mouse RJ-11 Phone Cord POWER REQUIREMENTS 100-120V -3A (50/60Hz) POWER MANAGEMENT ACPI 1.0 Compliant DIMENSIONS (CPU) 8.0"(W) x 14.2"(H) x 14.6"(D) WEIGHT (CPU) 28.5 lbs. rewrite / 40X max. read) DVD-ROM DRIVE 16X max. PRE-INSTALLED SOFTWARE: SONY ORIGINAL SOFTWARE...


