Quick Start Guide
Page 41
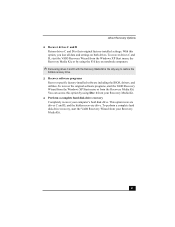
...using Disc 1 from the Recovery Media Kit. To recover drives C and D, start the VAIO Recovery Wizard from your computer's hard disk drive. To recover the original software programs, start the VAIO Recovery Wizard from the Windows XP Start menu, the Recovery Media Kit, or by using ...the hidden recovery drive. ❑ Recover software programs Recover specific factory-installed software including the BIOS, drivers, and utilities. You can access this option, you lose all data and settings on notebook computers. ✍ Recovering drives C and D with the Recovery Media Kit is the only ...
...using Disc 1 from the Recovery Media Kit. To recover drives C and D, start the VAIO Recovery Wizard from your computer's hard disk drive. To recover the original software programs, start the VAIO Recovery Wizard from the Windows XP Start menu, the Recovery Media Kit, or by using ...the hidden recovery drive. ❑ Recover software programs Recover specific factory-installed software including the BIOS, drivers, and utilities. You can access this option, you lose all data and settings on notebook computers. ✍ Recovering drives C and D with the Recovery Media Kit is the only ...
System Reference Manual
Page 11
Configuring Your System 17 Accessing the BIOS Setup Utility 18 Changing Power Management Settings 19 xi Identifying Components 1 Front View 2 Drives ...3 Buttons and Switches 4 Indicators 5 Ports ...6 Rear View ...7 PCV-RS320 series model 7 PCV-RS310 series model 8 Icon Labels 9 I/O Connectors 12 Expansion Slots 16 Chapter 2 - Contents Notice ...ii Owner's Record iii Safety Information and Caution iv...
Configuring Your System 17 Accessing the BIOS Setup Utility 18 Changing Power Management Settings 19 xi Identifying Components 1 Front View 2 Drives ...3 Buttons and Switches 4 Indicators 5 Ports ...6 Rear View ...7 PCV-RS320 series model 7 PCV-RS310 series model 8 Icon Labels 9 I/O Connectors 12 Expansion Slots 16 Chapter 2 - Contents Notice ...ii Owner's Record iii Safety Information and Caution iv...
System Reference Manual
Page 13
... 67 PCI Configuration Status and Error Messages 68 DMA Channel Assignments 69 System I/O Address Map (PCV-RS310 70 System I /O and Expansion Slots 82 Floppy Disk Drive and Controller 82 Hard Drives and Controller 82 Optical Drives 83 System BIOS 83 Index 85 xiii Chapter 6 - Specifications 79 Processor ...79 Chipset ...79 PCI Bus ...79...
... 67 PCI Configuration Status and Error Messages 68 DMA Channel Assignments 69 System I/O Address Map (PCV-RS310 70 System I /O and Expansion Slots 82 Floppy Disk Drive and Controller 82 Hard Drives and Controller 82 Optical Drives 83 System BIOS 83 Index 85 xiii Chapter 6 - Specifications 79 Processor ...79 Chipset ...79 PCI Bus ...79...
System Reference Manual
Page 31
Chapter 2 Configuring Your System This chapter contains information on configuring your system. ❑ Making changes to the BIOS settings. ❑ Making changes to the display's power management settings. 17
Chapter 2 Configuring Your System This chapter contains information on configuring your system. ❑ Making changes to the BIOS settings. ❑ Making changes to the display's power management settings. 17
System Reference Manual
Page 32
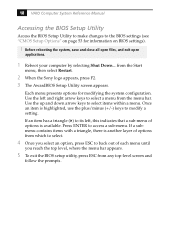
18 VAIO Computer System Reference Manual Accessing the BIOS Setup Utility Access the BIOS Setup Utility to make changes to access a sub-menu. from any top-level screen and follow the prompts. Press ENTER to the BIOS settings (see "CMOS Setup Options" on page 53 for modifying the system configuration. Once... to select. 4 Once you reach the top level, where the menu bar appears. 5 To exit the BIOS setup utility, press ESC from the Start menu, then select Restart. 2 When the Sony logo appears, press F2. 3 The AwardBIOS Setup Utility screen appears. If a submenu contains items with a ...
18 VAIO Computer System Reference Manual Accessing the BIOS Setup Utility Access the BIOS Setup Utility to make changes to access a sub-menu. from any top-level screen and follow the prompts. Press ENTER to the BIOS settings (see "CMOS Setup Options" on page 53 for modifying the system configuration. Once... to select. 4 Once you reach the top level, where the menu bar appears. 5 To exit the BIOS setup utility, press ESC from the Start menu, then select Restart. 2 When the Sony logo appears, press F2. 3 The AwardBIOS Setup Utility screen appears. If a submenu contains items with a ...
System Reference Manual
Page 46
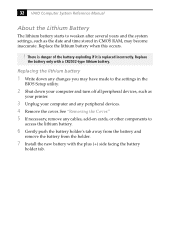
... battery holder tab. Replacing the lithium battery 1 Write down any changes you may have made to the settings in the BIOS Setup utility. 2 Shut down your computer and any cables, add-on cards, or other components to weaken after several years and the system settings, such as ...5 If necessary, remove any peripheral devices. 4 Remove the cover. There is danger of the battery exploding if it is replaced incorrectly. 32 VAIO Computer System Reference Manual About the Lithium Battery The lithium battery starts to access the lithium battery. 6 Gently push the battery holder's tab away from...
... battery holder tab. Replacing the lithium battery 1 Write down any changes you may have made to the settings in the BIOS Setup utility. 2 Shut down your computer and any cables, add-on cards, or other components to weaken after several years and the system settings, such as ...5 If necessary, remove any peripheral devices. 4 Remove the cover. There is danger of the battery exploding if it is replaced incorrectly. 32 VAIO Computer System Reference Manual About the Lithium Battery The lithium battery starts to access the lithium battery. 6 Gently push the battery holder's tab away from...
System Reference Manual
Page 48
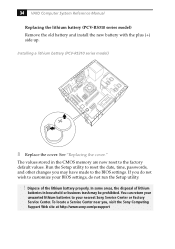
... trash may have made to the factory default values. If you , visit the Sony Computing Support Web site at http://www.sony.com/pcsupport 34 VAIO Computer System Reference Manual Replacing the lithium battery (PCV-RS310 series model) Remove the old battery and install the new battery with the plus ...(+) side up. See "Replacing the cover." Dispose of lithium batteries in the CMOS memory are now reset to the BIOS ...
... trash may have made to the factory default values. If you , visit the Sony Computing Support Web site at http://www.sony.com/pcsupport 34 VAIO Computer System Reference Manual Replacing the lithium battery (PCV-RS310 series model) Remove the old battery and install the new battery with the plus ...(+) side up. See "Replacing the cover." Dispose of lithium batteries in the CMOS memory are now reset to the BIOS ...

System Reference Manual
Page 52
Memory module configurations (MB)* PCV-RS310 Series PCV-RS320 Series DIMM1 0, 128, 256, 512 0, 128, 256, 512 DIMM2 0, 128, 256, 512 0, 128, 256, 512 DIMM3 0, 128, 256, 512 DIMM4 0, 128, 256, 512 * Your computer ships with more than 256 MB DDR-SDRAM depending on the configuration you purchased. ✍.... Memory modules can be single- Your model may ship with at least 256 MB of the memory modules. The BIOS automatically detects the type, size and speed of memory. 38 VAIO Computer System Reference Manual Installing Memory Modules Your system supports DDR-SDRAM memory modules.
Memory module configurations (MB)* PCV-RS310 Series PCV-RS320 Series DIMM1 0, 128, 256, 512 0, 128, 256, 512 DIMM2 0, 128, 256, 512 0, 128, 256, 512 DIMM3 0, 128, 256, 512 DIMM4 0, 128, 256, 512 * Your computer ships with more than 256 MB DDR-SDRAM depending on the configuration you purchased. ✍.... Memory modules can be single- Your model may ship with at least 256 MB of the memory modules. The BIOS automatically detects the type, size and speed of memory. 38 VAIO Computer System Reference Manual Installing Memory Modules Your system supports DDR-SDRAM memory modules.

System Reference Manual
Page 67
Press Enter to the main menu. 53 If you press the + key. Press Esc to go back to display the sub-menu. The BIOS setup has five menu items on page 18). A small triangle ( ) indicates that there is the option currently set for each screen in a sub-menu are ... select an option in the list, then press Enter to choose the selection. The other options. The information and options in the BIOS Setup Utility (see "Accessing the BIOS Setup Utility" on the menu bar. Use the up and down arrow keys to cycle through the other available options for your system...
Press Enter to the main menu. 53 If you press the + key. Press Esc to go back to display the sub-menu. The BIOS setup has five menu items on page 18). A small triangle ( ) indicates that there is the option currently set for each screen in a sub-menu are ... select an option in the list, then press Enter to choose the selection. The other options. The information and options in the BIOS Setup Utility (see "Accessing the BIOS Setup Utility" on the menu bar. Use the up and down arrow keys to cycle through the other available options for your system...

System Reference Manual
Page 97
Specifications 83 Optical Drives Drive Optical drive #1 Optical drive #2 System BIOS Make and model ROM Passwords Power management Advanced features Plug and Play devices Special features Description See online specifications sheet for details See online specifications sheet for details Award-based for PCV-RS310 series models AMI-based for PCV-RS320 series models 2 Mb Flash-ROM User and supervisor passwords supported APM 1.2 ACPI-1.0 compliant hardware for use with APM and PNP BIOS APIs Supported with steerable DMA channels and interrupts Multi-boot, PCI add-on card auto-configure
Specifications 83 Optical Drives Drive Optical drive #1 Optical drive #2 System BIOS Make and model ROM Passwords Power management Advanced features Plug and Play devices Special features Description See online specifications sheet for details See online specifications sheet for details Award-based for PCV-RS310 series models AMI-based for PCV-RS320 series models 2 Mb Flash-ROM User and supervisor passwords supported APM 1.2 ACPI-1.0 compliant hardware for use with APM and PNP BIOS APIs Supported with steerable DMA channels and interrupts Multi-boot, PCI add-on card auto-configure
System Reference Manual
Page 99
...64 main screen 55 options 53 power screen 61 screens 53 BIOS specifications 83 C caution lithium battery 32 CMOS - See BIOS CMOS Clear configuration jumper 52 CMOS RAM 32 codes, beeps 67 communications, specifications 81 computer add-on card installation 29 lithium battery ix memory upgrade ...35 removing unit cover 26 replacing lithium battery 32 configuration jumper, CMOS Clear 52 configuring BIOS setup utility 18 power management 19 connectors i.LINK 6 USB 6...
...64 main screen 55 options 53 power screen 61 screens 53 BIOS specifications 83 C caution lithium battery 32 CMOS - See BIOS CMOS Clear configuration jumper 52 CMOS RAM 32 codes, beeps 67 communications, specifications 81 computer add-on card installation 29 lithium battery ix memory upgrade ...35 removing unit cover 26 replacing lithium battery 32 configuration jumper, CMOS Clear 52 configuring BIOS setup utility 18 power management 19 connectors i.LINK 6 USB 6...
System Reference Manual
Page 101
... 80 hard drives and controllers 82 I/O and expansion slots 82 L2 cache 80 memory module 80 optical drives 83 PCI bus 79 processor 79 system BIOS 83 status and error messages 68 supervisor password 66 system board configuration jumper 52 memory module connector 50 system I /O connectors 12 icons 9 removing unit cover... user password 66 P passwords, user and supervisor 66 PCI Add-on Card inserting 29 power management, configuring 19 printer connector 13 R RAM - See graphics S setup, BIOS 18 slot -
... 80 hard drives and controllers 82 I/O and expansion slots 82 L2 cache 80 memory module 80 optical drives 83 PCI bus 79 processor 79 system BIOS 83 status and error messages 68 supervisor password 66 system board configuration jumper 52 memory module connector 50 system I /O connectors 12 icons 9 removing unit cover... user password 66 P passwords, user and supervisor 66 PCI Add-on Card inserting 29 power management, configuring 19 printer connector 13 R RAM - See graphics S setup, BIOS 18 slot -

VAIO User Guide (primary manual)
Page 117
... down your computer and turn off all peripheral devices, such as the date and time stored in the BIOS Setup utility. 2. Unplug your printer. 3. Gently push the battery holder's tab away from the battery and remove the battery from the holder. 7. Installing a lithium battery (PCV- Replace the... weaken after several years and the system settings, such as your computer and any peripheral devices. 4. Shut down any changes you may have made to the settings in CMOS RAM, may become inaccurate. Remove the cover. RS310 series m odel) Page 117 Replacing the lithium battery 1. See ...
... down your computer and turn off all peripheral devices, such as the date and time stored in the BIOS Setup utility. 2. Unplug your printer. 3. Gently push the battery holder's tab away from the battery and remove the battery from the holder. 7. Installing a lithium battery (PCV- Replace the... weaken after several years and the system settings, such as your computer and any peripheral devices. 4. Shut down any changes you may have made to the settings in CMOS RAM, may become inaccurate. Remove the cover. RS310 series m odel) Page 117 Replacing the lithium battery 1. See ...

VAIO User Guide (primary manual)
Page 118
...PCV-RS310 series model) Remove the old battery and install the new battery with the plus (+) side up. 8. If you do not run the Setup utility. Dispose of lithium batteries in household or business trash may have made to reset the date, time, passwords, and other changes you , visit the Sony Computing...Replacing the cover. Run the Setup utility to the BIOS settings. To locate a Service Center near you may be prohibited. Double-click on the time readout displayed in the CMOS memory are now reset to customize your nearest Sony Service Center or Factory Service Center. Replace the cover...
...PCV-RS310 series model) Remove the old battery and install the new battery with the plus (+) side up. 8. If you do not run the Setup utility. Dispose of lithium batteries in household or business trash may have made to reset the date, time, passwords, and other changes you , visit the Sony Computing...Replacing the cover. Run the Setup utility to the BIOS settings. To locate a Service Center near you may be prohibited. Double-click on the time readout displayed in the CMOS memory are now reset to customize your nearest Sony Service Center or Factory Service Center. Replace the cover...


