
User Guide
Page 7
... to the UNLOCK position. 2. Turn the computer over, and slide the LOCK/UNLOCK switch on the back of the computer to avoid data loss and manually activate a power saving mode. Page 7 Inserting a Battery 3. Lifting and turning the computer with those on the bottom of the computer. Some programs and peripheral devices...
... to the UNLOCK position. 2. Turn the computer over, and slide the LOCK/UNLOCK switch on the back of the computer to avoid data loss and manually activate a power saving mode. Page 7 Inserting a Battery 3. Lifting and turning the computer with those on the bottom of the computer. Some programs and peripheral devices...

User Guide
Page 19
... these steps: 1. If you can 't my computer enter Hibernate mode? Frequently asked questions Can my computer enter Hibernate mode while using battery power? Why can manually activate Hibernate mode. The Power Options Properties window appears. 2.
... these steps: 1. If you can 't my computer enter Hibernate mode? Frequently asked questions Can my computer enter Hibernate mode while using battery power? Why can manually activate Hibernate mode. The Power Options Properties window appears. 2.

User Guide
Page 23
... to a network connection. Click Next, and select I want to Programs, Accessories, Communications, and click Internet Connection Wizard. Connect your computer. Setting up my Internet connection manually, or I connect through a local area network (LAN). 4. Locate the Ethernet port on -screen instructions. Internet Connection Wizard 3. Page 23
... to a network connection. Click Next, and select I want to Programs, Accessories, Communications, and click Internet Connection Wizard. Connect your computer. Setting up my Internet connection manually, or I connect through a local area network (LAN). 4. Locate the Ethernet port on -screen instructions. Internet Connection Wizard 3. Page 23

User Guide
Page 27
Click I want to set up my Internet connection manually, or I connect through a local area network (LAN). 4. To connect the unit to a network connection. See To connect an Ethernet cable and Setting up a dial-up ...
Click I want to set up my Internet connection manually, or I connect through a local area network (LAN). 4. To connect the unit to a network connection. See To connect an Ethernet cable and Setting up a dial-up ...

User Guide
Page 35
Page 35 Lift the disc from the drive. 5. into the manual eject hole next to close it. Push the drive tray gently to the Eject button. 4.
Page 35 Lift the disc from the drive. 5. into the manual eject hole next to close it. Push the drive tray gently to the Eject button. 4.

User Guide
Page 41
... surface of the Eject button. To clean the disc, follow these steps: 1. Wipe off any remaining moisture with solvents (such as a paper clip) in the manual eject hole to the right of the disc may cause reading errors. Try using the battery to select a profile from the center out. 3.
... surface of the Eject button. To clean the disc, follow these steps: 1. Wipe off any remaining moisture with solvents (such as a paper clip) in the manual eject hole to the right of the disc may cause reading errors. Try using the battery to select a profile from the center out. 3.

User Guide
Page 76
.... 2. Wait for the LED indicator on . Inserting and removing floppy disks To write data to turn off. 3. Inserting a Floppy Disk Do not open the shutter manually and touch the surface of the floppy disk.
.... 2. Wait for the LED indicator on . Inserting and removing floppy disks To write data to turn off. 3. Inserting a Floppy Disk Do not open the shutter manually and touch the surface of the floppy disk.

User Guide
Page 77
Protecting floppy disks Do not open the shutter manually or touch the surface of the floppy disk. Keep floppy disks away from magnets, direct sunlight, and heat sources. Page 77
Protecting floppy disks Do not open the shutter manually or touch the surface of the floppy disk. Keep floppy disks away from magnets, direct sunlight, and heat sources. Page 77

Quick Start Guide
Page 5
... AND HEREBY EXPRESSLY DISCLAIMS ANY IMPLIED WARRANTIES OF MERCHANTABILITY OR FITNESS FOR ANY PARTICULAR PURPOSE WITH REGARD TO THIS MANUAL, THE SOFTWARE, OR SUCH OTHER INFORMATION. This product contains software owned by Sony and licensed by the terms of a separate user license agreement. Use of such software is governed by third parties...
... AND HEREBY EXPRESSLY DISCLAIMS ANY IMPLIED WARRANTIES OF MERCHANTABILITY OR FITNESS FOR ANY PARTICULAR PURPOSE WITH REGARD TO THIS MANUAL, THE SOFTWARE, OR SUCH OTHER INFORMATION. This product contains software owned by Sony and licensed by the terms of a separate user license agreement. Use of such software is governed by third parties...
Quick Start Guide
Page 9
...the REN without a decimal point (e.g., 03 is separately shown on the telephone line may be connected to the telephone line. or find Sony Customer Service on a circuit different from that may be connected to the line, as possible. Only peripherals (computer input/output devices, ...terminals, printers, etc.) that contains, among other information, a product identifier in this manual could affect the operations of devices which may result in the devices not ringing in order to maintain uninterrupted service. Myers, FL 33913...
...the REN without a decimal point (e.g., 03 is separately shown on the telephone line may be connected to the telephone line. or find Sony Customer Service on a circuit different from that may be connected to the line, as possible. Only peripherals (computer input/output devices, ...terminals, printers, etc.) that contains, among other information, a product identifier in this manual could affect the operations of devices which may result in the devices not ringing in order to maintain uninterrupted service. Myers, FL 33913...

Quick Start Guide
Page 21
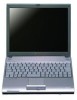
... indicator 6 USB port 2 Memory Stick® media slot 7 Air vent 3 CD-RW/DVD drive 8 Modem jack 4 CD-RW/DVD drive eject button 9 Network (Ethernet) port 5 Manual eject hole Only connect 10BASE-T or 100BASE-TX cables to the Network (Ethernet) port.
... indicator 6 USB port 2 Memory Stick® media slot 7 Air vent 3 CD-RW/DVD drive 8 Modem jack 4 CD-RW/DVD drive eject button 9 Network (Ethernet) port 5 Manual eject hole Only connect 10BASE-T or 100BASE-TX cables to the Network (Ethernet) port.

Quick Start Guide
Page 66
... 9 interference 9 internal speaker 19 Internet connection 34 J jacks headphone 20 microphone 20 modem jack 21 K keyboard 19 L LCD screen handling 51 locating 19 M maintenance 51 manual 32 Memory Stick media indicator 19, 21 slot 21 microphone jack 20 modem laws governing 10 modem jack 21 Monitor (VGA) port 20 Monitor port... data 42 S scroll lock indicator 19 shutting down computer 36 software locating 40 specifications 16 specifications (online) 33 starting computer 26 startup problems 37 support Sony 53 switch power 19 System Recovery CD 45 T technical support 53
... 9 interference 9 internal speaker 19 Internet connection 34 J jacks headphone 20 microphone 20 modem jack 21 K keyboard 19 L LCD screen handling 51 locating 19 M maintenance 51 manual 32 Memory Stick media indicator 19, 21 slot 21 microphone jack 20 modem laws governing 10 modem jack 21 Monitor (VGA) port 20 Monitor port... data 42 S scroll lock indicator 19 shutting down computer 36 software locating 40 specifications 16 specifications (online) 33 starting computer 26 startup problems 37 support Sony 53 switch power 19 System Recovery CD 45 T technical support 53


