
VAIO User Guide
Page 22
... by initiating a quick display time-out. DVD Optimizes performance and power requirements for camera usage. Maximum Battery Life Provides power saving features to the optical drive and Memory Stick® media slot. The following profiles, except the Disable Power Management profile. The Internal modem remains powered on the hard disk and...
... by initiating a quick display time-out. DVD Optimizes performance and power requirements for camera usage. Maximum Battery Life Provides power saving features to the optical drive and Memory Stick® media slot. The following profiles, except the Disable Power Management profile. The Internal modem remains powered on the hard disk and...

VAIO User Guide
Page 24
... only turns off power to the i.LINK® port. i.LINK Port power. (On selected models) Controls power to the hard disk drive. Disabling power to the i.LINK port conserves Memory Stick Port Power-saving media slot conserves power. Page 24 LCD Standby Timer Controls the time...computer screen (LCD) when the system is idle. Disabling power to the optical drive conserves power. 1 Slows the proc es s or s peed. Controls power to the optical drive. Disabling power to the Memory Stick Optical Drive Power-Saving Controls power to the Memory Stick media slot. HDD Standby Timer ...
... only turns off power to the i.LINK® port. i.LINK Port power. (On selected models) Controls power to the hard disk drive. Disabling power to the i.LINK port conserves Memory Stick Port Power-saving media slot conserves power. Page 24 LCD Standby Timer Controls the time...computer screen (LCD) when the system is idle. Disabling power to the optical drive conserves power. 1 Slows the proc es s or s peed. Controls power to the optical drive. Disabling power to the Memory Stick Optical Drive Power-Saving Controls power to the Memory Stick media slot. HDD Standby Timer ...

VAIO User Guide
Page 42
...you want to play some DVDs on both sides. Page 42 Inserting a Disc 4. For more information, see Using power saving modes. 2. Turn on the drive cover blinks while your CDs or DVDs. Opening the Driv e Tray 3. Press the disc onto the tray until the disc clicks securely into place. The...and DVDs Inserting and Ejecting CDs or DVDs Avoid using adhesive labels to identify your computer is active. Push the drive tray gently to open the drive tray. Turn on the drive cover to close it is active. Insert this type of DVD with the label facing up . Adhesive labels may...
...you want to play some DVDs on both sides. Page 42 Inserting a Disc 4. For more information, see Using power saving modes. 2. Turn on the drive cover blinks while your CDs or DVDs. Opening the Driv e Tray 3. Press the disc onto the tray until the disc clicks securely into place. The...and DVDs Inserting and Ejecting CDs or DVDs Avoid using adhesive labels to identify your computer is active. Push the drive tray gently to open the drive tray. Turn on the drive cover to close it is active. Insert this type of DVD with the label facing up . Adhesive labels may...

VAIO User Guide
Page 43
If the Eject button does not work, turn off the computer and insert a thin, straight object (such as a paper clip) into the manual eject hole next to close it. Page 43 Push the drive tray gently to the Eject button. 4. Lift the disc from the drive. 5.
If the Eject button does not work, turn off the computer and insert a thin, straight object (such as a paper clip) into the manual eject hole next to close it. Page 43 Push the drive tray gently to the Eject button. 4. Lift the disc from the drive. 5.

VAIO User Guide
Page 44
... active. Page 44 CDs and DVDs Inserting and Ejecting CDs or DVDs Avoid using adhesive labels to identify your computer is reading data from the drive. For more information, see Using power saving modes. 2. The Busy indicator on the computer or exit a power saving mode (Standby or Hibernate)... type of DVD with the label facing up . A loose disc may come off . 3. Press the Eject button on the optical drive cover to open the drive tray. If you want to open the drive tray. Turn on the drive cover blinks while your CDs or DVDs. Press the Eject button on the...
... active. Page 44 CDs and DVDs Inserting and Ejecting CDs or DVDs Avoid using adhesive labels to identify your computer is reading data from the drive. For more information, see Using power saving modes. 2. The Busy indicator on the computer or exit a power saving mode (Standby or Hibernate)... type of DVD with the label facing up . A loose disc may come off . 3. Press the Eject button on the optical drive cover to open the drive tray. If you want to open the drive tray. Turn on the drive cover blinks while your CDs or DVDs. Press the Eject button on the...

VAIO User Guide
Page 45
Page 45 Push the drive tray gently to the Eject button. 4. If the Eject button does not work, turn off the computer and insert a thin, straight object (such as a paper clip) into the manual eject hole next to close it. Lift the disc from the drive. 5.
Page 45 Push the drive tray gently to the Eject button. 4. If the Eject button does not work, turn off the computer and insert a thin, straight object (such as a paper clip) into the manual eject hole next to close it. Lift the disc from the drive. 5.
VAIO User Guide
Page 46
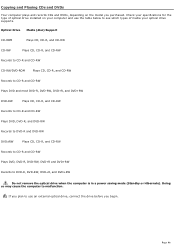
...-R, DVD-RW, DVD+R, and DVD+RW Do not remove the optical drive when the computer is in a power saving mode (Standby or Hibernate). Page 46 If you plan to use the table below to see which types of optical drive installed on the model you purchased. Check your specifications for the type... of media your optical drive supports. Optical Drive Media (disc) Support CD-ROM Plays CD, CD-R, and CD-RW CD-RW Plays CD, CD...
...-R, DVD-RW, DVD+R, and DVD+RW Do not remove the optical drive when the computer is in a power saving mode (Standby or Hibernate). Page 46 If you plan to use the table below to see which types of optical drive installed on the model you purchased. Check your specifications for the type... of media your optical drive supports. Optical Drive Media (disc) Support CD-ROM Plays CD, CD-R, and CD-RW CD-RW Plays CD, CD...

VAIO User Guide
Page 47
... Windows key + Insert to enable your computer's built-in speakers by doing one of the computer's hardware devices appears. 3. Double-click the listed drive, and select the Properties tab. 5. If there are no volume controls, then adjust the volume of your computer's audio feature. To play an...in the Device Manager box, click Device Manager. on -screen display may need to open the submenu. 4. Click OK. Double-click the optical drive device to open a CD program, such as SonicStage. The Volume Control dialog box In the Volume Control and Wave columns, move the ...
... Windows key + Insert to enable your computer's built-in speakers by doing one of the computer's hardware devices appears. 3. Double-click the listed drive, and select the Properties tab. 5. If there are no volume controls, then adjust the volume of your computer's audio feature. To play an...in the Device Manager box, click Device Manager. on -screen display may need to open the submenu. 4. Click OK. Double-click the optical drive device to open a CD program, such as SonicStage. The Volume Control dialog box In the Volume Control and Wave columns, move the ...

VAIO User Guide
Page 49
...6. See Powering Your Computer for more information. A new window appears with Removable Storage. Insert a blank CD-R or CD-RW disc into the optical drive. In the CD Writing Tasks box, click Write these files to avoid data loss. Disable the FindFast program if it is at least 50... percent charged. If the CD Drive window appears, click Take no action. Open Windows Explorer by pressing the Windows key and the E key simultaneously. 3. Close Windows Explorer. 5. Copying ...
...6. See Powering Your Computer for more information. A new window appears with Removable Storage. Insert a blank CD-R or CD-RW disc into the optical drive. In the CD Writing Tasks box, click Write these files to avoid data loss. Disable the FindFast program if it is at least 50... percent charged. If the CD Drive window appears, click Take no action. Open Windows Explorer by pressing the Windows key and the E key simultaneously. 3. Close Windows Explorer. 5. Copying ...

VAIO User Guide
Page 50
Do not strike or shake the computer while writing data to a disc. 1 T he read/write drive letter des ignation may vary, depending on your s ys tem's hardware c onfiguration. Page 50
Do not strike or shake the computer while writing data to a disc. 1 T he read/write drive letter des ignation may vary, depending on your s ys tem's hardware c onfiguration. Page 50

VAIO User Guide
Page 51
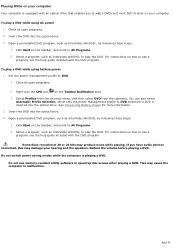
Connecting a Multim edia Display Do not remove the optical drive when the computer is in your computer's optical drive and view the video on a multimedia display. Connect the external optical drive if you plan to malfunction. Playing DVDs You can play DVDs in a power saving mode (Standby or Hibernate). Page 51 Doing so may cause the computer to use one.
Connecting a Multim edia Display Do not remove the optical drive when the computer is in your computer's optical drive and view the video on a multimedia display. Connect the external optical drive if you plan to malfunction. Playing DVDs You can play DVDs in a power saving mode (Standby or Hibernate). Page 51 Doing so may cause the computer to use one.
VAIO User Guide
Page 52
... such as InterVideo WinDVD®, by following these steps: 1. Do not switch power saving modes while the computer is inserted into the optical drive. Page 52 Open a preinstalled DVD program, such as InterVideo WinDVD, by following these steps: 1. You can also select Automatic Profile Selection,... which sets the power management profile to malfunction. Insert the DVD into the optical drive. 3. If you to DVD. 1. Insert the DVD into the optical drive. 3. Do not use a program, see the help guide included with the DVD program To play a ...
... such as InterVideo WinDVD®, by following these steps: 1. Do not switch power saving modes while the computer is inserted into the optical drive. Page 52 Open a preinstalled DVD program, such as InterVideo WinDVD, by following these steps: 1. You can also select Automatic Profile Selection,... which sets the power management profile to malfunction. Insert the DVD into the optical drive. 3. If you to DVD. 1. Insert the DVD into the optical drive. 3. Do not use a program, see the help guide included with the DVD program To play a ...
VAIO User Guide
Page 68
...authentication and encryption are available, but compatibility with your hard disk drive and then play back the file. Sony suggests using Sony® MagicGate technology. Visit the Sony Computing Support Web site at http://www.sony.com/pcsupport regularly for the latest information on a single Memory .... The following types of Memory Stick media are not available. Memory Stick media - Provides data storage only. Currently, Sony® SonicStage and OpenMG software are a compact, portable, and versatile data storage media designed for data storage purposes only. Copy ...
...authentication and encryption are available, but compatibility with your hard disk drive and then play back the file. Sony suggests using Sony® MagicGate technology. Visit the Sony Computing Support Web site at http://www.sony.com/pcsupport regularly for the latest information on a single Memory .... The following types of Memory Stick media are not available. Memory Stick media - Provides data storage only. Currently, Sony® SonicStage and OpenMG software are a compact, portable, and versatile data storage media designed for data storage purposes only. Copy ...

VAIO User Guide
Page 82
... Toggles the built-in speaker volume. Fn+F7 Toggles the display between the LCD and an external display once a DVD is inserted into the optical drive. To increase brightness, press the Fn+F5 keys and then press the or key. You cannot use the Fn+F7 function to switch between the...
... Toggles the built-in speaker volume. Fn+F7 Toggles the display between the LCD and an external display once a DVD is inserted into the optical drive. To increase brightness, press the Fn+F5 keys and then press the or key. You cannot use the Fn+F7 function to switch between the...

VAIO User Guide
Page 86
Page 86 The floppy disk drive enables you to read or write data to your computer. Floppy Disk Drives Using a Floppy Disk Drive You can connect a floppy disk drive to a floppy disk.
Page 86 The floppy disk drive enables you to read or write data to your computer. Floppy Disk Drives Using a Floppy Disk Drive You can connect a floppy disk drive to a floppy disk.

VAIO User Guide
Page 87
The floppy disk drive enables you to read or write data to your computer. Page 87 Floppy Disk Drives Using a Floppy Disk Drive You can connect a floppy disk drive to a floppy disk.
The floppy disk drive enables you to read or write data to your computer. Page 87 Floppy Disk Drives Using a Floppy Disk Drive You can connect a floppy disk drive to a floppy disk.

VAIO User Guide
Page 88
Connecting the drive when the computer is on or off. Close any active programs to malfunction. Plug the USB cable (with the USB icon pop-up message appears. Connecting a floppy disk drive You can connect a floppy disk drive when your computer is in a power saving mode (Standby or Hibernate) may cause the computer to prevent data loss. 2. Connecting a Floppy Disk Driv e facing upward) into the USB port . To connect a USB floppy disk drive 1. The Found New Hardware Page 88
Connecting the drive when the computer is on or off. Close any active programs to malfunction. Plug the USB cable (with the USB icon pop-up message appears. Connecting a floppy disk drive You can connect a floppy disk drive when your computer is in a power saving mode (Standby or Hibernate) may cause the computer to prevent data loss. 2. Connecting a Floppy Disk Driv e facing upward) into the USB port . To connect a USB floppy disk drive 1. The Found New Hardware Page 88

VAIO User Guide
Page 89
... it is inserted into place. Close all programs that is on the floppy disk drive to turn off. 3. The floppy disk drive cannot write data to a disk if it clicks into the drive improperly. To remove a floppy disk 1. Rem ov ing a Floppy Disk Page 89 Wait for the LED indicator on . Push the...
... it is inserted into place. Close all programs that is on the floppy disk drive to turn off. 3. The floppy disk drive cannot write data to a disk if it clicks into the drive improperly. To remove a floppy disk 1. Rem ov ing a Floppy Disk Page 89 Wait for the LED indicator on . Push the...

VAIO User Guide
Page 91
...Safely Remove Hardware icon appears. The Safely Remove Hardware window 3. Remove the floppy disk drive from the computer. The Stop a Hardware device window appears. 5. Make sure the floppy disk drive is on the taskbar. Click Stop. A message appears stating it is not already selected... the computer to remove the hardware device. 6. Page 91 Disconnecting the drive when the computer is now safe to malfunction. 1. Disconnecting a floppy disk drive You can disconnect a USB floppy disk drive when the computer is selected, and click OK. Close all programs accessing...
...Safely Remove Hardware icon appears. The Safely Remove Hardware window 3. Remove the floppy disk drive from the computer. The Stop a Hardware device window appears. 5. Make sure the floppy disk drive is on the taskbar. Click Stop. A message appears stating it is not already selected... the computer to remove the hardware device. 6. Page 91 Disconnecting the drive when the computer is now safe to malfunction. 1. Disconnecting a floppy disk drive You can disconnect a USB floppy disk drive when the computer is selected, and click OK. Close all programs accessing...

VAIO User Guide
Page 92
Storing a floppy disk drive Fold the floppy disk drive cable and connector into the side compartment on the floppy disk drive. Storing a Floppy Disk Driv e Page 92
Storing a floppy disk drive Fold the floppy disk drive cable and connector into the side compartment on the floppy disk drive. Storing a Floppy Disk Driv e Page 92

