Operating Instructions (primary manual)
Page 4
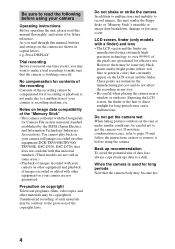
...Japan Electrics and Information Technology Industries Association). You cannot play back on your camera are normal in the manufacturing process and do not affect the recording in capital letters. Precaution on your camera still images recorded on other equipment (DCR-TRV890E/TRV900/ TRV900E, DSC-D700, DSC... of such materials may want to make sure that the camera body may become hot. 4 As you may be copyrighted. e.g. When the camera is not made due to the provision of the "Memory Stick" • This camera conforms with other equipment and playback of the recording cannot ...
...Japan Electrics and Information Technology Industries Association). You cannot play back on your camera are normal in the manufacturing process and do not affect the recording in capital letters. Precaution on your camera still images recorded on other equipment (DCR-TRV890E/TRV900/ TRV900E, DSC-D700, DSC... of such materials may want to make sure that the camera body may become hot. 4 As you may be copyrighted. e.g. When the camera is not made due to the provision of the "Memory Stick" • This camera conforms with other equipment and playback of the recording cannot ...
Operating Instructions (primary manual)
Page 5
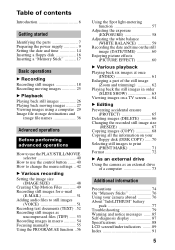
... the information on your floppy disk (DISK COPY) ...... 70 Selecting still images to print (PRINT MARK 71 Format 72 B As an external drive Using the camera as an external drive of a computer 73 Additional information Precautions 74 On "Memory Sticks 76 Using your camera abroad 76 About "InfoLITHIUM" battery pack 77 Troubleshooting 79 Warning and...
... the information on your floppy disk (DISK COPY) ...... 70 Selecting still images to print (PRINT MARK 71 Format 72 B As an external drive Using the camera as an external drive of a computer 73 Additional information Precautions 74 On "Memory Sticks 76 Using your camera abroad 76 About "InfoLITHIUM" battery pack 77 Troubleshooting 79 Warning and...

Operating Instructions (primary manual)
Page 6
Viewing images using a computer: page 29 Records a moving picture with audio The digital still camera can easily copy images onto your computer using application software. Recording moving picture with your computer You can record a moving ...page 51 Recording text documents (TEXT): page 52 Recording still images as uncompressed files (TIFF): page 53 6 Introduction Deletes undesired images right away, checking the image after shooting The digital still camera is able to your computer using a floppy disk or a "Memory Stick," and view and modify images on your situation Creating ...
Viewing images using a computer: page 29 Records a moving picture with audio The digital still camera can easily copy images onto your computer using application software. Recording moving picture with your computer You can record a moving ...page 51 Recording text documents (TEXT): page 52 Recording still images as uncompressed files (TIFF): page 53 6 Introduction Deletes undesired images right away, checking the image after shooting The digital still camera is able to your computer using a floppy disk or a "Memory Stick," and view and modify images on your situation Creating ...

Operating Instructions (primary manual)
Page 8
... L ACC (Accessory) jack M PLAY/STILL/MOVIE selector (40) N Access lamp (18, 19) O DISK EJECT lever (16) P Speaker Q Floppy disk slot (16) R Battery cover/PUSH button (bottom surface) (9) S "Memory Stick" cover/ "Memory Stick" slot (17) T USB cover/USB jack (31) U MS /FD ("Memory Stick"/floppy disk) selector V Control button (40...) qa 1 2 3 4 5 6 7 8 9 0 A LCD screen B Finder (19) C LCD ON/OFF switch (20) D VOL +/- You cannot firmly secure the camera to...
... L ACC (Accessory) jack M PLAY/STILL/MOVIE selector (40) N Access lamp (18, 19) O DISK EJECT lever (16) P Speaker Q Floppy disk slot (16) R Battery cover/PUSH button (bottom surface) (9) S "Memory Stick" cover/ "Memory Stick" slot (17) T USB cover/USB jack (31) U MS /FD ("Memory Stick"/floppy disk) selector V Control button (40...) qa 1 2 3 4 5 6 7 8 9 0 A LCD screen B Finder (19) C LCD ON/OFF switch (20) D VOL +/- You cannot firmly secure the camera to...

Operating Instructions (primary manual)
Page 12
STILL mode recording/playback when using "Memory Stick"s NP-F330 (supplied) NP-F550 Battery life (min.) Number of images Battery life (min.) Number of images Continuous recording* Approx. 80 Approx. 1600 Approx. 170 ...;480 image size and in NORMAL recording mode. ∗ Recording at about 5-second intervals when using a floppy disk, or at about 3-second intervals when using a "Memory Stick" ∗∗ Playing back single images continuously at about 2-second intervals MOVIE mode recording when using floppy disks NP-F330 (supplied) NP-F550 Battery life...
STILL mode recording/playback when using "Memory Stick"s NP-F330 (supplied) NP-F550 Battery life (min.) Number of images Battery life (min.) Number of images Continuous recording* Approx. 80 Approx. 1600 Approx. 170 ...;480 image size and in NORMAL recording mode. ∗ Recording at about 5-second intervals when using a floppy disk, or at about 3-second intervals when using a "Memory Stick" ∗∗ Playing back single images continuously at about 2-second intervals MOVIE mode recording when using floppy disks NP-F330 (supplied) NP-F550 Battery life...

Operating Instructions (primary manual)
Page 16
Removing the floppy disk While sliding the EJECT lock to the recordable position for Memory Stick. • Never remove the floppy disk, turn off the power, or change the position of the MS/FD selector while the access lamp is set ...
Removing the floppy disk While sliding the EJECT lock to the recordable position for Memory Stick. • Never remove the floppy disk, turn off the power, or change the position of the MS/FD selector while the access lamp is set ...

Operating Instructions (primary manual)
Page 17
... space The position or shape of the "Memory Stick." "Memory Stick" and are trademarks of the arrow. 2 Insert the "Memory Stick." Slide the cover in the direction of Sony Corporation. 17 Removing the "Memory Stick" Open the "Memory Stick" cover, then push the "Memory Stick" once lightly. Insert the "Memory Stick" with the B mark facing toward the "Memory Stick" slot as "MEMORY STICK ERROR" will be displayed. • Never...
... space The position or shape of the "Memory Stick." "Memory Stick" and are trademarks of the arrow. 2 Insert the "Memory Stick." Slide the cover in the direction of Sony Corporation. 17 Removing the "Memory Stick" Open the "Memory Stick" cover, then push the "Memory Stick" once lightly. Insert the "Memory Stick" with the B mark facing toward the "Memory Stick" slot as "MEMORY STICK ERROR" will be displayed. • Never...

Operating Instructions (primary manual)
Page 18
... ready for recording. MS: When recording on the power and insert a floppy disk or a "Memory Stick." 3, 4 12 Access lamp 1 Set the PLAY/STILL/MOVIE selector to turn on the "Memory Stick." The beeps sound and the image is flashing, the camera automatically adjusts the exposure and focus of the captured image. However, the image has not...
... ready for recording. MS: When recording on the power and insert a floppy disk or a "Memory Stick." 3, 4 12 Access lamp 1 Set the PLAY/STILL/MOVIE selector to turn on the "Memory Stick." The beeps sound and the image is flashing, the camera automatically adjusts the exposure and focus of the captured image. However, the image has not...

Operating Instructions (primary manual)
Page 19
.../FD selector, or not remove the battery pack/floppy disk/"Memory Stick." Finder adjustment dial Note The finder display is automatically turned off , not change after the automatic adjustment is complete. When this time, the camera is charging the flash.) Recording images with the finder Turn ... then record the image. However, the recording cannot be recorded on a floppy disk or a "Memory Stick," the access lamp lights. B Recording 4 Press the shutter button fully down at once, the camera starts recording after the AE is locked. "RECORDING" appears on the LCD screen or on the ...
.../FD selector, or not remove the battery pack/floppy disk/"Memory Stick." Finder adjustment dial Note The finder display is automatically turned off , not change after the automatic adjustment is complete. When this time, the camera is charging the flash.) Recording images with the finder Turn ... then record the image. However, the recording cannot be recorded on a floppy disk or a "Memory Stick," the access lamp lights. B Recording 4 Press the shutter button fully down at once, the camera starts recording after the AE is locked. "RECORDING" appears on the LCD screen or on the ...
Operating Instructions (primary manual)
Page 20
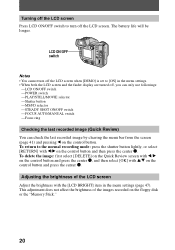
... be longer. LCD ON/OFF switch Notes • You cannot turn off , you can only use followings: -LCD ON/OFF switch -POWER switch -PLAY/STILL/MOVIE selector -Shutter button -MS/FD selector -STEADY SHOT ON/OFF switch -FOCUS AUTO/MANUAL switch -Focus ring Checking the last recorded image (Quick Review...LCD screen and the finder display are turned off the LCD screen. Adjusting the brightness of the images recorded on the floppy disk or the "Memory Stick." 20 This adjustment does not affect the brightness of the LCD screen Adjust the brightness with v/V on the control button and then press the ...
... be longer. LCD ON/OFF switch Notes • You cannot turn off , you can only use followings: -LCD ON/OFF switch -POWER switch -PLAY/STILL/MOVIE selector -Shutter button -MS/FD selector -STEADY SHOT ON/OFF switch -FOCUS AUTO/MANUAL switch -Focus ring Checking the last recorded image (Quick Review...LCD screen and the finder display are turned off the LCD screen. Adjusting the brightness of the images recorded on the floppy disk or the "Memory Stick." 20 This adjustment does not affect the brightness of the LCD screen Adjust the brightness with v/V on the control button and then press the ...

Operating Instructions (primary manual)
Page 25
... switch to the right to turn on/off the indicators on the LCD screen or on the power and insert a floppy disk or a "Memory Stick." 3 12 1 Set the PLAY/STILL/MOVIE selector to 23. To record moving images Moving images with audio are recorded in the menu settings is set to 10 or... 15 seconds with [REC TIME SET] in the menu settings (page 45). "REC" appears on the floppy disk or "Memory Stick." See page 89 for a detailed...
... switch to the right to turn on/off the indicators on the LCD screen or on the power and insert a floppy disk or a "Memory Stick." 3 12 1 Set the PLAY/STILL/MOVIE selector to 23. To record moving images Moving images with audio are recorded in the menu settings is set to 10 or... 15 seconds with [REC TIME SET] in the menu settings (page 45). "REC" appears on the floppy disk or "Memory Stick." See page 89 for a detailed...

Operating Instructions (primary manual)
Page 26
... displayed You can directly select and play back images whose image sizes are larger than the maximum image size that can be used with this camera on other equipment. • You may not be able to select "b/B" on the LCD screen or on the finder. 2 Select the playback media ...LCD screen or on the control button. LCD screen or finder indicators during still image playback Press DISPLAY to play back the image with the control button. B": To display the next image. FD: When playing back images in the "Memory Stick." See page 90 for recording. MS: When playing back images in ...
... displayed You can directly select and play back images whose image sizes are larger than the maximum image size that can be used with this camera on other equipment. • You may not be able to select "b/B" on the LCD screen or on the finder. 2 Select the playback media ...LCD screen or on the control button. LCD screen or finder indicators during still image playback Press DISPLAY to play back the image with the control button. B": To display the next image. FD: When playing back images in the "Memory Stick." See page 90 for recording. MS: When playing back images in ...

Operating Instructions (primary manual)
Page 27
Moving images are displayed one size smaller than still images. B": To display the next image. "b: To display the preceding image. FD: When playing back images in the "Memory Stick." MS: When playing back images in the floppy disk. 3 Press v on the control button to display the menu bar on the ...LCD screen or on the finder. 4 Select the desired moving image with the control button. The last recorded image (still or moving images ...
Moving images are displayed one size smaller than still images. B": To display the next image. "b: To display the preceding image. FD: When playing back images in the "Memory Stick." MS: When playing back images in the floppy disk. 3 Press v on the control button to display the menu bar on the ...LCD screen or on the finder. 4 Select the desired moving image with the control button. The last recorded image (still or moving images ...
Operating Instructions (primary manual)
Page 29
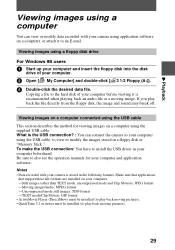
... images stored in the following formats. Make sure that applications that support these file formats are installed on your computer. -Still images (other than TEXT mode, uncompressed mode and Clip Motion): JPEG format -Moving images/audio: MPEG format -Uncompressed mode... off. What is the USB connection? : You can view or modify data recorded with your camera is stored in a floppy disk or "Memory Stick." B Playback Viewing images using a computer You can connect the camera to your computer and application software. Viewing images using a floppy disk drive For Windows 98 users...
... images stored in the following formats. Make sure that applications that support these file formats are installed on your computer. -Still images (other than TEXT mode, uncompressed mode and Clip Motion): JPEG format -Moving images/audio: MPEG format -Uncompressed mode... off. What is the USB connection? : You can view or modify data recorded with your camera is stored in a floppy disk or "Memory Stick." B Playback Viewing images using a computer You can connect the camera to your computer and application software. Viewing images using a floppy disk drive For Windows 98 users...
Operating Instructions (primary manual)
Page 31
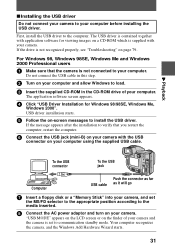
...connector as far USB cable as it will go 7 Insert a floppy disk or a "Memory Stick" into your camera, and set to load. 3 Insert the supplied CD-ROM in this step. 2 Turn on your camera with your camera. For Windows 98, Windows 98SE, Windows Me and Windows 2000 Professional users 1 Make ... appears after the installation to install the USB driver. USB driver installation starts. 5 Follow the on-screen messages to verify that the camera is supplied with the USB connector on page 79. The USB driver is contained together with application software for Windows 98/98SE, Windows ...
...connector as far USB cable as it will go 7 Insert a floppy disk or a "Memory Stick" into your camera, and set to load. 3 Insert the supplied CD-ROM in this step. 2 Turn on your camera with your camera. For Windows 98, Windows 98SE, Windows Me and Windows 2000 Professional users 1 Make ... appears after the installation to install the USB driver. USB driver installation starts. 5 Follow the on-screen messages to verify that the camera is supplied with the USB connector on page 79. The USB driver is contained together with application software for Windows 98/98SE, Windows ...

Operating Instructions (primary manual)
Page 33
...Computer USB cable Push the connector as far as it will go 3 Insert a floppy disk or "Memory Stick" into your camera, and set the MS/FD selector to the appropriate position according to the media inserted. 4 Connect the AC... power adaptor to your camera and then to the USB connector on your computer. B) on the camera and the other end to a wall outlet (mains) and turn on the ...98SE, Windows Me and Windows 2000 Professional users 1 Turn on the power of your camera. The folders inside the floppy disk or "Memory Stick" are displayed.
...Computer USB cable Push the connector as far as it will go 3 Insert a floppy disk or "Memory Stick" into your camera, and set the MS/FD selector to the appropriate position according to the media inserted. 4 Connect the AC... power adaptor to your camera and then to the USB connector on your computer. B) on the camera and the other end to a wall outlet (mains) and turn on the ...98SE, Windows Me and Windows 2000 Professional users 1 Turn on the power of your camera. The folders inside the floppy disk or "Memory Stick" are displayed.

Operating Instructions (primary manual)
Page 34
...Me or Windows 2000 Professional, the following procedures are recommended when disconnecting the USB cable from your computer, ejecting the floppy disk or "Memory Stick" from the camera, or changing the position of the MS/FD selector, while it is connected to the hard disk of your computer. 1 Stop ...the drive by clicking on the "Unplug/Eject" icon in this order Still image Moving image* Audio* Clip Motion image "Dcim" folder t "100msdcf" folder t Image file "Mssony...
...Me or Windows 2000 Professional, the following procedures are recommended when disconnecting the USB cable from your computer, ejecting the floppy disk or "Memory Stick" from the camera, or changing the position of the MS/FD selector, while it is connected to the hard disk of your computer. 1 Stop ...the drive by clicking on the "Unplug/Eject" icon in this order Still image Moving image* Audio* Clip Motion image "Dcim" folder t "100msdcf" folder t Image file "Mssony...

Operating Instructions (primary manual)
Page 35
...still image file. • When you load an image modified using the supplied retouching software from your computer to the camera or when you directly modify the image on the camera, the image format will differ so the "FILE ERROR" message may appear and you may be displayed. Other disks will shorten the "Memory Stick..." life. • Do not compress the data on the floppy disk or "Memory Stick." This will not be played back on your computer Floppy disk/"Memory Stick" • Format the floppy disk or "Memory Stick" only using this camera (page 72). ...
...still image file. • When you load an image modified using the supplied retouching software from your computer to the camera or when you directly modify the image on the camera, the image format will differ so the "FILE ERROR" message may appear and you may be displayed. Other disks will shorten the "Memory Stick..." life. • Do not compress the data on the floppy disk or "Memory Stick." This will not be played back on your computer Floppy disk/"Memory Stick" • Format the floppy disk or "Memory Stick" only using this camera (page 72). ...

Operating Instructions (primary manual)
Page 36
... range from 001 to 999. S: Still image file recorded at 640×480 size F: Still image file of the following characters below. Image file storage destinations and image file names Image files recorded with your camera are as follows. The meanings of the file names are grouped in a "Memory Stick" have different file names. When...
... range from 001 to 999. S: Still image file recorded at 640×480 size F: Still image file of the following characters below. Image file storage destinations and image file names Image files recorded with your camera are as follows. The meanings of the file names are grouped in a "Memory Stick" have different file names. When...

Operating Instructions (primary manual)
Page 38
For Windows 98 users (The drive recognizing the camera is "D.") Folder containing still image recorded in normal mode, TEXT mode image and Clip Motion image data Folder containing E-MAIL mode and TIFF mode image data Folder containing moving ... recorded in MOBILE mode (page 49) • Index image file of Clip Motion file recorded in MOBILE mode • Still image file recorded in TEXT mode (page 52) • Index image file of still image file recorded in - When using "Memory Stick"s ssss stands for any number within the range from 0001 to 9999.
For Windows 98 users (The drive recognizing the camera is "D.") Folder containing still image recorded in normal mode, TEXT mode image and Clip Motion image data Folder containing E-MAIL mode and TIFF mode image data Folder containing moving ... recorded in MOBILE mode (page 49) • Index image file of Clip Motion file recorded in MOBILE mode • Still image file recorded in TEXT mode (page 52) • Index image file of still image file recorded in - When using "Memory Stick"s ssss stands for any number within the range from 0001 to 9999.


