
Operating Instructions
Page 4
... start reading this manual and operating the unit, check the model number. As you read the following before using your camera, etc. If moisture condensation occurs, refer to page 55 and follow the instructions on how to record images, this manual thoroughly, and retain it before using the camera. Attention The electromagnetic fields at the specific frequencies may influence the picture and sound of this manual, buttons and settings...
... start reading this manual and operating the unit, check the model number. As you read the following before using your camera, etc. If moisture condensation occurs, refer to page 55 and follow the instructions on how to record images, this manual thoroughly, and retain it before using the camera. Attention The electromagnetic fields at the specific frequencies may influence the picture and sound of this manual, buttons and settings...

Operating Instructions
Page 5
... image file names 27 Advanced operations Before performing advanced operations How to use the PLAY/STILL/ MOVIE selector 29 How to use the control button .......29 How to change the menu settings ..31 B Various recording Setting the image size (IMAGE SIZE 36 Recording still images for e-mail (E-MAIL 37 Adding audio files to print (PRINT MARK 53 Format 54 Additional information Precautions 55 Using your camera abroad 57 Troubleshooting 58 Warning and notice messages .......61 Self-diagnosis display 63 Specifications 64 LCD screen/finder indicators...
... image file names 27 Advanced operations Before performing advanced operations How to use the PLAY/STILL/ MOVIE selector 29 How to use the control button .......29 How to change the menu settings ..31 B Various recording Setting the image size (IMAGE SIZE 36 Recording still images for e-mail (E-MAIL 37 Adding audio files to print (PRINT MARK 53 Format 54 Additional information Precautions 55 Using your camera abroad 57 Troubleshooting 58 Warning and notice messages .......61 Self-diagnosis display 63 Specifications 64 LCD screen/finder indicators...

Operating Instructions
Page 11
... up. 2 Connect the power cord (mains lead) to the AC power adaptor and then to water. Using a car battery Use Sony DC adaptor/charger. 11 The above figures are a guide when you continuously record/play back by replacing the floppy disk. • If sufficient battery remaining time is limited. Getting started Notes • The battery life and number of images will be decreased when using at low temperature, using the flash, turning the power on/off...
... up. 2 Connect the power cord (mains lead) to the AC power adaptor and then to water. Using a car battery Use Sony DC adaptor/charger. 11 The above figures are a guide when you continuously record/play back by replacing the floppy disk. • If sufficient battery remaining time is limited. Getting started Notes • The battery life and number of images will be decreased when using at low temperature, using the flash, turning the power on/off...

Operating Instructions
Page 16
...; When using a "Memory Stick," writing and reading images take about twice times than using a floppy disk. This adjustment does not affect the brightness of the LCD screen Adjust the brightness with the finder Turn the finder adjustment dial until the image appears clearly within the finder, then record the image. LCD ON/OFF switch Notes • You cannot turn off , you can only operate the LCD ON/OFF switch, POWER switch, and the PLAY/ STILL/MOVIE selector.
...; When using a "Memory Stick," writing and reading images take about twice times than using a floppy disk. This adjustment does not affect the brightness of the LCD screen Adjust the brightness with the finder Turn the finder adjustment dial until the image appears clearly within the finder, then record the image. LCD ON/OFF switch Notes • You cannot turn off , you can only operate the LCD ON/OFF switch, POWER switch, and the PLAY/ STILL/MOVIE selector.

Operating Instructions
Page 19
... the surrounding brightness. B Recording Using the self-timer When you use the self-timer function, the subject is recorded 10 seconds after you press the shutter button until the image is recorded. The (self-timer) indicator appears on the LCD screen or on the finder, and the subject is AUTO (no indication). This setting can change the flash mode, press (Flash) repeatedly so that the flash mode indicator appears on the LCD screen or on the control button, then press the center...
... the surrounding brightness. B Recording Using the self-timer When you use the self-timer function, the subject is recorded 10 seconds after you press the shutter button until the image is recorded. The (self-timer) indicator appears on the LCD screen or on the finder, and the subject is AUTO (no indication). This setting can change the flash mode, press (Flash) repeatedly so that the flash mode indicator appears on the LCD screen or on the control button, then press the center...

Operating Instructions
Page 21
... press the shutter button momentarily The image and sound are recorded on the power and insert a floppy disk. 2 1 1 Set the PLAY/STILL/MOVIE selector to turn on the floppy disk. Adjusting the brightness of the indicators. 21 However, when [IMAGE SIZE] in the menu settings (page 33). To record moving images Moving images with [REC TIME SET] in the menu settings is 15 seconds (page 36). LCD screen or finder indicators during recording Press DISPLAY to MOVIE. 2 Press the shutter button fully down...
... press the shutter button momentarily The image and sound are recorded on the power and insert a floppy disk. 2 1 1 Set the PLAY/STILL/MOVIE selector to turn on the floppy disk. Adjusting the brightness of the indicators. 21 However, when [IMAGE SIZE] in the menu settings (page 33). To record moving images Moving images with [REC TIME SET] in the menu settings is 15 seconds (page 36). LCD screen or finder indicators during recording Press DISPLAY to MOVIE. 2 Press the shutter button fully down...
Operating Instructions
Page 22
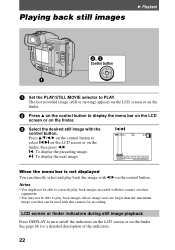
... play back the image with the control button. Playing back still images B Playback 2, 3 Control button 1 1 Set the PLAY/STILL/MOVIE selector to play back images whose image sizes are larger than the maximum image size that can directly select and play back images recorded with this camera on other equipment. • You may not be used with this camera for a detailed description of the indicators. 22 LCD screen or finder indicators during still image playback Press DISPLAY to display the menu bar on the LCD screen...
... play back the image with the control button. Playing back still images B Playback 2, 3 Control button 1 1 Set the PLAY/STILL/MOVIE selector to play back images whose image sizes are larger than the maximum image size that can directly select and play back images recorded with this camera on other equipment. • You may not be used with this camera for a detailed description of the indicators. 22 LCD screen or finder indicators during still image playback Press DISPLAY to display the menu bar on the LCD screen...

Operating Instructions
Page 27
... a "Memory Stick" have different file names. When using floppy disks sss stands for one of more than 640×480 size V: Moving image file recorded at 160×112 size W: Moving image file recorded at 320×240 size For Windows 98 users (The drive recognizing the floppy disk is [A].) Storage destination containing still or moving image data Folder containing E-mail mode image data Folder containing voice memo audio data B Playback Location 3 1/2 Floppy (A:) E-mail folder Voice folder File MVC...
... a "Memory Stick" have different file names. When using floppy disks sss stands for one of more than 640×480 size V: Moving image file recorded at 160×112 size W: Moving image file recorded at 320×240 size For Windows 98 users (The drive recognizing the floppy disk is [A].) Storage destination containing still or moving image data Folder containing E-mail mode image data Folder containing voice memo audio data B Playback Location 3 1/2 Floppy (A:) E-mail folder Voice folder File MVC...
Operating Instructions
Page 31
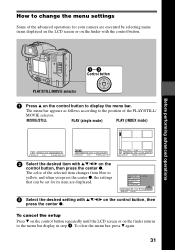
... color of the selected item changes from blue to yellow, and when you press the center z, the settings that can be set for your camera are displayed. To clear the menu bar, press V again. 31 VIDEO OUT /LANGUAGE CLOCK SET BEEP LCD BRIGHT NTSC INDEX DELETE FILE TOOL SETUP SELECT OK 3 Select the desired setting with v/V/b/B on the control button to display the menu bar. Before performing advanced operations 1-3 Control button PLAY/STILL/MOVIE...
... color of the selected item changes from blue to yellow, and when you press the center z, the settings that can be set for your camera are displayed. To clear the menu bar, press V again. 31 VIDEO OUT /LANGUAGE CLOCK SET BEEP LCD BRIGHT NTSC INDEX DELETE FILE TOOL SETUP SELECT OK 3 Select the desired setting with v/V/b/B on the control button to display the menu bar. Before performing advanced operations 1-3 Control button PLAY/STILL/MOVIE...
Operating Instructions
Page 32
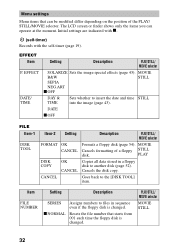
... DAY & TIME Sets whether to the [DISK TOOL] item. Initial settings are indicated with x. (self-timer) Records with the self-timer (page 19). EFFECT DATE/ TIME Setting Description PLAY/STILL/ MOVIE selector SOLARIZE Sets the image special effects (page 43). MOVIE Cancels formatting of the PLAY/ STILL/MOVIE selector. Item FILE NUMBER Setting Description SERIES x NORMAL Assigns numbers to files in a floppy disk to another disk (page 52). Menu settings Menu items that starts from 001 each time the floppy disk is changed . PLAY Copies all data stored...
... DAY & TIME Sets whether to the [DISK TOOL] item. Initial settings are indicated with x. (self-timer) Records with the self-timer (page 19). EFFECT DATE/ TIME Setting Description PLAY/STILL/ MOVIE selector SOLARIZE Sets the image special effects (page 43). MOVIE Cancels formatting of the PLAY/ STILL/MOVIE selector. Item FILE NUMBER Setting Description SERIES x NORMAL Assigns numbers to files in a floppy disk to another disk (page 52). Menu settings Menu items that starts from 001 each time the floppy disk is changed . PLAY Copies all data stored...

Operating Instructions
Page 34
... will start if you use digital zoom. STILL x NORMAL Normal setting. Sets the video output signal to -2 Adjusts the sharpness of the image. 1600×1200 Changes the recorded image size 1024×768 (page 50). 640×480 x CANCEL PLAY/STILL/ MOVIE selector PLAY PLAY Setting x STBY/ON OFF x NTSC PAL Description PLAY/STILL/ MOVIE selector Displayed only when you do not operate your camera. MOVIE STILL TOOL Item COPY RESIZE (Only in MOVIE or...
... will start if you use digital zoom. STILL x NORMAL Normal setting. Sets the video output signal to -2 Adjusts the sharpness of the image. 1600×1200 Changes the recorded image size 1024×768 (page 50). 640×480 x CANCEL PLAY/STILL/ MOVIE selector PLAY PLAY Setting x STBY/ON OFF x NTSC PAL Description PLAY/STILL/ MOVIE selector Displayed only when you do not operate your camera. MOVIE STILL TOOL Item COPY RESIZE (Only in MOVIE or...

Operating Instructions
Page 38
... data take more time than normal recording. 38 Recording images in macro 1 2 3 1 Set the PLAY/STILL/MOVIE selector to MOVIE or STILL. 2 Set the FOCUS AUTO/ MANUAL switch to AUTO. 3 Press (macro). The indicator disappears. To return to normal recording mode Press again. Landscape mode - Panfocus mode • You cannot record images in macro with the following PROGRAM AE modes: - Recording text documents (TEXT) Text is recorded in GIF format to provide a clear image. 3 1 2 1 Set the PLAY/STILL/MOVIE selector to STILL. 2 Select [FILE], [REC MODE...
... data take more time than normal recording. 38 Recording images in macro 1 2 3 1 Set the PLAY/STILL/MOVIE selector to MOVIE or STILL. 2 Set the FOCUS AUTO/ MANUAL switch to AUTO. 3 Press (macro). The indicator disappears. To return to normal recording mode Press again. Landscape mode - Panfocus mode • You cannot record images in macro with the following PROGRAM AE modes: - Recording text documents (TEXT) Text is recorded in GIF format to provide a clear image. 3 1 2 1 Set the PLAY/STILL/MOVIE selector to STILL. 2 Select [FILE], [REC MODE...
Operating Instructions
Page 39
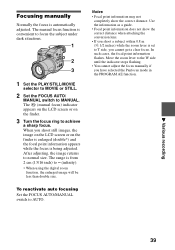
... convenient to focus the subject under dark situations. 1 2 3 1 Set the PLAY/STILL/MOVIE selector to MOVIE or STILL. 2 Set the FOCUS AUTO/ MANUAL switch to ∞ (infinity). ∗ When using the digital zoom function, the enlarged image will be less than double size. Focusing manually Normally the focus is being adjusted. Use the information as a guide. • Focal point information does not show the correct distance. The 9 (manual focus) indicator appears on the LCD screen or on...
... convenient to focus the subject under dark situations. 1 2 3 1 Set the PLAY/STILL/MOVIE selector to MOVIE or STILL. 2 Set the FOCUS AUTO/ MANUAL switch to ∞ (infinity). ∗ When using the digital zoom function, the enlarged image will be less than double size. Focusing manually Normally the focus is being adjusted. Use the information as a guide. • Focal point information does not show the correct distance. The 9 (manual focus) indicator appears on the LCD screen or on...

Operating Instructions
Page 58
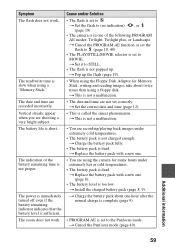
... not using an "InfoLITHIUM" battery pack. The picture is noisy. The picture is too dark. t Set it securely to MOVIE or STILL (page 15, 21). • No floppy disk has been inserted into your camera. Symptom Your camera does not work. t Turn off the power, and turn on the finder, the self-diagnosis display function is too low. Your camera cannot record images. Cause and/or Solution • You are shooting...
... not using an "InfoLITHIUM" battery pack. The picture is noisy. The picture is too dark. t Set it securely to MOVIE or STILL (page 15, 21). • No floppy disk has been inserted into your camera. Symptom Your camera does not work. t Turn off the power, and turn on the finder, the self-diagnosis display function is too low. Your camera cannot record images. Cause and/or Solution • You are shooting...
Operating Instructions
Page 59
... time are recording/playing back images under extremely hot or cold temperatures. • The battery pack is slow when using a floppy disk. t This is in one . • You are using the camera for Memory Stick, writing and reading images take about one (page 8). • The battery level is set correctly. The indication of the following PROGRAM AE modes: Twilight, Twilight plus, or Landscape. The zoom does not work . t Charge the battery...
... time are recording/playing back images under extremely hot or cold temperatures. • The battery pack is slow when using a floppy disk. t This is in one . • You are using the camera for Memory Stick, writing and reading images take about one (page 8). • The battery level is set correctly. The indication of the following PROGRAM AE modes: Twilight, Twilight plus, or Landscape. The zoom does not work . t Charge the battery...

Operating Instructions
Page 60
... cannot use digital zoom to the Panfocus mode. t Copy the file to the hard disk of your camera is set to record moving pictures. • You shot the image in TEXT mode. t Replace it to STILL or MOVIE, if you play back the file from the floppy disk. The slide show , select [START] again (page 46). • The camera is protected. You cannot resize the image. t Set it with the print mark. Cause and/or Solution...
... cannot use digital zoom to the Panfocus mode. t Copy the file to the hard disk of your camera is set to record moving pictures. • You shot the image in TEXT mode. t Replace it to STILL or MOVIE, if you play back the file from the floppy disk. The slide show , select [START] again (page 46). • The camera is protected. You cannot resize the image. t Set it with the print mark. Cause and/or Solution...

Operating Instructions
Page 61
... there is protected. The disk is low. The battery level of this camera. • You cannot do DISK COPY between a "Memory Stick" and a floppy disk. • You select [ALL] from [COPY] when copying images in the following list. You tried to play back images with the disk. The battery is not the "InfoLITHIUM" type. Message DRIVE ERROR NO DISK FORMAT ERROR DISK PROTECT DISK FULL NO FILE FILE ERROR FILE PROTECT DISK ERROR NOT ENOUGH MEMORY IMAGE SIZE OVER INVALID OPERATION for Memory Stick is...
... there is protected. The disk is low. The battery level of this camera. • You cannot do DISK COPY between a "Memory Stick" and a floppy disk. • You select [ALL] from [COPY] when copying images in the following list. You tried to play back images with the disk. The battery is not the "InfoLITHIUM" type. Message DRIVE ERROR NO DISK FORMAT ERROR DISK PROTECT DISK FULL NO FILE FILE ERROR FILE PROTECT DISK ERROR NOT ENOUGH MEMORY IMAGE SIZE OVER INVALID OPERATION for Memory Stick is...

Operating Instructions
Page 63
... repair the camera yourself. • E: ss: ss Contact your Sony dealer or local authorized Sony service facility. t Replace the battery with a combination of a letter and four digits of numbers. Self-diagnosis display Your camera has a self-diagnosis display. This function displays the camera condition on the LCD screen or on again. • An unformatted floppy disk is too low. If this camera is inserted. The code informs you try corrective actions a few times...
... repair the camera yourself. • E: ss: ss Contact your Sony dealer or local authorized Sony service facility. t Replace the battery with a combination of a letter and four digits of numbers. Self-diagnosis display Your camera has a self-diagnosis display. This function displays the camera condition on the LCD screen or on again. • An unformatted floppy disk is too low. If this camera is inserted. The code informs you try corrective actions a few times...
Operating Instructions
Page 65
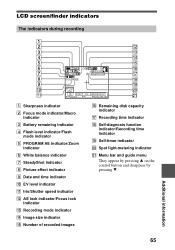
... indicator/Macro indicator C Battery remaining indicator D Flash level indicator/Flash mode indicator E PROGRAM AE indicator/Zoom indicator F White balance indicator G SteadyShot indicator H Picture effect indicator I Date and time indicator J EV level indicator K Iris/Shutter speed indicator L AE lock indicator/Focus lock indicator M Recording mode indicator N Image size indicator O Number of recorded images P Remaining disk capacity indicator Q Recording time indicator R Self-diagnosis function indicator/Recording time indicator S Self-timer indicator T Spot light-metering indicator U Menu...
... indicator/Macro indicator C Battery remaining indicator D Flash level indicator/Flash mode indicator E PROGRAM AE indicator/Zoom indicator F White balance indicator G SteadyShot indicator H Picture effect indicator I Date and time indicator J EV level indicator K Iris/Shutter speed indicator L AE lock indicator/Focus lock indicator M Recording mode indicator N Image size indicator O Number of recorded images P Remaining disk capacity indicator Q Recording time indicator R Self-diagnosis function indicator/Recording time indicator S Self-timer indicator T Spot light-metering indicator U Menu...
Operating Instructions
Page 67
... FORMAT 54 Full charge 9 I Image Copying 50 Deleting 49 File name 27 Print mark 53 Protect 48 Size 36 INDEX screen 44 Indicators on the LCD screen 65 J , JPEG 15 25 M Macro recording 38 Manual focusing 39 Menu 31 Moisture condensation .. 55 Moving image Playback 23 , Recording 21 MPEG 21 25 N Normal charge 9 Number of recordable images Battery pack 10 E-mail mode 37 Image size 36 TEXT mode 38 Voice mode 37 P PICTURE EFFECT....... 43 PLAY/STILL/MOVIE selector 29 Playing back INDEX screen........... 44 Moving images...
... FORMAT 54 Full charge 9 I Image Copying 50 Deleting 49 File name 27 Print mark 53 Protect 48 Size 36 INDEX screen 44 Indicators on the LCD screen 65 J , JPEG 15 25 M Macro recording 38 Manual focusing 39 Menu 31 Moisture condensation .. 55 Moving image Playback 23 , Recording 21 MPEG 21 25 N Normal charge 9 Number of recordable images Battery pack 10 E-mail mode 37 Image size 36 TEXT mode 38 Voice mode 37 P PICTURE EFFECT....... 43 PLAY/STILL/MOVIE selector 29 Playing back INDEX screen........... 44 Moving images...


