Sony MVC-FD7 - Digital Still Camera Mavica Research
Related Manual Pages


Related Videos

My SONY Digital Mavica MVC-FD7
Duration: 3:32
Total Views: 969
Duration: 3:32
Total Views: 969
Prise de vue avec Sony Mavica MVC-FD7
Duration: 3:11
Total Views: 3,572
Duration: 3:11
Total Views: 3,572
?????????? ???????: ???????? ?????? ?? ????????, Sony Mavica MVC-FD7
Duration: 9:31
Total Views: 52
Duration: 9:31
Total Views: 52
Similar Questions

Dsc-wx70 Resets Every Battery Change
My DSC-WX70 resets every time I change the battery. There is no access to a 'button-sized lithium ba...
My DSC-WX70 resets every time I change the battery. There is no access to a 'button-sized lithium ba...
(Posted by alandgent 7 years ago)
Dsc-wx70 Resets On Battery Change
I have just bought a DSC-WX70 and each time I want to change the battery I have to re-program the ti...
I have just bought a DSC-WX70 and each time I want to change the battery I have to re-program the ti...
(Posted by alandgent 7 years ago)

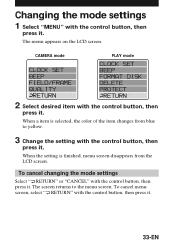
How To Change Camera Settings
So im curious how to change the settings for my camera like from black and white to sepia to normal ...
So im curious how to change the settings for my camera like from black and white to sepia to normal ...
(Posted by josiindermuehle 12 years ago)