Operating Instructions
Page 1
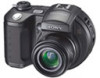
MVC-CD500 Serial No. Model No. Record the serial number in the space provided below. MVC-CD500 © 2003 Sony Corporation 3-081-837-11(1) Getting started Shooting still images Viewing still images Deleting still images Before advanced operations Advanced still image shooting _________ Advanced still image viewing __________ Still image editing Enjoying movies Enjoying images on the bottom. Digital Still Camera Operating Instructions Before operating the...
MVC-CD500 Serial No. Model No. Record the serial number in the space provided below. MVC-CD500 © 2003 Sony Corporation 3-081-837-11(1) Getting started Shooting still images Viewing still images Deleting still images Before advanced operations Advanced still image shooting _________ Advanced still image viewing __________ Still image editing Enjoying movies Enjoying images on the bottom. Digital Still Camera Operating Instructions Before operating the...
Operating Instructions
Page 3
... transfer to the collection and recycling location nearest you should lose the fuse cover, please contact your nearest Sony service station. If the plug supplied with or mark) must be sure to power this camera. Notice Certain countries may influence the picture and sound of this product. Should the fuse in the...
... transfer to the collection and recycling location nearest you should lose the fuse cover, please contact your nearest Sony service station. If the plug supplied with or mark) must be sure to power this camera. Notice Certain countries may influence the picture and sound of this product. Should the fuse in the...
Operating Instructions
Page 4
...points (white, red, blue or green in color) that you use . Before using your camera This digital still camera uses 8 cm CD-Rs/CDRWs as "disc" in this manual. Trial recording Before you record one-time events, you may want to make sure that may cause a malfunction. •...images recorded or edited with the Mavica logo. When a distinction between CD-Rs and CD-RWs is necessary, "disc" is not a malfunction. Unauthorized recording of such materials may be uneven and that the camera is working correctly. 4 No compensation for if recording or playback is indicated as recording media...
...points (white, red, blue or green in color) that you use . Before using your camera This digital still camera uses 8 cm CD-Rs/CDRWs as "disc" in this manual. Trial recording Before you record one-time events, you may want to make sure that may cause a malfunction. •...images recorded or edited with the Mavica logo. When a distinction between CD-Rs and CD-RWs is necessary, "disc" is not a malfunction. Unauthorized recording of such materials may be uneven and that the camera is working correctly. 4 No compensation for if recording or playback is indicated as recording media...
Operating Instructions
Page 5
... is a trademark or a registered trademark of Sony Corporation. • Microsoft and Windows are not actual images shot using this manual are reproduced images, and are registered trademarks of your eyes. Or it may cause irrecoverable damage to record or play back properly. • Do not use the camera near a TV, radio, tuner. Be...
... is a trademark or a registered trademark of Sony Corporation. • Microsoft and Windows are not actual images shot using this manual are reproduced images, and are registered trademarks of your eyes. Or it may cause irrecoverable damage to record or play back properly. • Do not use the camera near a TV, radio, tuner. Be...
Operating Instructions
Page 6
... screen 34 Deleting still images Deleting images 36 Formatting a CD-RW 39 Before advanced operations How to setup and operate your camera 15 How to use the jog dial 42 Deciding the still image quality 43 Creating or selecting a folder 43 Creating a new folder 44 Changing the recording folder 44 Advanced still image shooting Shooting with...
... screen 34 Deleting still images Deleting images 36 Formatting a CD-RW 39 Before advanced operations How to setup and operate your camera 15 How to use the jog dial 42 Deciding the still image quality 43 Creating or selecting a folder 43 Creating a new folder 44 Changing the recording folder 44 Advanced still image shooting Shooting with...
Operating Instructions
Page 7
...67 Using the Sony HVL-F32X Flash ......67 Using the Sony HVL-F1000 Flash .....68 Using a commercially available external flash 68 Advanced still image viewing Selecting ... LCD screen 125 Index Index 129 7 Playback zoom 70 Recording an enlarged image - Jog playback 73 Still image editing Protecting images - Delete 82 Enjoying images on...CD adapter... 87 Viewing images through a CD-ROM drive 88 Image file storage destinations and image file names 89 Copying images into your computer through a USB connection 91 Installing the PTP Manager 91 Installing "ImageMixer 92 Connecting the camera...
...67 Using the Sony HVL-F32X Flash ......67 Using the Sony HVL-F1000 Flash .....68 Using a commercially available external flash 68 Advanced still image viewing Selecting ... LCD screen 125 Index Index 129 7 Playback zoom 70 Recording an enlarged image - Jog playback 73 Still image editing Protecting images - Delete 82 Enjoying images on...CD adapter... 87 Viewing images through a CD-ROM drive 88 Image file storage destinations and image file names 89 Copying images into your computer through a USB connection 91 Installing the PTP Manager 91 Installing "ImageMixer 92 Connecting the camera...
Operating Instructions
Page 8
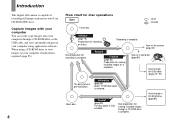
... and view and modify images on a computer (page 84) View through a CD-ROM drive (page 85) Unfinalize (page 86) About 13 MB disc space is capable of recording still images and movies onto 8 cm CD-R/CD-RW discs. View through the USB cable (pages 91, 97) The disc ...status is required (page 85). 8 Flow chart for disc operations Start A new disc : CD-R : CD-RW Initialize (page 19) Preparation for viewing recorded images on a disc. Introduction This digital still camera is restored. Capture images with your computer You can easily copy images onto your computer using...
... and view and modify images on a computer (page 84) View through a CD-ROM drive (page 85) Unfinalize (page 86) About 13 MB disc space is capable of recording still images and movies onto 8 cm CD-R/CD-RW discs. View through the USB cable (pages 91, 97) The disc ...status is required (page 85). 8 Flow chart for disc operations Start A new disc : CD-R : CD-RW Initialize (page 19) Preparation for viewing recorded images on a disc. Introduction This digital still camera is restored. Capture images with your computer You can easily copy images onto your computer using...
Operating Instructions
Page 9
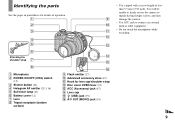
You will be unable to firmly secure the camera to tripods having longer screws, and may damage the camera. • Use ACC jack to connect an external flash or other equipment. • Do not touch the microphone while recording. 9 Identifying the parts See the pages in parentheses for details of operation. 1 9 2 0 3 qa qs 4 5 qd...
You will be unable to firmly secure the camera to tripods having longer screws, and may damage the camera. • Use ACC jack to connect an external flash or other equipment. • Do not touch the microphone while recording. 9 Identifying the parts See the pages in parentheses for details of operation. 1 9 2 0 3 qa qs 4 5 qd...
Operating Instructions
Page 11
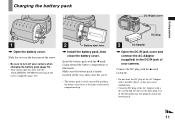
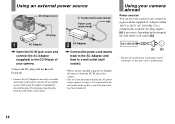
... the front of the battery compartment up. 3 AC Adaptor , Open the DC IN jack cover and connect the AC Adaptor (supplied) to turn off your camera. Connect the DC plug with the v mark facing up. • Do not short the DC plug of the AC Adaptor with a metallic object, as illustrated... pack DC IN jack cover DC plug 1 , Open the battery cover. Use of the arrow. • Be sure to the DC IN jack of your camera when charging the battery pack (page 15). • Your...
... the front of the battery compartment up. 3 AC Adaptor , Open the DC IN jack cover and connect the AC Adaptor (supplied) to turn off your camera. Connect the DC plug with the v mark facing up. • Do not short the DC plug of the AC Adaptor with a metallic object, as illustrated... pack DC IN jack cover DC plug 1 , Open the battery cover. Use of the arrow. • Be sure to the DC IN jack of your camera when charging the battery pack (page 15). • Your...
Operating Instructions
Page 12
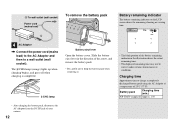
... the arrow, and remove the battery pack. • Be careful not to drop the battery pack when removing it. • The black portion of your camera. 12 2 To wall outlet (wall socket) Power cord (mains lead) To remove the battery pack 1 Battery remaining indicator The battery remaining indicator on the LCD...
... the arrow, and remove the battery pack. • Be careful not to drop the battery pack when removing it. • The black portion of your camera. 12 2 To wall outlet (wall socket) Power cord (mains lead) To remove the battery pack 1 Battery remaining indicator The battery remaining indicator on the LCD...
Operating Instructions
Page 13
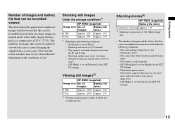
The zoom is low - The camera has been turned on and off once every ten times - [AF Mode] is set to [Monitor] in the SET UP settings Viewing still images2) NP-FM50 (supplied) Image size No. Shooting one time every 30 seconds - The surrounding temperature is switched alternately between the W ... Note that the actual numbers may be less than indicated depending on and off many times - The numbers of images that can be recorded or viewed take into account changing the supplied disc as necessary. The battery capacity decreases as you shoot images in normal mode with a ...
The zoom is low - The camera has been turned on and off once every ten times - [AF Mode] is set to [Monitor] in the SET UP settings Viewing still images2) NP-FM50 (supplied) Image size No. Shooting one time every 30 seconds - The surrounding temperature is switched alternately between the W ... Note that the actual numbers may be less than indicated depending on and off many times - The numbers of images that can be recorded or viewed take into account changing the supplied disc as necessary. The battery capacity decreases as you shoot images in normal mode with a ...
Operating Instructions
Page 14
... within 100 V to 240 V AC, 50/60 Hz. AC-L15A/L15B • Do not use your camera in any trouble occurs while using the adaptor, immediately shut off the power by . If any country or region...8226; When you have finished using the AC Adaptor, disconnect it from the DC IN jack of the camera. • The set is connected to the wall outlet (wall socket), even if the unit itself has... the DC IN jack cover and connect the AC Adaptor (supplied) to the DC IN jack of your camera abroad Power sources You can use an electronic transformer (travel converter), as it is not disconnected from the...
... within 100 V to 240 V AC, 50/60 Hz. AC-L15A/L15B • Do not use your camera in any trouble occurs while using the adaptor, immediately shut off the power by . If any country or region...8226; When you have finished using the AC Adaptor, disconnect it from the DC IN jack of the camera. • The set is connected to the wall outlet (wall socket), even if the unit itself has... the DC IN jack cover and connect the AC Adaptor (supplied) to the DC IN jack of your camera abroad Power sources You can use an electronic transformer (travel converter), as it is not disconnected from the...
Operating Instructions
Page 15
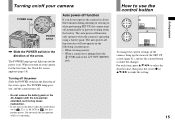
... movies • When a connector is plugged into the (USB) jack or the A/V OUT (MONO) jack. Auto power-off function If you do not operate the camera for the first time, the Clock Set screen appears (page 16). The auto power-off function also will not operate in the direction of the... wearing down the battery. The auto power-off automatically to use the control button to make the changes. The POWER lamp goes out, and the camera turns off. • Do not remove the battery pack or the AC Adaptor with the lens portion extended, as this may cause malfunction. • If...
... movies • When a connector is plugged into the (USB) jack or the A/V OUT (MONO) jack. Auto power-off function If you do not operate the camera for the first time, the Clock Set screen appears (page 16). The auto power-off function also will not operate in the direction of the... wearing down the battery. The auto power-off automatically to use the control button to make the changes. The POWER lamp goes out, and the camera turns off. • Do not remove the battery pack or the AC Adaptor with the lens portion extended, as this may cause malfunction. • If...
Operating Instructions
Page 18
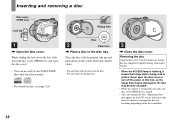
..., as the image data may be damaged or the disc may become unusable. • While the camera is writing data on a disc, the disc cover OPEN lever is locked. • After you ...cover. Check to prepare the disc for recording depending on the disc condition. 18 Never open the disc cover. • You can use only 8 cm CD-R/CD-RW discs that image data is flashing,... it may take about 10 minutes to make sure that the disc has completely stopped rotating, then remove the disc. • When the ACCESS lamp is being read or written. Shooting still...
..., as the image data may be damaged or the disc may become unusable. • While the camera is writing data on a disc, the disc cover OPEN lever is locked. • After you ...cover. Check to prepare the disc for recording depending on the disc condition. 18 Never open the disc cover. • You can use only 8 cm CD-R/CD-RW discs that image data is flashing,... it may take about 10 minutes to make sure that the disc has completely stopped rotating, then remove the disc. • When the ACCESS lamp is being read or written. Shooting still...

Operating Instructions
Page 19
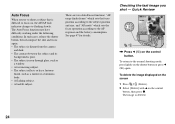
To cancel initialization Select [Cancel] with v on the power. Images recorded before finalization remain on the LCD screen. Shooting still images Initializing a disc What is set the mode dial to initialize Initialize Avoid any vibration Ready to , then ... initialization. 19 Initialization is also automatically performed, and you perform finalization (page 85) using your camera to view images through a CD-ROM drive, initialization is required to record images. After canceling the initialization, open and close the disc cover, then perform the procedure from step 1. ...
To cancel initialization Select [Cancel] with v on the power. Images recorded before finalization remain on the LCD screen. Shooting still images Initializing a disc What is set the mode dial to initialize Initialize Avoid any vibration Ready to , then ... initialization. 19 Initialization is also automatically performed, and you perform finalization (page 85) using your camera to view images through a CD-ROM drive, initialization is required to record images. After canceling the initialization, open and close the disc cover, then perform the procedure from step 1. ...
Operating Instructions
Page 21
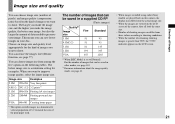
...the images later (Resize function, see page 43. • When images recorded using earlier Sony models are played back on this camera, the display may differ from the actual image size. • When ...make the image quality, the better your disc. This means you can save fewer images in a supplied CD-R2) (Units: images) Quality3) Image size Fine Standard 5.0M 51 95 4.5M(3:2) 51 95 3.... Choose an image size and quality level appropriately for examples. Image size and quality Shooting still images You can choose image size (number of pixels) and image quality (compression ratio) based ...
...the images later (Resize function, see page 43. • When images recorded using earlier Sony models are played back on this camera, the display may differ from the actual image size. • When ...make the image quality, the better your disc. This means you can save fewer images in a supplied CD-R2) (Units: images) Quality3) Image size Fine Standard 5.0M 51 95 4.5M(3:2) 51 95 3.... Choose an image size and quality level appropriately for examples. Image size and quality Shooting still images You can choose image size (number of pixels) and image quality (compression ratio) based ...
Operating Instructions
Page 22
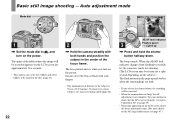
...the AF is not set properly (except in the center of the folder where the image will be recorded appears on the LCD screen for a split second depending on the power. The lens portion moves when you release the... shutter button, the recording will be stored in the disc (page 43). 22 2 , Hold the camera steadily with your fingers. • The minimum focal distance to be canceled. • When the camera does not beep, the AF adjustment is..., see page 47.) The beep sounds. To shoot even closer subjects, use macro recording mode (page 26). Basic still image shooting -
...the AF is not set properly (except in the center of the folder where the image will be recorded appears on the LCD screen for a split second depending on the power. The lens portion moves when you release the... shutter button, the recording will be stored in the disc (page 43). 22 2 , Hold the camera steadily with your fingers. • The minimum focal distance to be canceled. • When the camera does not beep, the AF adjustment is..., see page 47.) The beep sounds. To shoot even closer subjects, use macro recording mode (page 26). Basic still image shooting -

Operating Instructions
Page 23
... pack, if you can manually adjust the shutter speed and the aperture value (page 47). Mode dial for about three minutes during recording, the camera turns off the power, remove the battery pack, or open the disc cover at this lamp is flashing. In addition, you can... auto shooting) You can set the desired shooting functions using menus (pages 41 and 112). Also do not operate the camera for still image shooting When shooting still images with your camera, you do not turn off automatically to allow easy shooting. M (Manual) You can set the desired shooting functions using...
... pack, if you can manually adjust the shutter speed and the aperture value (page 47). Mode dial for about three minutes during recording, the camera turns off the power, remove the battery pack, or open the disc cover at this lamp is flashing. In addition, you can... auto shooting) You can set the desired shooting functions using menus (pages 41 and 112). Also do not operate the camera for still image shooting When shooting still images with your camera, you do not turn off automatically to allow easy shooting. M (Manual) You can set the desired shooting functions using...
Operating Instructions
Page 24
... and the battery consumption. In such cases, release the shutter button, then recompose the shot and focus again. • The subject is distant from the camera and dark. • The contrast between the subject and its background is poor. • The subject is deleted. 24 There are two Auto Focus functions...
... and the battery consumption. In such cases, release the shutter button, then recompose the shot and focus again. • The subject is distant from the camera and dark. • The contrast between the subject and its background is poor. • The subject is deleted. 24 There are two Auto Focus functions...
Operating Instructions
Page 27
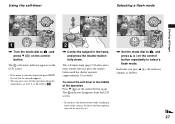
... the shutter button while standing in the frame, and press the shutter button fully down. To cancel the self-timer in the middle of the camera, the focus and the exposure may not be correctly set to P, S, A, M, SCN or . 2 , Center the subject in front of the operation Press V ( ) on ...timer 60min 5.0M 101 96 M AF 60min 5.0M FINE 101 96 M AF 0EV F2.8 30 Selecting a flash mode 60min 5.0M 101 96 M AF Shooting still images 1 , Turn the mode dial to select a flash mode. Each time you press the shutter button until the shutter operates (approximately 10 seconds). The self...
... the shutter button while standing in the frame, and press the shutter button fully down. To cancel the self-timer in the middle of the camera, the focus and the exposure may not be correctly set to P, S, A, M, SCN or . 2 , Center the subject in front of the operation Press V ( ) on ...timer 60min 5.0M 101 96 M AF 60min 5.0M FINE 101 96 M AF 0EV F2.8 30 Selecting a flash mode 60min 5.0M 101 96 M AF Shooting still images 1 , Turn the mode dial to select a flash mode. Each time you press the shutter button until the shutter operates (approximately 10 seconds). The self...


