Instruction Manual
Page 1
Instruction Manual Before operating the unit, please read this manual thoroughly, and retain it for future reference. Mobile HD Snap Camera For details on the advanced operations, please access "Mobile HD Snap Camera Handbook" contained on the supplied CD-ROM via a computer. MHS-CM1/CM3 © 2009 Sony Corporation 4-123-313-11(1)
Instruction Manual Before operating the unit, please read this manual thoroughly, and retain it for future reference. Mobile HD Snap Camera For details on the advanced operations, please access "Mobile HD Snap Camera Handbook" contained on the supplied CD-ROM via a computer. MHS-CM1/CM3 © 2009 Sony Corporation 4-123-313-11(1)
Instruction Manual
Page 4
... Stick PRO Duo" media in the European Union and other European countries with separate collection systems) This symbol on the battery or on using your camera • For recording movies, it shall be replaced by inappropriate waste handling of 512 MB or larger marked with: - * - * Marked with this product... memory and "Memory Stick PRO Duo" media back up to 16 GB has been confirmed to operate correctly with this camera. • See page 30 for the recycling of this product. For more detailed information about recycling of electrical and electronic equipment. To ...
... Stick PRO Duo" media in the European Union and other European countries with separate collection systems) This symbol on the battery or on using your camera • For recording movies, it shall be replaced by inappropriate waste handling of 512 MB or larger marked with: - * - * Marked with this product... memory and "Memory Stick PRO Duo" media back up to 16 GB has been confirmed to operate correctly with this camera. • See page 30 for the recycling of this product. For more detailed information about recycling of electrical and electronic equipment. To ...
Instruction Manual
Page 5
...support "MP4 format". • This camera does not support "AVCHD format" and therefore is not compatible with the playback and recording of movies in "AVCHD format" like a Digital HD Video camera recorder. • Still images recorded by this camera are compressed/recorded in JPEG*1 format.... Therefore, movies recorded by this camera cannot be played on recording/playback • Before you start recording,...
...support "MP4 format". • This camera does not support "AVCHD format" and therefore is not compatible with the playback and recording of movies in "AVCHD format" like a Digital HD Video camera recorder. • Still images recorded by this camera are compressed/recorded in JPEG*1 format.... Therefore, movies recorded by this camera cannot be played on recording/playback • Before you start recording,...

Instruction Manual
Page 6
*3 Japan Electronics and Information Technology Industries Association [ Warning on copyright Television programs, films, videotapes, and other materials may be contrary to a malfunction of the recording cannot be copyrighted. Unauthorized recording of such materials may be compensated for if recording or playback is not possible due to the provisions of the copyright laws. [ No compensation for contents of the recording The contents of your camera or recording media, etc. 6
*3 Japan Electronics and Information Technology Industries Association [ Warning on copyright Television programs, films, videotapes, and other materials may be contrary to a malfunction of the recording cannot be copyrighted. Unauthorized recording of such materials may be compensated for if recording or playback is not possible due to the provisions of the copyright laws. [ No compensation for contents of the recording The contents of your camera or recording media, etc. 6
Instruction Manual
Page 7
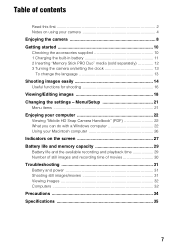
... Changing the settings - Menu/Setup 21 Menu items 21 Enjoying your computer 22 Viewing "Mobile HD Snap Camera Handbook" (PDF 22 What you can do with a Windows computer 22 Using your camera 4 Enjoying the camera 8 Getting started 10 Checking the accessories supplied 10 1 Charging the built-in battery 11 ...2 Inserting "Memory Stick PRO Duo" media (sold separately 12 3 Turning the camera on the screen 27 Battery life and memory capacity 29 Battery life and the available recording and playback time 29 Number of still images...
... Changing the settings - Menu/Setup 21 Menu items 21 Enjoying your computer 22 Viewing "Mobile HD Snap Camera Handbook" (PDF 22 What you can do with a Windows computer 22 Using your camera 4 Enjoying the camera 8 Getting started 10 Checking the accessories supplied 10 1 Charging the built-in battery 11 ...2 Inserting "Memory Stick PRO Duo" media (sold separately 12 3 Turning the camera on the screen 27 Battery life and memory capacity 29 Battery life and the available recording and playback time 29 Number of still images...
Instruction Manual
Page 8
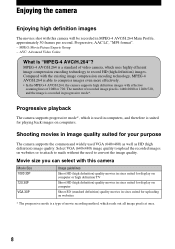
... movie recording method, which uses highly efficient image compression encoding technology to record HD (high definition) images. Compared with this camera Movie Size 1080 30P 720 30P VGA 30P Usage guidelines Shoot HD (high definition) quality movies in sizes suited for display on computer or high... for playing back images on websites * The progressive mode is used VGA (640×480) as well as HD (high definition) image quality. Enjoying the camera Enjoying high definition images The movies shot with the existing image compression encoding technology, MPEG-4 AVC/H.264 is "MPEG...
... movie recording method, which uses highly efficient image compression encoding technology to record HD (high definition) images. Compared with this camera Movie Size 1080 30P 720 30P VGA 30P Usage guidelines Shoot HD (high definition) quality movies in sizes suited for display on computer or high... for playing back images on websites * The progressive mode is used VGA (640×480) as well as HD (high definition) image quality. Enjoying the camera Enjoying high definition images The movies shot with the existing image compression encoding technology, MPEG-4 AVC/H.264 is "MPEG...
Instruction Manual
Page 9
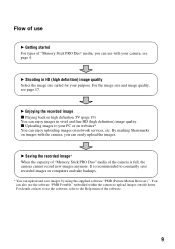
... images outside home. For details on high definition TV (page 19) You can use with the camera, you can enjoy images in HD (high definition) image quality Select the image size suited for your camera, see page 17. B Enjoying the recorded image x Playing back on how to use the software... "PMB Portable" embedded within the camera to the Help menu of the camera is recommended to your PC or...
... images outside home. For details on high definition TV (page 19) You can use with the camera, you can enjoy images in HD (high definition) image quality Select the image size suited for your camera, see page 17. B Enjoying the recorded image x Playing back on how to use the software... "PMB Portable" embedded within the camera to the Help menu of the camera is recommended to your PC or...
Instruction Manual
Page 10
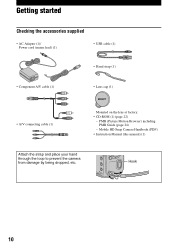
PMB (Picture Motion Browser) including PMB Guide (page 24) - Hook 10 Mobile HD Snap Camera Handbook (PDF) • Instruction Manual (this manual) (1) Attach the strap and place your hand through the loop to prevent the camera from damage by being dropped, etc. Getting started Checking the accessories supplied • AC Adaptor (1)/ Power cord (mains lead) (1) • USB cable (1) • Hand strap (1) • Component A/V cable (1) • Lens cap (1) • A/V connecting cable (1) Mounted on the lens at factory. • CD-ROM (1) (page 22) -
PMB (Picture Motion Browser) including PMB Guide (page 24) - Hook 10 Mobile HD Snap Camera Handbook (PDF) • Instruction Manual (this manual) (1) Attach the strap and place your hand through the loop to prevent the camera from damage by being dropped, etc. Getting started Checking the accessories supplied • AC Adaptor (1)/ Power cord (mains lead) (1) • USB cable (1) • Hand strap (1) • Component A/V cable (1) • Lens cap (1) • A/V connecting cable (1) Mounted on the lens at factory. • CD-ROM (1) (page 22) -

Instruction Manual
Page 11
... under certain circumstances or conditions. • See page 30 for the number of images that can be recorded. • If you do not operate the camera for a long time, disconnect the AC Adaptor from a wall outlet (wall socket). 11 1 Charging the built-in battery CHG lamp AC Adaptor 2 1 DC IN jack... Power cord (mains lead) • The battery is built in within the camera. 1Connect the AC Adaptor to the DC IN jack of the camera and from the DC IN jack of the camera, making sure the power is off , charging is finished. [ Charging time Full charge time Approx. 90...
... under certain circumstances or conditions. • See page 30 for the number of images that can be recorded. • If you do not operate the camera for a long time, disconnect the AC Adaptor from a wall outlet (wall socket). 11 1 Charging the built-in battery CHG lamp AC Adaptor 2 1 DC IN jack... Power cord (mains lead) • The battery is built in within the camera. 1Connect the AC Adaptor to the DC IN jack of the camera and from the DC IN jack of the camera, making sure the power is off , charging is finished. [ Charging time Full charge time Approx. 90...

Instruction Manual
Page 12
... Duo" media in once. • Never remove "Memory Stick PRO Duo" media when the access lamp is no "Memory Stick PRO Duo" media inserted The camera records/plays back images using the internal memory (approx. 12 MB). [ To remove "Memory Stick PRO Duo" media Open the "Memory Stick Duo" media cover...
... Duo" media in once. • Never remove "Memory Stick PRO Duo" media when the access lamp is no "Memory Stick PRO Duo" media inserted The camera records/plays back images using the internal memory (approx. 12 MB). [ To remove "Memory Stick PRO Duo" media Open the "Memory Stick Duo" media cover...
Instruction Manual
Page 13
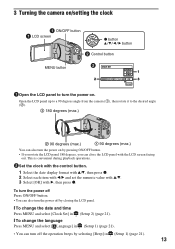
3 Turning the camera on/setting the clock 1 ON/OFF button 1 LCD screen z button v/V/b/B button 2 Control button MENU button 2 // : 1Open the LCD panel to the desired angle (2). 2 180 degrees (... b/B and set the numeric value with v/V. 3 Select [OK] with the LCD screen facing out. Open the LCD panel up to a 90 degrees angle from the camera (1), then rotate it to turn the power off the operation beeps by closing the LCD panel. [ To change the date and time Press MENU and...
3 Turning the camera on/setting the clock 1 ON/OFF button 1 LCD screen z button v/V/b/B button 2 Control button MENU button 2 // : 1Open the LCD panel to the desired angle (2). 2 180 degrees (... b/B and set the numeric value with v/V. 3 Select [OK] with the LCD screen facing out. Open the LCD panel up to a 90 degrees angle from the camera (1), then rotate it to turn the power off the operation beeps by closing the LCD panel. [ To change the date and time Press MENU and...

Instruction Manual
Page 15
... shooting distance is approximately 50 cm (19 3/4 inches) (W)/100 cm (39 3/8 inches) (T) (from that position, use Macro (Shooting close-up) (page 16). • When the camera does not focus on the subject automatically, the AE/AF lock indicator will be difficult in shooting standby. When you are shooting a subject closer than...
... shooting distance is approximately 50 cm (19 3/4 inches) (W)/100 cm (39 3/8 inches) (T) (from that position, use Macro (Shooting close-up) (page 16). • When the camera does not focus on the subject automatically, the AE/AF lock indicator will be difficult in shooting standby. When you are shooting a subject closer than...
Instruction Manual
Page 16
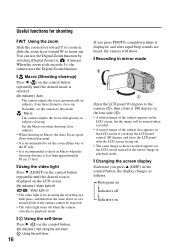
...The same image as follows. Useful functions for assisting the recording in a dark place, and therefore the same effect as of a normal flash of the camera cannot be normal when recorded. • A mirror-image of the subject also appears on the LCD screen if you press v (DISP) on subjects, ...(No indicator): Not using the self-timer : Using the self-timer 16 If you press PHOTO, countdown timer is selected. (No indicator): Auto The camera adjusts the focus automatically on the control button, the display changes as those recorded appears on the LCD screen instead of the subject appears on...
...The same image as follows. Useful functions for assisting the recording in a dark place, and therefore the same effect as of a normal flash of the camera cannot be normal when recorded. • A mirror-image of the subject also appears on the LCD screen if you press v (DISP) on subjects, ...(No indicator): Not using the self-timer : Using the self-timer 16 If you press PHOTO, countdown timer is selected. (No indicator): Auto The camera adjusts the focus automatically on the control button, the display changes as those recorded appears on the LCD screen instead of the subject appears on...

Instruction Manual
Page 17
...HD (high definition) quality movies in sizes suited for display on computer VGA 30P: Shoot SD (standard definition) quality movies in sizes suited for shooting in other bright places. 17 Landscape Focuses on the control button, then select the desired image size with v/V. Low Light Suitable for uploading on websites [ Selecting a camera...10×15 cm (4×6") or 13×18 cm (5×7") 2M: For prints up to A4 (8×10") 3:2: Shoot in (Camera) (page 21). Sports Shoots moving subjects outdoors or in dark places. To turn off the Image Size menu, press the (Image size) button...
...HD (high definition) quality movies in sizes suited for display on computer VGA 30P: Shoot SD (standard definition) quality movies in sizes suited for shooting in other bright places. 17 Landscape Focuses on the control button, then select the desired image size with v/V. Low Light Suitable for uploading on websites [ Selecting a camera...10×15 cm (4×6") or 13×18 cm (5×7") 2M: For prints up to A4 (8×10") 3:2: Shoot in (Camera) (page 21). Sports Shoots moving subjects outdoors or in dark places. To turn off the Image Size menu, press the (Image size) button...
Instruction Manual
Page 18
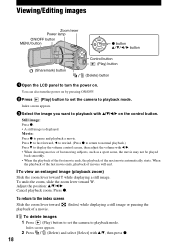
...zoom lever toward playback of a movie. (Index) while displaying a still image or pausing the [ 18 To delete images 1 Press (Play) button to set the camera to playback mode. Movie: Press z to playback with v/V/b/B on the control button. Adjust the position: v/V/b/B Cancel playback zoom: Press z. Index screen appears. 2...) button (Delete) button 1Open the LCD panel to turn the power on by pressing ON/OFF. 2Press (Play) button to set the camera to playback mode. Index screen appears. 3Select the image you want to pause and playback a movie. When the playback of the last movie...
...zoom lever toward playback of a movie. (Index) while displaying a still image or pausing the [ 18 To delete images 1 Press (Play) button to set the camera to playback mode. Movie: Press z to playback with v/V/b/B on the control button. Adjust the position: v/V/b/B Cancel playback zoom: Press z. Index screen appears. 2...) button (Delete) button 1Open the LCD panel to turn the power on by pressing ON/OFF. 2Press (Play) button to set the camera to playback mode. Index screen appears. 3Select the image you want to pause and playback a movie. When the playback of the last movie...
Instruction Manual
Page 19
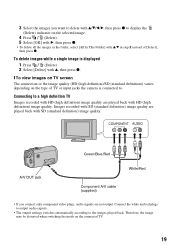
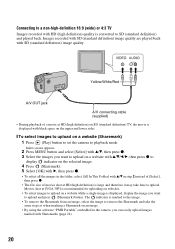
...Press (Delete). 5 Select [OK] with B, then press z. • To delete all the images in step 2 instead of TV or input jacks the camera is displayed 1 Press (Delete). 2 Select [Delete] with SD (standard definition) image quality. To delete images while a single image is connected to the images... definition) image quality are played back with v/V in the folder, select [All In This Folder] with HD (high definition) image quality. Connecting to a high definition TV Images recorded with HD (high definition) image quality are played back with v, then press z. [ To view images on TV ...
...Press (Delete). 5 Select [OK] with B, then press z. • To delete all the images in step 2 instead of TV or input jacks the camera is displayed 1 Press (Delete). 2 Select [Delete] with SD (standard definition) image quality. To delete images while a single image is connected to the images... definition) image quality are played back with v/V in the folder, select [All In This Folder] with HD (high definition) image quality. Connecting to a high definition TV Images recorded with HD (high definition) image quality are played back with v, then press z. [ To view images on TV ...
Instruction Manual
Page 20
...Sharemark). 5 Select [OK] with B, then press z. • To select all the images in the folder, select [All In This Folder] with v/V in the camera, you want to SD (standard definition) and played back. Index screen appears. 2 Press MENU button and select [Select] with v/V, then press z. 3 Select the ...images marked with Sharemarks (page 24). 20 Yellow/White/Red A/V OUT jack A/V connecting cable (supplied) • During playback of movies shot at HD (high definition) on SD (standard definition) TV, the movie is displayed with black space on the upper and lower sides. [ To select ...
...Sharemark). 5 Select [OK] with B, then press z. • To select all the images in the folder, select [All In This Folder] with v/V in the camera, you want to SD (standard definition) and played back. Index screen appears. 2 Press MENU button and select [Select] with v/V, then press z. 3 Select the ...images marked with Sharemarks (page 24). 20 Yellow/White/Red A/V OUT jack A/V connecting cable (supplied) • During playback of movies shot at HD (high definition) on SD (standard definition) TV, the movie is displayed with black space on the upper and lower sides. [ To select ...
Instruction Manual
Page 21
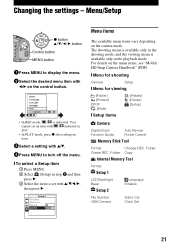
...available menu items vary depending on the menu items, see "Mobile HD Snap Camera Handbook" (PDF). [ Menu for shooting Camera Setup [ Menu for viewing (Folder) (Protect) DPOF (Slide) (Rotate) (Divide) (Setup) [ Setup items Camera Digital Zoom Function Guide Auto Review Flicker Cancel Memory Stick Tool Format...LCD Backlight Beep Setup 2 2 File Number USB Connect Language Initialize Video Out Clock Set 21 Changing the settings - For details on the camera mode. You cannot set with b/B on the control button. • In REC mode, / is indicated. The shooting menu is ...
...available menu items vary depending on the menu items, see "Mobile HD Snap Camera Handbook" (PDF). [ Menu for shooting Camera Setup [ Menu for viewing (Folder) (Protect) DPOF (Slide) (Rotate) (Divide) (Setup) [ Setup items Camera Digital Zoom Function Guide Auto Review Flicker Cancel Memory Stick Tool Format...LCD Backlight Beep Setup 2 2 File Number USB Connect Language Initialize Video Out Clock Set 21 Changing the settings - For details on the camera mode. You cannot set with b/B on the control button. • In REC mode, / is indicated. The shooting menu is ...
Instruction Manual
Page 22
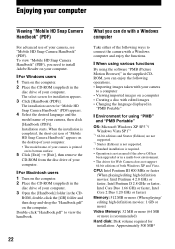
...required for using the software "PMB (Picture Motion Browser)" in the supplied CDROM, you need to view the handbook. To view "Mobile HD Snap Camera Handbook" (PDF), you can do with a Windows computer Take either of both Windows XP and Vista. The installation screen for installation appears.... and then drag-and-drop the "Handbook.pdf" on the computer. 2 Place the CD-ROM (supplied) in the disc drive of your camera, see "Mobile HD Snap Camera Handbook" (PDF). Double-click "Handbook.pdf" to install Adobe Reader on your computer. [ For Windows users 1 Turn on a computer •...
...required for using the software "PMB (Picture Motion Browser)" in the supplied CDROM, you need to view the handbook. To view "Mobile HD Snap Camera Handbook" (PDF), you can do with a Windows computer Take either of both Windows XP and Vista. The installation screen for installation appears.... and then drag-and-drop the "Handbook.pdf" on the computer. 2 Place the CD-ROM (supplied) in the disc drive of your camera, see "Mobile HD Snap Camera Handbook" (PDF). Double-click "Handbook.pdf" to install Adobe Reader on your computer. [ For Windows users 1 Turn on a computer •...
Instruction Manual
Page 23
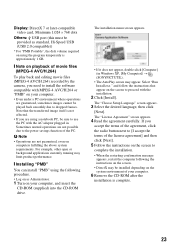
... is approximately 1 GB. [ Note on playback of movie files (MPEG-4 AVC/H.264) To play back and editing movie files (MPEG-4 AVC/H.264) recorded by the camera, you need to install the software compatible with MPEG-4 AVC/H.264 or "PMB" on your computer. • Even under a PC environment where operations are guaranteed...
... is approximately 1 GB. [ Note on playback of movie files (MPEG-4 AVC/H.264) To play back and editing movie files (MPEG-4 AVC/H.264) recorded by the camera, you need to install the software compatible with MPEG-4 AVC/H.264 or "PMB" on your computer. • Even under a PC environment where operations are guaranteed...


