Operating Instructions
Page 3
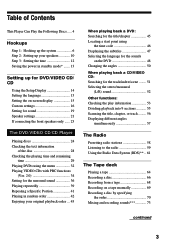
... power in standby mode* ....... 13 Setting up for DVD/VIDEO CD/ CD Using the Setup Display 14 Setting the language 15 Setting the on-screen display 15 Custom settings 16 Setting for sound 19 Speaker settings 21 If connecting the front speakers only ...... 23 The DVD/VIDEO CD/CD Player Playing discs 24 Checking the text information of the disc 28 Checking the playing time and remaining time 29 Playing DVDs using the menu 32 Playing VIDEO CDs with PBC functions (Ver. 2.0 34 Setting for the surround sound 36 Playing...
... power in standby mode* ....... 13 Setting up for DVD/VIDEO CD/ CD Using the Setup Display 14 Setting the language 15 Setting the on-screen display 15 Custom settings 16 Setting for sound 19 Speaker settings 21 If connecting the front speakers only ...... 23 The DVD/VIDEO CD/CD Player Playing discs 24 Checking the text information of the disc 28 Checking the playing time and remaining time 29 Playing DVDs using the menu 32 Playing VIDEO CDs with PBC functions (Ver. 2.0 34 Setting for the surround sound 36 Playing...
Operating Instructions
Page 11
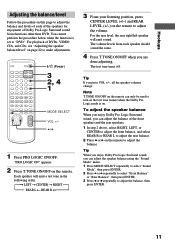
... When you enjoy Dolby Pro Logic Surround sound, you press VOL +/-, all the speaker volumes change. "PRO LOGIC ON" appears. 2 Press T.TONE ON/OFF on . Tip If you can only be used to turn on the test tone feature when the Dolby Pro Logic mode is set to "DVD". For playback of DVDs, VIDEO CDs, and CDs, see "Adjusting the speaker balance/level" on page 22 to adjust the volume. Each speaker will emit sound. Hookups Adjusting the balance/level Follow the...
... When you enjoy Dolby Pro Logic Surround sound, you press VOL +/-, all the speaker volumes change. "PRO LOGIC ON" appears. 2 Press T.TONE ON/OFF on . Tip If you can only be used to turn on the test tone feature when the Dolby Pro Logic mode is set to "DVD". For playback of DVDs, VIDEO CDs, and CDs, see "Adjusting the speaker balance/level" on page 22 to adjust the volume. Each speaker will emit sound. Hookups Adjusting the balance/level Follow the...
Operating Instructions
Page 16
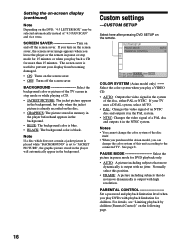
..., see "Limiting playback by children (Parental Control)" on the DVD, "4:3 LETTER BOX" may be selected automatically instead of a PAL disc and outputs it in pause mode for children. Setting the on-screen display (continued) Note Depending on the following page. 16 COLOR SYSTEM (Asian model only) -----Select the color system when you play a VIDEO CD. • AUTO: Outputs the video signal in the system of this position. • FRAME: A picture...
..., see "Limiting playback by children (Parental Control)" on the DVD, "4:3 LETTER BOX" may be selected automatically instead of a PAL disc and outputs it in pause mode for children. Setting the on-screen display (continued) Note Depending on the following page. 16 COLOR SYSTEM (Asian model only) -----Select the color system when you play a VIDEO CD. • AUTO: Outputs the video signal in the system of this position. • FRAME: A picture...
Operating Instructions
Page 17
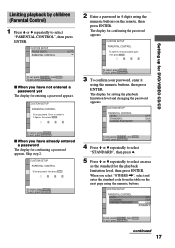
... select "PARENTAL CONTROL", then press ENTER. continued 17 To quit, press DVD SETUP . To quit, press DVD SETUP . 3 To confirm your password, enter it using the numeric buttons. Enter a number in 4 digits using the numeric buttons on the next page using the numeric buttons, then press ENTER. The display for setting the playback limitation level and changing the password appears. CUSTOM SETUP PARENTAL CONTROL LEVEL: OFF STANDARD: USA CHANGE PASSWORD To return, press RETURN . CUSTOM SETUP...
... select "PARENTAL CONTROL", then press ENTER. continued 17 To quit, press DVD SETUP . To quit, press DVD SETUP . 3 To confirm your password, enter it using the numeric buttons. Enter a number in 4 digits using the numeric buttons on the next page using the numeric buttons, then press ENTER. The display for setting the playback limitation level and changing the password appears. CUSTOM SETUP PARENTAL CONTROL LEVEL: OFF STANDARD: USA CHANGE PASSWORD To return, press RETURN . CUSTOM SETUP...
Operating Instructions
Page 19
..., press DVD SETUP . Notes • When you set a password, you play DVDs which contains the highest number of channels, the player selects PCM, Dolby Digital, and MPEG AUDIO sound tracks, in "LANGUAGE SETUP". Enter the password to "AUTO", the language may change the settings for sound -- In this order. • Depending on the remote. Setting for playback limitation. • Depending on the "AUDIO" settings in this case, enter the password, then change the parental control level while playing the disc. continued...
..., press DVD SETUP . Notes • When you set a password, you play DVDs which contains the highest number of channels, the player selects PCM, Dolby Digital, and MPEG AUDIO sound tracks, in "LANGUAGE SETUP". Enter the password to "AUTO", the language may change the settings for sound -- In this order. • Depending on the remote. Setting for playback limitation. • Depending on the "AUDIO" settings in this case, enter the password, then change the parental control level while playing the disc. continued...
Operating Instructions
Page 20
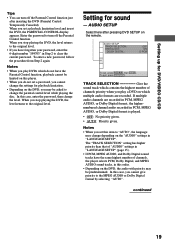
...channels. • DOLBY DIGITAL: When the player is connected to an audio component with 96 kHz sampling frequency, the output signals from the MD OUT jacks, the sampling frequency stays at 96kHz and the output signals are converted to 48 kHz (sampling frequency). Otherwise, when you connect a digital component such as a receiver (amplifier), DAT, or MD via the DIGITAL OUT OPTICAL jack using an optical digital connecting cord. AUDIO SETUP TRACK SELECTION: DIGITAL OUT: DOLBY DIGITAL: OFF ON D-PCM To set "DOLBY DIGITAL" in "AUDIO SETUP" to analog signals. • When you select...
...channels. • DOLBY DIGITAL: When the player is connected to an audio component with 96 kHz sampling frequency, the output signals from the MD OUT jacks, the sampling frequency stays at 96kHz and the output signals are converted to 48 kHz (sampling frequency). Otherwise, when you connect a digital component such as a receiver (amplifier), DAT, or MD via the DIGITAL OUT OPTICAL jack using an optical digital connecting cord. AUDIO SETUP TRACK SELECTION: DIGITAL OUT: DOLBY DIGITAL: OFF ON D-PCM To set "DOLBY DIGITAL" in "AUDIO SETUP" to analog signals. • When you select...
Operating Instructions
Page 21
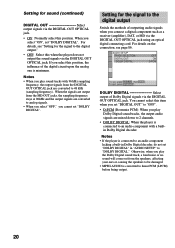
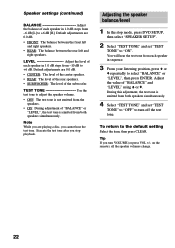
... fixed at 100Hz. • Set the cut off frequency on the subwoofer as high as possible. • Depending on the remote. Select here after pressing DVD SETUP on the settings of "VIRTUAL REAR SHIFT" and "VIRTUAL MULTI REAR" in the Control Menu display. - YES - for DVD/VIDEO CD/CD Speaker settings -- Default is 3.6 meter (12 ft.). SPEAKER SETUP SET UP: DISTANCE: BALANCE: LEVEL: TEST TONE: OFF FRONT: CENTER: REAR: SUBWOOFER: YES YES BEHIND YES To set the distance, the sound cuts off frequency...
... fixed at 100Hz. • Set the cut off frequency on the subwoofer as high as possible. • Depending on the remote. Select here after pressing DVD SETUP on the settings of "VIRTUAL REAR SHIFT" and "VIRTUAL MULTI REAR" in the Control Menu display. - YES - for DVD/VIDEO CD/CD Speaker settings -- Default is 3.6 meter (12 ft.). SPEAKER SETUP SET UP: DISTANCE: BALANCE: LEVEL: TEST TONE: OFF FRONT: CENTER: REAR: SUBWOOFER: YES YES BEHIND YES To set the distance, the sound cuts off frequency...
Operating Instructions
Page 22
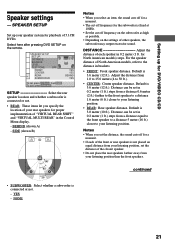
... a disc, you stop mode, press DVD SETUP, then select "SPEAKER SETUP". 2 Select "TEST TONE" and set "TEST TONE" to "OFF" to "ON". Adjust the value of "BALANCE" and "LEVEL" using V or v. Default adjustments are 0.0 dB. • CENTER: The level of the center speaker. • REAR: The level of the rear speakers. • SUBWOOFER: The level of the subwoofer. LEVEL Adjust the level of each speaker in 1.0 dB steps from both speakers simultaneously. 4 Select "TEST TONE" and set "TEST TONE" to turn VOLUME (or press VOL +/- Execute the test tone after you cannot hear the test tone...
... a disc, you stop mode, press DVD SETUP, then select "SPEAKER SETUP". 2 Select "TEST TONE" and set "TEST TONE" to "OFF" to "ON". Adjust the value of "BALANCE" and "LEVEL" using V or v. Default adjustments are 0.0 dB. • CENTER: The level of the center speaker. • REAR: The level of the rear speakers. • SUBWOOFER: The level of the subwoofer. LEVEL Adjust the level of each speaker in 1.0 dB steps from both speakers simultaneously. 4 Select "TEST TONE" and set "TEST TONE" to turn VOLUME (or press VOL +/- Execute the test tone after you cannot hear the test tone...

Operating Instructions
Page 23
In this system with the front speakers only. Setting up for DVD/VIDEO CD/CD If connecting the front speakers only You can use this case, switch the system to the 2-channel mode. ?/1 (Power) MULTI/2CH , Press MULTI/2CH to a 2-channel audio signal. 23 In the DVD 2CH mode, all of the audio channels are mixed down to turn off the indicator on the button.
In this system with the front speakers only. Setting up for DVD/VIDEO CD/CD If connecting the front speakers only You can use this case, switch the system to the 2-channel mode. ?/1 (Power) MULTI/2CH , Press MULTI/2CH to a 2-channel audio signal. 23 In the DVD 2CH mode, all of the audio channels are mixed down to turn off the indicator on the button.
Operating Instructions
Page 27
... headphones is 2 channel. • Switch the channel mode to 2CH by pressing MULTI/2CH when making an analog recording. 27 you change the settings of "TV TYPE" in "SCREEN SETUP" in Shuffle or Program Play mode. • Depending on where you change the settings of "DVD MENU", "AUDIO", or "SUBTITLE" in "LANGUAGE SETUP" in REC PAUSE mode. - When recording. - When recording using TAPE B. • When using a component connected to 2CH on the MULTI/2CH button turns off automatically...
... headphones is 2 channel. • Switch the channel mode to 2CH by pressing MULTI/2CH when making an analog recording. 27 you change the settings of "TV TYPE" in "SCREEN SETUP" in Shuffle or Program Play mode. • Depending on where you change the settings of "DVD MENU", "AUDIO", or "SUBTITLE" in "LANGUAGE SETUP" in REC PAUSE mode. - When recording. - When recording using TAPE B. • When using a component connected to 2CH on the MULTI/2CH button turns off automatically...

Operating Instructions
Page 38
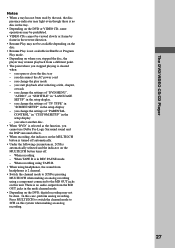
... you set "DOLBY DIGITAL" to "D-PCM". • When you play a sound track with a 96 kHz sampling frequency, be sure to select "OFF", or the output signals will be difficult to hear even if you set "VIRTUAL 3D SURROUND" to 48 kHz (sampling frequency). (Except when the player outputs the audio signal from DIGITAL OUT OPTICAL.) • When you connect a center speaker and a subwoofer, you can also hear the sound from the rear speakers when you select "VES...
... you set "DOLBY DIGITAL" to "D-PCM". • When you play a sound track with a 96 kHz sampling frequency, be sure to select "OFF", or the output signals will be difficult to hear even if you set "VIRTUAL 3D SURROUND" to 48 kHz (sampling frequency). (Except when the player outputs the audio signal from DIGITAL OUT OPTICAL.) • When you connect a center speaker and a subwoofer, you can also hear the sound from the rear speakers when you select "VES...

Operating Instructions
Page 44
... b repeatedly to select "Play Mode Set Up ?", then press ENTER. 5 Press B or b repeatedly to play the same program again. menu. Notes • The program is canceled when you change using V or v, then press ENTER. 2 Follow steps 6 through 7. 9 Press DVD N to "program" while "REPEAT 1" is selected, "REPEAT 1" is automatically canceled. 44 To cancel programming 1 Press FUNCTION repeatedly until "DVD" appears in the display. 2 While in the system's memory even...
... b repeatedly to select "Play Mode Set Up ?", then press ENTER. 5 Press B or b repeatedly to play the same program again. menu. Notes • The program is canceled when you change using V or v, then press ENTER. 2 Follow steps 6 through 7. 9 Press DVD N to "program" while "REPEAT 1" is selected, "REPEAT 1" is automatically canceled. 44 To cancel programming 1 Press FUNCTION repeatedly until "DVD" appears in the display. 2 While in the system's memory even...

Operating Instructions
Page 60
Preset number* STEREO Frequency * When only one station is in the Power Saving Mode, the One Touch Play function does not work. • You can be switched. • When you directly tune in step 2. For automatic tuning, press and hold m or M. may be no audio output. 60 Adjust the volume Press VOL +/-. Notes • When the TUNER function is selected, there is no display on the TV screen. • When DVD is selected as the current...
Preset number* STEREO Frequency * When only one station is in the Power Saving Mode, the One Touch Play function does not work. • You can be switched. • When you directly tune in step 2. For automatic tuning, press and hold m or M. may be no audio output. 60 Adjust the volume Press VOL +/-. Notes • When the TUNER function is selected, there is no display on the TV screen. • When DVD is selected as the current...

Operating Instructions
Page 65
... to select "DOLBY NR Set Up ?", then press PUSH ENTER. 4 Move the multi stick toward B or b repeatedly to select "1 Way" to play one side, "Cycle" to play both decks in the deck (One Touch Play). Remove the cassette Press A A or A B. To cancel the menu operation Press MODE SELECT. or > repeatedly to go back. Adjust the volume Turn VOLUME. • This tape deck does not have a play Press x. When the system is a tape in...
... to select "DOLBY NR Set Up ?", then press PUSH ENTER. 4 Move the multi stick toward B or b repeatedly to select "1 Way" to play one side, "Cycle" to play both decks in the deck (One Touch Play). Remove the cassette Press A A or A B. To cancel the menu operation Press MODE SELECT. or > repeatedly to go back. Adjust the volume Turn VOLUME. • This tape deck does not have a play Press x. When the system is a tape in...

Operating Instructions
Page 88
... external antenna. To the audio outputs of the plugs and the connectors. By connecting the audio output jacks of your VCR to the VIDEO (AUDIO) IN jacks using an optional audio cable Connecting external antennas Connect the external antenna to improve the reception. Connecting a VCR Make sure to match the color of the VCR using an optional audio cable, you can also use the TV antenna instead. Refer to the sound of each component. Jack type A 75-ohm coaxial cable...
... external antenna. To the audio outputs of the plugs and the connectors. By connecting the audio output jacks of your VCR to the VIDEO (AUDIO) IN jacks using an optional audio cable Connecting external antennas Connect the external antenna to improve the reception. Connecting a VCR Make sure to match the color of the VCR using an optional audio cable, you can also use the TV antenna instead. Refer to the sound of each component. Jack type A 75-ohm coaxial cable...

Operating Instructions
Page 92
... the direction of the microphone. menu. • Set the timer correctly. • Set the clock. The color irregularity on the power. DVD/VIDEO CD/CD Player The disc tray does not close to the appropriate level. Speakers Sound comes from the center speaker only. • The source being played back is no sound from the rear speakers. • Set the REAR LEVEL to turn off the TV set . "PROTECT" and "PUSH POWER" appear alternately. • A strong signal was input...
... the direction of the microphone. menu. • Set the timer correctly. • Set the clock. The color irregularity on the power. DVD/VIDEO CD/CD Player The disc tray does not close to the appropriate level. Speakers Sound comes from the center speaker only. • The source being played back is no sound from the rear speakers. • Set the REAR LEVEL to turn off the TV set . "PROTECT" and "PUSH POWER" appear alternately. • A strong signal was input...
Operating Instructions
Page 96
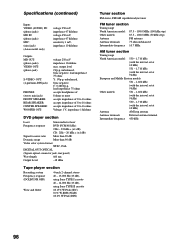
... DIGITAL OUT OPTICAL (Square optical connector jack, rear panel) Wavelength 660 nm Output Level -18 dBm Tape player section Recording system Frequency response (DOLBY NR OFF) Wow and flutter 4-track 2-channel stereo 40 - 13,000 Hz (±3 dB), using Sony TYPE I cassette 40 - 14,000 Hz (±3 dB), using Sony TYPE II cassette ±0.15% W.Peak (IEC) 0.1% W.RMS (NAB) ±0.2% W.Peak (DIN) Tuner section FM stereo, FM/AM superheterodyne tuner FM tuner section Tuning range...
... DIGITAL OUT OPTICAL (Square optical connector jack, rear panel) Wavelength 660 nm Output Level -18 dBm Tape player section Recording system Frequency response (DOLBY NR OFF) Wow and flutter 4-track 2-channel stereo 40 - 13,000 Hz (±3 dB), using Sony TYPE I cassette 40 - 14,000 Hz (±3 dB), using Sony TYPE II cassette ±0.15% W.Peak (IEC) 0.1% W.RMS (NAB) ±0.2% W.Peak (DIN) Tuner section FM stereo, FM/AM superheterodyne tuner FM tuner section Tuning range...

Operating Instructions
Page 99
... skipped or replaced with PBC functions, you can hear are 2 versions of conventional audio CDs. TV Remote Button(s) TV ?/1* TV/VIDEO* TV CH +/-* TV VOL +/-* Function Turn the TV on . Change the TV channels. By using menu screens recorded on VIDEO CDs with other scenes and so on or off. Parts Identification for a station or selects a preset station. Sounds outside the range of its original size. The limitation varies from disc to...
... skipped or replaced with PBC functions, you can hear are 2 versions of conventional audio CDs. TV Remote Button(s) TV ?/1* TV/VIDEO* TV CH +/-* TV VOL +/-* Function Turn the TV on . Change the TV channels. By using menu screens recorded on VIDEO CDs with other scenes and so on or off. Parts Identification for a station or selects a preset station. Sounds outside the range of its original size. The limitation varies from disc to...
Operating Instructions
Page 100
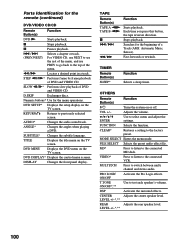
...Remote Button(s) Function DVD N Starts playback. OTHERS Remote Button(s) Function ?/1 Turns the system on the TV screen. FUNCTION Selects the function. x Stops playback. AUDIO* Changes the audio sound track. LEVEL +/-*,** REAR Adjusts the rear speaker level. VOL +/- MODE SELECT Enters the menu mode. DVD SETUP* Displays the setup display on or off. TAPE Remote Button(s) TAPE A nN TAPE B nN x ./> m/M Function Starts playback. PRO LOGIC ON/OFF Activates the Pro Logic effects. VIDEO* Press to listen to the connected MD deck. T.TONE ON/OFF*,** Use...
...Remote Button(s) Function DVD N Starts playback. OTHERS Remote Button(s) Function ?/1 Turns the system on the TV screen. FUNCTION Selects the function. x Stops playback. AUDIO* Changes the audio sound track. LEVEL +/-*,** REAR Adjusts the rear speaker level. VOL +/- MODE SELECT Enters the menu mode. DVD SETUP* Displays the setup display on or off. TAPE Remote Button(s) TAPE A nN TAPE B nN x ./> m/M Function Starts playback. PRO LOGIC ON/OFF Activates the Pro Logic effects. VIDEO* Press to listen to the connected MD deck. T.TONE ON/OFF*,** Use...
Operating Instructions
Page 108
...~63 R Radio Data System 61~63 Radio stations presetting 58~59 tuning in 58, 60 Recording a disc 66~67 manually 69~70 specifying track order 70~72 timer recording 84~85 Repeat Play 39~40 Resetting the system 94 Resume play 25 S Saving recordings 90 Screen 99 Selecting the audio effect file 76 Setting the time 12 Set up display 14~19 Shuffle Play 42 Sleep Timer 82 Sound adjustment GROOVE 75...
...~63 R Radio Data System 61~63 Radio stations presetting 58~59 tuning in 58, 60 Recording a disc 66~67 manually 69~70 specifying track order 70~72 timer recording 84~85 Repeat Play 39~40 Resetting the system 94 Resume play 25 S Saving recordings 90 Screen 99 Selecting the audio effect file 76 Setting the time 12 Set up display 14~19 Shuffle Play 42 Sleep Timer 82 Sound adjustment GROOVE 75...


