
Operating Instructions
Page 2
...-located or operated in this product will not occur in the United States and/or other antenna or transmitter. CAUTION The use of such marks by Sony Corporation is protected by turning the equipment off and on the lithium battery Do not expose the battery to radio communications. You are owned by one or more between the equipment and receiver. - For installation and connections...
...-located or operated in this product will not occur in the United States and/or other antenna or transmitter. CAUTION The use of such marks by Sony Corporation is protected by turning the equipment off and on the lithium battery Do not expose the battery to radio communications. You are owned by one or more between the equipment and receiver. - For installation and connections...
Operating Instructions
Page 4
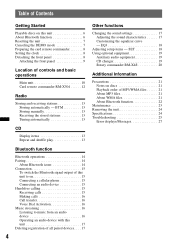
... function 6 Resetting the unit 7 Canceling the DEMO mode 7 Preparing the card remote commander 8 Setting the clock 8 Detaching the front panel 8 Attaching the front panel 9 Location of all paired devices. . . . 17 4 EQ3 18 Adjusting setup items - BTM 13 Storing manually 13 Receiving the stored stations 13 Tuning automatically 13 CD Display items 13 Repeat and shuffle play 13 Other functions Changing the sound settings 17 Adjusting the sound characteristics 17 Customizing the equalizer curve - SET 18 Using optional equipment 19 Auxiliary audio equipment 19 CD changer...
... function 6 Resetting the unit 7 Canceling the DEMO mode 7 Preparing the card remote commander 8 Setting the clock 8 Detaching the front panel 8 Attaching the front panel 9 Location of all paired devices. . . . 17 4 EQ3 18 Adjusting setup items - BTM 13 Storing manually 13 Receiving the stored stations 13 Tuning automatically 13 CD Display items 13 Repeat and shuffle play 13 Other functions Changing the sound settings 17 Adjusting the sound characteristics 17 Customizing the equalizer curve - SET 18 Using optional equipment 19 Auxiliary audio equipment 19 CD changer...
Operating Instructions
Page 7
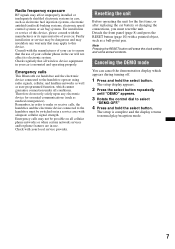
... manufacturer of your car. Remember, in order to make or receive calls, the handsfree and the electronic device connected to ensure that the use . The setup display appears. 2 Press the select button repeatedly until "DEMO" appears. 3 Rotate the control dial to the handsfree operate using radio signals, cellular, and landline networks as well as user-programmed function, which appears during turning off. 1 Press and hold the select button. Therefore do not...
... manufacturer of your car. Remember, in order to make or receive calls, the handsfree and the electronic device connected to ensure that the use . The setup display appears. 2 Press the select button repeatedly until "DEMO" appears. 3 Rotate the control dial to the handsfree operate using radio signals, cellular, and landline networks as well as user-programmed function, which appears during turning off. 1 Press and hold the select button. Therefore do not...
Operating Instructions
Page 8
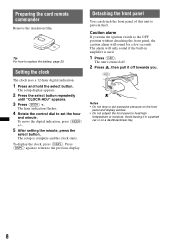
... panel to prevent theft. Avoid leaving it off . 2 Press , then pull it in amplifier is used. 1 Press (OFF). The unit is complete and the clock starts. To display the clock, press (DSPL). The alarm will sound for a few seconds. The setup display appears. 2 Press the select button repeatedly until "CLOCK-ADJ" appears. 3 Press (SEEK) +. The setup is turned off towards you turn the ignition switch to replace the battery...
... panel to prevent theft. Avoid leaving it off . 2 Press , then pull it in amplifier is used. 1 Press (OFF). The unit is complete and the clock starts. To display the clock, press (DSPL). The alarm will sound for a few seconds. The setup display appears. 2 Press the select button repeatedly until "CLOCK-ADJ" appears. 3 Press (SEEK) +. The setup is turned off towards you turn the ignition switch to replace the battery...
Operating Instructions
Page 10
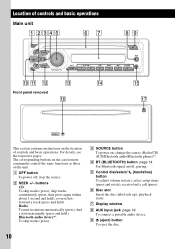
... same functions as those on ; reverse/fastforward a track (press and hold ). C SOURCE button To power on the unit. G Display window H AUX input jack page 19 To connect a portable audio device. find a station manually (press and hold ). skip tracks continuously (press, then press again within about 1 second and hold); change the source (Radio/CD/ AUX/Bluetooth audio/Bluetooth phone)*2. A OFF button To power off , pairing. B SEEK +/- receive/end a call (press). Radio: To tune in stations automatically (press); E Control dial/select/ (handsfree) button To adjust volume...
... same functions as those on ; reverse/fastforward a track (press and hold ). C SOURCE button To power on the unit. G Display window H AUX input jack page 19 To connect a portable audio device. find a station manually (press and hold ). skip tracks continuously (press, then press again within about 1 second and hold); change the source (Radio/CD/ AUX/Bluetooth audio/Bluetooth phone)*2. A OFF button To power off , pairing. B SEEK +/- receive/end a call (press). Radio: To tune in stations automatically (press); E Control dial/select/ (handsfree) button To adjust volume...
Operating Instructions
Page 11
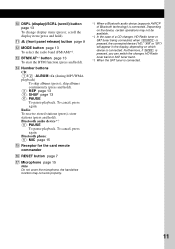
... handsfree function may not be available. *2 In the case of Bluetooth technology) is connected. when (SOURCE) is pressed, the connected device ("HD," "XM" or "SR") will appear in the display, depending on the device, certain operations may not work properly. *1 When a Bluetooth audio device (supports AVRCP of a CD changer, HD Radio tuner or SAT tuner being connected; K (front panel release) button page 8 L MODE button page 13 To select the radio band (FM/AM)*2. Radio: To receive stored stations (press); Bluetooth audio device...
... handsfree function may not be available. *2 In the case of Bluetooth technology) is connected. when (SOURCE) is pressed, the connected device ("HD," "XM" or "SR") will appear in the display, depending on the device, certain operations may not work properly. *1 When a Bluetooth audio device (supports AVRCP of a CD changer, HD Radio tuner or SAT tuner being connected; K (front panel release) button page 8 L MODE button page 13 To select the radio band (FM/AM)*2. Radio: To receive stored stations (press); Bluetooth audio device...
Operating Instructions
Page 12
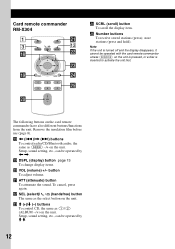
Setup, sound setting, etc., can be operated with the card remote commander unless (SOURCE) on the unit. To cancel, press again. Remove the insulation film before use (page 8). Card remote commander RM-X304 1 3 qk ql OFF ATT SOURCE SEL MODE + - DSPL SCRL 1 2 3 4 5 6 wa qs ws wd wf wg w; + VOL - wg Number buttons To receive stored stations (press); ql DSPL (display) button page 13 To change display items. w; VOL (volume) +/- wd M (+)/m (-) buttons To control CD, the same...
Setup, sound setting, etc., can be operated with the card remote commander unless (SOURCE) on the unit. To cancel, press again. Remove the insulation film before use (page 8). Card remote commander RM-X304 1 3 qk ql OFF ATT SOURCE SEL MODE + - DSPL SCRL 1 2 3 4 5 6 wa qs ws wd wf wg w; + VOL - wg Number buttons To receive stored stations (press); ql DSPL (display) button page 13 To change display items. w; VOL (volume) +/- wd M (+)/m (-) buttons To control CD, the same...

Operating Instructions
Page 13
...* SHUF DISC To play 1 During playback, press (3) (REP) or (4) (SHUF) repeatedly until "BTM" flashes. Storing automatically - To change display items B, press (DSPL). A beep sounds when the setting is changed. Tuning automatically 1 Select the band, then press (SEEK) +/- For details on the number buttons. Repeat and shuffle play track repeatedly. To change the band, press (MODE) repeatedly. album repeatedly. Radio Storing and receiving stations Caution When tuning in stations while driving, use Best Tuning Memory...
...* SHUF DISC To play 1 During playback, press (3) (REP) or (4) (SHUF) repeatedly until "BTM" flashes. Storing automatically - To change display items B, press (DSPL). A beep sounds when the setting is changed. Tuning automatically 1 Select the band, then press (SEEK) +/- For details on the number buttons. Repeat and shuffle play track repeatedly. To change the band, press (MODE) repeatedly. album repeatedly. Radio Storing and receiving stations Caution When tuning in stations while driving, use Best Tuning Memory...
Operating Instructions
Page 14
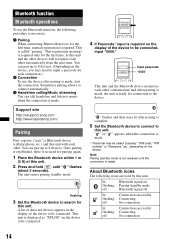
... required only for pairing again. 1 Place the Bluetooth device within 1 m (3 ft) of the device to be connected. Note Pairing standby mode is not released until " " flashes (about 5 seconds). You can talk handsfree and listen to input a passcode for the first time, mutual registration is required. XXXX Input passcode. Bluetooth function Bluetooth operations To use the device after pairing is complete. 5 Set the Bluetooth device to connect to be connected, input "0000." The unit enters pairing standby mode.
... required only for pairing again. 1 Place the Bluetooth device within 1 m (3 ft) of the device to be connected. Note Pairing standby mode is not released until " " flashes (about 5 seconds). You can talk handsfree and listen to input a passcode for the first time, mutual registration is required. XXXX Input passcode. Bluetooth function Bluetooth operations To use the device after pairing is complete. 5 Set the Bluetooth device to connect to be connected, input "0000." The unit enters pairing standby mode.
Operating Instructions
Page 15
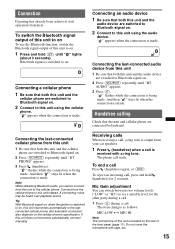
.... Connection If pairing has already been achieved, start operation from your car speakers. 1 Press (handsfree) when a call is received with tape, etc. 15 " "appears when the connection is made . Tip With Bluetooth signal on: when the ignition is output from here. Receiving calls When receiving a call . " " flashes while the connection is being made . Connect from this unit 1 Be sure that both this unit using the audio device. " " flashes while the connection...
.... Connection If pairing has already been achieved, start operation from your car speakers. 1 Press (handsfree) when a call is received with tape, etc. 15 " "appears when the connection is made . Tip With Bluetooth signal on: when the ignition is output from here. Receiving calls When receiving a call . " " flashes while the connection is being made . Connect from this unit 1 Be sure that both this unit using the audio device. " " flashes while the connection...

Operating Instructions
Page 16
... listening volume on the unit. 3 Press the select button repeatedly until "BT AUDIO" appears. 3 Operate the audio device to start playback. 4 Adjust the volume on this unit/cellular phone), check the following . Music streaming Listening to music from this unit, redial is used. 1 Press (SOURCE) repeatedly until "BT PHONE" appears. 2 Press (handsfree). Making calls In the case of making calls from an audio device You can activate voice dialing with sound recognition. The phone call...
... listening volume on the unit. 3 Press the select button repeatedly until "BT AUDIO" appears. 3 Operate the audio device to start playback. 4 Adjust the volume on this unit/cellular phone), check the following . Music streaming Listening to music from this unit, redial is used. 1 Press (SOURCE) repeatedly until "BT PHONE" appears. 2 Press (handsfree). Making calls In the case of making calls from an audio device You can activate voice dialing with sound recognition. The phone call...
Operating Instructions
Page 17
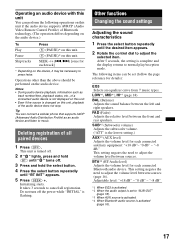
... number/time, playback status, etc., of a connected audio device is the lowest setting.) AUX*3 (AUX level) Adjusts the volume level for each connected Bluetooth audio device. Notes • During audio device playback, information such as an audio device and listen to adjust the selected item. FAD (Fader) Adjusts the relative level between the left and right speakers. BTA*4 (BT-Audio level) Adjusts the volume level for each track] * Depending on this unit. • Even if the source is flashing. SUB*2 (Subwoofer volume) Adjusts the subwoofer volume. ("ATT" is not displayed...
... number/time, playback status, etc., of a connected audio device is the lowest setting.) AUX*3 (AUX level) Adjusts the volume level for each connected Bluetooth audio device. Notes • During audio device playback, information such as an audio device and listen to adjust the selected item. FAD (Fader) Adjusts the relative level between the left and right speakers. BTA*4 (BT-Audio level) Adjusts the volume level for each track] * Depending on this unit. • Even if the source is flashing. SUB*2 (Subwoofer volume) Adjusts the subwoofer volume. ("ATT" is not displayed...

Operating Instructions
Page 18
Repeat steps 3 and 4 to only tune into stations with stronger signals. - SET 1 Press and hold the select button. SUB/REAR*1 Switches the audio output: "SUB-OUT" (subwoofer), "REAR-OUT" (power amplifier). DEMO (Demonstration) Activates the demonstration: "ON," "OFF." DIM (Dimmer) Changes the display brightness: "ON," "OFF." A.SCRL (Auto Scroll) Scrolls long items automatically: "ON," "OFF." "ON": to adjust the equalizer curve. LPF*3 (Low Pass Filter) Selects the subwoofer cut -off frequency: "OFF," "80Hz," "100Hz," "120Hz," "140Hz," "160Hz...
Repeat steps 3 and 4 to only tune into stations with stronger signals. - SET 1 Press and hold the select button. SUB/REAR*1 Switches the audio output: "SUB-OUT" (subwoofer), "REAR-OUT" (power amplifier). DEMO (Demonstration) Activates the demonstration: "ON," "OFF." DIM (Dimmer) Changes the display brightness: "ON," "OFF." A.SCRL (Auto Scroll) Scrolls long items automatically: "ON," "OFF." "ON": to adjust the equalizer curve. LPF*3 (Low Pass Filter) Selects the subwoofer cut -off frequency: "OFF," "80Hz," "100Hz," "120Hz," "140Hz," "160Hz...

Operating Instructions
Page 19
... the portable audio device at a moderate volume. 4 Set your car speakers. tracks in all units in random order. "AUX FRONT IN" appears. 3 Start playback of first releasing. CD changer Selecting the changer 1 Press (SOURCE) repeatedly until "CD" appears. 2 Press (MODE) repeatedly until the desired setting appears. repeatedly. Using optional equipment Auxiliary audio equipment By connecting an optional portable audio device to the unit. The volume level is adjustable for any difference between the unit and the portable audio device.
... the portable audio device at a moderate volume. 4 Set your car speakers. tracks in all units in random order. "AUX FRONT IN" appears. 3 Start playback of first releasing. CD changer Selecting the changer 1 Press (SOURCE) repeatedly until "CD" appears. 2 Press (MODE) repeatedly until the desired setting appears. repeatedly. Using optional equipment Auxiliary audio equipment By connecting an optional portable audio device to the unit. The volume level is adjustable for any difference between the unit and the portable audio device.
Operating Instructions
Page 20
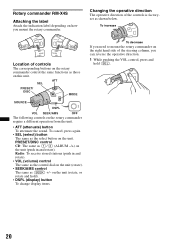
... PRESET/ DISC MODE SOURCE OFF DSPL VOL SEEK/AMS OFF The following controls on the rotary commander require a different operation from the unit. • ATT (attenuate) button To attenuate the sound. Radio: To receive stored stations (push in and rotate). To increase SEL MODE DSPL DSPL MODE SEL Location of controls The corresponding buttons on the rotary commander control the same functions as (SEEK) +/- To cancel, press again. • SEL (select) button...
... PRESET/ DISC MODE SOURCE OFF DSPL VOL SEEK/AMS OFF The following controls on the rotary commander require a different operation from the unit. • ATT (attenuate) button To attenuate the sound. Radio: To receive stored stations (push in and rotate). To increase SEL MODE DSPL DSPL MODE SEL Location of controls The corresponding buttons on the rotary commander control the same functions as (SEEK) +/- To cancel, press again. • SEL (select) button...
Operating Instructions
Page 22
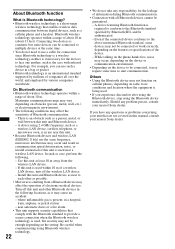
... international standard supported by various companies worldwide. A device using the Bluetooth device immediately. Use this unit at the same time. • You do not take any problem persist, consult your nearest Sony dealer. where inflammable gas is present, in a hospital, train, airplane, or petrol station - While talking on the phone hands free, noise may cause an accident. - About Bluetooth function What is Bluetooth technology? • Bluetooth wireless technology...
... international standard supported by various companies worldwide. A device using the Bluetooth device immediately. Use this unit at the same time. • You do not take any problem persist, consult your nearest Sony dealer. where inflammable gas is present, in a hospital, train, airplane, or petrol station - While talking on the phone hands free, noise may cause an accident. - About Bluetooth function What is Bluetooth technology? • Bluetooth wireless technology...
Operating Instructions
Page 24
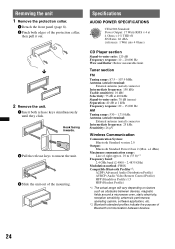
...)*1 Frequency band: 2.4 GHz band (2.4000 - 2.4835 GHz) Modulation method: FHSS Compatible Bluetooth Profiles*2: A2DP (Advanced Audio Distribution Profile) AVRCP (Audio Video Remote Control Profile) HFP (Handsfree Profile) 1.5 HSP (Headset Profile) *1 The actual range will vary depending on factors such as obstacles between devices. 24 Removing the unit 1 Remove the protection collar. 1 Detach the front panel (page 8). 2 Pinch both release keys simultaneously until they click. Hook facing...
...)*1 Frequency band: 2.4 GHz band (2.4000 - 2.4835 GHz) Modulation method: FHSS Compatible Bluetooth Profiles*2: A2DP (Advanced Audio Distribution Profile) AVRCP (Audio Video Remote Control Profile) HFP (Handsfree Profile) 1.5 HSP (Headset Profile) *1 The actual range will vary depending on factors such as obstacles between devices. 24 Removing the unit 1 Remove the protection collar. 1 Detach the front panel (page 8). 2 Pinch both release keys simultaneously until they click. Hook facing...
Operating Instructions
Page 25
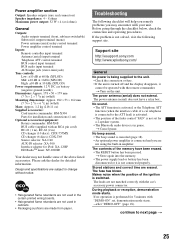
.... Stored stations and correct time are not matched correctly with an RCA pin cord): RC-61 (1 m), RC-62 (2 m) CD changer (10 discs): CDX-757MX CD changer (6 discs): CDX-T69 Source selector: XA-C40 AUX-IN selector: XA-300 Interface adaptor for detailed information. t Turn on the unit. The power antenna (aerial) does not have been erased. • The RESET button has been pressed. t Cancel pause. Please ask the dealer for iPod...
.... Stored stations and correct time are not matched correctly with an RCA pin cord): RC-61 (1 m), RC-62 (2 m) CD changer (10 discs): CDX-757MX CD changer (6 discs): CDX-T69 Source selector: XA-C40 AUX-IN selector: XA-300 Interface adaptor for detailed information. t Turn on the unit. The power antenna (aerial) does not have been erased. • The RESET button has been pressed. t Cancel pause. Please ask the dealer for iPod...
Operating Instructions
Page 26
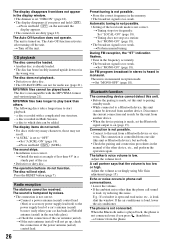
... dimmer is set the Bluetooth signal output to the power supply lead of the car antenna (aerial). Adjust the volume accordingly using Mic Gain adjustment (page 15). The display disappears from one side (this unit or Bluetooth device), but not both. • Check the pairing and connection procedures in the manual of the other than the phone call sound is loud, try reducing this noise. CD playback The disc cannot be played back...
... dimmer is set the Bluetooth signal output to the power supply lead of the car antenna (aerial). Adjust the volume accordingly using Mic Gain adjustment (page 15). The display disappears from one side (this unit or Bluetooth device), but not both. • Check the pairing and connection procedures in the manual of the other than the phone call sound is loud, try reducing this noise. CD playback The disc cannot be played back...
Operating Instructions
Page 27
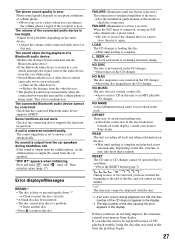
... the display. LOAD The CD changer is connected, storing an SAT radio channel into a preset failed. The local seek mode is poor. t Insert the disc magazine in the CD changer. OFFSET There may take the unit to a problem. If the error indication remains on during playback of a Bluetooth audio device. • Reduce the distance between this model to a place where you want to remove the disc. t Press the RESET button (page 7). Phone sound quality...
... the display. LOAD The CD changer is connected, storing an SAT radio channel into a preset failed. The local seek mode is poor. t Insert the disc magazine in the CD changer. OFFSET There may take the unit to a problem. If the error indication remains on during playback of a Bluetooth audio device. • Reduce the distance between this model to a place where you want to remove the disc. t Press the RESET button (page 7). Phone sound quality...


