
Operating Instructions
Page 1
Record the serial number in the space provided below. Refer to these numbers whenever you call upon your Sony dealer regarding this product. MEX-DV2000 Serial No. MEX-DV2000 © 2007 Sony Corporation Model No. Multi Disc Player 3-099-738-12 (1) Multi Disc Player Operating Instructions US Mode d'emploi FR Manual de instrucciones ES Owner's Record The model and serial numbers are located on the bottom of the unit.
Record the serial number in the space provided below. Refer to these numbers whenever you call upon your Sony dealer regarding this product. MEX-DV2000 Serial No. MEX-DV2000 © 2007 Sony Corporation Model No. Multi Disc Player 3-099-738-12 (1) Multi Disc Player Operating Instructions US Mode d'emploi FR Manual de instrucciones ES Owner's Record The model and serial numbers are located on the bottom of the unit.

Operating Instructions
Page 2
...cancel the demonstration (DEMO) display, see page 38. If the car starts moving during video playback or karaoke mode, pictures from that to radio communications. Video blocked for help. As the laser beam used in motion. DO NOT STARE INTO BEAM. Increase the separation between the equipment ...position, see page 35. The monitor connected to the REAR VIDEO OUT is active while the car is in accordance with this CD/DVD player is harmful to eyes, do not attempt to provide reasonable protection against harmful interference in this product will shut off completely and automatically...
...cancel the demonstration (DEMO) display, see page 38. If the car starts moving during video playback or karaoke mode, pictures from that to radio communications. Video blocked for help. As the laser beam used in motion. DO NOT STARE INTO BEAM. Increase the separation between the equipment ...position, see page 35. The monitor connected to the REAR VIDEO OUT is active while the car is in accordance with this CD/DVD player is harmful to eyes, do not attempt to provide reasonable protection against harmful interference in this product will shut off completely and automatically...
Operating Instructions
Page 3
...equalizer curves, which can be further customized by connecting an amplifier and speakers. t page 30 You can resume DVD VIDEO/ VCD playback even after the disc is stopped for up to 2,000 tracks* recorded on DVDR DL in ... delaying the sound output from preset settings according to 5 discs and can connect a microphone (not supplied) and enjoy karaoke. DVD, VCD, Super Audio CD, CD playback t page 6 Compatible with digital signal processing. t page 35, 36 Changes the ... advanced, high-purity matrix surround decoder. Before operating this unit, read this Sony Multi Disc Player. Welcome !
...equalizer curves, which can be further customized by connecting an amplifier and speakers. t page 30 You can resume DVD VIDEO/ VCD playback even after the disc is stopped for up to 2,000 tracks* recorded on DVDR DL in ... delaying the sound output from preset settings according to 5 discs and can connect a microphone (not supplied) and enjoy karaoke. DVD, VCD, Super Audio CD, CD playback t page 6 Compatible with digital signal processing. t page 35, 36 Changes the ... advanced, high-purity matrix surround decoder. Before operating this unit, read this Sony Multi Disc Player. Welcome !
Operating Instructions
Page 4
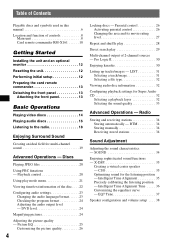
... settings 23 Changing the audio language/format. . . . . . 23 Checking the program format 24 Adjusting the audio output level - DVD level 24 Magnifying pictures 24 Adjusting the picture quality - Picture EQ 25 Customizing the picture quality 26 4 Locking discs - Pro Logic II... CSO 35 Optimizing sound for Super Audio CD 32 Selecting a playback layer 32 Selecting the sound quality 33 Advanced Operations - Radio Storing and receiving stations 34 Storing automatically - BTM 34 Storing manually 34 Receiving stored stations 34 Sound Adjustment Adjusting the sound characteristics...
... settings 23 Changing the audio language/format. . . . . . 23 Checking the program format 24 Adjusting the audio output level - DVD level 24 Magnifying pictures 24 Adjusting the picture quality - Picture EQ 25 Customizing the picture quality 26 4 Locking discs - Pro Logic II... CSO 35 Optimizing sound for Super Audio CD 32 Selecting a playback layer 32 Selecting the sound quality 33 Advanced Operations - Radio Storing and receiving stations 34 Storing automatically - BTM 34 Storing manually 34 Receiving stored stations 34 Sound Adjustment Adjusting the sound characteristics...
Operating Instructions
Page 5
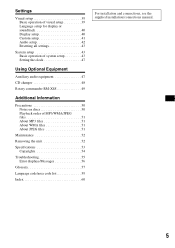
Settings Visual setup 39 Basic operation of visual setup 39 Language setup for display or soundtrack 40 Display setup 40 Custom setup 41 Audio setup 42 Resetting all settings 43 System setup 43 Basic operation of system setup 43 Setting the clock 47 Using Optional Equipment Auxiliary audio equipment 47 CD changer 48 Rotary commander RM-X4S 49 Additional Information Precautions 50 Notes on discs 50 Playback order of MP3/WMA/JPEG files 51 About MP3 files 51 About WMA files 51 About JPEG files 51 Maintenance 52 Removing the unit 52 Specifications 53 Copyrights 54 ...
Settings Visual setup 39 Basic operation of visual setup 39 Language setup for display or soundtrack 40 Display setup 40 Custom setup 41 Audio setup 42 Resetting all settings 43 System setup 43 Basic operation of system setup 43 Setting the clock 47 Using Optional Equipment Auxiliary audio equipment 47 CD changer 48 Rotary commander RM-X4S 49 Additional Information Precautions 50 Notes on discs 50 Playback order of MP3/WMA/JPEG files 51 About MP3 files 51 About WMA files 51 About JPEG files 51 Maintenance 52 Removing the unit 52 Specifications 53 Copyrights 54 ...

Operating Instructions
Page 6
...chart helps you to check if a disc is supported by this unit, as well as a general term for a given disc type. Note "DVD" may be used in this manual This unit can also be stored. Playable discs and symbols used in this manual as what functions are available... for DVD VIDEOs, DVD-Rs/DVD-RWs, and DVD+Rs/ DVD+RWs. 6 Disc symbol in manual Disc format Disc logo DVD VIDEO DVD-R*1 DVD-R DL*1 (Video mode/VR mode) DVD-RW*1 (Video mode/VR mode) VIDEO DVD+R*1 DVD+R DL*1 DVD+RW*1 Video CD (Ver. 1.0/1.1/2.0) Super Audio CD Audio ...
...chart helps you to check if a disc is supported by this unit, as well as a general term for a given disc type. Note "DVD" may be used in this manual This unit can also be stored. Playable discs and symbols used in this manual as what functions are available... for DVD VIDEOs, DVD-Rs/DVD-RWs, and DVD+Rs/ DVD+RWs. 6 Disc symbol in manual Disc format Disc logo DVD VIDEO DVD-R*1 DVD-R DL*1 (Video mode/VR mode) DVD-RW*1 (Video mode/VR mode) VIDEO DVD+R*1 DVD+R DL*1 DVD+RW*1 Video CD (Ver. 1.0/1.1/2.0) Super Audio CD Audio ...

Operating Instructions
Page 7
...utilizing only the inner 8 cm (3 1/4 in) data portion (the rest is transparent) • CD-ROM containing files other than MP3/WMA/JPEG • DVD-RAM • DVD-Audio • Active-Audio (Data) • SVCD (Super Video CD) • CDV • Discs created in manual File type Storable disc type MP3 ...audio file WMA audio file JPEG image file DATA DVDs DVD-ROM DVD-R DVD-R DL DVD-RW DVD+R DVD+R DL DVD+RW DATA CDs CD-ROM CD-R CD-RW Tip For details on this unit. Region code 7 will appear on the...
...utilizing only the inner 8 cm (3 1/4 in) data portion (the rest is transparent) • CD-ROM containing files other than MP3/WMA/JPEG • DVD-RAM • DVD-Audio • Active-Audio (Data) • SVCD (Super Video CD) • CDV • Discs created in manual File type Storable disc type MP3 ...audio file WMA audio file JPEG image file DATA DVDs DVD-ROM DVD-R DVD-R DL DVD-RW DVD+R DVD+R DL DVD+RW DATA CDs CD-ROM CD-R CD-RW Tip For details on this unit. Region code 7 will appear on the...
Operating Instructions
Page 8
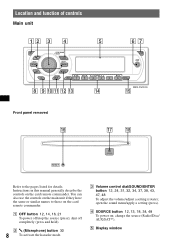
... 8 To activate the karaoke mode. change the source (Radio/Disc/ AUX/SAT*1). Location and function of controls Main unit 12 3 4 5 67 OFF SEEK PUSH SOUND/ ENTER SOURCE SEEK OPEN AUX LIST MODE SYSTEM REP SHUF ALBUM SETUP DSPL 1 2 3 4 5 6 SCRL 8 9 q; qa qs qd qf MEX-DV2000 qg Front panel removed qh qj qk RESET...
... 8 To activate the karaoke mode. change the source (Radio/Disc/ AUX/SAT*1). Location and function of controls Main unit 12 3 4 5 67 OFF SEEK PUSH SOUND/ ENTER SOURCE SEEK OPEN AUX LIST MODE SYSTEM REP SHUF ALBUM SETUP DSPL 1 2 3 4 5 6 SCRL 8 9 q; qa qs qd qf MEX-DV2000 qg Front panel removed qh qj qk RESET...
Operating Instructions
Page 9
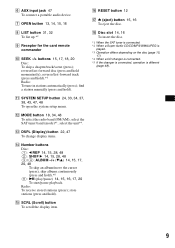
.../fast-forward track (press and hold ).*5 (6): u (play/pause) 14, 15, 16, 17, 20 To start/pause playback. skip albums continuously (press and hold ).*3 Radio: To tune in stations automatically (press); P RESET button 12 Q Z (eject) button 15, 16 To eject the disc. K SYSTEM SETUP button 24, 33, 34,...connected. *5 If the changer is connected, operation is different (page 48). 9 find a station manually (press and hold ). Radio: To receive stored stations (press); L MODE button 18, 34, 48 To select the radio band (FM/AM); G OPEN button 13, 14, 15, 16 H LIST button 31, 32 To list up.*2 I ...
.../fast-forward track (press and hold ).*5 (6): u (play/pause) 14, 15, 16, 17, 20 To start/pause playback. skip albums continuously (press and hold ).*3 Radio: To tune in stations automatically (press); P RESET button 12 Q Z (eject) button 15, 16 To eject the disc. K SYSTEM SETUP button 24, 33, 34,...connected. *5 If the changer is connected, operation is different (page 48). 9 find a station manually (press and hold ). Radio: To receive stored stations (press); L MODE button 18, 34, 48 To select the radio band (FM/AM); G OPEN button 13, 14, 15, 16 H LIST button 31, 32 To list up.*2 I ...

Operating Instructions
Page 10
... ENTER DSPL PICTURE ZXZ EQ PLII VOL SRC MODE qs qd qf qg qh qj qk ql w; Remove the insulation film before use (page 13). Radio: To receive stored stations (press);
... ENTER DSPL PICTURE ZXZ EQ PLII VOL SRC MODE qs qd qf qg qh qj qk ql w; Remove the insulation film before use (page 13). Radio: To receive stored stations (press);
Operating Instructions
Page 11
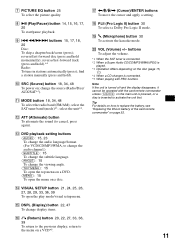
... to the previous display; I .m/M> buttons 15, 17, 18, 20 Disc: To skip a chapter/track/scene (press); reverse/fast-forward disc (press and hold ).*3 Radio: To tune in stations automatically (press); select the SAT tuner band (mode)*1; find a station manually (press and hold). O DSPL (Display) button 22, 47 To ... subtitle language. (ANGLE): 15 To change the viewing angle. (TOP MENU): 15 To open the top menu on a DVD. (MENU): 15 To open the play mode/visual setup menu. M DVD playback setting buttons (AUDIO): 15, 23 To change the audio language/format. (For VCD/CD/MP3/WMA, to cancel,...
... to the previous display; I .m/M> buttons 15, 17, 18, 20 Disc: To skip a chapter/track/scene (press); reverse/fast-forward disc (press and hold ).*3 Radio: To tune in stations automatically (press); select the SAT tuner band (mode)*1; find a station manually (press and hold). O DSPL (Display) button 22, 47 To ... subtitle language. (ANGLE): 15 To change the viewing angle. (TOP MENU): 15 To open the top menu on a DVD. (MENU): 15 To open the play mode/visual setup menu. M DVD playback setting buttons (AUDIO): 15, 23 To change the audio language/format. (For VCD/CD/MP3/WMA, to cancel,...
Operating Instructions
Page 12
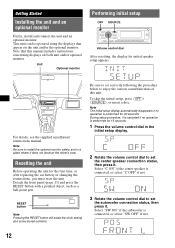
For details, see the supplied installation/ connections manual. Resetting the unit Before operating the unit for initial speaker setup appears. Note The initial setup display automatically disappears if no operation is performed for 15 seconds. 1 Press the volume control dial in a place where it . Getting Started Installing the unit and an optional monitor Firstly, install and connect the unit and an optional monitor. Note that appear on both unit and/or optional monitor. Detach the front panel (page 13) and press the RESET button with a pointed object, such as a ball-point pen....
For details, see the supplied installation/ connections manual. Resetting the unit Before operating the unit for initial speaker setup appears. Note The initial setup display automatically disappears if no operation is performed for 15 seconds. 1 Press the volume control dial in a place where it . Getting Started Installing the unit and an optional monitor Firstly, install and connect the unit and an optional monitor. Note that appear on both unit and/or optional monitor. Detach the front panel (page 13) and press the RESET button with a pointed object, such as a ball-point pen....

Operating Instructions
Page 13
Press (SOURCE) on the main unit (or insert a disc) to select your listening position is front left, or select "FRONT R" if front right. You can then be further configured in a parked car or on the inner surface of this unit to the right, then gently pull out the left side in amplifier is off. Preparing the card remote commander Before using the card remote commander for a few seconds. Avoid leaving it . A B Detaching the front panel SOURCE OPEN c Note Do not put excessive pressure on setting the speaker connection status, see "Optimizing sound for the listening position...
Press (SOURCE) on the main unit (or insert a disc) to select your listening position is front left, or select "FRONT R" if front right. You can then be further configured in a parked car or on the inner surface of this unit to the right, then gently pull out the left side in amplifier is off. Preparing the card remote commander Before using the card remote commander for a few seconds. Avoid leaving it . A B Detaching the front panel SOURCE OPEN c Note Do not put excessive pressure on setting the speaker connection status, see "Optimizing sound for the listening position...

Operating Instructions
Page 14
OFF Z OPEN OFF Number buttons b/B/V/v u u ZXZ 1 Turn on your monitor, then select the input source on your disc. Refer to the operating instructions supplied with your monitor corresponding to this unit. 2 Press (OPEN) on the disc, some operations may be different or restricted. Basic Operations Playing video discs Depending on the main unit. 3 Insert the disc (label side up).
OFF Z OPEN OFF Number buttons b/B/V/v u u ZXZ 1 Turn on your monitor, then select the input source on your disc. Refer to the operating instructions supplied with your monitor corresponding to this unit. 2 Press (OPEN) on the disc, some operations may be different or restricted. Basic Operations Playing video discs Depending on the main unit. 3 Insert the disc (label side up).

Operating Instructions
Page 15
....m/M> reverse/fast-forward disc and hold .m/M> momentarily; Other playback operations .m/M> b/B/V/v u Number buttons To Press pause/resume play a DVD that allow you can select a desired title using the DVD menu. and then repeatedly to switch the speed (× 2 t × 12 t × 120 t × 2...)... cancel reverse/fast-forward u show the DVD menu*1 Remote: (TOP MENU) or (MENU) select items in the DVD menu*1 Main unit: (1)(b)/(2)(B)/(3)(V)/(4)(v) to move the cursor, then press (6) (u) to select items such as subtitle/sound ...
....m/M> reverse/fast-forward disc and hold .m/M> momentarily; Other playback operations .m/M> b/B/V/v u Number buttons To Press pause/resume play a DVD that allow you can select a desired title using the DVD menu. and then repeatedly to switch the speed (× 2 t × 12 t × 120 t × 2...)... cancel reverse/fast-forward u show the DVD menu*1 Remote: (TOP MENU) or (MENU) select items in the DVD menu*1 Main unit: (1)(b)/(2)(B)/(3)(V)/(4)(v) to move the cursor, then press (6) (u) to select items such as subtitle/sound ...

Operating Instructions
Page 16
If playback does not start automatically, press u. ZXZ u 3 Close the front panel. Playback starts automatically. To eject the disc 1 Press (OPEN) on the main unit. 2 Insert the disc (label side up). Refer to the operating instructions supplied with your disc. OFF Z OPEN OFF u 1 Press (OPEN) on the main unit. 2 Press Z (rear of front panel). 3 Close the front panel. 16 To stop playback Press (OFF). Playing audio discs Depending on the disc, some operations may be different or restricted.
If playback does not start automatically, press u. ZXZ u 3 Close the front panel. Playback starts automatically. To eject the disc 1 Press (OPEN) on the main unit. 2 Insert the disc (label side up). Refer to the operating instructions supplied with your disc. OFF Z OPEN OFF u 1 Press (OPEN) on the main unit. 2 Press Z (rear of front panel). 3 Close the front panel. 16 To stop playback Press (OFF). Playing audio discs Depending on the disc, some operations may be different or restricted.

Operating Instructions
Page 17
Other playback operations .m/M> ALBUM u ZXZ u To pause/resume play after pause skip a track reverse/fast-forward track skip an album* skip albums continuously* * When an MP3/WMA is played. Press u .m ( (,) and hold .m/M> Main unit: (3) (ALBUM -)/(4) (ALBUM +) Remote: M/m Main unit: and hold (3) (ALBUM -)/(4) (ALBUM +) Remote: and hold M/m 17
Other playback operations .m/M> ALBUM u ZXZ u To pause/resume play after pause skip a track reverse/fast-forward track skip an album* skip albums continuously* * When an MP3/WMA is played. Press u .m ( (,) and hold .m/M> Main unit: (3) (ALBUM -)/(4) (ALBUM +) Remote: M/m Main unit: and hold (3) (ALBUM -)/(4) (ALBUM +) Remote: and hold M/m 17

Operating Instructions
Page 18
To tune manually Press and hold (SEEK) -/+ to locate the approximate frequency, then press (SEEK) -/+ repeatedly to fine adjust to the radio SOURCE SEEK MODE ZXZ SRC .m/M> MODE 1 Press (SOURCE) repeatedly until "TUNER" appears. 2 Press (MODE) repeatedly until the desired station...is received. Tip For details on page 34. Repeat this procedure until the desired band (FM1, FM2, FM3, AM1 or AM2) appears. Radio" on other radio functions, see "Advanced Operations - To tune automatically Press (SEEK) -/+. Scanning stops when the unit receives a station. With the card remote ...
To tune manually Press and hold (SEEK) -/+ to locate the approximate frequency, then press (SEEK) -/+ repeatedly to fine adjust to the radio SOURCE SEEK MODE ZXZ SRC .m/M> MODE 1 Press (SOURCE) repeatedly until "TUNER" appears. 2 Press (MODE) repeatedly until the desired station...is received. Tip For details on page 34. Repeat this procedure until the desired band (FM1, FM2, FM3, AM1 or AM2) appears. Radio" on other radio functions, see "Advanced Operations - To tune automatically Press (SEEK) -/+. Scanning stops when the unit receives a station. With the card remote ...

Operating Instructions
Page 19
Set the connection status of DVD/CD in multichannel format (Dolby Digital, DTS, etc.) 1 Activate CSO if a center speaker is not connected. To select "FRONT L" (front left) or "FRONT R" (front right) t ... (HPF) and subwoofer (LPF). t page 30 2 Activate CSO if a center speaker is introduced in multi-channel sound x For VCD/CD/MP3/WMA/AUX playback or radio reception 1 Activate Dolby Pro Logic mode. t page 35 x For playback of the multi-channel area of each speaker so that their perceived level is activated...
Set the connection status of DVD/CD in multichannel format (Dolby Digital, DTS, etc.) 1 Activate CSO if a center speaker is not connected. To select "FRONT L" (front left) or "FRONT R" (front right) t ... (HPF) and subwoofer (LPF). t page 30 2 Activate CSO if a center speaker is introduced in multi-channel sound x For VCD/CD/MP3/WMA/AUX playback or radio reception 1 Activate Dolby Pro Logic mode. t page 35 x For playback of the multi-channel area of each speaker so that their perceived level is activated...

Operating Instructions
Page 20
To return to 33 * Including JPEG operations. For details on how to start playback, follow step 1 to display. • Progressive JPEG files cannot be played. Playing JPEG files .m/M> ALBUM u Other playback operations To Press rotate the image skip an image Remote: skip an album Remote: M/m Main unit: (3) (ALBUM -)/ (4) (ALBUM +) skip albums continuously Remote: and hold M/m Main unit: and hold (3) (ALBUM -)/ (4) (ALBUM +) Notes • If a large-sized image is played. 1 Start playing a PBC compatible VCD. To play using a list (page 31). OFF Number buttons ZXZ ...
To return to 33 * Including JPEG operations. For details on how to start playback, follow step 1 to display. • Progressive JPEG files cannot be played. Playing JPEG files .m/M> ALBUM u Other playback operations To Press rotate the image skip an image Remote: skip an album Remote: M/m Main unit: (3) (ALBUM -)/ (4) (ALBUM +) skip albums continuously Remote: and hold M/m Main unit: and hold (3) (ALBUM -)/ (4) (ALBUM +) Notes • If a large-sized image is played. 1 Start playing a PBC compatible VCD. To play using a list (page 31). OFF Number buttons ZXZ ...