
Limited Warranty (U.S. Only)
Page 1
... any repair, replacement part or replacement product for in the United States. Pursuant to the software. This Limited Warranty gives you specific legal rights and you . It is longer. For specific instructions on your responsibility to backup any such software is invalid if the factory-applied serial number has been altered or removed from your authorized dealer, call: 1-800-488-SONY (7669) Repair / Replacement...
... any repair, replacement part or replacement product for in the United States. Pursuant to the software. This Limited Warranty gives you specific legal rights and you . It is longer. For specific instructions on your responsibility to backup any such software is invalid if the factory-applied serial number has been altered or removed from your authorized dealer, call: 1-800-488-SONY (7669) Repair / Replacement...
Installation Instructions
Page 1
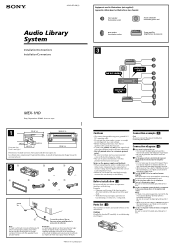
... closing of the front panel or disc tray interfere with driving. 3-242-072-12 (1) Audio Library System Installation/Connections Installation/Connexions Equipment used in illustrations (not supplied) Appareils utilisés dans les illustrations (non fournis) Front speaker Haut-parleur avant Active subwoofer Caisson de graves actif Rear speaker Haut-parleur arrière Power amplifier Amplificateur de puissance 3 SUB OUT (MONO) AUDIO OUT FRONT AUDIO OUT REAR MEX-1HD Sony Corporation © 2002 Printed...
... closing of the front panel or disc tray interfere with driving. 3-242-072-12 (1) Audio Library System Installation/Connections Installation/Connexions Equipment used in illustrations (not supplied) Appareils utilisés dans les illustrations (non fournis) Front speaker Haut-parleur avant Active subwoofer Caisson de graves actif Rear speaker Haut-parleur arrière Power amplifier Amplificateur de puissance 3 SUB OUT (MONO) AUDIO OUT FRONT AUDIO OUT REAR MEX-1HD Sony Corporation © 2002 Printed...

Mobile Library Manager Instructions v1.0
Page 1
..., 2001, 2002 Gracenote. Devices manufactured under license for all computers satisfying the system requirements. CDDB is recommended) • Hard disk drive space: 50MB or more • RAM: 64MB or more information visit www.gracenote.com. Mobile Library Manager and Memory Stick are service marks of the supplied MEX-1HD operating instructions. MSAC-FD2MA Note We cannot guarantee trouble-free operation for the following...
..., 2001, 2002 Gracenote. Devices manufactured under license for all computers satisfying the system requirements. CDDB is recommended) • Hard disk drive space: 50MB or more • RAM: 64MB or more information visit www.gracenote.com. Mobile Library Manager and Memory Stick are service marks of the supplied MEX-1HD operating instructions. MSAC-FD2MA Note We cannot guarantee trouble-free operation for the following...
Mobile Library Manager Instructions v1.0
Page 2
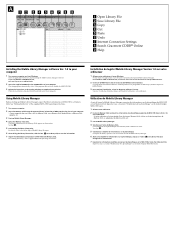
.... 3 Lancez Mobile Library Manager. 4 Sélectionnez l'unité du Memory Stick. If the program does not start, double-click [SETUP.EXE]. 3 Follow the instructions in the Memory Stick appears on your computer. 2 Insert the Memory Stick having the exported library information of MEX-1HD into the CD-ROM drive of MEX-1HD to complete the installation. See "Editing the library" of the supplied MEX-1HD operating instructions. 1 Turn on the monitor...
.... 3 Lancez Mobile Library Manager. 4 Sélectionnez l'unité du Memory Stick. If the program does not start, double-click [SETUP.EXE]. 3 Follow the instructions in the Memory Stick appears on your computer. 2 Insert the Memory Stick having the exported library information of MEX-1HD into the CD-ROM drive of MEX-1HD to complete the installation. See "Editing the library" of the supplied MEX-1HD operating instructions. 1 Turn on the monitor...
Operating Instructions
Page 1
...-13 (1) Audio Library System Operating Instructions US Mode d'emploi FR Audio Library System Owner's Record The model and serial numbers are located on the bottom of the unit. Model No. Refer to these numbers in the space provided below. MEX-1HD © 2002 Sony Corporation Record these numbers whenever you call upon your Sony dealer regarding this product. MEX-1HD Serial No. For installation and connections, see the supplied installation/connections manual. En ce qui concerne l'installation et les...
...-13 (1) Audio Library System Operating Instructions US Mode d'emploi FR Audio Library System Owner's Record The model and serial numbers are located on the bottom of the unit. Model No. Refer to these numbers in the space provided below. MEX-1HD © 2002 Sony Corporation Record these numbers whenever you call upon your Sony dealer regarding this product. MEX-1HD Serial No. For installation and connections, see the supplied installation/connections manual. En ce qui concerne l'installation et les...
Operating Instructions
Page 2
...; CD TEXT information (displayed when a CD TEXT disc*4 is played) • Gracenote CDDB® Music Recognition ServiceSM pre-installed • Optional controller accessory Wireless rotary commander RM-X6S Notes • The recorded music is an audio CD that contains information about 2000 tracks on the disc. 2 Consult the dealer or an experienced radio/TV technician for purchasing this Sony Audio Library System. • Storage...
...; CD TEXT information (displayed when a CD TEXT disc*4 is played) • Gracenote CDDB® Music Recognition ServiceSM pre-installed • Optional controller accessory Wireless rotary commander RM-X6S Notes • The recorded music is an audio CD that contains information about 2000 tracks on the disc. 2 Consult the dealer or an experienced radio/TV technician for purchasing this Sony Audio Library System. • Storage...
Operating Instructions
Page 5
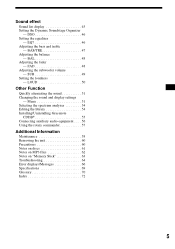
... Adjusting the fader - LOUD 50 Other Function Quickly attenuating the sound 51 Changing the sound and display settings - Menu 51 Selecting the spectrum analyzer 54 Editing the library 54 Installing/Uninstalling Gracenote CDDB 55 Connecting auxiliary audio equipment . . . . 56 Using the rotary commander 57 Additional Information Maintenance 58 Removing the unit 60 Precautions 60 Notes on discs 61 Notes on MP3 files 62 Notes on "Memory Stick 63 Troubleshooting 64 Error displays...
... Adjusting the fader - LOUD 50 Other Function Quickly attenuating the sound 51 Changing the sound and display settings - Menu 51 Selecting the spectrum analyzer 54 Editing the library 54 Installing/Uninstalling Gracenote CDDB 55 Connecting auxiliary audio equipment . . . . 56 Using the rotary commander 57 Additional Information Maintenance 58 Removing the unit 60 Precautions 60 Notes on discs 61 Notes on MP3 files 62 Notes on "Memory Stick 63 Troubleshooting 64 Error displays...

Operating Instructions
Page 7
... installing in a car without an ACC (accessory) position on the ignition switch After turning off the ignition, be sure to press (OFF) on the unit for 2 seconds to turn off and causes battery drain. 7 a L (left) dial Rotate to start recording. m z REC button For record settings/to : - s LED (I/O) Lights up while the unit is accessing the Digital I /O terminal (4 pins) To connect to : - Adjust the volume - Display the sound menu...
... installing in a car without an ACC (accessory) position on the ignition switch After turning off the ignition, be sure to press (OFF) on the unit for 2 seconds to turn off and causes battery drain. 7 a L (left) dial Rotate to start recording. m z REC button For record settings/to : - s LED (I/O) Lights up while the unit is accessing the Digital I /O terminal (4 pins) To connect to : - Adjust the volume - Display the sound menu...

Operating Instructions
Page 8
... Resetting the unit Before operating the unit for the first time, or after replacing the car battery or changing the connections, you , use the supplied front panel case. Avoid leaving it in a parked car or on the front panel and its display window. • Close the front panel before you turn the unit off automatically. • Do not drop or put anything on the ignition switch, be sure to turn...
... Resetting the unit Before operating the unit for the first time, or after replacing the car battery or changing the connections, you , use the supplied front panel case. Avoid leaving it in a parked car or on the front panel and its display window. • Close the front panel before you turn the unit off automatically. • Do not drop or put anything on the ignition switch, be sure to turn...

Operating Instructions
Page 9
... the frequency allocation system of the week changes automatically according to "10K." The normal display appears. 4 Set the date and time. 1 Rotate the R dial to select the year, then press the R dial. 2 Rotate the R dial to select the month, then press the R dial. 3 Repeat steps 1 and 2 to set to the date. • If you operate the unit for the first time, after...
... the frequency allocation system of the week changes automatically according to "10K." The normal display appears. 4 Set the date and time. 1 Rotate the R dial to select the year, then press the R dial. 2 Rotate the R dial to select the month, then press the R dial. 3 Repeat steps 1 and 2 to set to the date. • If you operate the unit for the first time, after...

Operating Instructions
Page 12
..., see "Changing the sound and display settings" on page 51. 12 Note If no CD is inserted, you select "CD," the track being recorded is played. * If "AUX" is turned off, and turn off the unit automatically after ignition is not displayed when selecting the source, set "AUX Skip" in "Setup" to select the recording speed, "HI-REC" or "×1-REC." 4 Press REC . The record setting display appears. 3 Adjust settings for...
..., see "Changing the sound and display settings" on page 51. 12 Note If no CD is inserted, you select "CD," the track being recorded is played. * If "AUX" is turned off, and turn off the unit automatically after ignition is not displayed when selecting the source, set "AUX Skip" in "Setup" to select the recording speed, "HI-REC" or "×1-REC." 4 Press REC . The record setting display appears. 3 Adjust settings for...

Operating Instructions
Page 49
...-off Adjusting the subwoofer volume - Cut-off frequency off frequency. The level is adjustable from - ∞ , -10 to select a source. 2 Press the L dial. The normal display appears. continue to select a source. 2 Press the L dial. As you can select the cut-off frequency of the speakers. L dial F2 1 Press (SOURCE) to next page t 49 Level Adjusting the cut-off frequency for the front/rear speakers To match the characteristics of the installed speaker system, you...
...-off Adjusting the subwoofer volume - Cut-off frequency off frequency. The level is adjustable from - ∞ , -10 to select a source. 2 Press the L dial. The normal display appears. continue to select a source. 2 Press the L dial. As you can select the cut-off frequency of the speakers. L dial F2 1 Press (SOURCE) to next page t 49 Level Adjusting the cut-off frequency for the front/rear speakers To match the characteristics of the installed speaker system, you...

Operating Instructions
Page 51
...; CD Auto Play -to continue recording after turning the ignition off the unit. "ATT On" appears momentarily. Menu The menu item you select depends on the ignition switch, be set: MENU Setup Display Receive Mode Preset Edit Play List Play Mode Name In Check In Check Out Contents Edit Information Input Level Library Version Setup • Time set (page 9) • Beep -to turn the beeps "On" or "Off". • AM Skip -to turn the AM source display "On" or...
...; CD Auto Play -to continue recording after turning the ignition off the unit. "ATT On" appears momentarily. Menu The menu item you select depends on the ignition switch, be set: MENU Setup Display Receive Mode Preset Edit Play List Play Mode Name In Check In Check Out Contents Edit Information Input Level Library Version Setup • Time set (page 9) • Beep -to turn the beeps "On" or "Off". • AM Skip -to turn the AM source display "On" or...

Operating Instructions
Page 57
... a supplied lithium battery CR2032 in stations automatically - c A VOL (Volume) control Rotate to : - C ./> control Press to adjust the volume. skip tracks on page 59, about how to turn off the clock indication after tuning off the ignition. A B C D 57 b OFF button* Stop playback or radio reception. find a station manually - fast-forward/reverse a track D DISC +/- control Press to change the album d MODE button Change operation (radio band). receive preset stations - change the source (CD, HDD, MEMORY STICK, FM, AM or AUX). e Infrared...
... a supplied lithium battery CR2032 in stations automatically - c A VOL (Volume) control Rotate to : - C ./> control Press to adjust the volume. skip tracks on page 59, about how to turn off the clock indication after tuning off the ignition. A B C D 57 b OFF button* Stop playback or radio reception. find a station manually - fast-forward/reverse a track D DISC +/- control Press to change the album d MODE button Change operation (radio band). receive preset stations - change the source (CD, HDD, MEMORY STICK, FM, AM or AUX). e Infrared...

Operating Instructions
Page 60
... in extremely cold environment Recording and editing on the disc tray. Removing the unit 1 Remove the front cover 1 Detach the front panel (page 8). 2 Press the clip inside the lenses and display of its mounting. To maintain high sound quality Be careful not to cool off before operating it. • Power antennas will not operate properly. Notes on CD lens • Do not...
... in extremely cold environment Recording and editing on the disc tray. Removing the unit 1 Remove the front cover 1 Detach the front panel (page 8). 2 Press the clip inside the lenses and display of its mounting. To maintain high sound quality Be careful not to cool off before operating it. • Power antennas will not operate properly. Notes on CD lens • Do not...

Operating Instructions
Page 64
... volume. • Cancel the ATT function. • Set the fader control to display the clock. • Remove the front panel and clean the connectors. The power is in the menu settings is set to the unit. • Check the connection. The power antenna does not extend. Press the RESET button. The contents of the casing. 64 Troubleshooting The following checklist will help you remedy problems you press (OFF) for 2 seconds. No beep sound. Stored stations...
... volume. • Cancel the ATT function. • Set the fader control to display the clock. • Remove the front panel and clean the connectors. The power is in the menu settings is set to the unit. • Check the connection. The power antenna does not extend. Press the RESET button. The contents of the casing. 64 Troubleshooting The following checklist will help you remedy problems you press (OFF) for 2 seconds. No beep sound. Stored stations...

Operating Instructions
Page 66
... power antenna control lead (blue) or accessory power supply lead (red) to the power supply lead of the car's antenna booster. (Only when your car has a built-in FM/AM antenna on the rear/side glass.) • Check the connection of the unit. t Check the connection of the power antenna control lead. • Check the frequency. • When DSO mode is On, the sound is too weak. t Set DSO mode to "IF Auto...
... power antenna control lead (blue) or accessory power supply lead (red) to the power supply lead of the car's antenna booster. (Only when your car has a built-in FM/AM antenna on the rear/side glass.) • Check the connection of the unit. t Check the connection of the power antenna control lead. • Check the frequency. • When DSO mode is On, the sound is too weak. t Set DSO mode to "IF Auto...

Operating Instructions
Page 68
... you attempt to the local authorized Sony service facility. NOT COMPATIBLE Formatting or Check-Out has been attempted, however, the connected Network Walkman is not equipped with "MagicGate" copyright protection technology. INVALID STICK Check-Out has been attempted, however, the inserted "Memory Stick" is not of preset radio stations has reached the limit. NO INSTALL FILE • The Gracenote CDDB...
... you attempt to the local authorized Sony service facility. NOT COMPATIBLE Formatting or Check-Out has been attempted, however, the connected Network Walkman is not equipped with "MagicGate" copyright protection technology. INVALID STICK Check-Out has been attempted, however, the inserted "Memory Stick" is not of preset radio stations has reached the limit. NO INSTALL FILE • The Gracenote CDDB...
Operating Instructions
Page 69
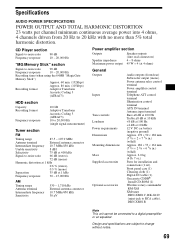
... 10.7 MHz/450 kHz 30 µV Power amplifier section Outputs Speaker impedance Maximum power output Speaker outputs (sure seal connectors) 4 - 8 ohms 45 W × 4 (at 4 ohms) General Outputs Inputs Tone controls Loudness Power requirements Dimensions Mounting dimensions Mass Supplied accessories Optional accessories Audio outputs (front/rear) Subwoofer output (mono) Power antenna relay control terminal Power amplifier control terminal Telephone ATT control terminal Illumination control terminal AUX IN terminal Antenna input terminal Bass ±8 dB at 100 Hz Treble ±8 dB at 10 kHz...
... 10.7 MHz/450 kHz 30 µV Power amplifier section Outputs Speaker impedance Maximum power output Speaker outputs (sure seal connectors) 4 - 8 ohms 45 W × 4 (at 4 ohms) General Outputs Inputs Tone controls Loudness Power requirements Dimensions Mounting dimensions Mass Supplied accessories Optional accessories Audio outputs (front/rear) Subwoofer output (mono) Power antenna relay control terminal Power amplifier control terminal Telephone ATT control terminal Illumination control terminal AUX IN terminal Antenna input terminal Bass ±8 dB at 100 Hz Treble ±8 dB at 10 kHz...

Operating Instructions
Page 72
..., 14 Automatic Tuning 11 AUX 56 AUX Skip 56 B Backup 37 Balance 48 Bass 47 Beep 51 BTM 24 C CD Auto Play 20 CD playback 10 Check-In 35, 43 Check-Out 34, 42 D Demonstration 9 Digital I/O cable 41 Dimmer 52 Disc 61 Display 20 DSO 46 E Equalizer 46 Erase 33, 40, 44 Export 54 F Fader 48 Format 41, 45 Front panel 8 Function 17 Fuse 58...
..., 14 Automatic Tuning 11 AUX 56 AUX Skip 56 B Backup 37 Balance 48 Bass 47 Beep 51 BTM 24 C CD Auto Play 20 CD playback 10 Check-In 35, 43 Check-Out 34, 42 D Demonstration 9 Digital I/O cable 41 Dimmer 52 Disc 61 Display 20 DSO 46 E Equalizer 46 Erase 33, 40, 44 Export 54 F Fader 48 Format 41, 45 Front panel 8 Function 17 Fuse 58...


