
Marketing Specifications
Page 1
...KV-36FV300 KV-32FV300 KV-27FV300 FD Trinitron® WEGA® TV KEY FEATURES • FD Trinitron® Picture Tube • 3-D Digital Comb Filter • Clear Edge VM™ Wideband Velocity Modulation • DynaBlack™ Picture Enhancement • Two Tuner Picture In Picture • Auto 16:9 Enhanced Mode (V Compression) • Component Video Input... Color Temperature • Vertical Aperture Compensation • S Video Detection • Component Video Input (Y/Pb/Pr) 1 Rear • Composite Video Input 1 Front 2 Rear • S Video Input 1 Front 1 Rear • RF...
...KV-36FV300 KV-32FV300 KV-27FV300 FD Trinitron® WEGA® TV KEY FEATURES • FD Trinitron® Picture Tube • 3-D Digital Comb Filter • Clear Edge VM™ Wideband Velocity Modulation • DynaBlack™ Picture Enhancement • Two Tuner Picture In Picture • Auto 16:9 Enhanced Mode (V Compression) • Component Video Input... Color Temperature • Vertical Aperture Compensation • S Video Detection • Component Video Input (Y/Pb/Pr) 1 Rear • Composite Video Input 1 Front 2 Rear • S Video Input 1 Front 1 Rear • RF...

Marketing Specifications
Page 2
...be formatted on 27-36" FV models), results...Input: 2 Rear General • Power Requirements: AC120V, 60Hz Accessories Supplied Accessories • Instruction Manual • Remote Control (RM-Y181) • AA Battery x 2 Optional Accessories • Television Stand SU-36HV1 KV-36FV300 SU-32HV1 KV-32FV300 SU-27HV1 KV-27FV300 Weights & Measures (Approx) • Dimensions (W x H x D): KV-36FV300 40 1/4 x 30 x 25 1/4 (1020x760x640mm) KV-32FV300 35 3/8 x 26 7/8 x 23 (898x682x584mm) KV...KV-36FV300 KV-32FV300 KV-27FV300 FD Trinitron® WEGA® TV KEY TECHNOLOGY 3D Digital Comb Filter Sony...
...be formatted on 27-36" FV models), results...Input: 2 Rear General • Power Requirements: AC120V, 60Hz Accessories Supplied Accessories • Instruction Manual • Remote Control (RM-Y181) • AA Battery x 2 Optional Accessories • Television Stand SU-36HV1 KV-36FV300 SU-32HV1 KV-32FV300 SU-27HV1 KV-27FV300 Weights & Measures (Approx) • Dimensions (W x H x D): KV-36FV300 40 1/4 x 30 x 25 1/4 (1020x760x640mm) KV-32FV300 35 3/8 x 26 7/8 x 23 (898x682x584mm) KV...KV-36FV300 KV-32FV300 KV-27FV300 FD Trinitron® WEGA® TV KEY TECHNOLOGY 3D Digital Comb Filter Sony...
Primary User Manual
Page 8
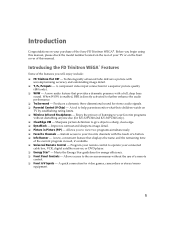
... of this manual, please check the model number located on the rear of your TV or on your purchase of the Sony FD Trinitron WEGA®. Technologically advanced tube delivers a picture with the touch of listening to view two programs simultaneously. ❏ Favorite Channels...favorite programs without the use of a remote control. ❏ Front A/V Inputs - Program your remote control to help parents monitor what their children watch on -screen menus without disturbing anyone else (for KV-32FV300 and KV-36FV300 only). ❏ ClearEdge VM - Meets the Energy Star guidelines for a ...
... of this manual, please check the model number located on the rear of your TV or on your purchase of the Sony FD Trinitron WEGA®. Technologically advanced tube delivers a picture with the touch of listening to view two programs simultaneously. ❏ Favorite Channels...favorite programs without the use of a remote control. ❏ Front A/V Inputs - Program your remote control to help parents monitor what their children watch on -screen menus without disturbing anyone else (for KV-32FV300 and KV-36FV300 only). ❏ ClearEdge VM - Meets the Energy Star guidelines for a ...
Primary User Manual
Page 9
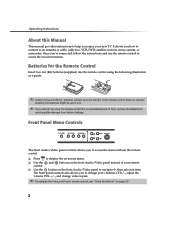
... will last up to six months. The front panel controls also allows you to change your channels CH+/-, adjust the volume VOL +/-, and change video inputs. ✍ To navigate the menus with your new TV. Operating Instructions About this Manual This manual provides instructions to help you enjoy your remote control...
... will last up to six months. The front panel controls also allows you to change your channels CH+/-, adjust the volume VOL +/-, and change video inputs. ✍ To navigate the menus with your new TV. Operating Instructions About this Manual This manual provides instructions to help you enjoy your remote control...
Primary User Manual
Page 10
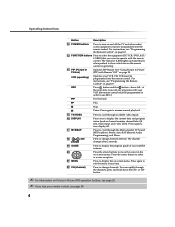
...CODE SET Description Press to switch back. Press to change from VHF/UHF input to the AUX input, press again to turn off the sound. While Sleep feature is in ... control, see "Programming the Remote Control" on page 35 for details. If you have a non-Sony VCR, you want the TV to recognize your remote control to step through the available video picture modes...49. 3 Press (+) or (-) to restore sound. The TV alternates between the TV and SAT (satellite) inputs when in TV FUNCTION mode. Press to power off automatically. Press again or press to adjust the volume. ...
...CODE SET Description Press to switch back. Press to change from VHF/UHF input to the AUX input, press again to turn off the sound. While Sleep feature is in ... control, see "Programming the Remote Control" on page 35 for details. If you have a non-Sony VCR, you want the TV to recognize your remote control to step through the available video picture modes...49. 3 Press (+) or (-) to restore sound. The TV alternates between the TV and SAT (satellite) inputs when in TV FUNCTION mode. Press to power off automatically. Press again or press to adjust the volume. ...
Primary User Manual
Page 11
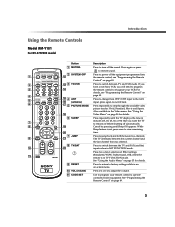
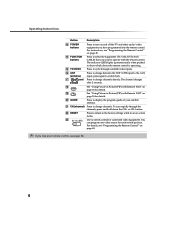
... the program guide of your VCR. Press to display the on page 49. Press to change channels directly. Press to cycle through available video inputs. Press again to exit the menu at the same time to record any time. For instructions, see "Programming the Remote Control" on Picture ...left - wa MENU ws CH (channel) Press to display the current time and program status (such as channel number, channel label (if set), video input, and video label). qg TV/VIDEO Press to cycle through the Multi-channel TV Sound (MTS) options: Stereo, Auto SAP (Second Audio Programming), and ...
... the program guide of your VCR. Press to display the on page 49. Press to change channels directly. Press to cycle through available video inputs. Press again to exit the menu at the same time to record any time. For instructions, see "Programming the Remote Control" on Picture ...left - wa MENU ws CH (channel) Press to display the current time and program status (such as channel number, channel label (if set), video input, and video label). qg TV/VIDEO Press to cycle through the Multi-channel TV Sound (MTS) options: Stereo, Auto SAP (Second Audio Programming), and ...
Primary User Manual
Page 12
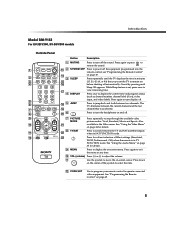
...display the current time and program status (such as channel number, channel label (if set), video input, and video label). Press down on page 35 for details. 8 TV/SAT ws Press to switch between the ...TV and SAT (satellite) inputs when in minutes qg (15, 30, 45, 60, or 90) that was selected. Cancel by ... 5 JUMP ql Press to restore the sound. Introduction Model RM-Y182 For KV-32FV300, KV-36FV300 models Outside Panel 1 2 3 4 5 6 7 8 9 0 qa qs Button Description 1 MUTING Press to turn off automatically.
...display the current time and program status (such as channel number, channel label (if set), video input, and video label). Press down on page 35 for details. 8 TV/SAT ws Press to switch between the ...TV and SAT (satellite) inputs when in minutes qg (15, 30, 45, 60, or 90) that was selected. Cancel by ... 5 JUMP ql Press to restore the sound. Introduction Model RM-Y182 For KV-32FV300, KV-36FV300 models Outside Panel 1 2 3 4 5 6 7 8 9 0 qa qs Button Description 1 MUTING Press to turn off automatically.
Primary User Manual
Page 13
... to display the program guide of your remote control, see page 54. 6 wa CH (channel) Press to change between the VHF/UHF input to the AUX input, press again to show which device the remote control is operating. ws RESET Press to return to the factory settings while in Picture (PIP... turn on and off the TV and other audio/video equipment you want to operate with the remote control. To scan rapidly through available video inputs. For instructions, see "Programming the Remote Control" on page 49. button. For details, see "Programming the Remote Control" on page 49. ✍ If you...
... to display the program guide of your remote control, see page 54. 6 wa CH (channel) Press to change between the VHF/UHF input to the AUX input, press again to show which device the remote control is operating. ws RESET Press to return to the factory settings while in Picture (PIP... turn on and off the TV and other audio/video equipment you want to operate with the remote control. To scan rapidly through available video inputs. For instructions, see "Programming the Remote Control" on page 49. button. For details, see "Programming the Remote Control" on page 49. ✍ If you...
Primary User Manual
Page 15
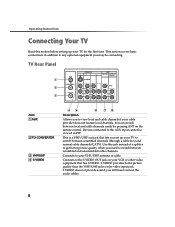
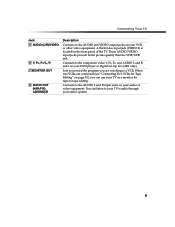
Devices connected to the S VIDEO OUT jack on the remote control. S VIDEO provides better picture quality than the VHF/UHF jacks or the video input jack. TV Rear Panel 1 2 3 1 3 4 MONITOR AUDIO OUT (VAR/FIX) Jack 1AUX 2TO CONVERTER 3 VHF/UHF 4 S VIDEO 45 6 78 Description...to any optional equipment you to switch between scrambled channels (through a cable box) and normal cable channels (CATV). Connects to the AUX input cannot be connecting. You can switch between scrambled and unscrambled cable channels. This section covers basic connections in PIP. This is a VHF...
Devices connected to the S VIDEO OUT jack on the remote control. S VIDEO provides better picture quality than the VHF/UHF jacks or the video input jack. TV Rear Panel 1 2 3 1 3 4 MONITOR AUDIO OUT (VAR/FIX) Jack 1AUX 2TO CONVERTER 3 VHF/UHF 4 S VIDEO 45 6 78 Description...to any optional equipment you to switch between scrambled channels (through a cable box) and normal cable channels (CATV). Connects to the AUX input cannot be connecting. You can switch between scrambled and unscrambled cable channels. This section covers basic connections in PIP. This is a VHF...
Primary User Manual
Page 16
... panel of the TV. Lets you record the program you can listen to your TV's audio through your VCR or other video equipment. A third video input jack (VIDEO 2) is located on page 15), you are connected (see "Connecting Two VCRs for tape-to a VCR. Connecting Your TV Jack 5 AUDIO (L/R)/VIDEO 6 Y, PB... the component video Y, PB, PR, and AUDIO L and R jacks on your DVD player or digital set-top box (480i only). Connects to the AUDIO L and R input jacks on your audio or video equipment. When two VCRs are watching to -tape editing. These AUDIO/VIDEO...
... panel of the TV. Lets you record the program you can listen to your TV's audio through your VCR or other video equipment. A third video input jack (VIDEO 2) is located on page 15), you are connected (see "Connecting Two VCRs for tape-to a VCR. Connecting Your TV Jack 5 AUDIO (L/R)/VIDEO 6 Y, PB... the component video Y, PB, PR, and AUDIO L and R jacks on your DVD player or digital set-top box (480i only). Connects to the AUDIO L and R input jacks on your audio or video equipment. When two VCRs are watching to -tape editing. These AUDIO/VIDEO...
Primary User Manual
Page 19
... to a cable system that you to channel 3 or 4. For more information on the remote control to switch between the cable box and direct cable inputs. ✍ Your Sony remote control can be programmed to operate your TV (see page 37). 12 This setup allows you to use the remote control to: ❏...
... to a cable system that you to channel 3 or 4. For more information on the remote control to switch between the cable box and direct cable inputs. ✍ Your Sony remote control can be programmed to operate your TV (see page 37). 12 This setup allows you to use the remote control to: ❏...
Primary User Manual
Page 20
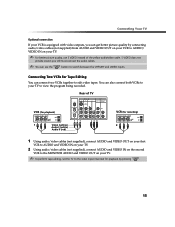
... on your VCR to the VHF/UHF jack on your TV. ✍ You can use the button to switch between the VHF/UHF and VIDEO inputs. ✍ For better picture quality, use S VIDEO instead of your VCR). 1 Connect the coaxial cable from your TV antenna or cable service to the IN...
... on your VCR to the VHF/UHF jack on your TV. ✍ You can use the button to switch between the VHF/UHF and VIDEO inputs. ✍ For better picture quality, use S VIDEO instead of your VCR). 1 Connect the coaxial cable from your TV antenna or cable service to the IN...
Primary User Manual
Page 21
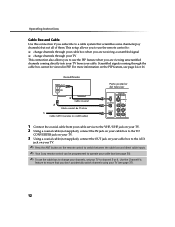
... be viewed in PIP. Rear of TV 1 3 4 VCR 2b 3 1 Splitter Cable 2a Cable Box Optional connection Video (yellow) Audio L (white) Audio R (red) 1 Connect the single input jack of the splitter to channel 3 or 4 (see page 24 or 26.
... be viewed in PIP. Rear of TV 1 3 4 VCR 2b 3 1 Splitter Cable 2a Cable Box Optional connection Video (yellow) Audio L (white) Audio R (red) 1 Connect the single input jack of the splitter to channel 3 or 4 (see page 24 or 26.
Primary User Manual
Page 22
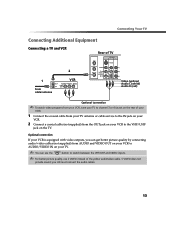
... by connecting audio/video cables (not supplied) from AUDIO and VIDEO OUT on your VCR to AUDIO/ VIDEO IN on your TV to the video input intended for playback by pressing . 15 Rear of the yellow audio/video cable. Connecting Your TV Optional connection If your VCR is equipped with video... AUDIO OUT (VAR/FIX) VCR (for playback) VCR (for Tape Editing You can connect two VCRs together to switch between the VHF/UHF and VIDEO inputs. S VIDEO does not provide sound;
... by connecting audio/video cables (not supplied) from AUDIO and VIDEO OUT on your VCR to AUDIO/ VIDEO IN on your TV to the video input intended for playback by pressing . 15 Rear of the yellow audio/video cable. Connecting Your TV Optional connection If your VCR is equipped with video... AUDIO OUT (VAR/FIX) VCR (for playback) VCR (for Tape Editing You can connect two VCRs together to switch between the VHF/UHF and VIDEO inputs. S VIDEO does not provide sound;

Primary User Manual
Page 23
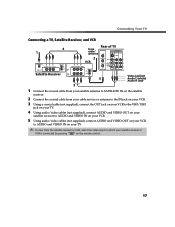
... your satellite receiver to AUDIO and VIDEO IN on your TV. ✍ You can use the button to switch between the VHF/UHF and VIDEO inputs. ✍ For better picture quality, use S VIDEO instead of the yellow audio/video cable. S VIDEO does not provide sound;
... your satellite receiver to AUDIO and VIDEO IN on your TV. ✍ You can use the button to switch between the VHF/UHF and VIDEO inputs. ✍ For better picture quality, use S VIDEO instead of the yellow audio/video cable. S VIDEO does not provide sound;
Primary User Manual
Page 24
... VIDEO OUT on your VCR to AUDIO and VIDEO IN on your TV. ✍ To view from the satellite receiver or VCR, select the video input to which your satellite receiver or VCR is connected by pressing on the remote control. 17
... VIDEO OUT on your VCR to AUDIO and VIDEO IN on your TV. ✍ To view from the satellite receiver or VCR, select the video input to which your satellite receiver or VCR is connected by pressing on the remote control. 17
Primary User Manual
Page 26
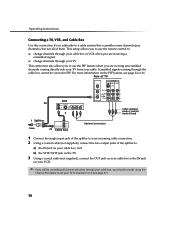
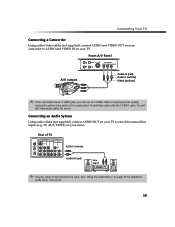
...cables for additional audio setup instructions. 19 Rear of TV 1 3 4 MONITOR AUDIO OUT (VAR/FIX) AUDIO-L (white) AUDIO-R (red) Line input ✍ Set your TV to one of the combination Audio/Video cable with the S VIDEO cable. Connecting an Audio System Using audio cables (not ...supplied), connect AUDIO OUT on your stereo to the selected line input. TV, AUX, TAPE2) on your TV. replace the yellow video cable of the unused line inputs (e.g. Front A/V Panel S VIDEO Front A/V Panel A/V output Audio R (red) Audio L (white) Video (...
...cables for additional audio setup instructions. 19 Rear of TV 1 3 4 MONITOR AUDIO OUT (VAR/FIX) AUDIO-L (white) AUDIO-R (red) Line input ✍ Set your TV to one of the combination Audio/Video cable with the S VIDEO cable. Connecting an Audio System Using audio cables (not ...supplied), connect AUDIO OUT on your stereo to the selected line input. TV, AUX, TAPE2) on your TV. replace the yellow video cable of the unused line inputs (e.g. Front A/V Panel S VIDEO Front A/V Panel A/V output Audio R (red) Audio L (white) Video (...

Primary User Manual
Page 30
... clock on your DVD (16:9 Enhanced), select menu language, or run a demo of most commonly-used menu settings. 23 Select closed captioning options, label video inputs, adjust tilt correction, enhance your picture resolution for your TV and program scheduled viewing using Timer 1 and Timer 2. Menu Video Audio Channel Parent Timer Setup...
... clock on your DVD (16:9 Enhanced), select menu language, or run a demo of most commonly-used menu settings. 23 Select closed captioning options, label video inputs, adjust tilt correction, enhance your picture resolution for your TV and program scheduled viewing using Timer 1 and Timer 2. Menu Video Audio Channel Parent Timer Setup...
Primary User Manual
Page 31
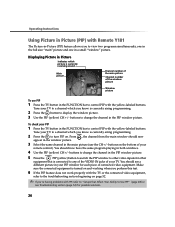
... "window" picture. buttons to change the channel in the PIP window picture. 5 Press the PIP (yellow) button to switch the PIP window to other video inputs for other equipment that Affect Your Ability to Use PIP" (page 28) or see a different picture in your remote control). To check your TV to...
... "window" picture. buttons to change the channel in the PIP window picture. 5 Press the PIP (yellow) button to switch the PIP window to other video inputs for other equipment that Affect Your Ability to Use PIP" (page 28) or see a different picture in your remote control). To check your TV to...
Primary User Manual
Page 33
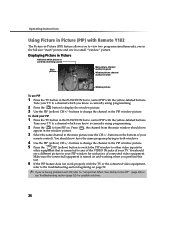
... to any of the VIDEO IN jacks of your TV to a channel which you know is currently airing programming. 2 Press the button to other video inputs for other equipment that is currently receiving sound Main picture 9 6 Main picture channel number in green 2 Window picture channel number in white Window picture To...
... to any of the VIDEO IN jacks of your TV to a channel which you know is currently airing programming. 2 Press the button to other video inputs for other equipment that is currently receiving sound Main picture 9 6 Main picture channel number in green 2 Window picture channel number in white Window picture To...


