
Child Safety: It Makes A Difference Where Your TV Stands
Page 1
... of the Electronic Industries Alliance The industry is large enough to support the weight of your television (and other electronic components). 2 Use appropriate angle braces, straps and anchors to secure your furniture to the wall (but never screw anything directly into the TV). 3...formed the Home Entertainment Support Safety Committee comprised of television and consumer electronics furniture manufacturers to making home entertainment enjoyable and safe. Use the appropriate furniture that children can become excited while watching a program and can potentially push or pull a TV over and ...
... of the Electronic Industries Alliance The industry is large enough to support the weight of your television (and other electronic components). 2 Use appropriate angle braces, straps and anchors to secure your furniture to the wall (but never screw anything directly into the TV). 3...formed the Home Entertainment Support Safety Committee comprised of television and consumer electronics furniture manufacturers to making home entertainment enjoyable and safe. Use the appropriate furniture that children can become excited while watching a program and can potentially push or pull a TV over and ...

Warranty Card
Page 1
... cover cosmetic damage or damage due to acts of God, accident, misuse, abuse, negligence, commercial use, or modification of the Product, including the antenna. PARTS: In addition, Sony will repair or replace the Product, at your convenience, Sony Electronics Inc. To obtain warranty service, you . This warranty is provided during the initial 90...
... cover cosmetic damage or damage due to acts of God, accident, misuse, abuse, negligence, commercial use, or modification of the Product, including the antenna. PARTS: In addition, Sony will repair or replace the Product, at your convenience, Sony Electronics Inc. To obtain warranty service, you . This warranty is provided during the initial 90...
Operating Instructions
Page 2
... the cord from SRS Labs, Inc. Licensed by U.S. FD Trinitron and the Wega logo are designed to provide reasonable protection against harmful interference in ... the same program can be indicated in the text, for the use strong solvents such as practical. NOTIFICATION This equipment has been tested ...Sony Corporation under USP 4638258.4482866. registered mark. (z)® SRS Sound Retrieval System The (z) SRS (SOUND RETRIEVAL SYSTEM) is manufactured by one way. The word "SRS" and the SRS symbol (z) are for models KV-32FV16, KV-32FV26, KV-36FS12, KV36FS16, KV-36FV16, and KV...
... the cord from SRS Labs, Inc. Licensed by U.S. FD Trinitron and the Wega logo are designed to provide reasonable protection against harmful interference in ... the same program can be indicated in the text, for the use strong solvents such as practical. NOTIFICATION This equipment has been tested ...Sony Corporation under USP 4638258.4482866. registered mark. (z)® SRS Sound Retrieval System The (z) SRS (SOUND RETRIEVAL SYSTEM) is manufactured by one way. The word "SRS" and the SRS symbol (z) are for models KV-32FV16, KV-32FV26, KV-36FS12, KV36FS16, KV-36FV16, and KV...

Operating Instructions
Page 3
...from the type of power source indicated on the serial/model plate. Alternate Warning For the set . Installation Water and Moisture Do not use liquid cleaners or aerosol cleaners. An appliance and cart combination should be blocked or covered. ❑ Never cover the slots and openings... plug. If a snapping or popping sound from the wall outlet before cleaning or polishing it in the operating instructions or service manual. Use only a cart or stand recommended by forcing it . Carefully observe and comply with water for necessary ventilation. WARNING To guard against the...
...from the type of power source indicated on the serial/model plate. Alternate Warning For the set . Installation Water and Moisture Do not use liquid cleaners or aerosol cleaners. An appliance and cart combination should be blocked or covered. ❑ Never cover the slots and openings... plug. If a snapping or popping sound from the wall outlet before cleaning or polishing it in the operating instructions or service manual. Use only a cart or stand recommended by forcing it . Carefully observe and comply with water for necessary ventilation. WARNING To guard against the...

Operating Instructions
Page 4
...exposed to rain or water. ❑ If the set has been subject to excessive shock by the manufacturer) to determine that he has used replacement parts specified by a qualified technician to restore the set to normal operation. ❑ When the set . Ask a qualified service technician... to dispose of its useful life, improper disposal could result in wire Power service grounding electrode system (NEC Art 250 Part H) Lightning For added protection for this indicates ...
...exposed to rain or water. ❑ If the set has been subject to excessive shock by the manufacturer) to determine that he has used replacement parts specified by a qualified technician to restore the set to normal operation. ❑ When the set . Ask a qualified service technician... to dispose of its useful life, improper disposal could result in wire Power service grounding electrode system (NEC Art 250 Part H) Lightning For added protection for this indicates ...

Operating Instructions
Page 5
Contents Introducing the FD Trinitron Wega Overview 1 Presenting the FD Trinitron Wega 2 Using the Remote Control 3 Installing the TV Overview 5 Connecting a Cable or Antenna 6 Connecting a VCR and Cable 9 Connecting a VCR and Cable Box 10 Connecting Two VCRs for...Up the TV Automatically 18 Using the Menus Overview 25 Using the Video Menu 26 Using the Audio Menu 27 Using the Channel Menu 29 Using the Parent Menu 30 Using the Timer Menu 33 Using the Setup Menu 34 Using the Basic Menu 36 Other Information Overview 37 TV Controls and Connectors 38 Using the Remote Control 40 ...
Contents Introducing the FD Trinitron Wega Overview 1 Presenting the FD Trinitron Wega 2 Using the Remote Control 3 Installing the TV Overview 5 Connecting a Cable or Antenna 6 Connecting a VCR and Cable 9 Connecting a VCR and Cable Box 10 Connecting Two VCRs for...Up the TV Automatically 18 Using the Menus Overview 25 Using the Video Menu 26 Using the Audio Menu 27 Using the Channel Menu 29 Using the Parent Menu 30 Using the Timer Menu 33 Using the Setup Menu 34 Using the Basic Menu 36 Other Information Overview 37 TV Controls and Connectors 38 Using the Remote Control 40 ...

Operating Instructions
Page 7
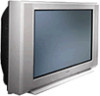
Introducing the FD Trinitron Wega Overview This chapter defines the contents of your Wega TV, and provides an overview of how to set up and use basic features. Topic Presenting the FD Trinitron Wega Using the Remote Control Page 2 3 1
Introducing the FD Trinitron Wega Overview This chapter defines the contents of your Wega TV, and provides an overview of how to set up and use basic features. Topic Presenting the FD Trinitron Wega Using the Remote Control Page 2 3 1

Operating Instructions
Page 9
... Control Introducing the FD Trinitron Wega Inserting Batteries Insert two size AA (R6) batteries (supplied) by matching the + and - on -screen functions Use This Button TV (POWER) 0 - 9 and ENTER Press 0 - 9 to select a channel, the channel changes after 2 seconds. button. Turn the TV on and off...toggle through the channels, press and hold down the CH+ or CH- MENU For details, see "Using the Remote Control" on page 40. Remote Control Overview z To scan rapidly through all models except KV-32FV26, 36FV26) 3 For a complete description of the buttons on page 25. Press ENTER for an...
... Control Introducing the FD Trinitron Wega Inserting Batteries Insert two size AA (R6) batteries (supplied) by matching the + and - on -screen functions Use This Button TV (POWER) 0 - 9 and ENTER Press 0 - 9 to select a channel, the channel changes after 2 seconds. button. Turn the TV on and off...toggle through the channels, press and hold down the CH+ or CH- MENU For details, see "Using the Remote Control" on page 40. Remote Control Overview z To scan rapidly through all models except KV-32FV26, 36FV26) 3 For a complete description of the buttons on page 25. Press ENTER for an...

Operating Instructions
Page 11
Use caution when removing the AC plug from the two lower hooks. Gently slide the cord in the upward direction, without removing the cord from its ... a Satellite Receiver Connecting a Satellite Receiver with a VCR Connecting an Audio Receiver Connecting a DVD Player with Component Video Connectors Connecting a DVD Player with A/V Connectors Connecting a Camcorder Using the CONTROL S Feature Setting Up the TV Automatically Page 6 9 10 11 12 13 14 15 16 17 18 18 Note About the AC Power Cord...
Use caution when removing the AC plug from the two lower hooks. Gently slide the cord in the upward direction, without removing the cord from its ... a Satellite Receiver Connecting a Satellite Receiver with a VCR Connecting an Audio Receiver Connecting a DVD Player with Component Video Connectors Connecting a DVD Player with A/V Connectors Connecting a Camcorder Using the CONTROL S Feature Setting Up the TV Automatically Page 6 9 10 11 12 13 14 15 16 17 18 18 Note About the AC Power Cord...

Operating Instructions
Page 13
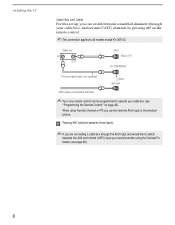
...and perform the Auto Program function (see page 29). 7 Installing the TV Cable and Antenna If your cable service to the cable box's IN jack. 2 Using a coaxial cable, connect the cable box's OUT jack to the TV's VHF/UHF jack. Cable VHF/UHF Rear of TV (No connection to TO CONVERTER... channels with an antenna, you may find this set up convenient. ✍ This connection applies to all models except KV-36FS12. CATV cable AUX Rear of TV IN OUT Cable box ✍ If you should consider using the Channel Fix feature (see page 29). Cable Box Connections Some pay cable TV systems...
...and perform the Auto Program function (see page 29). 7 Installing the TV Cable and Antenna If your cable service to the cable box's IN jack. 2 Using a coaxial cable, connect the cable box's OUT jack to the TV's VHF/UHF jack. Cable VHF/UHF Rear of TV (No connection to TO CONVERTER... channels with an antenna, you may find this set up convenient. ✍ This connection applies to all models except KV-36FS12. CATV cable AUX Rear of TV IN OUT Cable box ✍ If you should consider using the Channel Fix feature (see page 29). Cable Box Connections Some pay cable TV systems...
Operating Instructions
Page 14
... Channel or PIP, you should consider using the Channel Fix feature (see "Programming the Remote Control" on the remote control. ✍ This connection applies to all models except KV-36FS12. z Pressing ANT switches between these inputs. ✍ If you are connecting a cable box through the AUX input and...IN OUT AUX Rear of TV TO CONVERTER 75-ohm coaxial cable (not supplied) Signal VHF/UHF CATV cable (unscrambled channels) ✍ Your Sony remote control can switch between the AUX and normal (CATV) input you cannot view the AUX input in the window picture. Installing the TV ...
... Channel or PIP, you should consider using the Channel Fix feature (see "Programming the Remote Control" on the remote control. ✍ This connection applies to all models except KV-36FS12. z Pressing ANT switches between these inputs. ✍ If you are connecting a cable box through the AUX input and...IN OUT AUX Rear of TV TO CONVERTER 75-ohm coaxial cable (not supplied) Signal VHF/UHF CATV cable (unscrambled channels) ✍ Your Sony remote control can switch between the AUX and normal (CATV) input you cannot view the AUX input in the window picture. Installing the TV ...

Operating Instructions
Page 15
... IN jack. Installing the TV Connecting a VCR and Cable 1 Connect the cable TV cable to the VCR's IN jack. 2 Using a coaxial cable, connect the VCR's OUT jack to the TV's VHF/UHF jack. 3 Using an A/V cable, connect the VCR's A/V OUT jacks to the TV's A/V IN jacks. ✍ If your VCR has an... S VIDEO jack: For best picture quality, use an S VIDEO connection instead of the yellow video cable on your combined A/V cable. TV...
... IN jack. Installing the TV Connecting a VCR and Cable 1 Connect the cable TV cable to the VCR's IN jack. 2 Using a coaxial cable, connect the VCR's OUT jack to the TV's VHF/UHF jack. 3 Using an A/V cable, connect the VCR's A/V OUT jacks to the TV's A/V IN jacks. ✍ If your VCR has an... S VIDEO jack: For best picture quality, use an S VIDEO connection instead of the yellow video cable on your combined A/V cable. TV...

Operating Instructions
Page 16
... VCR and Cable Box ✍ This connection applies to all models except KV-36FS12. 1 Connect your incoming cable connection to the TV's VHF/UHF jack. 2 Using a coaxial cable, connect the cable box's IN jack to the TV's TO CONVERTER jack. 3 Using a coaxial cable, connect the cable box's OUT jack to the VCR's... VHF/UHF IN jack. 4 Using an A/V cable, connect the VCR's A/V OUT jacks to the TV's A/V IN jacks. ✍ If your VCR has an S VIDEO jack: For best picture quality, use an S VIDEO connection instead of the yellow video cable on your combined A/V cable...
... VCR and Cable Box ✍ This connection applies to all models except KV-36FS12. 1 Connect your incoming cable connection to the TV's VHF/UHF jack. 2 Using a coaxial cable, connect the cable box's IN jack to the TV's TO CONVERTER jack. 3 Using a coaxial cable, connect the cable box's OUT jack to the VCR's... VHF/UHF IN jack. 4 Using an A/V cable, connect the VCR's A/V OUT jacks to the TV's A/V IN jacks. ✍ If your VCR has an S VIDEO jack: For best picture quality, use an S VIDEO connection instead of the yellow video cable on your combined A/V cable...
Operating Instructions
Page 17
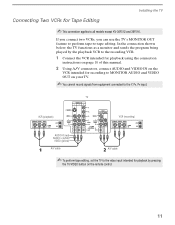
... the TV/VIDEO button on your TV. ✍ You cannot record signals from equipment connected to -tape editing. If you connect two VCRs, you can use the TV's MONITOR OUT feature to perform tape-to the Y, PB, PR input. TV VCR (playback) VCR (recording) AUDIO-R (red) AUDIO-L (white) ...VIDEO (yellow) A/V cable A/V cable ✍ To perform tape editing, set the TV to all models except KV-36FS12 and 36FS16. Installing the TV Connecting Two VCRs for Tape Editing ✍ This connection applies to the video input intended for playback by the...
... the TV/VIDEO button on your TV. ✍ You cannot record signals from equipment connected to -tape editing. If you connect two VCRs, you can use the TV's MONITOR OUT feature to perform tape-to the Y, PB, PR input. TV VCR (playback) VCR (recording) AUDIO-R (red) AUDIO-L (white) ...VIDEO (yellow) A/V cable A/V cable ✍ To perform tape editing, set the TV to all models except KV-36FS12 and 36FS16. Installing the TV Connecting Two VCRs for Tape Editing ✍ This connection applies to the video input intended for playback by the...

Operating Instructions
Page 18
... S VIDEO IN jack. TV Coaxial cable Satellite antenna cable Satellite receiver A/V cable AUDIO-R (red) AUDIO-L (white) VIDEO (yellow) 12 Using an S VIDEO cable, connect the satellite receiver's VIDEO OUT jack to provide sound. Installing the TV Connecting a Satellite Receiver 1 Connect the ...satellite antenna cable to the satellite receiver's SATELLITE IN jack. 2 Using an A/V cable, connect the satellite receiver's A/V OUT jacks to the TV's A/V IN jacks. 3 Connect a coaxial cable from your cable ...
... S VIDEO IN jack. TV Coaxial cable Satellite antenna cable Satellite receiver A/V cable AUDIO-R (red) AUDIO-L (white) VIDEO (yellow) 12 Using an S VIDEO cable, connect the satellite receiver's VIDEO OUT jack to provide sound. Installing the TV Connecting a Satellite Receiver 1 Connect the ...satellite antenna cable to the satellite receiver's SATELLITE IN jack. 2 Using an A/V cable, connect the satellite receiver's A/V OUT jacks to the TV's A/V IN jacks. 3 Connect a coaxial cable from your cable ...

Operating Instructions
Page 19
Satellite receiver TV Coaxial cable VCR Coaxial cable AUDIO-R (red) AUDIO-L (white) VIDEO (yellow) A/V cable 13 Installing the TV Connecting a Satellite Receiver with a VCR 1 Connect the satellite antenna cable to the satellite receiver's SATELLITE IN jack. 2 Connect the CATV cable to the VCR's VHF/UHF IN jack. 3 Using a coaxial cable, connect the VCR's OUT jack to the TV's VHF/UHF jack. 4 Using an A/V cable, connect the satellite receiver's A/V OUT jacks to the VCR's A/V IN jacks. 5 Using an A/V cable, connect the VCR's A/V OUT jacks to the TV's A/V IN jacks.
Satellite receiver TV Coaxial cable VCR Coaxial cable AUDIO-R (red) AUDIO-L (white) VIDEO (yellow) A/V cable 13 Installing the TV Connecting a Satellite Receiver with a VCR 1 Connect the satellite antenna cable to the satellite receiver's SATELLITE IN jack. 2 Connect the CATV cable to the VCR's VHF/UHF IN jack. 3 Using a coaxial cable, connect the VCR's OUT jack to the TV's VHF/UHF jack. 4 Using an A/V cable, connect the satellite receiver's A/V OUT jacks to the VCR's A/V IN jacks. 5 Using an A/V cable, connect the VCR's A/V OUT jacks to the TV's A/V IN jacks.

Operating Instructions
Page 20
Installing the TV Connecting an Audio Receiver 1 Using audio cables, connect the TV's AUDIO OUT jacks to the audio receiver's audio LINE IN jacks. AUDIO-L (white) AUDIO-R (red) Line input 14
Installing the TV Connecting an Audio Receiver 1 Using audio cables, connect the TV's AUDIO OUT jacks to the audio receiver's audio LINE IN jacks. AUDIO-L (white) AUDIO-R (red) Line input 14

Operating Instructions
Page 21
Component video cables TV DVD player Audio cable AUDIO-R (red) AUDIO-L (white) 15 Installing the TV Connecting a DVD Player with Component Video Connectors 1 Using three separate component video cables, connect the DVD player's Y, PB, and PR jacks to the TV's audio IN jacks. The Y, PB, and PR jacks do ...not provide audio, so audio cables must be connected to provide sound. 2 Using an audio cable, connect the DVD player's audio OUT jacks to the Y, PB, and PR jacks on the TV. ✍ The Y, PB, and PR jacks...
Component video cables TV DVD player Audio cable AUDIO-R (red) AUDIO-L (white) 15 Installing the TV Connecting a DVD Player with Component Video Connectors 1 Using three separate component video cables, connect the DVD player's Y, PB, and PR jacks to the TV's audio IN jacks. The Y, PB, and PR jacks do ...not provide audio, so audio cables must be connected to provide sound. 2 Using an audio cable, connect the DVD player's audio OUT jacks to the Y, PB, and PR jacks on the TV. ✍ The Y, PB, and PR jacks...

Operating Instructions
Page 22
TV S-VIDEO cable DVD player Audio cable AUDIO-R (red) AUDIO-L (white) 16 Installing the TV Connecting a DVD Player with A/V Connectors ✍ If your DVD player has video component output connectors: for best picture quality use the connection described on page 15. 1 Using audio cables, connect the DVD player's audio OUT jacks to the TV's audio IN jacks. 2 Using an S-VIDEO cable, connect the DVD player's S-VIDEO jack to the TV's S-VIDEO jack.
TV S-VIDEO cable DVD player Audio cable AUDIO-R (red) AUDIO-L (white) 16 Installing the TV Connecting a DVD Player with A/V Connectors ✍ If your DVD player has video component output connectors: for best picture quality use the connection described on page 15. 1 Using audio cables, connect the DVD player's audio OUT jacks to the TV's audio IN jacks. 2 Using an S-VIDEO cable, connect the DVD player's S-VIDEO jack to the TV's S-VIDEO jack.

Operating Instructions
Page 23
However, if you prefer, you have a mono camcorder, connect its left audio output to the TV's rear A/V IN jacks. Installing the TV Connecting a Camcorder 1 Using A/V cables, connect the camcorder's A/V OUT jacks to the TV's A/V IN jacks. ✍ If you can also connect the camcorder to the TV's AUDIO L jack. AUDIO-R (red) AUDIO-L (white) VIDEO (yellow) A/V output 17 For easy connection of the camcorder, the TV has front A/V inputs (shown below).
However, if you prefer, you have a mono camcorder, connect its left audio output to the TV's rear A/V IN jacks. Installing the TV Connecting a Camcorder 1 Using A/V cables, connect the camcorder's A/V OUT jacks to the TV's A/V IN jacks. ✍ If you can also connect the camcorder to the TV's AUDIO L jack. AUDIO-R (red) AUDIO-L (white) VIDEO (yellow) A/V output 17 For easy connection of the camcorder, the TV has front A/V inputs (shown below).


