Operating Instructions
Page 7
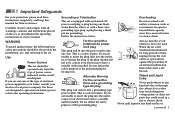
...suitable outlet installed. If you are unable to insert the plug into the outlet, contact your electrician to be operated only from the type of power source indicated on the serial/ model plate. Always turn the set with a three-wire grounding type AC plug This plug will fit into ...objects of any kind on the set is left unattended and unused for future reference. If you are not sure of the type of electrical power supplied to have a suitable outlet installed. Important Safeguards For your protection, please read these instructions completely, and keep this can result in fire or...
...suitable outlet installed. If you are unable to insert the plug into the outlet, contact your electrician to be operated only from the type of power source indicated on the serial/ model plate. Always turn the set with a three-wire grounding type AC plug This plug will fit into ...objects of any kind on the set is left unattended and unused for future reference. If you are not sure of the type of electrical power supplied to have a suitable outlet installed. Important Safeguards For your protection, please read these instructions completely, and keep this can result in fire or...
Operating Instructions
Page 14
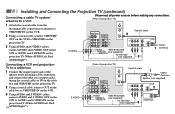
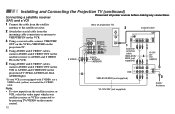
...the Projection TV (continued) Connecting a cable TV system/ antenna to a VCR Disconnect all power sources before making any connections. (Rear of the splitter to the incoming cable connection, and connect the other two (output) ...VIDEO (Rear of projection TV) Coaxial cable AUX 1 TO CONVERTER Cable/ Antenna IN VIDEO 1 VIDEO 3 S VIDEO OUT MONITOR AUDIO (VAR/FIX) VIDEO Y VIDEO L (MONO) AUDIO R L PB (MONO) AUDIO PR R VHF/UHF Splitter (not supplied) AUDIO R AUDIO L VIDEO LINE IN LINE OUT S VIDEO VCR VHF/UHF OUT 2 IN COMPONENT VIDEO VMC-810S/820S AUDIO-L (not supplied...
...the Projection TV (continued) Connecting a cable TV system/ antenna to a VCR Disconnect all power sources before making any connections. (Rear of the splitter to the incoming cable connection, and connect the other two (output) ...VIDEO (Rear of projection TV) Coaxial cable AUX 1 TO CONVERTER Cable/ Antenna IN VIDEO 1 VIDEO 3 S VIDEO OUT MONITOR AUDIO (VAR/FIX) VIDEO Y VIDEO L (MONO) AUDIO R L PB (MONO) AUDIO PR R VHF/UHF Splitter (not supplied) AUDIO R AUDIO L VIDEO LINE IN LINE OUT S VIDEO VCR VHF/UHF OUT 2 IN COMPONENT VIDEO VMC-810S/820S AUDIO-L (not supplied...
Operating Instructions
Page 15
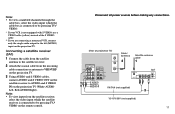
Disconnect all power sources before making any connections. (Rear of the S VIDEO cable. ** If you are connecting a monaural VCR, connect only the single audio output to the left (MONO) input on the projection TV... S VIDEO, use a VIDEO cable (yellow) instead of projection TV) AUX TO CONVERTER Cable/ Antenna 2 Satellite antenna cable 1 IN VIDEO 1 VIDEO 3 S VIDEO OUT MONITOR AUDIO (VAR/FIX) VIDEO Y VIDEO L (MONO) AUDIO R L PB (MONO) AUDIO PR R COMPONENT S VIDEO AUDIO-L AUDIO-R VHF/UHF SATELLITE IN LINE OUT RK-74A (not supplied) SAT VHF/UHF AUDIO R AUDIO L VIDEO S VIDEO IN ...
Disconnect all power sources before making any connections. (Rear of the S VIDEO cable. ** If you are connecting a monaural VCR, connect only the single audio output to the left (MONO) input on the projection TV... S VIDEO, use a VIDEO cable (yellow) instead of projection TV) AUX TO CONVERTER Cable/ Antenna 2 Satellite antenna cable 1 IN VIDEO 1 VIDEO 3 S VIDEO OUT MONITOR AUDIO (VAR/FIX) VIDEO Y VIDEO L (MONO) AUDIO R L PB (MONO) AUDIO PR R COMPONENT S VIDEO AUDIO-L AUDIO-R VHF/UHF SATELLITE IN LINE OUT RK-74A (not supplied) SAT VHF/UHF AUDIO R AUDIO L VIDEO S VIDEO IN ...
Operating Instructions
Page 16
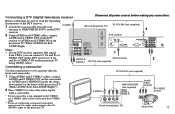
... S VIDEO IN on the remote control. S VIDEO (Rear of the S VIDEO cable. Installing and Connecting the Projection TV (continued) Connecting a satellite receiver Disconnect all power sources ...VIDEO 1 VIDEO 3 S VIDEO OUT MONITOR AUDIO (VAR/FIX) VIDEO Y VIDEO L (MONO) AUDIO R L PB (MONO) AUDIO PR R COMPONENT VIDEO AUDIO-L AUDIO-R AUX TO CONVERTER VHF/UHF 3 Coaxial cable SATELLITE IN AUDIO R AUDIO L VIDEO LINE OUT S VIDEO SAT VHF/UHF OUT IN 1 Satellite antenna cable VMC-810S/ 820S (not supplied) YC-15V/ 4 30V (not supplied) AUDIO R AUDIO L VIDEO LINE IN S VIDEO...
... S VIDEO IN on the remote control. S VIDEO (Rear of the S VIDEO cable. Installing and Connecting the Projection TV (continued) Connecting a satellite receiver Disconnect all power sources ...VIDEO 1 VIDEO 3 S VIDEO OUT MONITOR AUDIO (VAR/FIX) VIDEO Y VIDEO L (MONO) AUDIO R L PB (MONO) AUDIO PR R COMPONENT VIDEO AUDIO-L AUDIO-R AUX TO CONVERTER VHF/UHF 3 Coaxial cable SATELLITE IN AUDIO R AUDIO L VIDEO LINE OUT S VIDEO SAT VHF/UHF OUT IN 1 Satellite antenna cable VMC-810S/ 820S (not supplied) YC-15V/ 4 30V (not supplied) AUDIO R AUDIO L VIDEO LINE IN S VIDEO...
Operating Instructions
Page 17
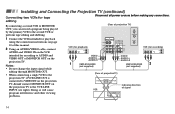
... on the DTV receiver to AUDIO and S VIDEO IN on the projection TV using VIDEO cables. Connecting a DTV (digital television) receiver Disconnect all power sources before making any connections. S VIDEO (Rear of projection TV) YC-15V/30V (not supplied) 2 AUX IN VIDEO 1 VIDEO 3 S VIDEO OUT MONITOR AUDIO (VAR/FIX) VIDEO Y VIDEO TO CONVERTER VHF/UHF DTV receiver VHF/UHF IN VHF...
... on the DTV receiver to AUDIO and S VIDEO IN on the projection TV using VIDEO cables. Connecting a DTV (digital television) receiver Disconnect all power sources before making any connections. S VIDEO (Rear of projection TV) YC-15V/30V (not supplied) 2 AUX IN VIDEO 1 VIDEO 3 S VIDEO OUT MONITOR AUDIO (VAR/FIX) VIDEO Y VIDEO TO CONVERTER VHF/UHF DTV receiver VHF/UHF IN VHF...
Operating Instructions
Page 18
... on the projection TV, do not connect MONITOR OUT on the VCR intended for recording) AUDIO R AUDIO L VIDEO LINE IN OUT IN VIDEO AUDIO-L AUDIO-R VMC-810S/820S 2 (not supplied) (Rear of projectionTV) VIDEO IN VCR MONITOR OUT Indicates direction of signal LINE IN OUT 14 Doing so will cause program interference and other viewing... by the primary VCR to the VCR LINE INPUT (see right). Installing and Connecting the Projection TV (continued) Connecting two VCRs for tape Disconnect all power sources before making any connections.
... on the projection TV, do not connect MONITOR OUT on the VCR intended for recording) AUDIO R AUDIO L VIDEO LINE IN OUT IN VIDEO AUDIO-L AUDIO-R VMC-810S/820S 2 (not supplied) (Rear of projectionTV) VIDEO IN VCR MONITOR OUT Indicates direction of signal LINE IN OUT 14 Doing so will cause program interference and other viewing... by the primary VCR to the VCR LINE INPUT (see right). Installing and Connecting the Projection TV (continued) Connecting two VCRs for tape Disconnect all power sources before making any connections.
Operating Instructions
Page 19
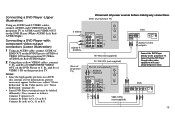
... Connect the DVD Player directly to Y. Disconnect all power sources before making any connections. (Rear of projection TV) AUX S VIDEO IN VIDEO 1 VIDEO 3 S VIDEO OUT MONITOR AUDIO (VAR/FIX) VIDEO Y VIDEO L (MONO) AUDIO R AUDIO-R AUDIO-L PB PR COMPONENT L (MONO) AUDIO R TO CONVERTER VHF/UHF RK-74A (not supplied) (Rear of VIDEO 3 IN on the DVD Player (White-AUDIO Left, RedAUDIO Right...
... Connect the DVD Player directly to Y. Disconnect all power sources before making any connections. (Rear of projection TV) AUX S VIDEO IN VIDEO 1 VIDEO 3 S VIDEO OUT MONITOR AUDIO (VAR/FIX) VIDEO Y VIDEO L (MONO) AUDIO R AUDIO-R AUDIO-L PB PR COMPONENT L (MONO) AUDIO R TO CONVERTER VHF/UHF RK-74A (not supplied) (Rear of VIDEO 3 IN on the DVD Player (White-AUDIO Left, RedAUDIO Right...
Operating Instructions
Page 20
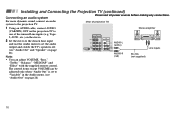
...Installing and Connecting the Projection TV (continued) Connecting an audio system Disconnect all power sources before making any connections. For more dynamic sound, connect an audio system to the projection TV. (Rear of projection TV) 1 Using an AUDIO cable, connect AUDIO (VAR/FIX...Out" and "Speaker" on page 28) Note: CONTROL S OUT IN VIDEO 1 VIDEO 3 S VIDEO OUT MONITOR AUDIO (VAR/FIX) VIDEO Y VIDEO L (MONO) AUDIO R L PB (MONO) AUDIO PR R COMPONENT AUDIO-L (white) AUDIO-R (red) HRD Line inputs RK-74A (not supplied) • You can be adjusted only when "Audio Out" is set...
...Installing and Connecting the Projection TV (continued) Connecting an audio system Disconnect all power sources before making any connections. For more dynamic sound, connect an audio system to the projection TV. (Rear of projection TV) 1 Using an AUDIO cable, connect AUDIO (VAR/FIX...Out" and "Speaker" on page 28) Note: CONTROL S OUT IN VIDEO 1 VIDEO 3 S VIDEO OUT MONITOR AUDIO (VAR/FIX) VIDEO Y VIDEO L (MONO) AUDIO R L PB (MONO) AUDIO PR R COMPONENT AUDIO-L (white) AUDIO-R (red) HRD Line inputs RK-74A (not supplied) • You can be adjusted only when "Audio Out" is set...
Operating Instructions
Page 21
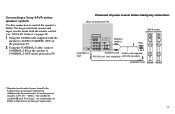
...series speaker system IN VIDEO 1 VIDEO 3 S VIDEO CONTROL S OUT VIDEO L (MONO) AUDIO R OUT MONITOR AUDIO (VAR/FIX) Y VIDEO L PB (MONO) AUDIO PR R COMPONENT AUDIO-L (white) 1 1 IN L 1 IN R CONTROL S AUDIO-R (red) Audio cord supplied OUT RK-G34, etc. (not supplied) with the speaker to... 1 Using the AUDIO cable supplied with the speakers 2 CONTROL S IN * Manufactured under Canadian patent number 1,037,877. Disconnect all power sources before making any connections. (Rear of Dolby Laboratories Licensing Corporation. 17 Connecting a Sony SAVA series speaker system Use ...
...series speaker system IN VIDEO 1 VIDEO 3 S VIDEO CONTROL S OUT VIDEO L (MONO) AUDIO R OUT MONITOR AUDIO (VAR/FIX) Y VIDEO L PB (MONO) AUDIO PR R COMPONENT AUDIO-L (white) 1 1 IN L 1 IN R CONTROL S AUDIO-R (red) Audio cord supplied OUT RK-G34, etc. (not supplied) with the speaker to... 1 Using the AUDIO cable supplied with the speakers 2 CONTROL S IN * Manufactured under Canadian patent number 1,037,877. Disconnect all power sources before making any connections. (Rear of Dolby Laboratories Licensing Corporation. 17 Connecting a Sony SAVA series speaker system Use ...
Operating Instructions
Page 22
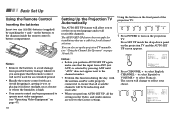
... to reflect your choice. - Press SET UP inside the remote control's battery compartment. CHANNEL + POWER TIMER/STAND BY 1 Press POWER to turn on the front panel of the projection TV: - + FLASH FOCUS TV/VIDEO VOLUME - The screen will not be broadcasting and receivable. • When you to set the.... Using the buttons on the projection TV. Basic Set Up Using the Remote Control Inserting the batteries Insert two size AA (R6) batteries (supplied) by pressing ANT until "AUX" does not appear next to the channel number. • Perform this function during the day, with the ...
... to reflect your choice. - Press SET UP inside the remote control's battery compartment. CHANNEL + POWER TIMER/STAND BY 1 Press POWER to turn on the front panel of the projection TV: - + FLASH FOCUS TV/VIDEO VOLUME - The screen will not be broadcasting and receivable. • When you to set the.... Using the buttons on the projection TV. Basic Set Up Using the Remote Control Inserting the batteries Insert two size AA (R6) batteries (supplied) by pressing ANT until "AUX" does not appear next to the channel number. • Perform this function during the day, with the ...
Operating Instructions
Page 52
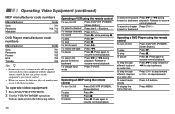
...remote control To turn On/Off Press DVD/VTR (POWER). [Green Button] To select a channel Press the 0 - 9 buttons. To display the menu (Set up) Press MENU. 48 Operating Video Equipment (continued) MDP manufacturer code numbers Manufacturer Sony Panasonic Mistubishi Code 701 704, 710 702 DVD ...may not be able to operate your non-Sony video equipment with the supplied remote control. Operating a VCR using the remote control To turn On/Off Press DVD/VTR (POWER). [Green Button] To play Press (. To step through different tracks of a video disc Press CH + to step forward or ...
...remote control To turn On/Off Press DVD/VTR (POWER). [Green Button] To select a channel Press the 0 - 9 buttons. To display the menu (Set up) Press MENU. 48 Operating Video Equipment (continued) MDP manufacturer code numbers Manufacturer Sony Panasonic Mistubishi Code 701 704, 710 702 DVD ...may not be able to operate your non-Sony video equipment with the supplied remote control. Operating a VCR using the remote control To turn On/Off Press DVD/VTR (POWER). [Green Button] To play Press (. To step through different tracks of a video disc Press CH + to step forward or ...
Operating Instructions
Page 53
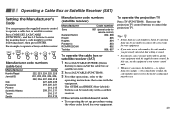
... previously entered at that come to the correct code for example - For example, to operate a Sony satellite receiver: FUNCTION CODE SET SAT/CABLE ENTER 8 0 1 Manufacturer code numbers (cable box) ...803 802 806, 807 To operate the cable box or satellite receiver (SAT) 1 Press SAT/CABLE (POWER) [Green Button] to turn on/off the cable box or satellite receiver. 2 Press SAT/CABLE (FUNCTION... instructions that setting is taken, the code numbers may not be used only with the supplied remote control. In this case, use the projection TV control buttons to control the projection...
... previously entered at that come to the correct code for example - For example, to operate a Sony satellite receiver: FUNCTION CODE SET SAT/CABLE ENTER 8 0 1 Manufacturer code numbers (cable box) ...803 802 806, 807 To operate the cable box or satellite receiver (SAT) 1 Press SAT/CABLE (POWER) [Green Button] to turn on/off the cable box or satellite receiver. 2 Press SAT/CABLE (FUNCTION... instructions that setting is taken, the code numbers may not be used only with the supplied remote control. In this case, use the projection TV control buttons to control the projection...
Operating Instructions
Page 55
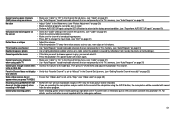
...are recording the main picture and you cannot select it. • Press the projection TV's power button off and on again. Cannot play shooting games • Some shooting games which involve ...Program" on page 31) No color • Adjust "Color" in the Video menu. (see "Picture Adjustment" on page 26) • Black and white programs cannot be seen in color. • Perform AUTO SET ...broadcasting programs. • Press ANT to change the input mode. (see the instruction manual supplied with the video game software. 51 For details, see "ANT" on page 35) appear when you want ...
...are recording the main picture and you cannot select it. • Press the projection TV's power button off and on again. Cannot play shooting games • Some shooting games which involve ...Program" on page 31) No color • Adjust "Color" in the Video menu. (see "Picture Adjustment" on page 26) • Black and white programs cannot be seen in color. • Perform AUTO SET ...broadcasting programs. • Press ANT to change the input mode. (see the instruction manual supplied with the video game software. 51 For details, see "ANT" on page 35) appear when you want ...
Operating Instructions
Page 56
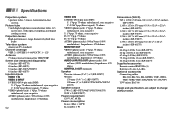
... (measured diagonally) 43 inches (KP-43T75) 48 inches (KP-48S75) 53 inches (KP-53S75/53N77) 61 inches (KP-61S75) Inputs/outputs VIDEO 1 IN VIDEO 2 INPUT S VIDEO IN (4-pin mini DIN): Y:...KP-53N77) Woofer: 130 mm (5 1/8") × 2 (KP-53N77) 100 mm (4") × 2 (KP-43T75/48S75/53S75/ 61S75) Speaker output 17W × 2 (KP-43T75/48S75/53S75/61S75) 20 W × 2 (KP-53N77) Power requirement 120 V AC, 60 Hz Power...KP-61S75) Mass 64.6 kg (142 lbs 5 oz) (KP-43T75) 64 kg (141 lbs 2 oz) (KP-48S75) 67.6 kg (149 lbs) (KP-53S75) 75.2 kg (165 lbs 13 oz) (KP-53N77) 84.6 kg (186 lbs 8 oz) (KP-61S75) Supplied...
... (measured diagonally) 43 inches (KP-43T75) 48 inches (KP-48S75) 53 inches (KP-53S75/53N77) 61 inches (KP-61S75) Inputs/outputs VIDEO 1 IN VIDEO 2 INPUT S VIDEO IN (4-pin mini DIN): Y:...KP-53N77) Woofer: 130 mm (5 1/8") × 2 (KP-53N77) 100 mm (4") × 2 (KP-43T75/48S75/53S75/ 61S75) Speaker output 17W × 2 (KP-43T75/48S75/53S75/61S75) 20 W × 2 (KP-53N77) Power requirement 120 V AC, 60 Hz Power...KP-61S75) Mass 64.6 kg (142 lbs 5 oz) (KP-43T75) 64 kg (141 lbs 2 oz) (KP-48S75) 67.6 kg (149 lbs) (KP-53S75) 75.2 kg (165 lbs 13 oz) (KP-53N77) 84.6 kg (186 lbs 8 oz) (KP-61S75) Supplied...

