
Limited Warranty (U.S. Only)
Page 1
... charges. 2. REPAIR OR REPLACEMENT AS PROVIDED UNDER THIS WARRANTY IS THE EXCLUSIVE REMEDY OF THE CONSUMER. 4-557-168-03 ® LIMITED WARRANTY HDTV Color TV XBR Projection TV Sony Electronics Inc. ("Sony") warrants this Product is determined to be presented to obtain warranty service. After the Warranty Period, you . two (2) years). This warranty does not cover customer instruction, installation, set up adjustments or signal reception problems. This...
... charges. 2. REPAIR OR REPLACEMENT AS PROVIDED UNDER THIS WARRANTY IS THE EXCLUSIVE REMEDY OF THE CONSUMER. 4-557-168-03 ® LIMITED WARRANTY HDTV Color TV XBR Projection TV Sony Electronics Inc. ("Sony") warrants this Product is determined to be presented to obtain warranty service. After the Warranty Period, you . two (2) years). This warranty does not cover customer instruction, installation, set up adjustments or signal reception problems. This...

Operating Instructions
Page 1
4-077-171-11(1) Color Rear Video Projector Operating Instructions KP-43T75 KP-48S75 KP-53S75 KP-53N77 KP-61S75 © 2000 Sony Corporation
4-077-171-11(1) Color Rear Video Projector Operating Instructions KP-43T75 KP-48S75 KP-53S75 KP-53N77 KP-61S75 © 2000 Sony Corporation
Operating Instructions
Page 2
..., which the receiver is connected. • Consult the dealer or an experienced radio/TV technician for help. NO USER-SERVICEABLE PARTS INSIDE. This symbol is for the remote control RM-Y906 MODELS: KP-43T75, KP-48S75, KP-53S75, KP-53N77, KP-61S75 Please keep the brightness and contrast functions at a high brightness or contrast setting, the image can be determined by turning the equipment off and on Caption Vision This television receiver provides display of television closed captioning in particular...
..., which the receiver is connected. • Consult the dealer or an experienced radio/TV technician for help. NO USER-SERVICEABLE PARTS INSIDE. This symbol is for the remote control RM-Y906 MODELS: KP-43T75, KP-48S75, KP-53S75, KP-53N77, KP-61S75 Please keep the brightness and contrast functions at a high brightness or contrast setting, the image can be determined by turning the equipment off and on Caption Vision This television receiver provides display of television closed captioning in particular...
Operating Instructions
Page 4
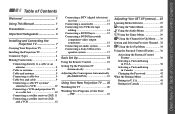
...SAT) 11 Connecting a satellite receiver (SAT) and a VCR 12 Connecting a DTV (digital television) receiver 13 Connecting a camcorder 13 Connecting two VCRs for tape editing 14 Connecting a DVD Player 15 Connecting a DVD Player with component video output connectors 15 Connecting an audio system 16 Connecting a Sony SAVA series speaker system 17 Basic Set Up 18 Using the Remote Control 18 Setting Up the Projection TV Automatically 18 Adjusting the Convergence Automatically (FLASH FOCUS 19 Using Your New Projection TV .... 20 Watching the TV 20 Watching Two Programs at One Time -
...SAT) 11 Connecting a satellite receiver (SAT) and a VCR 12 Connecting a DTV (digital television) receiver 13 Connecting a camcorder 13 Connecting two VCRs for tape editing 14 Connecting a DVD Player 15 Connecting a DVD Player with component video output connectors 15 Connecting an audio system 16 Connecting a Sony SAVA series speaker system 17 Basic Set Up 18 Using the Remote Control 18 Setting Up the Projection TV Automatically 18 Adjusting the Convergence Automatically (FLASH FOCUS 19 Using Your New Projection TV .... 20 Watching the TV 20 Watching Two Programs at One Time -
Operating Instructions
Page 5
... new projection TV. 1 Installing and Connecting the Projection TV This section guides you for the remote control. Thank you through your new projection TV. Using This Manual Operating Video Equipment 47 Setting the Manufacturer's Code 47 Operating a Cable Box or Satellite Receiver (SAT 49 Setting the Manufacturer's Code 49 Troubleshooting 50 Specifications 52 Index 53 Owner's Record The model and serial numbers are written for purchasing the Sony Color Rear Video Projection TV. Similar controls may be found on the TV box (white label). Record these numbers in...
... new projection TV. 1 Installing and Connecting the Projection TV This section guides you for the remote control. Thank you through your new projection TV. Using This Manual Operating Video Equipment 47 Setting the Manufacturer's Code 47 Operating a Cable Box or Satellite Receiver (SAT 49 Setting the Manufacturer's Code 49 Troubleshooting 50 Specifications 52 Index 53 Owner's Record The model and serial numbers are written for purchasing the Sony Color Rear Video Projection TV. Similar controls may be found on the TV box (white label). Record these numbers in...
Operating Instructions
Page 7
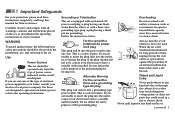
... these instructions completely, and keep this can result in fire or electric shock. Use Power Sources This set should be operated only from the type of the polarized plug by forcing it in the installation, use, and servicing of an internal malfunction that could create a fire hazard. Do not defeat the safety purpose of power source indicated on the serial/ model...
... these instructions completely, and keep this can result in fire or electric shock. Use Power Sources This set should be operated only from the type of the polarized plug by forcing it in the installation, use, and servicing of an internal malfunction that could create a fire hazard. Do not defeat the safety purpose of power source indicated on the serial/ model...
Operating Instructions
Page 9
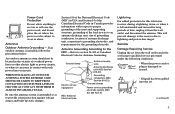
... for this television receiver during a lightning storm, or when it from the wall outlet and refer servicing to lightning and power-line surges. Refer to the NEC - Power-Cord Protection Do not allow anything to rest on or roll over the power cord, and do not place the set where the power cord is installed, follow the precautions below. WHEN INSTALLING AN OUTDOOR ANTENNA SYSTEM...
... for this television receiver during a lightning storm, or when it from the wall outlet and refer servicing to lightning and power-line surges. Refer to the NEC - Power-Cord Protection Do not allow anything to rest on or roll over the power cord, and do not place the set where the power cord is installed, follow the precautions below. WHEN INSTALLING AN OUTDOOR ANTENNA SYSTEM...
Operating Instructions
Page 13
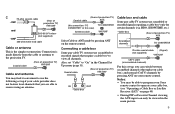
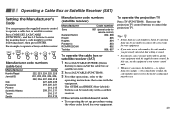
... Cable and antenna You may be able to program your Sony remote control to use the following set up , you are able to receive using an antenna. (Rear of projection TV) Coaxial cable AUX (No connection "TO CONVERTER" in this set "Cable" to "On" in the main picture. 9 Coaxial cable (Rear of projection TV) AUX Scrambled channels TO CONVERTER 75-ohm coaxial cable (Signal) (not supplied) VHF/UHF CATV cable (unscrambled channels) For this case) Antenna cable TO CONVERTER VHF/UHF Select Cable or ANT mode...
... Cable and antenna You may be able to program your Sony remote control to use the following set up , you are able to receive using an antenna. (Rear of projection TV) Coaxial cable AUX (No connection "TO CONVERTER" in this set "Cable" to "On" in the main picture. 9 Coaxial cable (Rear of projection TV) AUX Scrambled channels TO CONVERTER 75-ohm coaxial cable (Signal) (not supplied) VHF/UHF CATV cable (unscrambled channels) For this case) Antenna cable TO CONVERTER VHF/UHF Select Cable or ANT mode...
Operating Instructions
Page 17
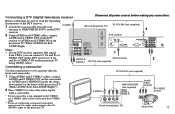
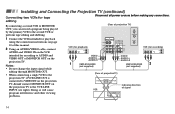
... supplied) TEL LINE Connecting a camcorder Use this connection to view a picture directly from your camcorder. 1 Using AUDIO and S VIDEO* cables, connect AUDIO and S VIDEO OUT on the camcorder to AUDIO and S VIDEO IN inside the dropdown panel on the front of the projection TV (White-AUDIO Left, Red-AUDIO Right**). 2 Press VIDEO 2 to select the video inputs from a camcorder. * If your DTV receiver supports 480i signal from the roof antenna to VHF/UHF IN (DTV) on the DTV receiver. 2 Using AUDIO and S VIDEO cables, connect AUDIO and S VIDEO OUT...
... supplied) TEL LINE Connecting a camcorder Use this connection to view a picture directly from your camcorder. 1 Using AUDIO and S VIDEO* cables, connect AUDIO and S VIDEO OUT on the camcorder to AUDIO and S VIDEO IN inside the dropdown panel on the front of the projection TV (White-AUDIO Left, Red-AUDIO Right**). 2 Press VIDEO 2 to select the video inputs from a camcorder. * If your DTV receiver supports 480i signal from the roof antenna to VHF/UHF IN (DTV) on the DTV receiver. 2 Using AUDIO and S VIDEO cables, connect AUDIO and S VIDEO OUT...
Operating Instructions
Page 18
... CONVERTER 1 Connect the VCR intended for playback using the connection instructions on page 10 of this manual. 2 Using an AUDIO/VIDEO cable, connect AUDIO and VIDEO IN on the VCR intended for recording) AUDIO R AUDIO L VIDEO LINE IN OUT IN VIDEO AUDIO-L AUDIO-R VMC-810S/820S 2 (not supplied) (Rear of projectionTV) VIDEO IN VCR MONITOR OUT Indicates direction of MONITOR OUT on the projection TV to the VCR LINE INPUT (see right). Doing so will cause program interference and other viewing problems...
... CONVERTER 1 Connect the VCR intended for playback using the connection instructions on page 10 of this manual. 2 Using an AUDIO/VIDEO cable, connect AUDIO and VIDEO IN on the VCR intended for recording) AUDIO R AUDIO L VIDEO LINE IN OUT IN VIDEO AUDIO-L AUDIO-R VMC-810S/820S 2 (not supplied) (Rear of projectionTV) VIDEO IN VCR MONITOR OUT Indicates direction of MONITOR OUT on the projection TV to the VCR LINE INPUT (see right). Doing so will cause program interference and other viewing problems...
Operating Instructions
Page 19
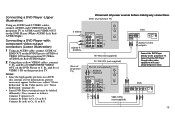
... picture noise may be labeled differently. Disconnect all power sources before making any connections. (Rear of projection TV) AUX S VIDEO IN VIDEO 1 VIDEO 3 S VIDEO OUT MONITOR AUDIO (VAR/FIX) VIDEO Y VIDEO L (MONO) AUDIO R AUDIO-R AUDIO-L PB PR COMPONENT L (MONO) AUDIO R TO CONVERTER VHF/UHF RK-74A (not supplied) (Rear of VIDEO 3 IN on the DVD Player to Y, PB, and PR of projection TV) YC-15V/30V (not supplied) RK-74A (not supplied) AUX AUDIO-L AUDIO-R TO CONVERTER DVD LINE OUT S VIDEO OUT R-AUDIO 1-L VIDEO S-LINK DIGITAL OUT OPTICAL COAXIAL Audio/S video outputs...
... picture noise may be labeled differently. Disconnect all power sources before making any connections. (Rear of projection TV) AUX S VIDEO IN VIDEO 1 VIDEO 3 S VIDEO OUT MONITOR AUDIO (VAR/FIX) VIDEO Y VIDEO L (MONO) AUDIO R AUDIO-R AUDIO-L PB PR COMPONENT L (MONO) AUDIO R TO CONVERTER VHF/UHF RK-74A (not supplied) (Rear of VIDEO 3 IN on the DVD Player to Y, PB, and PR of projection TV) YC-15V/30V (not supplied) RK-74A (not supplied) AUX AUDIO-L AUDIO-R TO CONVERTER DVD LINE OUT S VIDEO OUT R-AUDIO 1-L VIDEO S-LINK DIGITAL OUT OPTICAL COAXIAL Audio/S video outputs...
Operating Instructions
Page 20
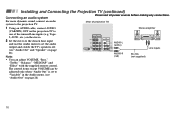
... projection TV) 1 Using an AUDIO cable, connect AUDIO (VAR/FIX) OUT on the projection TV to set to "Variable" in the Audio menu. (see "Audio Out" and "Speaker" on page 28) 16 For more dynamic sound, connect an audio system to the projection TV. (Rear of the unused Line inputs (e.g. The control items except VOLUME can be adjusted only when "Audio Out" is set the audio output and switch the TV's speakers off. (see "Audio Out" on page 28) Note: CONTROL S OUT IN VIDEO 1 VIDEO 3 S VIDEO OUT MONITOR AUDIO (VAR/FIX) VIDEO Y VIDEO...
... projection TV) 1 Using an AUDIO cable, connect AUDIO (VAR/FIX) OUT on the projection TV to set to "Variable" in the Audio menu. (see "Audio Out" and "Speaker" on page 28) 16 For more dynamic sound, connect an audio system to the projection TV. (Rear of the unused Line inputs (e.g. The control items except VOLUME can be adjusted only when "Audio Out" is set the audio output and switch the TV's speakers off. (see "Audio Out" on page 28) Note: CONTROL S OUT IN VIDEO 1 VIDEO 3 S VIDEO OUT MONITOR AUDIO (VAR/FIX) VIDEO Y VIDEO...
Operating Instructions
Page 21
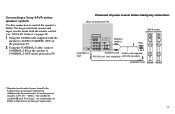
... IN VIDEO 1 VIDEO 3 S VIDEO CONTROL S OUT VIDEO L (MONO) AUDIO R OUT MONITOR AUDIO (VAR/FIX) Y VIDEO L PB (MONO) AUDIO PR R COMPONENT AUDIO-L (white) 1 1 IN L 1 IN R CONTROL S AUDIO-R (red) Audio cord supplied OUT RK-G34, etc. (not supplied) with the speaker to AUDIO (VAR/FIX) OUT on the projection TV. 2 Using the CONTROL S cable, connect CONTROL S IN on the speaker to CONTROL S OUT on the projection TV. Connecting a Sony SAVA series speaker system Use this connection to control the speaker's Dolby* Pro Logic surround system and super woofer mode with the remote control...
... IN VIDEO 1 VIDEO 3 S VIDEO CONTROL S OUT VIDEO L (MONO) AUDIO R OUT MONITOR AUDIO (VAR/FIX) Y VIDEO L PB (MONO) AUDIO PR R COMPONENT AUDIO-L (white) 1 1 IN L 1 IN R CONTROL S AUDIO-R (red) Audio cord supplied OUT RK-G34, etc. (not supplied) with the speaker to AUDIO (VAR/FIX) OUT on the projection TV. 2 Using the CONTROL S cable, connect CONTROL S IN on the speaker to CONTROL S OUT on the projection TV. Connecting a Sony SAVA series speaker system Use this connection to control the speaker's Dolby* Pro Logic surround system and super woofer mode with the remote control...
Operating Instructions
Page 22
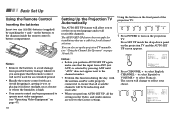
... menu" on the front panel of the projection TV: - + FLASH FOCUS TV/VIDEO VOLUME - Using the buttons on pages 30 and 31) Notes: • Before you perform AUTO SET UP again, make sure that the input from possible battery leakage whenever you to set the on the projection TV. Press [ SET UP ] to exit. 2 Press CHANNEL + to reflect your choice. - VOLUME + - CHANNEL + POWER TIMER/STAND BY 1 Press POWER to turn on -screen language and set up the projection TV manually. (see "Operating Video...
... menu" on the front panel of the projection TV: - + FLASH FOCUS TV/VIDEO VOLUME - Using the buttons on pages 30 and 31) Notes: • Before you perform AUTO SET UP again, make sure that the input from possible battery leakage whenever you to set the on the projection TV. Press [ SET UP ] to exit. 2 Press CHANNEL + to reflect your choice. - VOLUME + - CHANNEL + POWER TIMER/STAND BY 1 Press POWER to turn on -screen language and set up the projection TV manually. (see "Operating Video...

Operating Instructions
Page 23
Press SET UP inside the drop-down panel on the screen in three layers (red, green and blue). Before you use your projection TV, be displayed on page 35. FLASH FOCUS Press FLASH FOCUS. The adjustment is displayed. While scanning, the received channel will be sure to preset channels automatically. - Yes : [CH+] No : [CH-] To perform AUTO SET UP again SET UP MENU FLASH FOCUS TV/VIDEO 4 Press CHANNEL + to adjust the convergence. When all the receivable channels are stored, the lowest numbered channel is completed when...
Press SET UP inside the drop-down panel on the screen in three layers (red, green and blue). Before you use your projection TV, be displayed on page 35. FLASH FOCUS Press FLASH FOCUS. The adjustment is displayed. While scanning, the received channel will be sure to preset channels automatically. - Yes : [CH+] No : [CH-] To perform AUTO SET UP again SET UP MENU FLASH FOCUS TV/VIDEO 4 Press CHANNEL + to adjust the convergence. When all the receivable channels are stored, the lowest numbered channel is completed when...
Operating Instructions
Page 53
... the factory setting and must be able to operate a cable box or satellite receiver. The GUIDE and INDEX (blue-labeled) buttons can program the supplied remote control to operate your equipment with the supplied remote control. if too much time is listed, try entering them , for your equipment. Operating a Cable Box or Satellite Receiver (SAT) Setting the Manufacturer's Code You can be used only with the equipment. For example, to operate a Sony satellite receiver: FUNCTION CODE SET SAT/CABLE ENTER 8 0 1 Manufacturer code numbers (cable box) Manufacturer Code...
... the factory setting and must be able to operate a cable box or satellite receiver. The GUIDE and INDEX (blue-labeled) buttons can program the supplied remote control to operate your equipment with the supplied remote control. if too much time is listed, try entering them , for your equipment. Operating a Cable Box or Satellite Receiver (SAT) Setting the Manufacturer's Code You can be used only with the equipment. For example, to operate a Sony satellite receiver: FUNCTION CODE SET SAT/CABLE ENTER 8 0 1 Manufacturer code numbers (cable box) Manufacturer Code...
Operating Instructions
Page 54
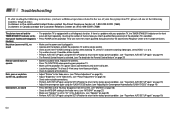
... number of the projection TV's condition. Replace the batteries. • Press TV (FUNCTION) when operating your projection TV. • Make sure the projection TV's power cord is plugged in the Video menu. (see "Picture Adjustment" on page 26) • Check antenna/cable connections. • Perform AUTO SET UP again using the SET UP button to return to the factory preset condition. (see "To perform AUTO SET UP again" on page 19) • Adjust the convergence again using the FLASH FOCUS button. (see "Adjusting the Convergence Automatically (FLASH FOCUS...
... number of the projection TV's condition. Replace the batteries. • Press TV (FUNCTION) when operating your projection TV. • Make sure the projection TV's power cord is plugged in the Video menu. (see "Picture Adjustment" on page 26) • Check antenna/cable connections. • Perform AUTO SET UP again using the SET UP button to return to the factory preset condition. (see "To perform AUTO SET UP again" on page 19) • Adjust the convergence again using the FLASH FOCUS button. (see "Adjusting the Convergence Automatically (FLASH FOCUS...
Operating Instructions
Page 55
... picture using the AUDIO button, the main picture will be recorded with the video game software. 51 For details, see the instruction manual supplied with sound recording in PIP mode from the other program. TV is fixed to one channel • Use "Auto Program" to add receivable channels that are not presently in TV's memory. (see "Auto Program" on page 31) Double images or ghosts • Use a highly directional outdoor antenna or a cable (when the problem is "On" in the Channel Set Up menu...
... picture using the AUDIO button, the main picture will be recorded with the video game software. 51 For details, see the instruction manual supplied with sound recording in PIP mode from the other program. TV is fixed to one channel • Use "Auto Program" to add receivable channels that are not presently in TV's memory. (see "Auto Program" on page 31) Double images or ghosts • Use a highly directional outdoor antenna or a cable (when the problem is "On" in the Channel Set Up menu...
Operating Instructions
Page 56
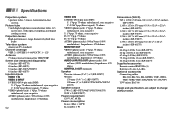
Specifications Projection system 3 picture tubes, 3 lenses, horizontal in-line system Picture tube 7-inch high-brightness monochrome tubes (6.3 raster size), with optical coupling and liquid cooling system Projection lenses High performance, large diameter hybrid lens F1.05 Television system American TV standard Channel coverage VHF: 2-13/UHF: 14 -69/CATV: 1 - 125 Antenna 75 ohm external terminal for VHF/UHF Screen size (measured diagonally) 43 inches (KP-43T75) 48 inches (KP-48S75) 53 inches (KP-53S75/53N77) 61 inches (KP-61S75) Inputs/outputs VIDEO 1 IN VIDEO 2 INPUT S VIDEO IN (4-pin mini ...
Specifications Projection system 3 picture tubes, 3 lenses, horizontal in-line system Picture tube 7-inch high-brightness monochrome tubes (6.3 raster size), with optical coupling and liquid cooling system Projection lenses High performance, large diameter hybrid lens F1.05 Television system American TV standard Channel coverage VHF: 2-13/UHF: 14 -69/CATV: 1 - 125 Antenna 75 ohm external terminal for VHF/UHF Screen size (measured diagonally) 43 inches (KP-43T75) 48 inches (KP-48S75) 53 inches (KP-53S75/53N77) 61 inches (KP-61S75) Inputs/outputs VIDEO 1 IN VIDEO 2 INPUT S VIDEO IN (4-pin mini ...
Operating Instructions
Page 57
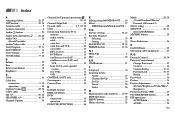
... Connecting Projection TV to antenna 8 audio system 16 cable 8 cable box 9 cable box and VCR 10 camcorder 13 DTV receiver 13 DVD Player 15 satellite receiver (SAT 11 satellite receiver (SAT) and VCR 12 Sony SAVA series speaker system 17 two VCRs 14 VCR 10 CONTROL S OUT jack 8 Convergence 19 Current Time 29 D Daylight Savings 29 DISPLAY button 21 DVD connection 15 operation 48 DVD/VTR (FUNCTION 48 E Editing using MONITOR OUT ....... 14 Effect 27 (BBE/Surround/Simulated/Off ) F, G Factory settings...
... Connecting Projection TV to antenna 8 audio system 16 cable 8 cable box 9 cable box and VCR 10 camcorder 13 DTV receiver 13 DVD Player 15 satellite receiver (SAT 11 satellite receiver (SAT) and VCR 12 Sony SAVA series speaker system 17 two VCRs 14 VCR 10 CONTROL S OUT jack 8 Convergence 19 Current Time 29 D Daylight Savings 29 DISPLAY button 21 DVD connection 15 operation 48 DVD/VTR (FUNCTION 48 E Editing using MONITOR OUT ....... 14 Effect 27 (BBE/Surround/Simulated/Off ) F, G Factory settings...


