Limited Warranty (U.S. Only)
Page 1
... initial one (1) year period for one (1) year (color picture tube - LABOR: For a period of one (1) year from your convenience, Sony Electronics Inc. 4-557-168-03 ® LIMITED WARRANTY HDTV Color TV XBR Projection TV Sony Electronics Inc. ("Sony") warrants this Product is within 90 days of the... Product freight prepaid, in exchange for defective parts for all accessories are for 19" (measured diagonally), or larger screen size through a Sony authorized service facility. To obtain warranty service, you must pay for a period of purchase, if this Product (including any...
... initial one (1) year period for one (1) year (color picture tube - LABOR: For a period of one (1) year from your convenience, Sony Electronics Inc. 4-557-168-03 ® LIMITED WARRANTY HDTV Color TV XBR Projection TV Sony Electronics Inc. ("Sony") warrants this Product is within 90 days of the... Product freight prepaid, in exchange for defective parts for all accessories are for 19" (measured diagonally), or larger screen size through a Sony authorized service facility. To obtain warranty service, you must pay for a period of purchase, if this Product (including any...
Operating Instructions
Page 2
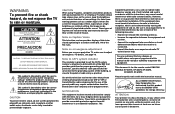
...to the presence of important operating and maintenance (servicing) instructions in a particular installation. As an ENERGY STAR Partner, Sony Corporation has determined that any changes or modifications not expressly approved in accordance with the instructions, may be of sufficient ...KP-48S75, KP-53S75, KP-53N77, KP-61S75 Please keep the brightness and contrast functions at a high brightness or contrast setting, the image can be fully inserted to prevent blade exposure. Use of this television receiver for other outlet unless the blades can be permanently imprinted onto the screen...
...to the presence of important operating and maintenance (servicing) instructions in a particular installation. As an ENERGY STAR Partner, Sony Corporation has determined that any changes or modifications not expressly approved in accordance with the instructions, may be of sufficient ...KP-48S75, KP-53S75, KP-53N77, KP-61S75 Please keep the brightness and contrast functions at a high brightness or contrast setting, the image can be fully inserted to prevent blade exposure. Use of this television receiver for other outlet unless the blades can be permanently imprinted onto the screen...
Operating Instructions
Page 5
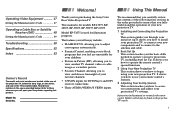
Thank you how to access on-screen menus and adjust your projection TV's settings. Model KP-53S75 is for purchasing the Sony Color Rear Video Projection TV. It shows you how to begin using your remote control's features. 4 Adjusting Your Set Up (menus) This section teaches you for models KP-43T75, KP48S75, KP-53S75, KP-53N77, KP-61S75. Record these numbers...
Thank you how to access on-screen menus and adjust your projection TV's settings. Model KP-53S75 is for purchasing the Sony Color Rear Video Projection TV. It shows you how to begin using your remote control's features. 4 Adjusting Your Set Up (menus) This section teaches you for models KP-43T75, KP48S75, KP-53S75, KP-53N77, KP-61S75. Record these numbers...
Operating Instructions
Page 6
... any liquid or solid object should fall inside of the projection TV with solution of a reflective material. 2 Never use spot lighting directed down from the screen, wipe it may be necessary to use strong solvents such as thinner or benzine for several days, disconnect the power by qualified service personnel before... the cabinet, unplug the projection TV immediately and have it checked by pulling the plug itself. If you will not be blurred or show poor color. Stubborn stains may be removed with a cloth slightly dampened with a dry soft cloth.
... any liquid or solid object should fall inside of the projection TV with solution of a reflective material. 2 Never use spot lighting directed down from the screen, wipe it may be necessary to use strong solvents such as thinner or benzine for several days, disconnect the power by qualified service personnel before... the cabinet, unplug the projection TV immediately and have it checked by pulling the plug itself. If you will not be blurred or show poor color. Stubborn stains may be removed with a cloth slightly dampened with a dry soft cloth.
Operating Instructions
Page 22
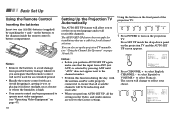
... and set up the projection TV manually. (see "Using the Channel Set Up menu" on the projection TV and the AUTO SET UP screen appears. Notes: • Remove the batteries to reflect your choice. - to select Español or VOLUME + to the diagram inside the drop-down ...31) Notes: • Before you perform AUTO SET UP again, make sure that the remote control will not be programmed to operate most video equipment. (see "Operating Video Equipment" on page 47) 18 Setting Up the Projection TV Automatically The AUTO SET UP feature will change to avoid damage from ANT (not...
... and set up the projection TV manually. (see "Using the Channel Set Up menu" on the projection TV and the AUTO SET UP screen appears. Notes: • Remove the batteries to reflect your choice. - to select Español or VOLUME + to the diagram inside the drop-down ...31) Notes: • Before you perform AUTO SET UP again, make sure that the remote control will not be programmed to operate most video equipment. (see "Operating Video Equipment" on page 47) 18 Setting Up the Projection TV Automatically The AUTO SET UP feature will change to avoid damage from ANT (not...

Operating Instructions
Page 23
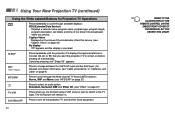
...• You can also perform FLASH FOCUS using the Set Up menu on the sub screen. If they do not converge, the color is working. 19 FLASH FOCUS Press FLASH FOCUS. to work. The cross pattern appears ... pattern becomes white. The adjustment is displayed. Press SET UP inside the drop-down panel on the screen in three layers (red, green and blue). Before you to exit. CHANNEL + Auto Program "Auto... : [CH-] To perform AUTO SET UP again SET UP MENU FLASH FOCUS TV/VIDEO 4 Press CHANNEL + to Auto Program ? Tips z • It is recommended to adjust the convergence.
...• You can also perform FLASH FOCUS using the Set Up menu on the sub screen. If they do not converge, the color is working. 19 FLASH FOCUS Press FLASH FOCUS. to work. The cross pattern appears ... pattern becomes white. The adjustment is displayed. Press SET UP inside the drop-down panel on the screen in three layers (red, green and blue). Before you to exit. CHANNEL + Auto Program "Auto... : [CH-] To perform AUTO SET UP again SET UP MENU FLASH FOCUS TV/VIDEO 4 Press CHANNEL + to Auto Program ? Tips z • It is recommended to adjust the convergence.

Operating Instructions
Page 24
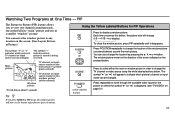
... PICTURE MODE Press PICTURE MODE repeatedly to directly choose one of five different video modes that best suits the program you can also perform the "Picture Adjustment" (such as "Brightness," "Color," etc.) to suit your remote control. Standard: Select to display a ...can be accessed directly through the channels (+ up or - VOL +/- For details, see "Mode" on the screen, press TV/VIDEO until a channel number appears. If a video input indication (e.g., VIDEO 1, VIDEO 2) appears on page 26. Press 0-9 to select a channel (for immediate selection. Using Your New Projection TV ...
... PICTURE MODE Press PICTURE MODE repeatedly to directly choose one of five different video modes that best suits the program you can also perform the "Picture Adjustment" (such as "Brightness," "Color," etc.) to suit your remote control. Standard: Select to display a ...can be accessed directly through the channels (+ up or - VOL +/- For details, see "Mode" on the screen, press TV/VIDEO until a channel number appears. If a video input indication (e.g., VIDEO 1, VIDEO 2) appears on page 26. Press 0-9 to select a channel (for immediate selection. Using Your New Projection TV ...

Operating Instructions
Page 25
..., channel caption (if set), and MTS/SAP mode (if SAP is useful when you selected. (see "Video Label" on the TV's screen. The projection TV will skip the video input you need to copy down information that appears on page 35) JUMP FREEZE (yellow labeled button) Press ...to scroll through available video inputs: TV, VIDEO 1, VIDEO 2 and VIDEO 3. To turn the display off, press DISPLAY again. (continued) ...
..., channel caption (if set), and MTS/SAP mode (if SAP is useful when you selected. (see "Video Label" on the TV's screen. The projection TV will skip the video input you need to copy down information that appears on page 35) JUMP FREEZE (yellow labeled button) Press ...to scroll through available video inputs: TV, VIDEO 1, VIDEO 2 and VIDEO 3. To turn the display off, press DISPLAY again. (continued) ...
Operating Instructions
Page 26
...(continued) Using the White Labeled Buttons for detailed connection information, see "Caption Vision" on before shutting off the projection TV and all other Sony equipment. 22 REFER TO THE ILLUSTRATION OF THE REMOTE CONTROL ON THE INSIDE FRONT COVER OF THIS MANUAL AS YOU REVIEW THIS CHART Caption Vision... Displayed on the screen if the broadcaster offers this service. (see "Cable and antenna" or "Cable box and cable" on page 9) MTS/SAP Press to scroll ...
...(continued) Using the White Labeled Buttons for detailed connection information, see "Caption Vision" on before shutting off the projection TV and all other Sony equipment. 22 REFER TO THE ILLUSTRATION OF THE REMOTE CONTROL ON THE INSIDE FRONT COVER OF THIS MANUAL AS YOU REVIEW THIS CHART Caption Vision... Displayed on the screen if the broadcaster offers this service. (see "Cable and antenna" or "Cable box and cable" on page 9) MTS/SAP Press to scroll ...
Operating Instructions
Page 27
.... Press POSITION repeatedly to any location on the screen. (Free Layout Picturein Picture) The symbol "b" or "B" indicates which the symbol "b" (or "B") is being received. The symbol "b" (or "B") will appear to scroll through the available video inputs for the picture on which picture's TV ... repeatedly to indicate which picture's sound is displayed. (see "TV/VIDEO" on the pressed button. Main picture 6 10 Window picture TV channel or inputsource mode for the main picture* (yellowgreen-colored) TV channel or inputsource mode for PIP Operations PIP POSITION or Press...
.... Press POSITION repeatedly to any location on the screen. (Free Layout Picturein Picture) The symbol "b" or "B" indicates which the symbol "b" (or "B") is being received. The symbol "b" (or "B") will appear to scroll through the available video inputs for the picture on which picture's TV ... repeatedly to indicate which picture's sound is displayed. (see "TV/VIDEO" on the pressed button. Main picture 6 10 Window picture TV channel or inputsource mode for the main picture* (yellowgreen-colored) TV channel or inputsource mode for PIP Operations PIP POSITION or Press...

Operating Instructions
Page 28
...the TV channel on page 31) 24 AUDIO Press to freeze the desired scene in the main picture. The frozen picture is snowy, the entire screen may become unstable. SWAP Press to copy down information of the two will appear for details, see "Channel Skip/ Add" on which the symbol ..."b" (or "B") is automatically changed to resume normal PIP viewing. Each time you need to switch the audio and video of the pictures received through PIP is displayed in the window picture while viewing the normal picture in the main picture. to change the channel...
...the TV channel on page 31) 24 AUDIO Press to freeze the desired scene in the main picture. The frozen picture is snowy, the entire screen may become unstable. SWAP Press to copy down information of the two will appear for details, see "Channel Skip/ Add" on which the symbol ..."b" (or "B") is automatically changed to resume normal PIP viewing. Each time you need to switch the audio and video of the pictures received through PIP is displayed in the window picture while viewing the normal picture in the main picture. to change the channel...
Operating Instructions
Page 29
...Select Exit MENU You may require further operations. MENU Video Mode: Vivid Picture Adjustment Trinitone: High Noise Reduction: Off ch 3 Press V or v to exit the menu screens. Set Up Parental Control Caption Vision: CC1 Language: English Video Label Flash Focus: No ch Move Select Exit MENU... 4 Press . The previous screen will be displayed. MENU To exit from the menus at the bottom...
...Select Exit MENU You may require further operations. MENU Video Mode: Vivid Picture Adjustment Trinitone: High Noise Reduction: Off ch 3 Press V or v to exit the menu screens. Set Up Parental Control Caption Vision: CC1 Language: English Video Label Flash Focus: No ch Move Select Exit MENU... 4 Press . The previous screen will be displayed. MENU To exit from the menus at the bottom...
Operating Instructions
Page 34
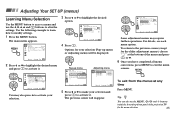
... MENU Channel Caption Easy recognition of the channel you preset (or the last channel that is selected with the Channel Caption menu in the sub screen. 2 Press . 3 Press V or v to select it. To erase a caption, press RESET.
... MENU Channel Caption Easy recognition of the channel you preset (or the last channel that is selected with the Channel Caption menu in the sub screen. 2 Press . 3 Press V or v to select it. To erase a caption, press RESET.
Operating Instructions
Page 35
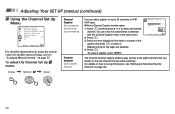
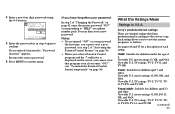
... TV to automatically program all the receivable channels are stored, the lowest numbered channel is selected with the Channel Skip/Add menu in the sub screen. Select On if your projection TV is connected to an antenna. 31 When all receivable channels. Auto Program Automatic channel presetting Cable Cable system setting...
... TV to automatically program all the receivable channels are stored, the lowest numbered channel is selected with the Channel Skip/Add menu in the sub screen. Select On if your projection TV is connected to an antenna. 31 When all receivable channels. Auto Program Automatic channel presetting Cable Cable system setting...

Operating Instructions
Page 37
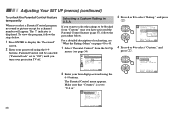
Changing Favorite Channel choices You have the option of returning to the Favorite Channel screen to adjust any of the menu and press . 1 CNN 2 10 SPTN 20 30 40 50 100 Exit 33 Favorite Channel ch 1. 6 2. 2 3. 10 SPTN 4. 20 5. 30 6. ...
Changing Favorite Channel choices You have the option of returning to the Favorite Channel screen to adjust any of the menu and press . 1 CNN 2 10 SPTN 20 30 40 50 100 Exit 33 Favorite Channel ch 1. 6 2. 2 3. 10 SPTN 4. 20 5. 30 6. ...

Operating Instructions
Page 38
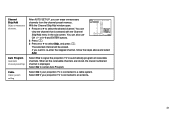
... TV programs can cause errors in your children. (see "Using the Parental Control Feature" on page 25. Set Up Parental Control Caption Vision: C C 1 Language: CC2 Video Label CC3 F l a s h F o c u s : C CN4o ch Text1 Text2 Text3 Text4 CC 1, CC 2, CC 3 or CC 4 displays a printed Move Select...Using the Set Up Menu Set Up Parental Control Caption Vision: CC1 Language: English Video Label Flash Focus: No ch Move Select Exit MENU For detailed information on using either half or the whole screen. To select the Set Up menu: Display / Highlight / Select MENU Parental ...
... TV programs can cause errors in your children. (see "Using the Parental Control Feature" on page 25. Set Up Parental Control Caption Vision: C C 1 Language: CC2 Video Label CC3 F l a s h F o c u s : C CN4o ch Text1 Text2 Text3 Text4 CC 1, CC 2, CC 3 or CC 4 displays a printed Move Select...Using the Set Up Menu Set Up Parental Control Caption Vision: CC1 Language: English Video Label Flash Focus: No ch Move Select Exit MENU For detailed information on using either half or the whole screen. To select the Set Up menu: Display / Highlight / Select MENU Parental ...
Operating Instructions
Page 39
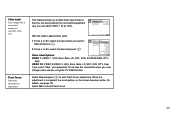
... VIDEO1 VIDEO2 VIDEO3 With the Video Label window open: Move Select Exit MENU 1 Press V or v to select the input mode you want to label and press . 2 Press V or v to cancel Flash Focus. 35 When the adjustment is completed, the cross pattern on the screen becomes white. (for details..., see page 19) Select No to select the label and press . you scan through video sources using the TV/VIDEO button. Video Label Options: Video Label VIDEO1: Video1 VIDEO2: VHS VIDEO3: 8mm Beta LD ...
... VIDEO1 VIDEO2 VIDEO3 With the Video Label window open: Move Select Exit MENU 1 Press V or v to select the input mode you want to label and press . 2 Press V or v to cancel Flash Focus. 35 When the adjustment is completed, the cross pattern on the screen becomes white. (for details..., see page 19) Select No to select the label and press . you scan through video sources using the TV/VIDEO button. Video Label Options: Video Label VIDEO1: Video1 VIDEO2: VHS VIDEO3: 8mm Beta LD ...
Operating Instructions
Page 42
... number will be blocked from the Set Up menu. (see page 34) Set Up Parental Control C a p t i o n VPi saisosnw: o r dC C 1 L a n g u a g e :_ _ _ _ Video Label ch Flash Focus: No 3 Press V or v to display the "Password" screen. 2 Enter your four digit password using the 0-9 buttons. Parental Control Country: U.S.A. To view the program, follow the procedure below . 1 Press...
... number will be blocked from the Set Up menu. (see page 34) Set Up Parental Control C a p t i o n VPi saisosnw: o r dC C 1 L a n g u a g e :_ _ _ _ Video Label ch Flash Focus: No 3 Press V or v to display the "Password" screen. 2 Enter your four digit password using the 0-9 buttons. Parental Control Country: U.S.A. To view the program, follow the procedure below . 1 Press...
Operating Instructions
Page 47
... first time, you cannot store a new password. (see "To unlock the Parental Control feature temporarily" on the screen, you cannot view that Sony predetermined according to exit the menu. movie ratings: G, NR, and N/A Viewable U.S. Sony's predetermined ratings These are original ratings that program even if you select a Parental Control program and the indicator...
... first time, you cannot store a new password. (see "To unlock the Parental Control feature temporarily" on the screen, you cannot view that Sony predetermined according to exit the menu. movie ratings: G, NR, and N/A Viewable U.S. Sony's predetermined ratings These are original ratings that program even if you select a Parental Control program and the indicator...
Operating Instructions
Page 54
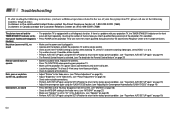
... the projection TV at : (416) 499-SONY (7669) The picture turns off , then inform qualified Sony personnel or the above Direct Response Center of the number of flashes. Dark, poor or no picture (screen lit), good sound • Adjust "Picture" in the Video menu. (see "Picture Adjustment" on page ...26) • Adjust "Brightness" in the Video menu. (see "Picture...
... the projection TV at : (416) 499-SONY (7669) The picture turns off , then inform qualified Sony personnel or the above Direct Response Center of the number of flashes. Dark, poor or no picture (screen lit), good sound • Adjust "Picture" in the Video menu. (see "Picture Adjustment" on page ...26) • Adjust "Brightness" in the Video menu. (see "Picture...


