
Operating Instructions
Page 2
... complies with Canadian ICES-003. This equipment generates, uses and can be determined by one or more of the FCC Rules. Sony LCD Monitor Model No. and other countries. 2 US CAUTION To prevent electric shock and blade exposure, do not use this equipment... Class B digital equipment, pursuant to Part 15 of the following WALL-MOUNT BRACKET or TV-stand. However, there is a trademark of HDMI Licensing, LLC. For Customers in injury. Sony Wall- KLV-40ZX1M SU-WL700 SU-FL71M Use with the following measures: s Reorient or relocate the receiving ...
... complies with Canadian ICES-003. This equipment generates, uses and can be determined by one or more of the FCC Rules. Sony LCD Monitor Model No. and other countries. 2 US CAUTION To prevent electric shock and blade exposure, do not use this equipment... Class B digital equipment, pursuant to Part 15 of the following WALL-MOUNT BRACKET or TV-stand. However, there is a trademark of HDMI Licensing, LLC. For Customers in injury. Sony Wall- KLV-40ZX1M SU-WL700 SU-FL71M Use with the following measures: s Reorient or relocate the receiving ...

Operating Instructions
Page 5
...your palm directly underneath the panel but do not put stress on the rear of the LCD monitor. The screws and booklet can be found in the accessory bag attached on a ...US Stand cover Be sure to shocks, vibration, or excessive force. For product protection and safety reasons, Sony strongly recommends that you finish installing the Table-Top Stand. Preparation for a Wall-Mount Bracket •...• Securing the Unit Carrying the Unit Be sure to follow these guidelines to place on a TV stand (each sold separately). Installing the Unit This Unit can be mounted on a wall using a ...
...your palm directly underneath the panel but do not put stress on the rear of the LCD monitor. The screws and booklet can be found in the accessory bag attached on a ...US Stand cover Be sure to shocks, vibration, or excessive force. For product protection and safety reasons, Sony strongly recommends that you finish installing the Table-Top Stand. Preparation for a Wall-Mount Bracket •...• Securing the Unit Carrying the Unit Be sure to follow these guidelines to place on a TV stand (each sold separately). Installing the Unit This Unit can be mounted on a wall using a ...

Operating Instructions
Page 8
... Stand Support adapter to the Table- s Install the Unit where it cannot be used , consider the following recommended measures. If a Sony specified TV stand is no excess slack in property damage, serious bodily injury or even death. Unsecured Unit may cause the unit's picture to blur... furniture and Unit sets. Make sure that they are not accessible to the TV stand (not supplied). Use a Sony TV stand Use a Sony specified TV stand (see page 2) and follow the instruction manual provided with the Sony TV stand. For each angle brace use the appropriate hardware to: • attach...
... Stand Support adapter to the Table- s Install the Unit where it cannot be used , consider the following recommended measures. If a Sony specified TV stand is no excess slack in property damage, serious bodily injury or even death. Unsecured Unit may cause the unit's picture to blur... furniture and Unit sets. Make sure that they are not accessible to the TV stand (not supplied). Use a Sony TV stand Use a Sony specified TV stand (see page 2) and follow the instruction manual provided with the Sony TV stand. For each angle brace use the appropriate hardware to: • attach...

Operating Instructions
Page 14
... items such as the Picture, Sound, Screen, HDMI Settings, Monitor Settings and PC Settings. Press to display the MENU to input and then press OK. 6 TV Lights up in red during the operations. 7 VOL +/- HDMI-PC Menu Item Picture Adjustments Sound Power Saving H Center V Center Device Control Sync'd HDMI Devices Reference...
... items such as the Picture, Sound, Screen, HDMI Settings, Monitor Settings and PC Settings. Press to display the MENU to input and then press OK. 6 TV Lights up in red during the operations. 7 VOL +/- HDMI-PC Menu Item Picture Adjustments Sound Power Saving H Center V Center Device Control Sync'd HDMI Devices Reference...

Operating Instructions
Page 24
... below instead of "2 Preparing for the installation of the TV" (page 6) of the instruction manual supplied with your LCD Monitor). 1 Remove four screws from the LCD Monitor when the supplied Table-Top Stand is not installed, use the LCD Monitor with the exclusive Speaker System (optional) to step ...M6 × 20 (supplied with the accessories. supplied with your Speaker System) on the lower part. 3 Install the Bracket I J on the LCD Monitor. 1 Place the Bracket I 24 US Go to output sound. Installing With the Unit. Follow the instructions in this manual referring to correspond ...
... below instead of "2 Preparing for the installation of the TV" (page 6) of the instruction manual supplied with your LCD Monitor). 1 Remove four screws from the LCD Monitor when the supplied Table-Top Stand is not installed, use the LCD Monitor with the exclusive Speaker System (optional) to step ...M6 × 20 (supplied with the accessories. supplied with your Speaker System) on the lower part. 3 Install the Bracket I J on the LCD Monitor. 1 Place the Bracket I 24 US Go to output sound. Installing With the Unit. Follow the instructions in this manual referring to correspond ...

Operating Instructions
Page 27
...8226; This is due to the digital compression of the source content used by certain other digital sources display a DVDs which may cause your LCD monitor screen to display less detail than loss of detail, especially during usual, or cause artifacts (small blocks or dots, pixelations) to adjust... the volume. • Press TV on the unit. • Press VOL +/- to appear on your remote control operation; Other Information 27 US These signal compressions are more visible ...
...8226; This is due to the digital compression of the source content used by certain other digital sources display a DVDs which may cause your LCD monitor screen to display less detail than loss of detail, especially during usual, or cause artifacts (small blocks or dots, pixelations) to adjust... the volume. • Press TV on the unit. • Press VOL +/- to appear on your remote control operation; Other Information 27 US These signal compressions are more visible ...
Operating Instructions
Page 28
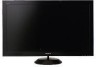
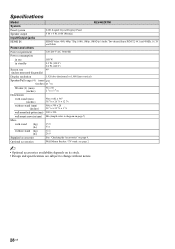
.../ TV stand: see page 2 ~ • Optional accessories availability depends on its stock. • Design and specifications are subject to diagram on page 7) 15.0 33.1 12.2 26.9 See "Checking the Accessories" on page 4. Specifications Model System KLV-40ZX1M Panel system Speaker output Input/Output jacks LCD (... requirement 120-240 V AC, 50/60 Hz Power consumption in use 188 W in standby 0.3 W (120 V) 0.4 W (240 V) Screen size 40 (inches measured diagonally) Display resolution 1,920 dots (horizontal) × 1,080 lines (vertical) Speaker/Full range (4) (mm) ø30 (inches) ...
.../ TV stand: see page 2 ~ • Optional accessories availability depends on its stock. • Design and specifications are subject to diagram on page 7) 15.0 33.1 12.2 26.9 See "Checking the Accessories" on page 4. Specifications Model System KLV-40ZX1M Panel system Speaker output Input/Output jacks LCD (... requirement 120-240 V AC, 50/60 Hz Power consumption in use 188 W in standby 0.3 W (120 V) 0.4 W (240 V) Screen size 40 (inches measured diagonally) Display resolution 1,920 dots (horizontal) × 1,080 lines (vertical) Speaker/Full range (4) (mm) ø30 (inches) ...


