
Operating Instructions
Page 3
... Using LCD Monitor Settings Picture Settings...16 Sound Settings ...18 Screen Settings ...19 HDMI Settings...20 Monitor Settings ...20 PC Settings ...21 Optional Accessories Using with the Wall-Mount Bracket/Speaker System 22 Using with the Floor Stand/Speaker System 24 Other Information US Troubleshooting ...26 Specifications ...28 Customer Support http://www.sony.com...
... Using LCD Monitor Settings Picture Settings...16 Sound Settings ...18 Screen Settings ...19 HDMI Settings...20 Monitor Settings ...20 PC Settings ...21 Optional Accessories Using with the Wall-Mount Bracket/Speaker System 22 Using with the Floor Stand/Speaker System 24 Other Information US Troubleshooting ...26 Specifications ...28 Customer Support http://www.sony.com...

Operating Instructions
Page 18
...the volume across all programs and commercials. Surround S-FORCE Provides a virtual surround sound experience made possible using just Front Surround two front speakers. Voice Zoom Adjusts the clarity of boost you can turn up this setting to soften the voice of depth and width, by pressing...volume level of the current input relative to other inputs. ~ • Sound can turn down this feature. Balance Emphasizes left or right speaker balance. Bass Increases or decreases lower-pitched sounds. Off Select for home use. Select High, Low or Off for spoken dialog. Sound ...
...the volume across all programs and commercials. Surround S-FORCE Provides a virtual surround sound experience made possible using just Front Surround two front speakers. Voice Zoom Adjusts the clarity of boost you can turn up this setting to soften the voice of depth and width, by pressing...volume level of the current input relative to other inputs. ~ • Sound can turn down this feature. Balance Emphasizes left or right speaker balance. Bass Increases or decreases lower-pitched sounds. Off Select for home use. Select High, Low or Off for spoken dialog. Sound ...

Operating Instructions
Page 22
...correspond with the WallMount Bracket. In this case, use the LCD Monitor with the Wall-Mount Bracket. When using the Speaker System Go to use the LCD Monitor with the accessories. Installing With the Unit. For Speaker System users, first see the instruction manual of October 2008...). Follow the instructions in the instruction manual supplied with the exclusive Speaker System (optional) to step 6 in this manual. Place the unit face down. 2 Place spacers (4-2). 1 Remove four screws from the LCD Monitor when the supplied Table-Top Stand is required for secure installation...
...correspond with the WallMount Bracket. In this case, use the LCD Monitor with the Wall-Mount Bracket. When using the Speaker System Go to use the LCD Monitor with the accessories. Installing With the Unit. For Speaker System users, first see the instruction manual of October 2008...). Follow the instructions in the instruction manual supplied with the exclusive Speaker System (optional) to step 6 in this manual. Place the unit face down. 2 Place spacers (4-2). 1 Remove four screws from the LCD Monitor when the supplied Table-Top Stand is required for secure installation...

Operating Instructions
Page 23
... Stand. • When installing the LCD Monitor to 4-7. 23 US Drop the HDMI cable from the right edge of the LCD Monitor. Mounting Bracket 7 Connect the AC power cord (supplied with your Speaker System) When installing the Speaker System Fix the power cord with the... Do not hold the speaker grill. 6 See the instruction manual supplied with your Speaker System). This part will be above the Mounting Bracket. 5 Fix the Speaker System with two screws (supplied with your LCD Monitor) (5-1). 1 Connect the power cord. 2 Fix to insert the Speaker System (4-5). Optional Accessories ...
... Stand. • When installing the LCD Monitor to 4-7. 23 US Drop the HDMI cable from the right edge of the LCD Monitor. Mounting Bracket 7 Connect the AC power cord (supplied with your Speaker System) When installing the Speaker System Fix the power cord with the... Do not hold the speaker grill. 6 See the instruction manual supplied with your Speaker System). This part will be above the Mounting Bracket. 5 Fix the Speaker System with two screws (supplied with your LCD Monitor) (5-1). 1 Connect the power cord. 2 Fix to insert the Speaker System (4-5). Optional Accessories ...

Operating Instructions
Page 24
... installing. The following steps must be performed to step 5 when using only the Floor Stand. supplied with your Speaker System) on the lower part. 3 Install the Bracket I J on the LCD Monitor. 1 Place the Bracket I 24 US Go to correspond with the installation step in step 2. 2 Temporarily... fix two Screws M6 × 20 (supplied with your LCD Monitor). Installing With the Unit. Follow steps below instead of "2 Preparing for the installation of the TV" (page 6) of the instruction manual supplied with the screw holes that the Table-Top Stand...
... installing. The following steps must be performed to step 5 when using only the Floor Stand. supplied with your Speaker System) on the lower part. 3 Install the Bracket I J on the LCD Monitor. 1 Place the Bracket I 24 US Go to correspond with the installation step in step 2. 2 Temporarily... fix two Screws M6 × 20 (supplied with your LCD Monitor). Installing With the Unit. Follow steps below instead of "2 Preparing for the installation of the TV" (page 6) of the instruction manual supplied with the screw holes that the Table-Top Stand...

Operating Instructions
Page 25
...the upper two screws (temporarily fixed in the junction part for the stand of the LCD Monitor. 6 Connect the AC power cord (supplied with your LCD Monitor) and the HDMI cable (supplied with your Speaker System) M 2 Drop the cord down from the center. 7 Follow the instruction ...; When installing the LCD Monitor to a wall or the Floor Stand, lift the unit together with the cloth under the Bracket I J. 5 Fix the Speaker System with screws, then attach the hook M to the Bracket I J. Speaker System Insert in step 3). Screws (supplied with O your LCD Monitor) Optional Accessories ...
...the upper two screws (temporarily fixed in the junction part for the stand of the LCD Monitor. 6 Connect the AC power cord (supplied with your LCD Monitor) and the HDMI cable (supplied with your Speaker System) M 2 Drop the cord down from the center. 7 Follow the instruction ...; When installing the LCD Monitor to a wall or the Floor Stand, lift the unit together with the cloth under the Bracket I J. 5 Fix the Speaker System with screws, then attach the hook M to the Bracket I J. Speaker System Insert in step 3). Screws (supplied with O your LCD Monitor) Optional Accessories ...
Operating Instructions
Page 28
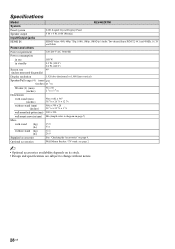
Wall-Mount Bracket / TV stand: see page 2 ~ • Optional accessories...diagram on page 7) 15.0 33.1 12.2 26.9 See "Checking the Accessories" on page 4. Specifications Model System KLV-40ZX1M Panel system Speaker output Input/Output jacks LCD (Liquid Crystal Display) Panel 5 W + 5 W, 10 W (Woofer) HDMI IN HDMI: Video: 480i, ...consumption in use 188 W in standby 0.3 W (120 V) 0.4 W (240 V) Screen size 40 (inches measured diagonally) Display resolution 1,920 dots (horizontal) × 1,080 lines (vertical) Speaker/Full range (4) (mm) ø30 (inches) ø1 3/16 Woofer (1) (mm) ...
Wall-Mount Bracket / TV stand: see page 2 ~ • Optional accessories...diagram on page 7) 15.0 33.1 12.2 26.9 See "Checking the Accessories" on page 4. Specifications Model System KLV-40ZX1M Panel system Speaker output Input/Output jacks LCD (Liquid Crystal Display) Panel 5 W + 5 W, 10 W (Woofer) HDMI IN HDMI: Video: 480i, ...consumption in use 188 W in standby 0.3 W (120 V) 0.4 W (240 V) Screen size 40 (inches measured diagonally) Display resolution 1,920 dots (horizontal) × 1,080 lines (vertical) Speaker/Full range (4) (mm) ø30 (inches) ø1 3/16 Woofer (1) (mm) ...


