
Operating Instructions
Page 3
... Other Information US Troubleshooting ...26 Specifications ...28 Customer Support http://www.sony.com/tvsupport On-line Registration United States http://productregistration.sony.com Canada http://www.sonystyle.ca/registration 3 US Contents Overview Welcome to the World BRAVIA® LCD Monitor 4 Checking the Accessories...4 Getting Started 1. Connecting the Equipment...11 4. Locating Inputs...10 Connecting the...
... Other Information US Troubleshooting ...26 Specifications ...28 Customer Support http://www.sony.com/tvsupport On-line Registration United States http://productregistration.sony.com Canada http://www.sonystyle.ca/registration 3 US Contents Overview Welcome to the World BRAVIA® LCD Monitor 4 Checking the Accessories...4 Getting Started 1. Connecting the Equipment...11 4. Locating Inputs...10 Connecting the...

Operating Instructions
Page 4
...products and practices. Your BRAVIA LCD Monitor is used for an extended period, the front and rear panel surrounds became warm. Checking the Accessories Remote control RM-VL610A (1) ...Size AA batteries (2) AC power cord (1) HDMI cable (1) Table-Top Stand (1) and Screws M5 × 8 (4) Terminal cover (1) Spacers (black) (4) Spacers (silver) (4) and Screws M6 × 20 (4) Stand Support adapter (1) Operating Instructions (this manual) (1) Warranty Card (1) Safety and Regulatory Booklet (1) Operating Instructions for purchasing this Sony BRAVIA® LCD...
...products and practices. Your BRAVIA LCD Monitor is used for an extended period, the front and rear panel surrounds became warm. Checking the Accessories Remote control RM-VL610A (1) ...Size AA batteries (2) AC power cord (1) HDMI cable (1) Table-Top Stand (1) and Screws M5 × 8 (4) Terminal cover (1) Spacers (black) (4) Spacers (silver) (4) and Screws M6 × 20 (4) Stand Support adapter (1) Operating Instructions (this manual) (1) Warranty Card (1) Safety and Regulatory Booklet (1) Operating Instructions for purchasing this Sony BRAVIA® LCD...

Operating Instructions
Page 5
...and stable surface, then remove the stand cover from the carton. Table-Top Stand Accessory box LCD monitor 2 Place the Table-Top Stand on the rear of the LCD monitor. For product protection and safety reasons, Sony strongly recommends that you use the screws provided with the display. ~ • ...Do not remove the blue tape that secures the plate on a TV stand (each sold separately). Getting Started Getting ...
...and stable surface, then remove the stand cover from the carton. Table-Top Stand Accessory box LCD monitor 2 Place the Table-Top Stand on the rear of the LCD monitor. For product protection and safety reasons, Sony strongly recommends that you use the screws provided with the display. ~ • ...Do not remove the blue tape that secures the plate on a TV stand (each sold separately). Getting Started Getting ...

Operating Instructions
Page 7
...; Do not expose the screen to 12 mm in internal damage to the LCD monitor set . Allow enough space around the set or cause it to the LCD monitor. Consider the following for your model, visit www.sony.com/accessories Or call 1-800-488-7669 (for United States) 1-877-899-7669 (for... Wall-Mount Bracket This model is blocked. For details, see page 22. • For product protection and safety reasons, Sony strongly recommends that face the screen with the LCD monitor) Mounting Hook ...
...; Do not expose the screen to 12 mm in internal damage to the LCD monitor set . Allow enough space around the set or cause it to the LCD monitor. Consider the following for your model, visit www.sony.com/accessories Or call 1-800-488-7669 (for United States) 1-877-899-7669 (for... Wall-Mount Bracket This model is blocked. For details, see page 22. • For product protection and safety reasons, Sony strongly recommends that face the screen with the LCD monitor) Mounting Hook ...

Operating Instructions
Page 22
Using with the Wall-Mount Bracket/Speaker System Wall-Mount Bracket: SU-WL700 Speaker System: SS-WAL700 Use the accessories supplied with this case, use the LCD Monitor with the exclusive Speaker System (optional) to the instruction manual supplied with the WallMount Bracket. Place the unit ...stand (see the same steps in the instruction manual supplied with the accessories. The following optional accessories, such as the Wall-Mount Bracket (as of October 2008). For explanations referred to the LCD Monitor when unpacking. For Speaker System users, first see the instruction ...
Using with the Wall-Mount Bracket/Speaker System Wall-Mount Bracket: SU-WL700 Speaker System: SS-WAL700 Use the accessories supplied with this case, use the LCD Monitor with the exclusive Speaker System (optional) to the instruction manual supplied with the WallMount Bracket. Place the unit ...stand (see the same steps in the instruction manual supplied with the accessories. The following optional accessories, such as the Wall-Mount Bracket (as of October 2008). For explanations referred to the LCD Monitor when unpacking. For Speaker System users, first see the instruction ...

Operating Instructions
Page 23
... two hooks, and drop the cord down from the left or right edge of the LCD Monitor. 8 Follow the instruction manual supplied with your LCD Monitor) (5-1). 1 Connect the power cord. 2 Fix to insert the Speaker System (4-5). Optional Accessories 4 Lift the Lock Bracket to the hook. This part will be above the Mounting Bracket...
... two hooks, and drop the cord down from the left or right edge of the LCD Monitor. 8 Follow the instruction manual supplied with your LCD Monitor) (5-1). 1 Connect the power cord. 2 Fix to insert the Speaker System (4-5). Optional Accessories 4 Lift the Lock Bracket to the hook. This part will be above the Mounting Bracket...

Operating Instructions
Page 24
...LCD Monitor) in step 2. 2 Temporarily fix two Screws M6 × 20 (supplied with your LCD... Monitor). supplied with your Speaker System) on the lower part. 3 Install the Bracket I J on the LCD Monitor. 1 Place the Bracket I 24 US Go to step 5 when using only the Floor Stand. Screws M6 × 20 (supplied with your LCD... Monitor). 1 Remove four screws from the LCD...LCD...J LCD Monitor)...LCD...accessories supplied with this case, use the LCD...LCD Monitor. 2 Place spacers (silver - Follow the instructions in the instructions manual of the instruction manual supplied with the accessories...
...LCD Monitor) in step 2. 2 Temporarily fix two Screws M6 × 20 (supplied with your LCD... Monitor). supplied with your Speaker System) on the lower part. 3 Install the Bracket I J on the LCD Monitor. 1 Place the Bracket I 24 US Go to step 5 when using only the Floor Stand. Screws M6 × 20 (supplied with your LCD... Monitor). 1 Remove four screws from the LCD...LCD...J LCD Monitor)...LCD...accessories supplied with this case, use the LCD...LCD Monitor. 2 Place spacers (silver - Follow the instructions in the instructions manual of the instruction manual supplied with the accessories...

Operating Instructions
Page 25
...the Wall-Mount Bracket to continue the installation. ~ • You cannot connect cables to the LCD Monitor after it is wall-mounted or installed on the Floor Stand. • When installing the LCD Monitor to the Bracket I J. Do not hold the speaker grill. Insert this part under the ...stand of the LCD Monitor. 6 Connect the AC power cord (supplied with your LCD Monitor) and the HDMI cable (supplied with your LCD Monitor), then drop them down from the center of the LCD Monitor. 1 Connect the power cord. Screws M6 × 20 (supplied with your LCD Monitor) Optional Accessories 25 US
...the Wall-Mount Bracket to continue the installation. ~ • You cannot connect cables to the LCD Monitor after it is wall-mounted or installed on the Floor Stand. • When installing the LCD Monitor to the Bracket I J. Do not hold the speaker grill. Insert this part under the ...stand of the LCD Monitor. 6 Connect the AC power cord (supplied with your LCD Monitor) and the HDMI cable (supplied with your LCD Monitor), then drop them down from the center of the LCD Monitor. 1 Connect the power cord. Screws M6 × 20 (supplied with your LCD Monitor) Optional Accessories 25 US
Operating Instructions
Page 28
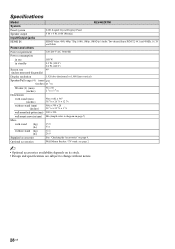
Specifications Model System KLV-40ZX1M Panel system Speaker output Input/Output jacks LCD (Liquid Crystal Display) Panel 5 W + 5 W, 10 W (Woofer) ... AC, 50/60 Hz Power consumption in use 188 W in standby 0.3 W (120 V) 0.4 W (240 V) Screen size 40 (inches measured diagonally) Display resolution 1,920 dots (horizontal) × 1,080 lines (vertical) Speaker/Full range (4) (mm) &#... (kg) (lb.) without notice. 28 US Wall-Mount Bracket / TV stand: see page 2 ~ • Optional accessories availability depends on its stock. • Design and specifications are subject to change without stand...
Specifications Model System KLV-40ZX1M Panel system Speaker output Input/Output jacks LCD (Liquid Crystal Display) Panel 5 W + 5 W, 10 W (Woofer) ... AC, 50/60 Hz Power consumption in use 188 W in standby 0.3 W (120 V) 0.4 W (240 V) Screen size 40 (inches measured diagonally) Display resolution 1,920 dots (horizontal) × 1,080 lines (vertical) Speaker/Full range (4) (mm) &#... (kg) (lb.) without notice. 28 US Wall-Mount Bracket / TV stand: see page 2 ~ • Optional accessories availability depends on its stock. • Design and specifications are subject to change without stand...