
Operating Instructions
Page 3
... Using LCD Monitor Settings Picture Settings...16 Sound Settings ...18 Screen Settings ...19 HDMI Settings...20 Monitor Settings ...20 PC Settings ...21 Optional Accessories Using with the Wall-Mount Bracket/Speaker System 22 Using with the Floor Stand/Speaker System 24 Other Information US Troubleshooting ...26 Specifications ...28 Customer Support http://www.sony.com/tvsupport...
... Using LCD Monitor Settings Picture Settings...16 Sound Settings ...18 Screen Settings ...19 HDMI Settings...20 Monitor Settings ...20 PC Settings ...21 Optional Accessories Using with the Wall-Mount Bracket/Speaker System 22 Using with the Floor Stand/Speaker System 24 Other Information US Troubleshooting ...26 Specifications ...28 Customer Support http://www.sony.com/tvsupport...

Operating Instructions
Page 5
... Sony strongly recommends that you use the screws provided with the display. ~ • Do not remove the blue tape that secures the plate on the rear of the LCD monitor until you finish installing the Table-Top Stand. Accessory ... Preparation for a Wall-Mount Bracket • Installation against a wall or enclosed area • Securing the Unit Carrying the Unit Be sure to follow these guidelines to shocks, vibration, or excessive force. Table-Top Stand Accessory box LCD monitor 2 Place the... palm directly underneath the panel but do not put stress on a TV stand (each sold separately).
... Sony strongly recommends that you use the screws provided with the display. ~ • Do not remove the blue tape that secures the plate on the rear of the LCD monitor until you finish installing the Table-Top Stand. Accessory ... Preparation for a Wall-Mount Bracket • Installation against a wall or enclosed area • Securing the Unit Carrying the Unit Be sure to follow these guidelines to shocks, vibration, or excessive force. Table-Top Stand Accessory box LCD monitor 2 Place the... palm directly underneath the panel but do not put stress on a TV stand (each sold separately).

Operating Instructions
Page 7
...page 22. • For product protection and safety reasons, Sony strongly recommends that you are not of LCD monitor should be mounted on how to use the Wall-Mount Bracket model designed for Canada) When Installing the Unit Against a Wall or Enclosed Area Make sure that they are designed so that... from the attaching surface of the unit and may result in internal damage to your model, visit www.sony.com/accessories Or call 1-800-488-7669 (for United States) 1-877-899-7669 (for your LCD monitor and the wall-mounting of a reflective material. (Continued) 7 US Getting Started
...page 22. • For product protection and safety reasons, Sony strongly recommends that you are not of LCD monitor should be mounted on how to use the Wall-Mount Bracket model designed for Canada) When Installing the Unit Against a Wall or Enclosed Area Make sure that they are designed so that... from the attaching surface of the unit and may result in internal damage to your model, visit www.sony.com/accessories Or call 1-800-488-7669 (for United States) 1-877-899-7669 (for your LCD monitor and the wall-mounting of a reflective material. (Continued) 7 US Getting Started

Operating Instructions
Page 22
...). • If the Table-Top Stand has already been attached, remove the stand (see the same steps in this unit when installing. Optional Accessories This unit is designed for use the LCD Monitor with the Wall-Mount Bracket. In this manual. Installing With the Unit. When using the Speaker System Go to licensed contractors.
...). • If the Table-Top Stand has already been attached, remove the stand (see the same steps in this unit when installing. Optional Accessories This unit is designed for use the LCD Monitor with the Wall-Mount Bracket. In this manual. Installing With the Unit. When using the Speaker System Go to licensed contractors.

Operating Instructions
Page 23
...Optional Accessories 4 Lift the Lock Bracket to 4-7. 23 US Speaker System Insert in the junction part for Lock Bracket the stand of the LCD Monitor. Do not hold the speaker grill. 6 See the instruction manual supplied with the Wall-Mount Bracket to continue installing this unit on the wall. ...~ • You cannot connect cables to the LCD Monitor after it is wall-mounted or installed on the Floor Stand. • When installing the LCD Monitor to the hook. This part will...
...Optional Accessories 4 Lift the Lock Bracket to 4-7. 23 US Speaker System Insert in the junction part for Lock Bracket the stand of the LCD Monitor. Do not hold the speaker grill. 6 See the instruction manual supplied with the Wall-Mount Bracket to continue installing this unit on the wall. ...~ • You cannot connect cables to the LCD Monitor after it is wall-mounted or installed on the Floor Stand. • When installing the LCD Monitor to the hook. This part will...

Operating Instructions
Page 25
...Accessories 25 US Screws M6 × 20 (supplied with screws, then attach the hook M to a wall or the Floor Stand, lift the unit together with the cloth under the Bracket I J. 5 Fix the Speaker System with your LCD Monitor), then drop them down from the center. 7 Follow the instruction manual supplied with the Wall-Mount... Bracket to continue the installation. ~ • You cannot connect cables to the LCD Monitor after it is wall-mounted or installed on the...
...Accessories 25 US Screws M6 × 20 (supplied with screws, then attach the hook M to a wall or the Floor Stand, lift the unit together with the cloth under the Bracket I J. 5 Fix the Speaker System with your LCD Monitor), then drop them down from the center. 7 Follow the instruction manual supplied with the Wall-Mount... Bracket to continue the installation. ~ • You cannot connect cables to the LCD Monitor after it is wall-mounted or installed on the...
Operating Instructions
Page 28
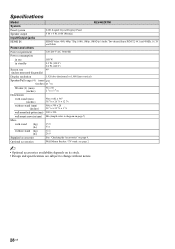
Specifications Model System KLV-40ZX1M Panel system Speaker output Input/Output jacks LCD (Liquid Crystal Display) Panel 5 W + 5 W, 10 W (Woofer) HDMI IN HDMI: Video: 480i, 480p, 720p, ...40 (inches measured diagonally) Display resolution 1,920 dots (horizontal) × 1,080 lines (vertical) Speaker/Full range (4) (mm) ø30 (inches) ø1 3/16 Woofer (1) (mm) (inches) Dimensions with stand (mm) (inches) without stand (mm) (inches) wall-mount hole pattern (mm) wall-mount screw size (mm) Mass with stand (kg) (lb.) without stand (kg) (lb.) Supplied accessories Optional accessories...
Specifications Model System KLV-40ZX1M Panel system Speaker output Input/Output jacks LCD (Liquid Crystal Display) Panel 5 W + 5 W, 10 W (Woofer) HDMI IN HDMI: Video: 480i, 480p, 720p, ...40 (inches measured diagonally) Display resolution 1,920 dots (horizontal) × 1,080 lines (vertical) Speaker/Full range (4) (mm) ø30 (inches) ø1 3/16 Woofer (1) (mm) (inches) Dimensions with stand (mm) (inches) without stand (mm) (inches) wall-mount hole pattern (mm) wall-mount screw size (mm) Mass with stand (kg) (lb.) without stand (kg) (lb.) Supplied accessories Optional accessories...

