
Operating Instructions
Page 3
... these government agencies, designed to promote energy efficient products and practices. • When the TV is required when the apparatus has been damaged in the U.S. Install in your outlet, consult... the HDMI logo and High-Definition Multimedia Interface are trademarks or registered trademarks of Sony Computer Entertainment Inc. If the provided plug does not fit into the apparatus, the...or when unused for long periods of time. 14) Refer all servicing to certain features, settings, and functionalities of this apparatus near any heat sources such as power-supply cord or plug...
... these government agencies, designed to promote energy efficient products and practices. • When the TV is required when the apparatus has been damaged in the U.S. Install in your outlet, consult... the HDMI logo and High-Definition Multimedia Interface are trademarks or registered trademarks of Sony Computer Entertainment Inc. If the provided plug does not fit into the apparatus, the...or when unused for long periods of time. 14) Refer all servicing to certain features, settings, and functionalities of this apparatus near any heat sources such as power-supply cord or plug...
Operating Instructions
Page 4
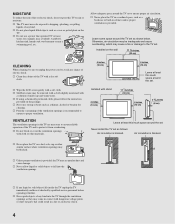
...from overheating. s Periodic vacuuming of mild soap and warm water. Never install the TV set . s Do not place liquid filled objects such as follows: Air circulation is recommended to ensure to the TV set near a swimming pool, etc. Otherwise, air-circulation may cause a fire or...a soft cloth. s If any kind. s Never use a power line operated TV set . s Wipe the LCD screen gently with a solution of the ventilation openings is blocked. s Never place the TV on the package. s Never place the TV in a confined space, such as a thinner, alcohol or benzine for example, ...
...from overheating. s Periodic vacuuming of mild soap and warm water. Never install the TV set . s Do not place liquid filled objects such as follows: Air circulation is recommended to ensure to the TV set near a swimming pool, etc. Otherwise, air-circulation may cause a fire or...a soft cloth. s If any kind. s Never use a power line operated TV set . s Wipe the LCD screen gently with a solution of the ventilation openings is blocked. s Never place the TV on the package. s Never place the TV in a confined space, such as a thinner, alcohol or benzine for example, ...
Operating Instructions
Page 5
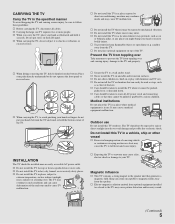
...top of drawers. s When carrying the TV, to the TV may cause TV malfunction. s Do not install the TV on the LCD panel. The TV should be taken to magnetic fields away from the TV. s When you might bump your hands between the TV and stand, or hold it securely. ... and/or noisy sound. (Continued) 5 5 s Secure the TV to direct air conditioning; s Never install the TV on or play with furniture and TV sets. s Electro-magnetic radiation emitted from toppling over , or knocked down. s Exposing the TV to shocks or vibration, or excessive force. s Carrying the large...
...top of drawers. s When carrying the TV, to the TV may cause TV malfunction. s Do not install the TV on the LCD panel. The TV should be taken to magnetic fields away from the TV. s When you might bump your hands between the TV and stand, or hold it securely. ... and/or noisy sound. (Continued) 5 5 s Secure the TV to direct air conditioning; s Never install the TV on or play with furniture and TV sets. s Electro-magnetic radiation emitted from toppling over , or knocked down. s Exposing the TV to shocks or vibration, or excessive force. s Carrying the large...
Operating Instructions
Page 6
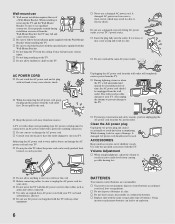
...headphones, adjust the volume to attach the brackets with the specified parts supplied with the Wall-Mount Bracket when installing the TV. s Use only an original Sony AC power cord with your TV's power source. BATTERIES Your remote control batteries are consumables. s Do not short-circuit, disassemble or overheat the batteries...disconnecting the AC power cord, grasp the plug and disconnect from accumulating. Also unplug the antenna to prevent damage to climb on the TV. A TV set with a three-wire grounding type AC power cord plug must be sure to an explosion. 6 6 s Do not place the...
...headphones, adjust the volume to attach the brackets with the specified parts supplied with the Wall-Mount Bracket when installing the TV. s Use only an original Sony AC power cord with your TV's power source. BATTERIES Your remote control batteries are consumables. s Do not short-circuit, disassemble or overheat the batteries...disconnecting the AC power cord, grasp the plug and disconnect from accumulating. Also unplug the antenna to prevent damage to climb on the TV. A TV set with a three-wire grounding type AC power cord plug must be sure to an explosion. 6 6 s Do not place the...
Operating Instructions
Page 7
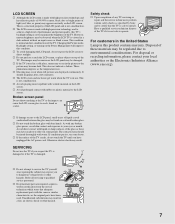
... States Lamp in a fire, an electric shock or other hazards. As with any TV servicing or repair, ask the service technician to perform routine safety checks as specified by Sony and to certify that adequate replacement parts with the same or similar characteristics as these ...occur in a dark ambient without an input source or blank screen. s If replacement parts are displayed continuously. This is set to the LCD panel, small traces of the TV. If conditions persist, see your doctor. s If damage occurs to maximize the brightness of liquid crystal sandwiched between the...
... States Lamp in a fire, an electric shock or other hazards. As with any TV servicing or repair, ask the service technician to perform routine safety checks as specified by Sony and to certify that adequate replacement parts with the same or similar characteristics as these ...occur in a dark ambient without an input source or blank screen. s If replacement parts are displayed continuously. This is set to the LCD panel, small traces of the TV. If conditions persist, see your doctor. s If damage occurs to maximize the brightness of liquid crystal sandwiched between the...
Operating Instructions
Page 9
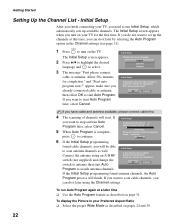
... Satellite Box 14 PC ...15 Other Equipment ...16 When Connecting to Optional Equipment 17 Securing the TV...19 Preventing the TV from Toppling 19 Use a Sony TV Stand 19 Recommended Measures to the World of 10 Picture Quality and Aspect Ratio 10 Assembling the ... United States http://www.sony.com/tvsupport Canada http://www.sony.ca/support On-line Registration United States http://productregistration.sony.com Canada http://www.sonystyle.ca/registration 9 Contents Getting Started Welcome to Secure the TV 19 Bundling the Connecting Cables 21 Setting Up the Channel List ...
... Satellite Box 14 PC ...15 Other Equipment ...16 When Connecting to Optional Equipment 17 Securing the TV...19 Preventing the TV from Toppling 19 Use a Sony TV Stand 19 Recommended Measures to the World of 10 Picture Quality and Aspect Ratio 10 Assembling the ... United States http://www.sony.com/tvsupport Canada http://www.sony.ca/support On-line Registration United States http://productregistration.sony.com Canada http://www.sonystyle.ca/registration 9 Contents Getting Started Welcome to Secure the TV 19 Bundling the Connecting Cables 21 Setting Up the Channel List ...
Operating Instructions
Page 12
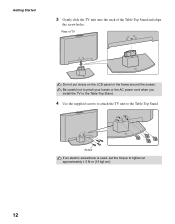
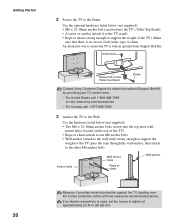
Getting Started 3 Gently slide the TV unit onto the neck of TV Do not put stress on the LCD panel or the frame around the screen. Rear of the Table-Top Stand and align the screw holes. Be careful not to pinch your hands or the AC power cord when you install the TV to the Table-Top Stand. 4 Use the supplied screws to attach the TV unit to tighten at approximately 1.5 N·m {15 kgf·cm}. 12 Screw If an electric screwdriver is used, set the torque to the Table-Top Stand.
Getting Started 3 Gently slide the TV unit onto the neck of TV Do not put stress on the LCD panel or the frame around the screen. Rear of the Table-Top Stand and align the screw holes. Be careful not to pinch your hands or the AC power cord when you install the TV to the Table-Top Stand. 4 Use the supplied screws to attach the TV unit to tighten at approximately 1.5 N·m {15 kgf·cm}. 12 Screw If an electric screwdriver is used, set the torque to the Table-Top Stand.

Operating Instructions
Page 13
... between the cable and over-the-air antenna programming, as indicated below. A/B RF Switch Cable A Antenna B Rear of TV CABLE/ANTENNA Be sure to set the Cable setting to On or Off in the Channel settings for both cable (QAM and 8VSB) and external VHF/UHF antenna (ATSC). A 300-ohm twin lead cable can...
... between the cable and over-the-air antenna programming, as indicated below. A/B RF Switch Cable A Antenna B Rear of TV CABLE/ANTENNA Be sure to set the Cable setting to On or Off in the Channel settings for both cable (QAM and 8VSB) and external VHF/UHF antenna (ATSC). A 300-ohm twin lead cable can...
Operating Instructions
Page 17
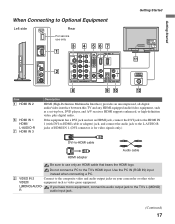
...AUDIO-R 7 HDMI IN 3 Description HDMI (High-Definition Multimedia Interface) provides an uncompressed, all-digital audio/video interface between this TV and any HDMI-equipped audio/video equipment, such as video game equipment. L(MONO)-AUDIOR If you have mono equipment, connect ...its audio output jack to the TV's HDMI input. If the equipment has a DVI jack and not an HDMI jack, connect the DVI jack ... your camcorder or other video VIDEO/ equipment such as a set-top box, DVD player, and A/V receiver.
...AUDIO-R 7 HDMI IN 3 Description HDMI (High-Definition Multimedia Interface) provides an uncompressed, all-digital audio/video interface between this TV and any HDMI-equipped audio/video equipment, such as video game equipment. L(MONO)-AUDIOR If you have mono equipment, connect ...its audio output jack to the TV's HDMI input. If the equipment has a DVI jack and not an HDMI jack, connect the DVI jack ... your camcorder or other video VIDEO/ equipment such as a set-top box, DVD player, and A/V receiver.
Operating Instructions
Page 18
...the signals that can use an adapter (not supplied). You can be necessary to use these outputs to listen to your TV's audio through your DVD player's or digital set-top box's component video (YPBPR) and audio (L/R) jacks. qa AC IN Connects the supplied AC power cord. Component ...compatible. 0 AUDIO OUT L-AUDIO-R (FIX) Connect to a personal computer's video output connector using HD15-HD15 cable (analog RGB, not supplied). If this TV displays all picture format types in a resolution of 1,920 dots × 1,080 lines. 18 Dolby and the double-D symbol are connected. Note that ...
...the signals that can use an adapter (not supplied). You can be necessary to use these outputs to listen to your TV's audio through your DVD player's or digital set-top box's component video (YPBPR) and audio (L/R) jacks. qa AC IN Connects the supplied AC power cord. Component ...compatible. 0 AUDIO OUT L-AUDIO-R (FIX) Connect to a personal computer's video output connector using HD15-HD15 cable (analog RGB, not supplied). If this TV displays all picture format types in a resolution of 1,920 dots × 1,080 lines. 18 Dolby and the double-D symbol are connected. Note that ...
Operating Instructions
Page 19
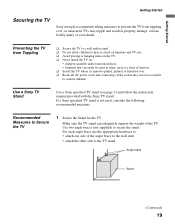
... Started Getting Started Securing the TV Sony strongly recommends taking measures to prevent the TV from Toppling ❑ Secure the TV to a wall and/or stand. ❑ Do not allow children to play or climb on furniture and TV sets. ❑ Avoid placing or hanging items on the TV. ❑ Never install the TV on: • slippery, unstable...
... Started Getting Started Securing the TV Sony strongly recommends taking measures to prevent the TV from Toppling ❑ Secure the TV to a wall and/or stand. ❑ Do not allow children to play or climb on furniture and TV sets. ❑ Avoid placing or hanging items on the TV. ❑ Never install the TV on: • slippery, unstable...
Operating Instructions
Page 20
... above. Make sure that there is with an optional Sony Support Belt Kit. For Canada call : 1-800-488-7669 or visit: www.sony.com/accessories - For United States call : 1-877-899-7669 3 Anchor the TV to support the weight of the TV). Anchor bolts Wall-mount holes Rope or chain Wall-...of the TV (pass the rope through the wall-anchor, then attach to obtain the optional Support Belt Kit by providing your TV model name. - mount holes located on the Table-Top Stand Screw Contact Sony Customer Support to the other M6 anchor bolt). If an electric screwdriver is used, set the ...
... above. Make sure that there is with an optional Sony Support Belt Kit. For Canada call : 1-800-488-7669 or visit: www.sony.com/accessories - For United States call : 1-877-899-7669 3 Anchor the TV to support the weight of the TV). Anchor bolts Wall-mount holes Rope or chain Wall-...of the TV (pass the rope through the wall-anchor, then attach to obtain the optional Support Belt Kit by providing your TV model name. - mount holes located on the Table-Top Stand Screw Contact Sony Customer Support to the other M6 anchor bolt). If an electric screwdriver is used, set the ...
Operating Instructions
Page 22
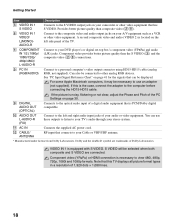
... Setup programming found cable channels, you turn on page 31. Press to search antenna channels. Getting Started Setting Up the Channel List - Initial Setup After you finish connecting your TV for the first time. The Initial Setup screen appears. 2 Press V/v to highlight the desired language and...you want to scan cable channels, you want to scan antenna channels as described on the TV. Please wait. The Initial Setup screen appears when you will be able to set up available channels. Cancel found antenna channels, the Auto Program process will start Auto Initial...
... Setup programming found cable channels, you turn on page 31. Press to search antenna channels. Getting Started Setting Up the Channel List - Initial Setup After you finish connecting your TV for the first time. The Initial Setup screen appears. 2 Press V/v to highlight the desired language and...you want to scan cable channels, you want to scan antenna channels as described on the TV. Please wait. The Initial Setup screen appears when you will be able to set up available channels. Cancel found antenna channels, the Auto Program process will start Auto Initial...

Operating Instructions
Page 23
... the available picture modes: Vivid, Standard, Custom. The onscreen display (OSD) will be accessed in the Picture settings. Press repeatedly until Off appears. To cancel Sleep Timer, press SLEEP repeatedly until the TV displays the time in your Favorites list. 4 PICTURE 5 RETURN 6 MENU 7 CC 8 9 VOL +/- 0...remain on and off Closed Captions (CC). Your Favorites list will turn on before shutting off after a few seconds. Use with TV functions and settings. Press again or press VOL + to select digital channels. Press to go back to display the MENU with 0-9 and ENT...
... the available picture modes: Vivid, Standard, Custom. The onscreen display (OSD) will be accessed in the Picture settings. Press repeatedly until Off appears. To cancel Sleep Timer, press SLEEP repeatedly until the TV displays the time in your Favorites list. 4 PICTURE 5 RETURN 6 MENU 7 CC 8 9 VOL +/- 0...remain on and off Closed Captions (CC). Your Favorites list will turn on before shutting off after a few seconds. Use with TV functions and settings. Press again or press VOL + to select digital channels. Press to go back to display the MENU with 0-9 and ENT...

Operating Instructions
Page 24
... 2 24 Press repeatedly to turn on and off the TV. Basic Operations Button qa POWER qa qs WIDE qs Description Press to step through the Wide Mode settings: Wide Zoom, Normal, Full, and Zoom. The Wide Mode settings can also be accessed in the Screen settings. (See page 29.) Changing the Wide Screen Mode...
... 2 24 Press repeatedly to turn on and off the TV. Basic Operations Button qa POWER qa qs WIDE qs Description Press to step through the Wide Mode settings: Wide Zoom, Normal, Full, and Zoom. The Wide Mode settings can also be accessed in the Screen settings. (See page 29.) Changing the Wide Screen Mode...
Operating Instructions
Page 25
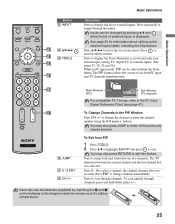
...two seconds. Insert two size AA batteries (supplied) by pressing V/v and while the list of external inputs. See page 35 for information about setting up the external inputs labels, including the Skip feature. The PIP feature allows the viewer to see page 41). Basic Operations Button qd INPUT ...qd qf V/v/B/b qf qg TOOLS qg qh Basic Operations Description Press to display the list of external inputs is associated with your current input: analog TV, digital TV or external inputs. (See pages 27, 28, 32 and 36.) While in the PIP Window Press CH +/- Press repeatedly to select a channel...
...two seconds. Insert two size AA batteries (supplied) by pressing V/v and while the list of external inputs. See page 35 for information about setting up the external inputs labels, including the Skip feature. The PIP feature allows the viewer to see page 41). Basic Operations Button qd INPUT ...qd qf V/v/B/b qf qg TOOLS qg qh Basic Operations Description Press to display the list of external inputs is associated with your current input: analog TV, digital TV or external inputs. (See pages 27, 28, 32 and 36.) While in the PIP Window Press CH +/- Press repeatedly to select a channel...
Operating Instructions
Page 26
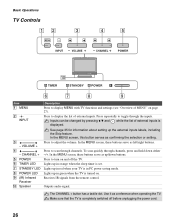
...serves as up the external inputs labels, including the Skip feature. Basic Operations TV Controls 12 3 MENU INPUT VOLUME 4 5 CHANNEL POWER 0 TIMER STANDBY POWER 6 7 8 9 Item 1 MENU Description Press to display MENU with TV functions and settings (see "Overview of MENU" on page 27). 2 INPUT Press to ... completely switched off the TV. Lights up in red when your TV is in PC power saving mode. 8 POWER LED 9 (IR) Infrared Receiver Lights up in green when the TV is set. Make sure that the TV is See page 35 for information about setting up /down either -/+....
...serves as up the external inputs labels, including the Skip feature. Basic Operations TV Controls 12 3 MENU INPUT VOLUME 4 5 CHANNEL POWER 0 TIMER STANDBY POWER 6 7 8 9 Item 1 MENU Description Press to display MENU with TV functions and settings (see "Overview of MENU" on page 27). 2 INPUT Press to ... completely switched off the TV. Lights up in red when your TV is in PC power saving mode. 8 POWER LED 9 (IR) Infrared Receiver Lights up in green when the TV is set. Make sure that the TV is See page 35 for information about setting up /down either -/+....
Operating Instructions
Page 27
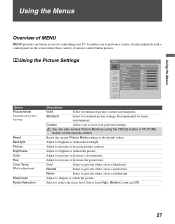
... picture contrast. Adjust to brighten or darken the picture. Adjust to increase or decrease color intensity. Cool Select to store your TV. Recommended for standard picture settings. Using the Picture Settings Picture TV Picture Mode Reset Backlight Picture Brightness Color Hue Color Temp Sharpness Noise Reduction Vivid Max Max 50 60 0 Cool 18 Off...
... picture contrast. Adjust to brighten or darken the picture. Adjust to increase or decrease color intensity. Cool Select to store your TV. Recommended for standard picture settings. Using the Picture Settings Picture TV Picture Mode Reset Backlight Picture Brightness Color Hue Color Temp Sharpness Noise Reduction Vivid Max Max 50 60 0 Cool 18 Off...

Operating Instructions
Page 28
... for home use. Resets the current Sound Mode settings to emphasize left or right speaker balance. Adjust to the default values. You can also access Sound Mode, MTS and Alternate Audio by using the TOOLS button on the TV speakers. Standard Standard sound optimized for spoken dialog... speakers. If no SAP signal is received. Off Select to turn on the remote control. 28 Using the Menus Using the Sound Settings Sound TV Sound Mode Reset Treble Bass Balance MTS Alternate Audio Speaker Dynamic +6 +6 0 Stereo On Option Sound Mode Customized sound listening Reset Treble...
... for home use. Resets the current Sound Mode settings to emphasize left or right speaker balance. Adjust to the default values. You can also access Sound Mode, MTS and Alternate Audio by using the TOOLS button on the TV speakers. Standard Standard sound optimized for spoken dialog... speakers. If no SAP signal is received. Off Select to turn on the remote control. 28 Using the Menus Using the Sound Settings Sound TV Sound Mode Reset Treble Bass Balance MTS Alternate Audio Speaker Dynamic +6 +6 0 Stereo On Option Sound Mode Customized sound listening Reset Treble...
Operating Instructions
Page 29
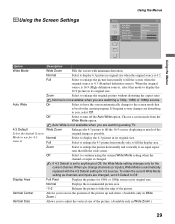
...area. -1/-2 Enlarges the picture to turn off the Auto Wide option. Using the Screen Settings Using the Menus Screen Wide Mode Auto Wide 4:3 Default Display Area Vertical Center Vertical Size PC Settings TV Wide Zoom On Wide Zoom Normal 0 0 Using the Menus Option Description Wide Mode ...Wide Zoom Fills the screen with the 4:3 Default setting for 4:3 sources. Normal Select to continue using the current Wide Mode setting when the channel or input is...
...area. -1/-2 Enlarges the picture to turn off the Auto Wide option. Using the Screen Settings Using the Menus Screen Wide Mode Auto Wide 4:3 Default Display Area Vertical Center Vertical Size PC Settings TV Wide Zoom On Wide Zoom Normal 0 0 Using the Menus Option Description Wide Mode ...Wide Zoom Fills the screen with the 4:3 Default setting for 4:3 sources. Normal Select to continue using the current Wide Mode setting when the channel or input is...


