Operating Instructions
Page 4
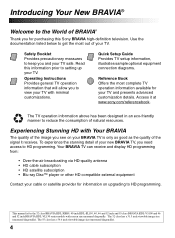
...KDL-XBR9, 40 inch KDL-SL150, 40, 46 and 52 inch and 55 class BRAVIA KDL-V5100 and 46 and 52 inch BRAVIA KDL-VL150 series models with screen size measured diagonally. Safety Booklet Provides precautionary measures to keep you and your TV. Experiencing Stunning HD with minimal customizations. Access it...connection diagrams. Reference Book Offers the most out of your TV with Your BRAVIA The quality of the image you to reduce the consumption of natural resources. To experience the stunning detail of the signal it at www.sony.com/referencebook. This manual is only as good as ...
...KDL-XBR9, 40 inch KDL-SL150, 40, 46 and 52 inch and 55 class BRAVIA KDL-V5100 and 46 and 52 inch BRAVIA KDL-VL150 series models with screen size measured diagonally. Safety Booklet Provides precautionary measures to keep you and your TV. Experiencing Stunning HD with minimal customizations. Access it...connection diagrams. Reference Book Offers the most out of your TV with Your BRAVIA The quality of the image you to reduce the consumption of natural resources. To experience the stunning detail of the signal it at www.sony.com/referencebook. This manual is only as good as ...

Operating Instructions
Page 5
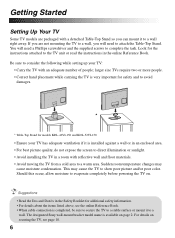
...inputs are at www.sony.com/referencebook. 5 The picture quality may not be as sharp as with complicated operation. The 16:9 fills your BRAVIA screen, maintaining a crisp, clear, vivid picture. 4:3 (standard-definition) source Most standard-definition signals use a wide screen aspect ratio of ...equipment. 16:9 (high-definition) source Most HDTV signals use a boxy 4:3 aspect ratio. Backlight - Light Sensor - TV Feature Highlights Your new BRAVIA High Definition LCD TV will see page 18). ➢ ECO Settings: This model includes a number of features designed to make your new...
...inputs are at www.sony.com/referencebook. 5 The picture quality may not be as sharp as with complicated operation. The 16:9 fills your BRAVIA screen, maintaining a crisp, clear, vivid picture. 4:3 (standard-definition) source Most standard-definition signals use a wide screen aspect ratio of ...equipment. 16:9 (high-definition) source Most HDTV signals use a boxy 4:3 aspect ratio. Backlight - Light Sensor - TV Feature Highlights Your new BRAVIA High Definition LCD TV will see page 18). ➢ ECO Settings: This model includes a number of features designed to make your new...
Operating Instructions
Page 6
...for additional safety information. • For details about the items listed above, see page 10. 6 For details on page 2. The designated Sony wall-mount bracket model name is available on securing the TV, see the online Reference Book. • When cable connection is completed, be sure to secure the... or in an enclosed area. • For best picture quality, do not expose the screen to avoid damages. * * Table-Top Stand for safety and to direct illumination or sunlight. • Avoid installing the TV in the online Reference Book. If you can mount it to complete the task. Be...
...for additional safety information. • For details about the items listed above, see page 10. 6 For details on page 2. The designated Sony wall-mount bracket model name is available on securing the TV, see the online Reference Book. • When cable connection is completed, be sure to secure the... or in an enclosed area. • For best picture quality, do not expose the screen to avoid damages. * * Table-Top Stand for safety and to direct illumination or sunlight. • Avoid installing the TV in the online Reference Book. If you can mount it to complete the task. Be...
Operating Instructions
Page 7
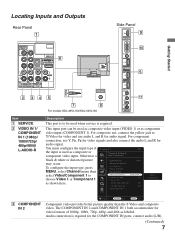
Lock Video/Component 1 Component 1 Control for audio signal. Sound Add Digital Channels To configure the input type, press Screen MENU, select Channel menu then Auto Program Manage Channels Manage Inputs select Video/Component 1 to Channel choose Video 1 or ...1) or as component video input (COMPONENT 1). For component connection, use audio L and R for HDMI On Device List Device Auto Power Off Off TV Auto Power On Off Video 1 Component 1 Signal Diagnostics Setup 3 COMPONENT IN 2 Change RETURN Back MENU Exit Component video provides better picture quality than...
Lock Video/Component 1 Component 1 Control for audio signal. Sound Add Digital Channels To configure the input type, press Screen MENU, select Channel menu then Auto Program Manage Channels Manage Inputs select Video/Component 1 to Channel choose Video 1 or ...1) or as component video input (COMPONENT 1). For component connection, use audio L and R for HDMI On Device List Device Auto Power Off Off TV Auto Power On Off Video 1 Component 1 Signal Diagnostics Setup 3 COMPONENT IN 2 Change RETURN Back MENU Exit Component video provides better picture quality than...
Operating Instructions
Page 11
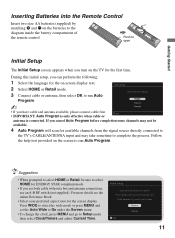
... batteries to the diagram inside the battery compartment of use for this initial setup, you can perform the following: 1 Select the language for the on-screen display text. 2 Select HOME or Retail mode. 3 Connect cable or antenna, then select OK to run Auto Program. • When prompted to ...select HOME or Retail, be available. 4 Auto Program will scan for available channels from the signal source directly connected to the TV's CABLE/ANTENNA input and may not be sure to select HOME for ENERGY STAR compliant mode. • If you have cable and antenna available, ...
... batteries to the diagram inside the battery compartment of use for this initial setup, you can perform the following: 1 Select the language for the on-screen display text. 2 Select HOME or Retail mode. 3 Connect cable or antenna, then select OK to run Auto Program. • When prompted to ...select HOME or Retail, be available. 4 Auto Program will scan for available channels from the signal source directly connected to the TV's CABLE/ANTENNA input and may not be sure to select HOME for ENERGY STAR compliant mode. • If you have cable and antenna available, ...

Operating Instructions
Page 12
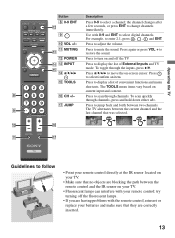
...: Press to play a program in fast forward mode. You can enable or disable the Info Banner by an HDMI connection to the previous screen or exit from your TV (see the online Reference Book for details. 5 WIDE Press repeatedly to play a program in fast rewind mode. X PAUSE: Press to ...CC). These buttons are watching when the program time is less than 24 hours. SYNC MENU: Displays the menu of the attached speakers from the screen when displaying menu items and settings. 7 MENU Press to turn on all Control for details). 4 FAVORITES Press once to exit from the Favorites...
...: Press to play a program in fast forward mode. You can enable or disable the Info Banner by an HDMI connection to the previous screen or exit from your TV (see the online Reference Book for details. 5 WIDE Press repeatedly to play a program in fast rewind mode. X PAUSE: Press to ...CC). These buttons are watching when the program time is less than 24 hours. SYNC MENU: Displays the menu of the attached speakers from the screen when displaying menu items and settings. 7 MENU Press to turn on all Control for details). 4 FAVORITES Press once to exit from the Favorites...
Operating Instructions
Page 13
... ENT to select a channel; Press to scan through the inputs, press V/v. Press to restore the sound. The TOOLS menu items vary based on -screen cursor. To toggle through channels. Press to follow • Point your remote control directly at the IR sensor located on your...move the on current input and content. For example, to select digital channels. Press to display the list of convenient functions and menu shortcuts. The TV alternates between two channels. WIDE INPUT qa MUTING qd qs POWER qf qd INPUT TOOLS qg qf V/v/B/b qg TOOLS 8 qh CH +/- Press to...
... ENT to select a channel; Press to scan through the inputs, press V/v. Press to restore the sound. The TOOLS menu items vary based on -screen cursor. To toggle through channels. Press to follow • Point your remote control directly at the IR sensor located on your...move the on current input and content. For example, to select digital channels. Press to display the list of convenient functions and menu shortcuts. The TV alternates between two channels. WIDE INPUT qa MUTING qd qs POWER qf qd INPUT TOOLS qg qf V/v/B/b qg TOOLS 8 qh CH +/- Press to...

Operating Instructions
Page 14
...confirm the selection or setting. 9 MENU Press to display the list of external inputs. In the menu screen, these buttons serve as its function may indicate the TV needs servicing (see contacting Sony information on the front cover). 4 POWER LED Lights up in the PC input (see the online Reference... Book. In the menu screen, this LED will remain lit even if the TV is turned on. 5 POWER Press to...
...confirm the selection or setting. 9 MENU Press to display the list of external inputs. In the menu screen, these buttons serve as its function may indicate the TV needs servicing (see contacting Sony information on the front cover). 4 POWER LED Lights up in the PC input (see the online Reference... Book. In the menu screen, this LED will remain lit even if the TV is turned on. 5 POWER Press to...

Operating Instructions
Page 16
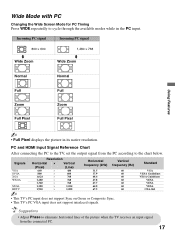
...manually change the Wide Mode setting while watching TV by pressing the WIDE button on the original source, a black frame or black bars may surround the picture. Select Auto Wide and set to Auto Wide Press MENU then go to the Screen menu. Navigating Favorites 1 Press B/b to ... remove the current channel or input while you to an item, highlight its native resolution. 16 Based on your preference. Changing the Wide Screen Mode Press WIDE repeatedly to On. How to set to cycle through the available modes. 4:3 Original source 16:9 Original source Standarddefinition source...
...manually change the Wide Mode setting while watching TV by pressing the WIDE button on the original source, a black frame or black bars may surround the picture. Select Auto Wide and set to Auto Wide Press MENU then go to the Screen menu. Navigating Favorites 1 Press B/b to ... remove the current channel or input while you to an item, highlight its native resolution. 16 Based on your preference. Changing the Wide Screen Mode Press WIDE repeatedly to On. How to set to cycle through the available modes. 4:3 Original source 16:9 Original source Standarddefinition source...
Operating Instructions
Page 17
... (Hz) 60 60 60 60 60 60 60 • This TV's PC input does not support Sync on Green or Composite Sync. • This TV's PC VGA input does not support interlaced signals. Wide Mode with PC Changing the Wide Screen Mode for PC Timing Press WIDE repeatedly to cycle through the... available modes while in its native resolution. Standard VGA VESA Guidelines VESA Guidelines VESA VESA VESA CEA-861 • Adjust Phase to eliminate horizontal lines of the picture when the TV receives an input signal...
... (Hz) 60 60 60 60 60 60 60 • This TV's PC input does not support Sync on Green or Composite Sync. • This TV's PC VGA input does not support interlaced signals. Wide Mode with PC Changing the Wide Screen Mode for PC Timing Press WIDE repeatedly to cycle through the... available modes while in its native resolution. Standard VGA VESA Guidelines VESA Guidelines VESA VESA VESA CEA-861 • Adjust Phase to eliminate horizontal lines of the picture when the TV receives an input signal...
Operating Instructions
Page 18
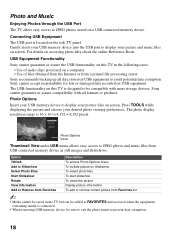
... accessed when the equipment containing media is located on the side TV panel. Sony cannot guarantee or assure compatibility with mass storage devices. Press TOOLS while displaying the picture and choose your picture files on screen. The photo display resolution range is designed to be sure to...photo files check the online Reference Book. Photo and Music Enjoying Photos through the USB Port The TV offers easy access to display your picture and music files on screen. Photo Options Insert your USB memory device to avoid potential data corruption. Gently insert your USB ...
... accessed when the equipment containing media is located on the side TV panel. Sony cannot guarantee or assure compatibility with mass storage devices. Press TOOLS while displaying the picture and choose your picture files on screen. The photo display resolution range is designed to be sure to...photo files check the online Reference Book. Photo and Music Enjoying Photos through the USB Port The TV offers easy access to display your picture and music files on screen. Photo Options Insert your USB memory device to avoid potential data corruption. Gently insert your USB ...
Operating Instructions
Page 20
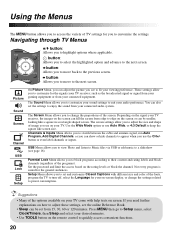
...to quickly access convenient functions. 20 Depending on the signal your TV receives, the images on the screen can be smaller, looking like screen size. The screen settings allow you see the online Reference Book. • Sleep can fill the screen from your connected audio system. USB Menu allows you see ... to power consumption. • Many of the options available on your TV come with help texts on screen. The Screen Menu allows you to move to suit your desired minutes. • Use TOOLS button on the screen or can show or hide channels to appear when you use Auto Wide...
...to quickly access convenient functions. 20 Depending on the signal your TV receives, the images on the screen can be smaller, looking like screen size. The screen settings allow you see the online Reference Book. • Sleep can fill the screen from your connected audio system. USB Menu allows you see ... to power consumption. • Many of the options available on your TV come with help texts on screen. The Screen Menu allows you to move to suit your desired minutes. • Use TOOLS button on the screen or can show or hide channels to appear when you use Auto Wide...

Operating Instructions
Page 22
...Digital terrestrial: 2 - 69 Analog Cable: 1 - 135 / Digital Cable: 1 - 135 Panel system LCD (Liquid Crystal Display) Panel Speaker output 10 W + 10 W Input/Output jacks CABLE/ANTENNA 75-ohm... include thumbdrives, hard disks and some MP3 players and cameras. Screen size (inches measured diagonally) 31.5 (32 class) 40 46 52 54.6 (55 class) Display resolution 1,920 dots (horizontal...200 300 × 300 400 × 300 wall-mount screw size (mm) M6 (length: refer to the TV) / Operating Instructions (1) / Quick Setup Guide (1) / Warranty Card (1) / Safety and Regulatory Booklet (1) / ...
...Digital terrestrial: 2 - 69 Analog Cable: 1 - 135 / Digital Cable: 1 - 135 Panel system LCD (Liquid Crystal Display) Panel Speaker output 10 W + 10 W Input/Output jacks CABLE/ANTENNA 75-ohm... include thumbdrives, hard disks and some MP3 players and cameras. Screen size (inches measured diagonally) 31.5 (32 class) 40 46 52 54.6 (55 class) Display resolution 1,920 dots (horizontal...200 300 × 300 400 × 300 wall-mount screw size (mm) M6 (length: refer to the TV) / Operating Instructions (1) / Quick Setup Guide (1) / Warranty Card (1) / Safety and Regulatory Booklet (1) / ...
Operating Instructions
Page 23
... standby 120 V AC, 60 Hz 200 W All models less than 1 W. 245 W 300 W Screen size (inches measured diagonally) Display resolution Speaker/Full range (2) (mm) (inches) Dimensions (W ×... (mm) Mass with stand (kg) (lb.) without stand (kg) (lb.) Supplied accessories Optional accessories 40 46 52 1,920 dots (horizontal) × 1,080 lines (vertical) 35 × 175 1 7/16 ×...power cord (1) (For KDL-46VL150/ KDL-52VL150) / Cable holder (1) (For KDL-40SL150 attached to the TV) (For KDL-46VL150/ KDL-52VL150 attached to the Table-Top Stand) / Operating Instructions (1) / Quick Setup...
... standby 120 V AC, 60 Hz 200 W All models less than 1 W. 245 W 300 W Screen size (inches measured diagonally) Display resolution Speaker/Full range (2) (mm) (inches) Dimensions (W ×... (mm) Mass with stand (kg) (lb.) without stand (kg) (lb.) Supplied accessories Optional accessories 40 46 52 1,920 dots (horizontal) × 1,080 lines (vertical) 35 × 175 1 7/16 ×...power cord (1) (For KDL-46VL150/ KDL-52VL150) / Cable holder (1) (For KDL-40SL150 attached to the TV) (For KDL-46VL150/ KDL-52VL150 attached to the Table-Top Stand) / Operating Instructions (1) / Quick Setup...


