Operating Instructions
Page 3
...with Your BRAVIA 4 The Four Steps to a Stunning HD Experience 5 TV Feature Highlights 5 Getting Started Setting Up Your TV 7 Attaching the Table-Top Stand 8 Locating Inputs and Outputs 10 Connecting the TV 12 Connecting Other Equipment 16 When Installing the TV Against a Wall or Enclosed Area 17 Securing the... Bracket 51 Installing the Wall-Mount Bracket 52 Troubleshooting 57 Important Notices 62 Specifications 63 Index 65 Customer Support United States http://www.sony.com/tvsupport Canada http://www.sony.ca/support On-line Registration United States http://productregistration...
...with Your BRAVIA 4 The Four Steps to a Stunning HD Experience 5 TV Feature Highlights 5 Getting Started Setting Up Your TV 7 Attaching the Table-Top Stand 8 Locating Inputs and Outputs 10 Connecting the TV 12 Connecting Other Equipment 16 When Installing the TV Against a Wall or Enclosed Area 17 Securing the... Bracket 51 Installing the Wall-Mount Bracket 52 Troubleshooting 57 Important Notices 62 Specifications 63 Index 65 Customer Support United States http://www.sony.com/tvsupport Canada http://www.sony.ca/support On-line Registration United States http://productregistration...

Operating Instructions
Page 7
... Started Getting Started Setting Up Your TV Some TV models are not mounting the TV to a wall, you will need to attach the Table-Top Stand. Be sure to consider the following while setting up your TV: • Disconnect all cables when carrying the TV. • Carry the TV with ...a detached Table-Top Stand so you are packaged with the adequate number of people; larger size TVs require two or more people. • Correct hand placement while carrying the...
... Started Getting Started Setting Up Your TV Some TV models are not mounting the TV to a wall, you will need to attach the Table-Top Stand. Be sure to consider the following while setting up your TV: • Disconnect all cables when carrying the TV. • Carry the TV with ...a detached Table-Top Stand so you are packaged with the adequate number of people; larger size TVs require two or more people. • Correct hand placement while carrying the...

Operating Instructions
Page 8
... attach the screws tightly without damaging the screw head. 8 Thick and soft cloth Screw (+PSW 5 x 16) (Supplied) * Be careful not to hit the Table-Top Stand against the edge of the surface when attaching it dropping when attaching. • This TV is very heavy, so two or more people should place... using the supplied screws. Do not remove any other screws. • Hold the Table-Top Stand with a thick and soft cloth. 2 Fix the TV to the stand according to avoid it . • To detach the Table-Top Stand from the TV, remove the three screws guided by the allow mark on a level and...
... attach the screws tightly without damaging the screw head. 8 Thick and soft cloth Screw (+PSW 5 x 16) (Supplied) * Be careful not to hit the Table-Top Stand against the edge of the surface when attaching it dropping when attaching. • This TV is very heavy, so two or more people should place... using the supplied screws. Do not remove any other screws. • Hold the Table-Top Stand with a thick and soft cloth. 2 Fix the TV to the stand according to avoid it . • To detach the Table-Top Stand from the TV, remove the three screws guided by the allow mark on a level and...

Operating Instructions
Page 9
Getting Started • Please ensure the AC power cord is away from the stand installation location when you attach the stand. • Do not touch the inner side of the bottom of the TV stand to avoid being hurt. 9
Getting Started • Please ensure the AC power cord is away from the stand installation location when you attach the stand. • Do not touch the inner side of the bottom of the TV stand to avoid being hurt. 9

Operating Instructions
Page 17
Installed with stand 4 inches (10 cm) 11 7/8 inches (30 cm) 4 inches (10 cm) 2 3/8 inches (6 cm) Leave at least this much space around the set as shown below 41 &#...
Installed with stand 4 inches (10 cm) 11 7/8 inches (30 cm) 4 inches (10 cm) 2 3/8 inches (6 cm) Leave at least this much space around the set as shown below 41 &#...

Operating Instructions
Page 18
... the TV from toppling over . ❑ Route all AC power cords and connecting cables so that they are not accessible to the TV stand. Make sure the TV stand can easily be used as steps, such as a chest of drawers. ❑ Install the TV where it cannot be pulled, pushed, or knocked... over . Angle braces Stand 18 Securing the TV Sony strongly recommends taking measures to prevent the TV from Toppling ❑ Secure the TV to a wall and/or stand. ❑ Do not allow children to play or climb on furniture and TV sets...
... the TV from toppling over . ❑ Route all AC power cords and connecting cables so that they are not accessible to the TV stand. Make sure the TV stand can easily be used as steps, such as a chest of drawers. ❑ Install the TV where it cannot be pulled, pushed, or knocked... over . Angle braces Stand 18 Securing the TV Sony strongly recommends taking measures to prevent the TV from Toppling ❑ Secure the TV to a wall and/or stand. ❑ Do not allow children to play or climb on furniture and TV sets...

Operating Instructions
Page 19
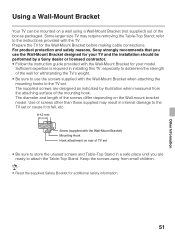
...no excess slack in the rope or chain. For further protection, be sure to the stand. Wall-mount holes Wall-anchor (not supplied) Anchor bolts (not supplied) Rope or chain (not supplied) • Contact Sony Customer Support to the wall by providing your TV model name. Anchor the TV to... of the TV). For United States call: 1-800-488-7669 or visit: http://www.sony.com/accessories For Canada call: 1-877-899-7669 • Securing the TV to the stand without securing the TV and the stand to the wall. Use the optional hardware listed below illustration. 6-8 mm Screw M4 Rope...
...no excess slack in the rope or chain. For further protection, be sure to the stand. Wall-mount holes Wall-anchor (not supplied) Anchor bolts (not supplied) Rope or chain (not supplied) • Contact Sony Customer Support to the wall by providing your TV model name. Anchor the TV to... of the TV). For United States call: 1-800-488-7669 or visit: http://www.sony.com/accessories For Canada call: 1-877-899-7669 • Securing the TV to the stand without securing the TV and the stand to the wall. Use the optional hardware listed below illustration. 6-8 mm Screw M4 Rope...
Operating Instructions
Page 51
...-mount bracket model. Keep the screws away from the attaching surface of screws other than those supplied may require removing the Table-Top Stand; Some larger size TV may result in internal damage to the TV set • Be sure to store the unused screws and Table-... • Be sure to use the Wall-Mount Bracket designed for your model. For product protection and safety reasons, Sony strongly recommends that you are designed as indicated by a Sony dealer or licensed contractor. • Follow the instruction guide provided with the Wall-Mount Bracket for the Wall-Mount Bracket...
...-mount bracket model. Keep the screws away from the attaching surface of screws other than those supplied may require removing the Table-Top Stand; Some larger size TV may result in internal damage to the TV set • Be sure to store the unused screws and Table-... • Be sure to use the Wall-Mount Bracket designed for your model. For product protection and safety reasons, Sony strongly recommends that you are designed as indicated by a Sony dealer or licensed contractor. • Follow the instruction guide provided with the Wall-Mount Bracket for the Wall-Mount Bracket...

Operating Instructions
Page 54
Thick and soft cloth • Hold the Table-Top Stand with its screen facing down behind the TV. 54 Step 4: Prepare the TV for wall mount installation Follow the steps below to avoid it dropping ... with its screen facing down on a level and stable surface covered with a thick and soft cloth. • Be careful not to hit the Table-Top Stand against the edge of the surface when placing the TV with one hand to prepare for installing the TV. 1 Disconnect all the cables from the...
Thick and soft cloth • Hold the Table-Top Stand with its screen facing down behind the TV. 54 Step 4: Prepare the TV for wall mount installation Follow the steps below to avoid it dropping ... with its screen facing down on a level and stable surface covered with a thick and soft cloth. • Be careful not to hit the Table-Top Stand against the edge of the surface when placing the TV with one hand to prepare for installing the TV. 1 Disconnect all the cables from the...
Operating Instructions
Page 56
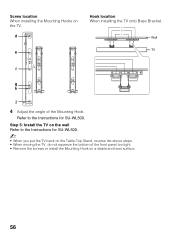
Screw location When installing the Mounting Hooks on the Table-Top Stand, reverse the above steps. • When moving the TV, do not squeeze the bottom of the Mounting Hook. Wall TV 4 Adjust the angle of the front panel too tight. • Remove the screws or install the Mounting Hook on the wall Refer to the Instructions for SU-WL500. ~ • When you put the TV back on the TV. Step 5: Install the TV on a stable and level surface. 56 Hook location When installing the TV onto Base Bracket. Refer to the Instructions for SU-WL500.
Screw location When installing the Mounting Hooks on the Table-Top Stand, reverse the above steps. • When moving the TV, do not squeeze the bottom of the Mounting Hook. Wall TV 4 Adjust the angle of the front panel too tight. • Remove the screws or install the Mounting Hook on the wall Refer to the Instructions for SU-WL500. ~ • When you put the TV back on the TV. Step 5: Install the TV on a stable and level surface. 56 Hook location When installing the TV onto Base Bracket. Refer to the Instructions for SU-WL500.
Operating Instructions
Page 63
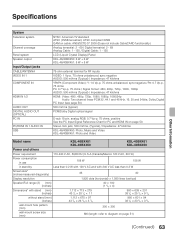
... than 0.3 W Screen size* (inches measured diagonally) 46 40 Display resolution 1,920 dots (horizontal) × 1,080 lines (vertical) Speaker/Full range (2) (mm) (inches) Dimensions* with stand (mm) (inches) without stand (mm) (inches) wall-mount hole pattern (mm) 1,112 × 713 × 279 43 7/8 × 28 1/8 × 11 1,112 × 675 × 97 43...
... than 0.3 W Screen size* (inches measured diagonally) 46 40 Display resolution 1,920 dots (horizontal) × 1,080 lines (vertical) Speaker/Full range (2) (mm) (inches) Dimensions* with stand (mm) (inches) without stand (mm) (inches) wall-mount hole pattern (mm) 1,112 × 713 × 279 43 7/8 × 28 1/8 × 11 1,112 × 675 × 97 43...

Operating Instructions
Page 64
Model name KDL-46BX451 KDL-46BX450 KDL-40BX451 KDL-40BX450 Mass* with stand (kg) 17.2 13.8 (lb.) 37.9 30.4 without stand (kg) 16.0 12.8 (lb.) 35.3 28.2 Supplied accessories common to all models Remote control RM-YD080 (1)/Size... AA batteries (2)/Operating Instructions (1)/Quick Setup Guide (1)/Warranty Card (1)/Safety and Regulatory Booklet (1)/Software License (1)/Stand installation guide (1)/Table-Top Stand (1 set)/Screw (3) Optional accessories Connecting cables / Support Belt Kit / Wall-Mount Bracket: SU-WL500 • Optional accessories ...
Model name KDL-46BX451 KDL-46BX450 KDL-40BX451 KDL-40BX450 Mass* with stand (kg) 17.2 13.8 (lb.) 37.9 30.4 without stand (kg) 16.0 12.8 (lb.) 35.3 28.2 Supplied accessories common to all models Remote control RM-YD080 (1)/Size... AA batteries (2)/Operating Instructions (1)/Quick Setup Guide (1)/Warranty Card (1)/Safety and Regulatory Booklet (1)/Software License (1)/Stand installation guide (1)/Table-Top Stand (1 set)/Screw (3) Optional accessories Connecting cables / Support Belt Kit / Wall-Mount Bracket: SU-WL500 • Optional accessories ...


