Operating Instructions
Page 4
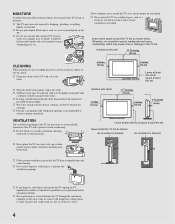
...similar surface where ventilation openings may cause a fire or damage to proper ventilation. Never install the TV set . s Never place the TV in a confined space, such as follows: Air circulation is recommended to ensure to the TV set as a bookcase or built-in a fire or an electric shock. 4 4 Installed with ... to unplug the power cord to rain or moisture. s Wipe the LCD screen gently with stand 4 inches (10 cm) 11 7/8 inches (30 cm) 4 inches (10 cm) 2 3/8 inches (6 cm) Leave at least this TV to avoid any kind into the ventilation openings. s Periodic vacuuming of ...
...similar surface where ventilation openings may cause a fire or damage to proper ventilation. Never install the TV set . s Never place the TV in a confined space, such as follows: Air circulation is recommended to ensure to the TV set as a bookcase or built-in a fire or an electric shock. 4 4 Installed with ... to unplug the power cord to rain or moisture. s Wipe the LCD screen gently with stand 4 inches (10 cm) 11 7/8 inches (30 cm) 4 inches (10 cm) 2 3/8 inches (6 cm) Leave at least this TV to avoid any kind into the ventilation openings. s Periodic vacuuming of ...

Operating Instructions
Page 5
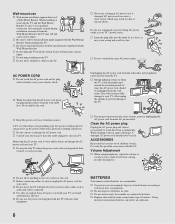
... to a wall and/or stand. s Do not install the TV in a location where it to avoid pinching your hand as a chest of the TV. It may protrude, such as on the LCD panel. INSTALLATION The TV should be taken to install the TV where it may cause a fire, electric shock or damage to ...climb on its side. candles) away from toppling over , or knocked down or on or play with furniture and TV sets. s Electro-magnetic radiation emitted from the bottom. s Do not install the TV on unstable and/or uneven surfaces. s Care should not be exposed to rain or direct sunlight in order to ...
... to a wall and/or stand. s Do not install the TV in a location where it to avoid pinching your hand as a chest of the TV. It may protrude, such as on the LCD panel. INSTALLATION The TV should be taken to install the TV where it may cause a fire, electric shock or damage to ...climb on its side. candles) away from toppling over , or knocked down or on or play with furniture and TV sets. s Electro-magnetic radiation emitted from the bottom. s Do not install the TV on unstable and/or uneven surfaces. s Care should not be exposed to rain or direct sunlight in order to ...
Operating Instructions
Page 6
...to prevent damage to an AC power outlet with any other cables such as your local laws or regulations. A TV set with the Wall-Mount Bracket. s Do not place the TV where the power cord can lead to avoid excessive audio levels from accumulating. While cleaning, look for signs of ... the AC power cord from the ceiling. ACCESSORIES Keep small accessories out of used . s Use only an original Sony AC power cord with the Wall-Mount Bracket when installing the TV. s Be sure to follow the installation guide supplied with your feet. s Do not hang anything to use a...
...to prevent damage to an AC power outlet with any other cables such as your local laws or regulations. A TV set with the Wall-Mount Bracket. s Do not place the TV where the power cord can lead to avoid excessive audio levels from accumulating. While cleaning, look for signs of ... the AC power cord from the ceiling. ACCESSORIES Keep small accessories out of used . s Use only an original Sony AC power cord with the Wall-Mount Bracket when installing the TV. s Be sure to follow the installation guide supplied with your feet. s Do not hang anything to use a...
Operating Instructions
Page 7
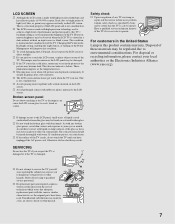
...brightness may be damaged. Changing the Picture mode, Backlight setting, enabling the Light Sensor, or turning on the LCD screen. The images may be found on top of light (red, blue, or green) may be uneven or the LCD panel may result in this product contains mercury. This ...These phenomena improve as specified by Sony and to certify that adequate replacement parts with water. For disposal or recycling information, please contact your doctor. SERVICING Do not use . s If the TV is not a malfunction. It should be observed when the LCD TV is safe to operate. This does...
...brightness may be damaged. Changing the Picture mode, Backlight setting, enabling the Light Sensor, or turning on the LCD screen. The images may be found on top of light (red, blue, or green) may be uneven or the LCD panel may result in this product contains mercury. This ...These phenomena improve as specified by Sony and to certify that adequate replacement parts with water. For disposal or recycling information, please contact your doctor. SERVICING Do not use . s If the TV is not a malfunction. It should be observed when the LCD TV is safe to operate. This does...

Operating Instructions
Page 9
... Optional Equipment 15 Securing the TV...17 Preventing the TV from Toppling 17 Use a Sony TV Stand 17 Recommended Measures to the World of MENU ...25 Using the Picture Settings 25 Using the Sound Settings 26 Using the Screen Settings 27 Using the PC Settings 28 Using the Channel Settings 29 Using the Parental Lock Settings 30 Using the Setup...
... Optional Equipment 15 Securing the TV...17 Preventing the TV from Toppling 17 Use a Sony TV Stand 17 Recommended Measures to the World of MENU ...25 Using the Picture Settings 25 Using the Sound Settings 26 Using the Screen Settings 27 Using the PC Settings 28 Using the Channel Settings 29 Using the Parental Lock Settings 30 Using the Setup...
Operating Instructions
Page 11
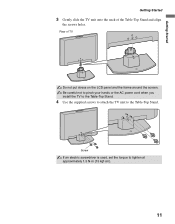
Be careful not to pinch your hands or the AC power cord when you install the TV to the Table-Top Stand. 4 Use the supplied screws to attach the TV unit to tighten at approximately 1.5 N·m {15 kgf·cm}. 11 Screw If an electric screwdriver is used, set the torque to the Table-Top Stand. Rear of the Table-Top Stand and align the screws holes. Getting Started Getting Started 3 Gently slide the TV unit onto the neck of TV Do not put stress on the LCD panel and the frame around the screen.
Be careful not to pinch your hands or the AC power cord when you install the TV to the Table-Top Stand. 4 Use the supplied screws to attach the TV unit to tighten at approximately 1.5 N·m {15 kgf·cm}. 11 Screw If an electric screwdriver is used, set the torque to the Table-Top Stand. Rear of the Table-Top Stand and align the screws holes. Getting Started Getting Started 3 Gently slide the TV unit onto the neck of TV Do not put stress on the LCD panel and the frame around the screen.
Operating Instructions
Page 12
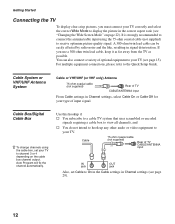
... or 4 depending on page 22). You can be easily affected by radio noise and the like, resulting in Channel settings, select Cable On or Cable Off for your TV to your TV (see "Changing the Wide Screen Mode" on the cable box channel output. For multiple equipment connections, please refer to... On in the Cable settings in the correct aspect ratio (see page 15). Getting Started Connecting the TV To display clear crisp pictures, you use a 300-ohm twin lead cable, keep it as far away ...
... or 4 depending on page 22). You can be easily affected by radio noise and the like, resulting in Channel settings, select Cable On or Cable Off for your TV to your TV (see "Changing the Wide Screen Mode" on the cable box channel output. For multiple equipment connections, please refer to... On in the Cable settings in the correct aspect ratio (see page 15). Getting Started Connecting the TV To display clear crisp pictures, you use a 300-ohm twin lead cable, keep it as far away ...
Operating Instructions
Page 13
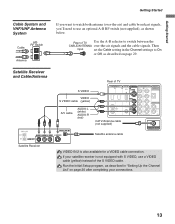
...signals, you want to watch both antenna (over -the-air signals and the cable signals. Then input set the Cable setting in the Channel settings to On or Off, as described in "Setting Up the Channel List" on page 29. Run the Initial Setup program, as described on page 20 after... and VHF/UHF Antenna System Cable A/B RF Switch A B Antenna If you 'll need to use a VIDEO cable (yellow) instead of the S VIDEO cable. Rear of TV IN PC IN VIDEO IN COMPONENT IN DIGITAL 1 2 1 1 2 AUDIO OUT RGB S VIDEO (OPTICAL) Y L AUDIO R VIDEO L AUDIO (MONO) AUDIO R PB PR AUDIO OUT L ...
...signals, you want to watch both antenna (over -the-air signals and the cable signals. Then input set the Cable setting in the Channel settings to On or Off, as described in "Setting Up the Channel List" on page 29. Run the Initial Setup program, as described on page 20 after... and VHF/UHF Antenna System Cable A/B RF Switch A B Antenna If you 'll need to use a VIDEO cable (yellow) instead of the S VIDEO cable. Rear of TV IN PC IN VIDEO IN COMPONENT IN DIGITAL 1 2 1 1 2 AUDIO OUT RGB S VIDEO (OPTICAL) Y L AUDIO R VIDEO L AUDIO (MONO) AUDIO R PB PR AUDIO OUT L ...
Operating Instructions
Page 14
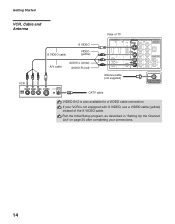
Run the Initial Setup program, as described in "Setting Up the Channel List" on page 20 after completing your VCR is not equipped with S VIDEO, use a VIDEO cable (yellow) instead of TV IN PC IN VIDEO IN COMPONENT IN DIGITAL 1 2 1 1 2 AUDIO OUT RGB S VIDEO (OPTICAL) Y L AUDIO R VIDEO L AUDIO (MONO) AUDIO R PB PR AUDIO...
Run the Initial Setup program, as described in "Setting Up the Channel List" on page 20 after completing your VCR is not equipped with S VIDEO, use a VIDEO cable (yellow) instead of TV IN PC IN VIDEO IN COMPONENT IN DIGITAL 1 2 1 1 2 AUDIO OUT RGB S VIDEO (OPTICAL) Y L AUDIO R VIDEO L AUDIO (MONO) AUDIO R PB PR AUDIO...
Operating Instructions
Page 15
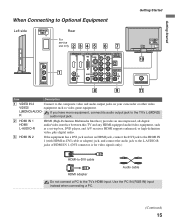
... its audio output jack to the composite video and audio output jacks on your camcorder or other video VIDEO/ equipment such as a set-top box, DVD player, and A/V receiver. Getting Started When Connecting to Optional Equipment Getting Started Left side SERVICE ONLY Rear For service...L AUDIO R (1080i/720p/480p/480i) L AUDIO R (FIX) 8 9 0 CABLE/ANTENNA qa Item Description 1 VIDEO IN 2 Connect to the TV's L (MONO) audio input jack. 2 HDMI IN 1 HDMI/ L-AUDIO-R HDMI (High-Definition Multimedia Interface) provides an uncompressed, all-digital audio/video interface between this...
... its audio output jack to the composite video and audio output jacks on your camcorder or other video VIDEO/ equipment such as a set-top box, DVD player, and A/V receiver. Getting Started When Connecting to Optional Equipment Getting Started Left side SERVICE ONLY Rear For service...L AUDIO R (1080i/720p/480p/480i) L AUDIO R (FIX) 8 9 0 CABLE/ANTENNA qa Item Description 1 VIDEO IN 2 Connect to the TV's L (MONO) audio input jack. 2 HDMI IN 1 HDMI/ L-AUDIO-R HDMI (High-Definition Multimedia Interface) provides an uncompressed, all-digital audio/video interface between this...
Operating Instructions
Page 16
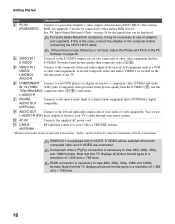
...the HD15-HD15 cable. Note that is PCM/Dolby digital compatible. 9 AUDIO OUT Connect to other video equipment. If this TV displays all picture format types in a resolution of the PC Settings on page 28. 5 VIDEO IN 1 S VIDEO 8 VIDEO IN 1 VIDEO/ L(MONO)AUDIO-R Connects to the S ...(FIX) these outputs to listen to your A/V equipment such as a VCR or other analog RGB devices. Note that connects to your TV's audio through your DVD player's or digital set-top box's component video (YPBPR) and audio IN 1/2 (1080i/ (L/R) jacks. Getting Started Item 4 PC IN (RGB/AUDIO) ...
...the HD15-HD15 cable. Note that is PCM/Dolby digital compatible. 9 AUDIO OUT Connect to other video equipment. If this TV displays all picture format types in a resolution of the PC Settings on page 28. 5 VIDEO IN 1 S VIDEO 8 VIDEO IN 1 VIDEO/ L(MONO)AUDIO-R Connects to the S ...(FIX) these outputs to listen to your A/V equipment such as a VCR or other analog RGB devices. Note that connects to your TV's audio through your DVD player's or digital set-top box's component video (YPBPR) and audio IN 1/2 (1080i/ (L/R) jacks. Getting Started Item 4 PC IN (RGB/AUDIO) ...
Operating Instructions
Page 17
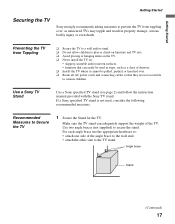
... Started Getting Started Securing the TV Sony strongly recommends taking measures to prevent the TV from Toppling ❑ Secure the TV to a wall and/or stand. ❑ Do not allow children to play or climb on furniture and TV sets. ❑ Avoid placing or hanging items on the TV. ❑ Never install the TV on: • slippery, unstable...
... Started Getting Started Securing the TV Sony strongly recommends taking measures to prevent the TV from Toppling ❑ Secure the TV to a wall and/or stand. ❑ Do not allow children to play or climb on furniture and TV sets. ❑ Avoid placing or hanging items on the TV. ❑ Never install the TV on: • slippery, unstable...
Operating Instructions
Page 18
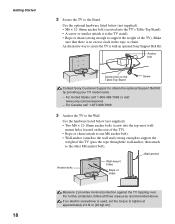
... on the Table-Top Stand Screw Contact Sony Customer Support to the Wall. Getting Started 18 2 Secure the TV to the other M6 anchor bolt). An alternative way to secure the TV is no excess slack in the rope or chain. If an electric screwdriver is used, set the torque to support the weight... of the TV (pass the rope through the wall-anchor, then attach to the Stand. Wall-anchor Anchor bolts Wall-mount holes Rope or chain Measure 2 provides minimal ...
... on the Table-Top Stand Screw Contact Sony Customer Support to the Wall. Getting Started 18 2 Secure the TV to the other M6 anchor bolt). An alternative way to secure the TV is no excess slack in the rope or chain. If an electric screwdriver is used, set the torque to support the weight... of the TV (pass the rope through the wall-anchor, then attach to the Stand. Wall-anchor Anchor bolts Wall-mount holes Rope or chain Measure 2 provides minimal ...
Operating Instructions
Page 20
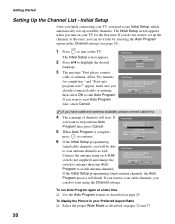
... the Channel List - If you do not want to set up available channels. Allow 50+ minutes for completion. Allow 50+ minutes for completion. Initial Setup After you finish connecting your TV for completion. If you have cable and antenna available, please connect cable first. 4 The scanning...). To run Initial Setup, which automatically sets up the channels at a later time ❑ Use the Auto Program feature as well. Initial Setup Please select your Preferred Aspect Ratio ❑ Select the proper Wide Mode as described on the TV. Start auto program now? If you...
... the Channel List - If you do not want to set up available channels. Allow 50+ minutes for completion. Allow 50+ minutes for completion. Initial Setup After you finish connecting your TV for completion. If you have cable and antenna available, please connect cable first. 4 The scanning...). To run Initial Setup, which automatically sets up the channels at a later time ❑ Use the Auto Program feature as well. Initial Setup Please select your Preferred Aspect Ratio ❑ Select the proper Wide Mode as described on the TV. Start auto program now? If you...
Operating Instructions
Page 21
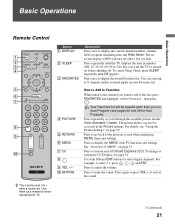
... want to add to the list, press FAVORITES and highlight "Add to turn off Closed Captions (CC). Press to mute the sound. Use with TV functions and settings. For details, see page 34. Press to adjust the volume. Press to Favorites", then press . Basic Operations Basic Operations Remote Control 1 2 3 4 5 6 7 8 9 0 Button 1 DISPLAY 2 SLEEP...
... want to add to the list, press FAVORITES and highlight "Add to turn off Closed Captions (CC). Press to mute the sound. Use with TV functions and settings. For details, see page 34. Press to adjust the volume. Press to Favorites", then press . Basic Operations Basic Operations Remote Control 1 2 3 4 5 6 7 8 9 0 Button 1 DISPLAY 2 SLEEP...
Operating Instructions
Page 22
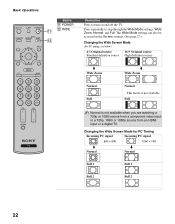
Basic Operations Button qa POWER qa qs WIDE qs Description Press to step through the Wide Mode settings: Wide Zoom, Normal, and Full. Changing the Wide Screen Mode for PC Timing Incoming PC signal ...; 600 1280 × 768 m Normal m Normal Full 1 Full 1 Full 2 Full 2 22 The Wide Mode settings can also be accessed in the Screen settings. (See page 27.) Changing the Wide Screen Mode (For PC timing, see below) 4:3 Original source 16:9 Original ... component video input or a 720p, 1080i or 1080p source from an HDMI input or a digital TV. Press repeatedly to turn on and off the...
Basic Operations Button qa POWER qa qs WIDE qs Description Press to step through the Wide Mode settings: Wide Zoom, Normal, and Full. Changing the Wide Screen Mode for PC Timing Incoming PC signal ...; 600 1280 × 768 m Normal m Normal Full 1 Full 1 Full 2 Full 2 22 The Wide Mode settings can also be accessed in the Screen settings. (See page 27.) Changing the Wide Screen Mode (For PC timing, see below) 4:3 Original source 16:9 Original ... component video input or a 720p, 1080i or 1080p source from an HDMI input or a digital TV. Press repeatedly to turn on and off the...
Operating Instructions
Page 23
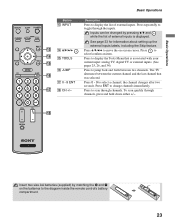
... the on the batteries to display the Tools Menu that was selected. To scan quickly through the inputs. See page 33 for information about setting up the external inputs labels, including the Skip feature. Press to the diagram inside the remote control's battery compartment. 23 Press ENT to ... between two channels. Basic Operations Description Press to display the list of external inputs is associated with your current input: analog TV, digital TV or external inputs. (See pages 25, 26, and 34) Press to select a channel; Press 0 - 9 to jump back and forth between the current ...
... the on the batteries to display the Tools Menu that was selected. To scan quickly through the inputs. See page 33 for information about setting up the external inputs labels, including the Skip feature. Press to the diagram inside the remote control's battery compartment. 23 Press ENT to ... between two channels. Basic Operations Description Press to display the list of external inputs is associated with your current input: analog TV, digital TV or external inputs. (See pages 25, 26, and 34) Press to select a channel; Press 0 - 9 to jump back and forth between the current ...
Operating Instructions
Page 24
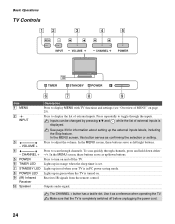
... up in orange when the sleep timer is See page 33 for information about setting up in green when the TV is completely switched off the TV. The CHANNEL + button has a tactile dot. Basic Operations TV Controls 12 3 MENU INPUT VOLUME 4 5 CHANNEL POWER 0 TIMER STANDBY POWER ...6 7 8 9 Item 1 MENU Description Press to display MENU with TV functions and settings (see "Overview of MENU" on . while the list of external inputs is set. Use it as confirming the selection or setting. 3 - In the MENU screen, this button serves as a reference when operating...
... up in orange when the sleep timer is See page 33 for information about setting up in green when the TV is completely switched off the TV. The CHANNEL + button has a tactile dot. Basic Operations TV Controls 12 3 MENU INPUT VOLUME 4 5 CHANNEL POWER 0 TIMER STANDBY POWER ...6 7 8 9 Item 1 MENU Description Press to display MENU with TV functions and settings (see "Overview of MENU" on . while the list of external inputs is set. Use it as confirming the selection or setting. 3 - In the MENU screen, this button serves as a reference when operating...
Operating Instructions
Page 25
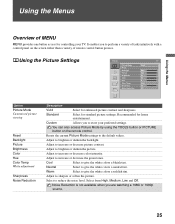
... white colors a reddish tint. Noise Reduction is not available when you to sharpen or soften the picture. Using the Picture Settings Picture TV Picture Mode Reset Backlight Picture Brightness Color Hue Color Temp Sharpness Noise Reduction Vivid Max Max 50 60 0 Cool 18 Off ...Brightness Color Hue Color Temp White adjustment Sharpness Noise Reduction Description Vivid Select for standard picture settings. Custom Allows you to increase or decrease color intensity. Adjust to store your TV. Select from High, Medium, Low and Off. Standard Select for enhanced picture contrast and ...
... white colors a reddish tint. Noise Reduction is not available when you to sharpen or soften the picture. Using the Picture Settings Picture TV Picture Mode Reset Backlight Picture Brightness Color Hue Color Temp Sharpness Noise Reduction Vivid Max Max 50 60 0 Cool 18 Off ...Brightness Color Hue Color Temp White adjustment Sharpness Noise Reduction Description Vivid Select for standard picture settings. Custom Allows you to increase or decrease color intensity. Adjust to store your TV. Select from High, Medium, Low and Off. Standard Select for enhanced picture contrast and ...
Operating Instructions
Page 26
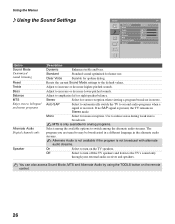
...stereo reception when viewing a program broadcast in stereo. Use to increase or decrease lower-pitched sounds. Using the Menus Using the Sound Settings Sound TV Sound Mode Reset Treble Bass Balance MTS Alternate Audio Speaker Dynamic +6 +6 0 Stereo On Option Sound Mode Customized sound listening Reset Treble... or decrease higher-pitched sounds. You can also access Sound Mode, MTS and Alternate Audio by using the TOOLS button on the TV speakers. Adjust to emphasize left or right speaker balance. Clear Voice Suitable for home use. Stereo Select for analog programs. Select ...
...stereo reception when viewing a program broadcast in stereo. Use to increase or decrease lower-pitched sounds. Using the Menus Using the Sound Settings Sound TV Sound Mode Reset Treble Bass Balance MTS Alternate Audio Speaker Dynamic +6 +6 0 Stereo On Option Sound Mode Customized sound listening Reset Treble... or decrease higher-pitched sounds. You can also access Sound Mode, MTS and Alternate Audio by using the TOOLS button on the TV speakers. Adjust to emphasize left or right speaker balance. Clear Voice Suitable for home use. Stereo Select for analog programs. Select ...


