Operating Instructions
Page 1
Operating Instructions LCD Digital Color TV KDL-37L5000 KDL-32L5000 KDL-26L5000 KDL-22L5000 © 2009 Sony Corporation Sony Customer Support U.S.A.: www.sony.com/tvsupport Canada: www.sony.ca/support United States 1.800.222.SONY Canada 1.877.899.SONY Please Do Not Return the Product to the Store
Operating Instructions LCD Digital Color TV KDL-37L5000 KDL-32L5000 KDL-26L5000 KDL-22L5000 © 2009 Sony Corporation Sony Customer Support U.S.A.: www.sony.com/tvsupport Canada: www.sony.ca/support United States 1.800.222.SONY Canada 1.877.899.SONY Please Do Not Return the Product to the Store
Operating Instructions
Page 2
..., alcohol or benzine for cleaning. • See the supplied Safety Booklet for the 22 class, 26, 32 class, and 37 inch BRAVIA KDL-L5000 series models with your Sony dealer regarding this TV (i.e. Licensing Information Macintosh is initially set by the U.S. Fergason Patent Properties, LLC: U.S. Environmental Protection Agency and Department of Apple Inc., registered...
..., alcohol or benzine for cleaning. • See the supplied Safety Booklet for the 22 class, 26, 32 class, and 37 inch BRAVIA KDL-L5000 series models with your Sony dealer regarding this TV (i.e. Licensing Information Macintosh is initially set by the U.S. Fergason Patent Properties, LLC: U.S. Environmental Protection Agency and Department of Apple Inc., registered...
Operating Instructions
Page 3
...BRAVIA® Welcome to the World of BRAVIA 4 Experiencing Stunning HD with Your BRAVIA 4 The Four Steps to a Stunning HD Experience 5 TV Feature Highlights 5 Getting Started Setting Up Your TV 6 Locating Inputs and Outputs 7 Adjusting the viewing angle of the TV 8 Connecting the TV...TV Against a Wall or Enclosed Area 13 Securing the TV 14 Running Initial Setup 16 Operating the TV Using the Remote Control 17 Remote Control Button Description 18 TV Controls and Indicators 20 Using Features Using BRAVIA... 37 Preparing the TV for Wall-Mounting 38 Troubleshooting 39 Important Notices 43...
...BRAVIA® Welcome to the World of BRAVIA 4 Experiencing Stunning HD with Your BRAVIA 4 The Four Steps to a Stunning HD Experience 5 TV Feature Highlights 5 Getting Started Setting Up Your TV 6 Locating Inputs and Outputs 7 Adjusting the viewing angle of the TV 8 Connecting the TV...TV Against a Wall or Enclosed Area 13 Securing the TV 14 Running Initial Setup 16 Operating the TV Using the Remote Control 17 Remote Control Button Description 18 TV Controls and Indicators 20 Using Features Using BRAVIA... 37 Preparing the TV for Wall-Mounting 38 Troubleshooting 39 Important Notices 43...

Operating Instructions
Page 4
...Sony BRAVIA® high-definition television. Operating Instructions Provides the most out of your TV. To experience the stunning detail of your TV safe. Safety Booklet Contains precautionary measures to keep you and your new BRAVIA TV, you need access to HD programming. Quick Setup Guide Provides TV setup information with Your BRAVIA...8226; HD satellite subscription • Blu-ray Disc™ player or other HD compatible external equipment Contact your BRAVIA TV is only as good as the quality of the signal it receives. Experiencing Stunning HD with sample connection diagrams and...
...Sony BRAVIA® high-definition television. Operating Instructions Provides the most out of your TV. To experience the stunning detail of your TV safe. Safety Booklet Contains precautionary measures to keep you and your new BRAVIA TV, you need access to HD programming. Quick Setup Guide Provides TV setup information with Your BRAVIA...8226; HD satellite subscription • Blu-ray Disc™ player or other HD compatible external equipment Contact your BRAVIA TV is only as good as the quality of the signal it receives. Experiencing Stunning HD with sample connection diagrams and...
Operating Instructions
Page 5
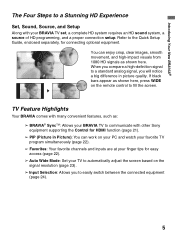
... press WIDE on your PC and watch your favorite TV program simultaneously (page 22). ➢ Favorites: Your ...; Auto Wide Mode: Set your BRAVIA TV set, a complete HD system requires an HD sound system, ... and a proper connection setup. Introducing Your New BRAVIA® The Four Steps to a standard analog ...HD signals as : ➢ BRAVIA® SyncTM: Allows your BRAVIA TV to communicate with your TV to automatically adjust the screen based ... Selection: Allows you to fill the screen. TV Feature Highlights Your BRAVIA comes with many convenient features, such as shown...
... press WIDE on your PC and watch your favorite TV program simultaneously (page 22). ➢ Favorites: Your ...; Auto Wide Mode: Set your BRAVIA TV set, a complete HD system requires an HD sound system, ... and a proper connection setup. Introducing Your New BRAVIA® The Four Steps to a standard analog ...HD signals as : ➢ BRAVIA® SyncTM: Allows your BRAVIA TV to communicate with your TV to automatically adjust the screen based ... Selection: Allows you to fill the screen. TV Feature Highlights Your BRAVIA comes with many convenient features, such as shown...
Operating Instructions
Page 6
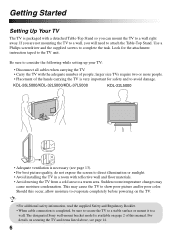
... do not expose the screen to direct illumination or sunlight. • Avoid installing the TV in a room with reflective wall and floor materials. • Avoid moving the TV from a cold area to a warm area. The designated Sony wall-mount bracket model is available on page 2 of the hands carrying the... TV is very important for the attachment instruction taped to show poor picture and/or ...
... do not expose the screen to direct illumination or sunlight. • Avoid installing the TV in a room with reflective wall and floor materials. • Avoid moving the TV from a cold area to a warm area. The designated Sony wall-mount bracket model is available on page 2 of the hands carrying the... TV is very important for the attachment instruction taped to show poor picture and/or ...
Operating Instructions
Page 7
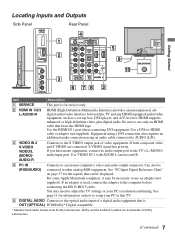
..., connect its audio output port to the computer before connecting the HD15-HD15 cable. If an adapter is used, connect the adapter to the TV's L (MONO) audio input port. See page 11 for information on page 37 for service only. 2 HDMI IN 1/2/3 L-AUDIO-R HDMI ...(High-Definition Multimedia Interface) provides an uncompressed, alldigital audio/video interface between this TV. 5 DIGITAL AUDIO Connects to the S VIDEO output jack of video equipment. Use the HDMI IN 1 port when connecting DVI equipment. Equipment using ...
..., connect its audio output port to the computer before connecting the HD15-HD15 cable. If an adapter is used, connect the adapter to the TV's L (MONO) audio input port. See page 11 for information on page 37 for service only. 2 HDMI IN 1/2/3 L-AUDIO-R HDMI ...(High-Definition Multimedia Interface) provides an uncompressed, alldigital audio/video interface between this TV. 5 DIGITAL AUDIO Connects to the S VIDEO output jack of video equipment. Use the HDMI IN 1 port when connecting DVI equipment. Equipment using ...
Operating Instructions
Page 8
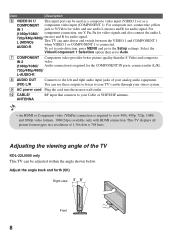
...the VIDEO 1 and COMPONENT 1 when VIDEO 1 or COMPONENT 1 is connected. Adjusting the viewing angle of 1,366 dots × 768 lines. L (MONO)AUDIO-R This TV can use Y, PB, PR for video signals and also connect the audio L 720p/480p/480i)/ (mono) and R for audio signal. Select the Video/Component 1 ...the angle back and forth (tilt) Right view 3˚ 8˚ Front 8 For (1080p/1080i/ component connection, use these outputs to listen to your TV's audio through your stereo system. 9 AC power cord Plug the cord into the nearest wall outlet. 0 CABLE/ ANTENNA RF input that connects to view ...
...the VIDEO 1 and COMPONENT 1 when VIDEO 1 or COMPONENT 1 is connected. Adjusting the viewing angle of 1,366 dots × 768 lines. L (MONO)AUDIO-R This TV can use Y, PB, PR for video signals and also connect the audio L 720p/480p/480i)/ (mono) and R for audio signal. Select the Video/Component 1 ...the angle back and forth (tilt) Right view 3˚ 8˚ Front 8 For (1080p/1080i/ component connection, use these outputs to listen to your TV's audio through your stereo system. 9 AC power cord Plug the cord into the nearest wall outlet. 0 CABLE/ ANTENNA RF input that connects to view ...
Operating Instructions
Page 9
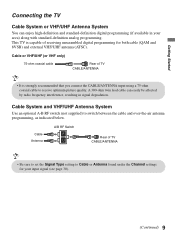
... or VHF/UHF Antenna System You can easily be affected by radio frequency interference, resulting in your input signal (see page 30). (Continued) 9 This TV is strongly recommended that you connect the CABLE/ANTENNA input using a 75-ohm coaxial cable to switch between the cable and over-the-air antenna... area) along with standard-definition analog programming. Cable or VHF/UHF (or VHF only) 75-ohm coaxial cable Rear of TV CABLE/ANTENNA • It is capable of TV CABLE/ANTENNA • Be sure to set the Signal Type setting to Cable or Antenna found under the Channel settings for ...
... or VHF/UHF Antenna System You can easily be affected by radio frequency interference, resulting in your input signal (see page 30). (Continued) 9 This TV is strongly recommended that you connect the CABLE/ANTENNA input using a 75-ohm coaxial cable to switch between the cable and over-the-air antenna... area) along with standard-definition analog programming. Cable or VHF/UHF (or VHF only) 75-ohm coaxial cable Rear of TV CABLE/ANTENNA • It is capable of TV CABLE/ANTENNA • Be sure to set the Signal Type setting to Cable or Antenna found under the Channel settings for ...

Operating Instructions
Page 10
...or a high-definition satellite service. For the best possible picture, make sure you connect this equipment to your TV. For details, see page 7. 10 Shown with HDMI Connection Rear of TV VIDEO AUDIO PC IN VIDEO IN Y PB RGB DIGITAL AUDIO OUT (OPTICAL) CATV/Satellite antenna cable HD ... L (MONO) AUDIO R 1 2 COMPONENT IN (1080p/1080i/ 720p/480p/480i) 1 AUDIO OUT (FIX) L AUDIO R 3 IN HDMI cable Shown with DVI Connection Rear of TV VIDEO AUDIO PC IN VIDEO IN Y PB RGB DIGITAL AUDIO OUT (OPTICAL) PR L (MONO) AUDIO R 1 2 COMPONENT IN (1080p/1080i/ 720p/480p/480i) 1 AUDIO OUT ...
...or a high-definition satellite service. For the best possible picture, make sure you connect this equipment to your TV. For details, see page 7. 10 Shown with HDMI Connection Rear of TV VIDEO AUDIO PC IN VIDEO IN Y PB RGB DIGITAL AUDIO OUT (OPTICAL) CATV/Satellite antenna cable HD ... L (MONO) AUDIO R 1 2 COMPONENT IN (1080p/1080i/ 720p/480p/480i) 1 AUDIO OUT (FIX) L AUDIO R 3 IN HDMI cable Shown with DVI Connection Rear of TV VIDEO AUDIO PC IN VIDEO IN Y PB RGB DIGITAL AUDIO OUT (OPTICAL) PR L (MONO) AUDIO R 1 2 COMPONENT IN (1080p/1080i/ 720p/480p/480i) 1 AUDIO OUT ...

Operating Instructions
Page 11
... a PC with a DVI or HDMI output. (Refer to the separate Quick Setup Guide.) HD15-HD15 cable (analog RGB) Audio cable (stereo mini plugs) Rear of TV VIDEO AUDIO PC IN VIDEO IN Y PB RGB DIGITAL AUDIO OUT (OPTICAL) PR L (MONO) AUDIO R 1 2 COMPONENT IN (1080p/1080i/ 720p/480p/480i) 1 AUDIO ...OUT (FIX) L AUDIO R 3 IN • Connect the PC IN jack to the PC using an HD15-HD15 cable with Component Connection Rear of TV VIDEO AUDIO PC IN VIDEO IN Y PB RGB DIGITAL AUDIO OUT (OPTICAL) PR L (MONO) AUDIO R 1 2 COMPONENT IN (1080p/1080i/ 720p/480p/480i) 1 AUDIO ...
... a PC with a DVI or HDMI output. (Refer to the separate Quick Setup Guide.) HD15-HD15 cable (analog RGB) Audio cable (stereo mini plugs) Rear of TV VIDEO AUDIO PC IN VIDEO IN Y PB RGB DIGITAL AUDIO OUT (OPTICAL) PR L (MONO) AUDIO R 1 2 COMPONENT IN (1080p/1080i/ 720p/480p/480i) 1 AUDIO ...OUT (FIX) L AUDIO R 3 IN • Connect the PC IN jack to the PC using an HD15-HD15 cable with Component Connection Rear of TV VIDEO AUDIO PC IN VIDEO IN Y PB RGB DIGITAL AUDIO OUT (OPTICAL) PR L (MONO) AUDIO R 1 2 COMPONENT IN (1080p/1080i/ 720p/480p/480i) 1 AUDIO ...

Operating Instructions
Page 12
... Analog audio Digital audio equipment system recorder equipment (A/V Receiver/ HomeTheater) Camcorder • Refer to the Quick Setup Guide (supplied) when connecting other equipment to your TV. 12
... Analog audio Digital audio equipment system recorder equipment (A/V Receiver/ HomeTheater) Camcorder • Refer to the Quick Setup Guide (supplied) when connecting other equipment to your TV. 12
Operating Instructions
Page 13
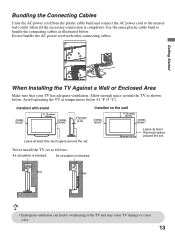
... other connecting cables. Air circulation is blocked. Getting Started When Installing the TV Against a Wall or Enclosed Area Make sure that your TV has adequate ventilation. Allow enough space around the TV as illustrated below 41 °F (5 °C). Never install the TV set . Bundling the Connecting Cables Untie the AC power cord from the...
... other connecting cables. Air circulation is blocked. Getting Started When Installing the TV Against a Wall or Enclosed Area Make sure that your TV has adequate ventilation. Allow enough space around the TV as illustrated below 41 °F (5 °C). Never install the TV set . Bundling the Connecting Cables Untie the AC power cord from the...
Operating Instructions
Page 14
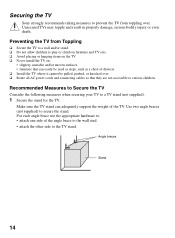
... they are not accessible to curious children. Make sure the TV stand can easily be used as steps, such as a chest of the TV. Securing the TV Sony strongly recommends taking measures to prevent the TV from Toppling ❑ Secure the TV to a wall and/or stand. ❑ Do not ...allow children to a TV stand (not supplied). 1 Secure the stand for the TV. Preventing the TV from toppling over . ❑ ...
... they are not accessible to curious children. Make sure the TV stand can easily be used as steps, such as a chest of the TV. Securing the TV Sony strongly recommends taking measures to prevent the TV from Toppling ❑ Secure the TV to a wall and/or stand. ❑ Do not ...allow children to a TV stand (not supplied). 1 Secure the stand for the TV. Preventing the TV from toppling over . ❑ ...
Operating Instructions
Page 15
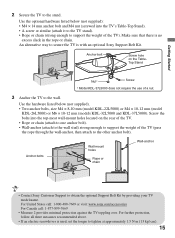
... call: 1-800-488-7669 or visit: www.sony.com/accessories For Canada call: 1-877-899-7669 • Measure 2 provides minimal protection against the TV toppling over. Getting Started 2 Secure the TV to obtain the optional Support Belt Kit by providing your TV model name. Use the optional hardware listed below ... the other anchor bolt). An alternative way to secure the TV is used, set the torque to the wall. For further protection, follow all three measures recommended above. • If an electric screwdriver is with an optional Sony Support Belt Kit. Make sure that there is no excess...
... call: 1-800-488-7669 or visit: www.sony.com/accessories For Canada call: 1-877-899-7669 • Measure 2 provides minimal protection against the TV toppling over. Getting Started 2 Secure the TV to obtain the optional Support Belt Kit by providing your TV model name. Use the optional hardware listed below ... the other anchor bolt). An alternative way to secure the TV is used, set the torque to the wall. For further protection, follow all three measures recommended above. • If an electric screwdriver is with an optional Sony Support Belt Kit. Make sure that there is no excess...

Operating Instructions
Page 16
...control buttons described below to the Quick Setup Guide (supplied) for ENERGY STAR compliant mode. Initial Setup • Select Cancel to the TV (you will scan for digital and analog channels Complete your viewing environment • Signal source connection check • Scan for available channels ... text • Choose your cable connections before beginning the Initial Setup. To run the Auto Program. • When prompted to the TV's CABLE/ANTENNA input. Please select the type of use and is Energy Star compliant. Running Initial Setup During initial setup, you can ...
...control buttons described below to the Quick Setup Guide (supplied) for ENERGY STAR compliant mode. Initial Setup • Select Cancel to the TV (you will scan for digital and analog channels Complete your viewing environment • Signal source connection check • Scan for available channels ... text • Choose your cable connections before beginning the Initial Setup. To run the Auto Program. • When prompted to the TV's CABLE/ANTENNA input. Please select the type of use and is Energy Star compliant. Running Initial Setup During initial setup, you can ...
Operating Instructions
Page 17
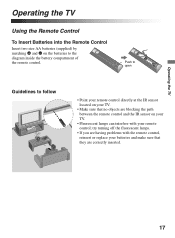
...; If you are having problems with your remote control; Operating the TV Operating the TV Using the Remote Control To Insert Batteries into the Remote Control Insert two size AA batteries (supplied) by matching e and E on your TV. • Fluorescent lamps can interfere with the remote control, reinsert... or replace your TV. • Make sure that they are blocking the path between the remote control and the IR ...
...; If you are having problems with your remote control; Operating the TV Operating the TV Using the Remote Control To Insert Batteries into the Remote Control Insert two size AA batteries (supplied) by matching e and E on your TV. • Fluorescent lamps can interfere with the remote control, reinsert... or replace your TV. • Make sure that they are blocking the path between the remote control and the IR ...
Operating Instructions
Page 18
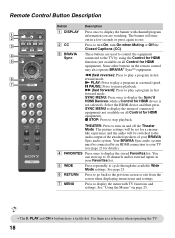
...program information you are used to control the equipment connected to the TV by an HDMI connection to your Favorites list. 5 WIDE Press repeatedly to play a program in fast rewind mode. Your BRAVIA Sync audio system must be switched to the audio output of ... exit. Remote Control Button Description 1 2 3 DISPLAY CC POWER 4 5 WIDE INPUT 6 7 TOOLS Button Description 1 DISPLAY 2 CC 3 BRAVIA Sync Press once to display the banner with TV functions and settings. Some other buttons on page 25. • The 5, PLAY and CH + buttons have a tactile dot. The picture ...
...program information you are used to control the equipment connected to the TV by an HDMI connection to your Favorites list. 5 WIDE Press repeatedly to play a program in fast rewind mode. Your BRAVIA Sync audio system must be switched to the audio output of ... exit. Remote Control Button Description 1 2 3 DISPLAY CC POWER 4 5 WIDE INPUT 6 7 TOOLS Button Description 1 DISPLAY 2 CC 3 BRAVIA Sync Press once to display the banner with TV functions and settings. Some other buttons on page 25. • The 5, PLAY and CH + buttons have a tactile dot. The picture ...
Operating Instructions
Page 19
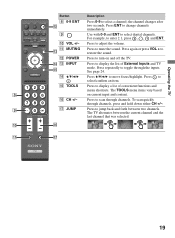
... sound. JUMP JUMP qa qj 19 the channel changes after two seconds. Press repeatedly to display a list of External Inputs and TV mode. Press to toggle through the inputs. The TV alternates between two channels. qa MUTING qd qs POWER qf qd INPUT qg qf V/v/B/b qg TOOLS qh CH +/- Press to mute... the sound. The TOOLS menu items vary based on and off the TV. Press to adjust the volume. Press to jump back and forth between the current channel and the last channel that was selected. See page 24...
... sound. JUMP JUMP qa qj 19 the channel changes after two seconds. Press repeatedly to display a list of External Inputs and TV mode. Press to toggle through the inputs. The TV alternates between two channels. qa MUTING qd qs POWER qf qd INPUT qg qf V/v/B/b qg TOOLS qh CH +/- Press to mute... the sound. The TOOLS menu items vary based on and off the TV. Press to adjust the volume. Press to jump back and forth between the current channel and the last channel that was selected. See page 24...
Operating Instructions
Page 20
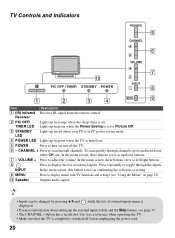
... list of external inputs menu is displayed. • For more information about setting up in green when the TV is turned on. 5 POWER Press to display menu with TV functions and settings (see page 35. • The CHANNEL + button has a tactile dot. To scan ...to toggle through channels, press and hold down buttons. 7 - INPUT In the menu screen, this button serves as a reference when operating the TV. • Make sure that the TV is set. TV Controls and Indicators POWER 5 CHANNEL 6 VOLUME 0 PIC OFF / TIMER STANDBY POWER 7 INPUT 8 MENU 9 1 2 3 4 Item Description 1...
... list of external inputs menu is displayed. • For more information about setting up in green when the TV is turned on. 5 POWER Press to display menu with TV functions and settings (see page 35. • The CHANNEL + button has a tactile dot. To scan ...to toggle through channels, press and hold down buttons. 7 - INPUT In the menu screen, this button serves as a reference when operating the TV. • Make sure that the TV is set. TV Controls and Indicators POWER 5 CHANNEL 6 VOLUME 0 PIC OFF / TIMER STANDBY POWER 7 INPUT 8 MENU 9 1 2 3 4 Item Description 1...


