Operating Instructions
Page 3
... General Setup Settings 51 Initial Setup 52 Other Information Troubleshooting 53 Specifications 57 Index 58 Customer Support United States http://www.sony.com/tvsupport Canada http://www.sony.ca/support On-line Registration United States http://productregistration.sony.com Canada http://www.SonyStyle.ca/registration 3 Installing the TV 6 Carrying the TV 6 Preparation for HDMI ....36 Using...
... General Setup Settings 51 Initial Setup 52 Other Information Troubleshooting 53 Specifications 57 Index 58 Customer Support United States http://www.sony.com/tvsupport Canada http://www.sony.ca/support On-line Registration United States http://productregistration.sony.com Canada http://www.SonyStyle.ca/registration 3 Installing the TV 6 Carrying the TV 6 Preparation for HDMI ....36 Using...
Operating Instructions
Page 5
...). • Music: listen to music files via USB or add music to display the XMB™. DISPLAY LIGHT POWER TV POWER DVD AMP STB TV FUNCTION PREV REPLAY ADVANCE NEXT PLAY SYNC MENU PAUSE STOP THEATER SOUND PICTURE WIDE CC FREEZE Product Support Clock/Timers Settings Sound...8482; is an easy way to certain features, settings, and functionalities of this TV (i.e. It meets strict energy efficiency guidelines set up, it is designed to meet ENERGY STAR requirements. • Changes to access the TV settings for the 52 inch BRAVIA KDL-XBR7 model with screen size measured diagonally. 5
...). • Music: listen to music files via USB or add music to display the XMB™. DISPLAY LIGHT POWER TV POWER DVD AMP STB TV FUNCTION PREV REPLAY ADVANCE NEXT PLAY SYNC MENU PAUSE STOP THEATER SOUND PICTURE WIDE CC FREEZE Product Support Clock/Timers Settings Sound...8482; is an easy way to certain features, settings, and functionalities of this TV (i.e. It meets strict energy efficiency guidelines set up, it is designed to meet ENERGY STAR requirements. • Changes to access the TV settings for the 52 inch BRAVIA KDL-XBR7 model with screen size measured diagonally. 5
Operating Instructions
Page 14
...Setup Guide.) Rear of the above PC input signals to display on the television. • For the best picture quality, it is connected to the TV and no signal has been input from the PC according to the supported resolutions and timings indicated below . Supported resolutions Signal VGA Horizontal × (Pixel... plugs) ~ • Connect the PC IN jack to the PC using an HD15HD15 cable with ferrite core (analog RGB) and audio cable (see page 52). To view PC content set the output signal from the PC for your PC by connecting a HD15-HD15 cable as shown below . PC Input Signal...
...Setup Guide.) Rear of the above PC input signals to display on the television. • For the best picture quality, it is connected to the TV and no signal has been input from the PC according to the supported resolutions and timings indicated below . Supported resolutions Signal VGA Horizontal × (Pixel... plugs) ~ • Connect the PC IN jack to the PC using an HD15HD15 cable with ferrite core (analog RGB) and audio cable (see page 52). To view PC content set the output signal from the PC for your PC by connecting a HD15-HD15 cable as shown below . PC Input Signal...
Operating Instructions
Page 17
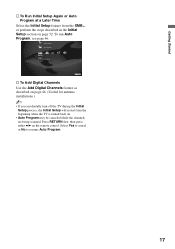
... may be canceled while the channels are being scanned. Press RETURN first, then press either B/b on page 52. To run Auto Program, see page 46. HDMI Settings General Setup Settings Initial Setup TV s To Add Digital Channels Use the Add Digital Channels feature as described on page 46. (Useful for... antenna installations.) ~ • If you accidentally turn off the TV during the Initial Setup process, the Initial Setup will restart from the XMB™ or perform the steps described in the Initial Setup section on...
... may be canceled while the channels are being scanned. Press RETURN first, then press either B/b on page 52. To run Auto Program, see page 46. HDMI Settings General Setup Settings Initial Setup TV s To Add Digital Channels Use the Add Digital Channels feature as described on page 46. (Useful for... antenna installations.) ~ • If you accidentally turn off the TV during the Initial Setup process, the Initial Setup will restart from the XMB™ or perform the steps described in the Initial Setup section on...
Operating Instructions
Page 24
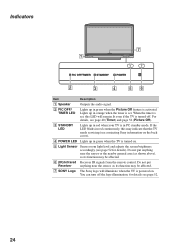
...nearby general area (as shown above), as its function may indicate that the TV needs servicing (see page 52 for details see page 40 (Timer) and page 52 (Picture Off). 3 STANDBY LED Lights up in red when your TV is activated. If the LED blinks in red continuously, this LED will illuminate... up in orange when the timer is turned on . You can turn off . When the timer is set, this may be affected. 7 SONY Logo The Sony logo will remain lit even if the TV is powered on . 5 Light Sensor Senses room light level and adjusts the screen brightness accordingly (see contacting...
...nearby general area (as shown above), as its function may indicate that the TV needs servicing (see page 52 for details see page 40 (Timer) and page 52 (Picture Off). 3 STANDBY LED Lights up in red when your TV is activated. If the LED blinks in red continuously, this LED will illuminate... up in orange when the timer is turned on . You can turn off . When the timer is set, this may be affected. 7 SONY Logo The Sony logo will remain lit even if the TV is powered on . 5 Light Sensor Senses room light level and adjusts the screen brightness accordingly (see contacting...

Operating Instructions
Page 28
...see page 52). 28 Removing from Favorites 1 Press FAVORITES, then select an item to be removed, and press OPTIONS. 2 Press V/v to highlight Remove from Favorites and press . ~ • Auto Program will clear your TV channels from Favorites, follow the instructions below. Background TV Photos ... you wish to add and press OPTIONS. 2 Press V/v to highlight Add to Favorites 1 From the XMBTM, select a Photo, Music, TV, or External Inputs icon. Displaying Favorites Press FAVORITES. Exploring Fun Features Favorites With Favorites, you can manage your Favorites to factory default settings...
...see page 52). 28 Removing from Favorites 1 Press FAVORITES, then select an item to be removed, and press OPTIONS. 2 Press V/v to highlight Remove from Favorites and press . ~ • Auto Program will clear your TV channels from Favorites, follow the instructions below. Background TV Photos ... you wish to add and press OPTIONS. 2 Press V/v to highlight Add to Favorites 1 From the XMBTM, select a Photo, Music, TV, or External Inputs icon. Displaying Favorites Press FAVORITES. Exploring Fun Features Favorites With Favorites, you can manage your Favorites to factory default settings...
Operating Instructions
Page 39
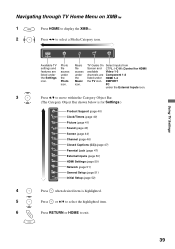
... and features are Component 1-2 listed under the Music icon. Photo file access under the Settings icon. Music file access under HDMI 1-4 the TV icon. DMPORT PC under the External Inputs icon. 3 Press V/v to move within the Category Object Bar. (The Category Object Bar shown below is highlighted. 5 Press ... (CC) (page 47) Parental Lock (page 47) External Inputs (page 50) HDMI Settings (page 50) Network (page 51) General Setup (page 51) Initial Setup (page 52) 4 Press when desired item is for HDMI) available Video 1-3 channels are listed under the Photo icon.
... and features are Component 1-2 listed under the Music icon. Photo file access under the Settings icon. Music file access under HDMI 1-4 the TV icon. DMPORT PC under the External Inputs icon. 3 Press V/v to move within the Category Object Bar. (The Category Object Bar shown below is highlighted. 5 Press ... (CC) (page 47) Parental Lock (page 47) External Inputs (page 50) HDMI Settings (page 50) Network (page 51) General Setup (page 51) Initial Setup (page 52) 4 Press when desired item is for HDMI) available Video 1-3 channels are listed under the Photo icon.
Operating Instructions
Page 52
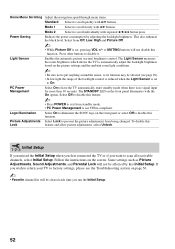
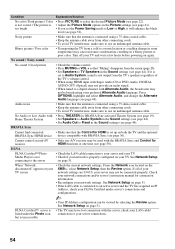
... on the front panel illuminates with repeated V/v/B/b button press. Press other buttons to have the TV automatically enter standby mode when there is not VESA-compliant. The STANDBY LED on page 56...~ • Press POWER to exit from being changed. Logo Illumination Select On to illuminate the SONY logo on the screen. Mode 2 Select to scroll individually with the On option. or MUTING... buttons will not be cleared each time you run the Initial Setup. 52 Select Off to disable this function. This also enhances the black level. Follow the instructions...
... on the front panel illuminates with repeated V/v/B/b button press. Press other buttons to have the TV automatically enter standby mode when there is not VESA-compliant. The STANDBY LED on page 56...~ • Press POWER to exit from being changed. Logo Illumination Select On to illuminate the SONY logo on the screen. Mode 2 Select to scroll individually with the On option. or MUTING... buttons will not be cleared each time you run the Initial Setup. 52 Select Off to disable this function. This also enhances the black level. Follow the instructions...

Operating Instructions
Page 53
... the best possible picture for your Sony TV, please visit our website or call one of the following numbers: http://www.sony.com/tvsupport for US Support http://www.sony.ca/support for Canadian Support 1-800-222-SONY(7669) for US Support 1-877-899-SONY(7669) for Canadian Support Condition No...is activated, or confirm the Duration setting of Timer (see page 40). • Check PC Power Management in General Setup settings (see page 52). • Check the connection between channel and program. • Confirm the picture quality by selecting Signal Diagnostics in the Product Support settings (...
... the best possible picture for your Sony TV, please visit our website or call one of the following numbers: http://www.sony.com/tvsupport for US Support http://www.sony.ca/support for Canadian Support 1-800-222-SONY(7669) for US Support 1-877-899-SONY(7669) for Canadian Support Condition No...is activated, or confirm the Duration setting of Timer (see page 40). • Check PC Power Management in General Setup settings (see page 52). • Check the connection between channel and program. • Confirm the picture quality by selecting Signal Diagnostics in the Product Support settings (...
Operating Instructions
Page 54
...the desired Picture Mode (see page 22). See Network Setup on your server connections. If it will enhance the black level (see page 52). See Network Setup on again. DLNA Certified™ server is connected to a digital channel with the server, check your LAN cable/ ... Turn off your server may cause moisture condensation, resulting in a blurry picture or poor color. From the Network icon located on both the TV and the optional BRAVIA Sync HDMI device device compatible with BRAVIA Sync (see page 36). Condition Explanation/Solution No color / Dark picture / ...
...the desired Picture Mode (see page 22). See Network Setup on your server connections. If it will enhance the black level (see page 52). See Network Setup on again. DLNA Certified™ server is connected to a digital channel with the server, check your LAN cable/ ... Turn off your server may cause moisture condensation, resulting in a blurry picture or poor color. From the Network icon located on both the TV and the optional BRAVIA Sync HDMI device device compatible with BRAVIA Sync (see page 36). Condition Explanation/Solution No color / Dark picture / ...

Operating Instructions
Page 55
... of the screen • Some wide screen programs are filmed in standby or hibernation mode. Poor Picture • Adjust the resolution (see page 52). • Verify the PC is not in aspect ratios that came with your DVD (or contact your program provider). • Programs in HD...digital sources display a digital broadcasts and DVDs which will remain in effect until you prefer (see image on left and right sides of the TV. General Wide Mode changes automatically • The current Wide Mode setting is automatically replaced with the 4:3 Default setting when you change the ...
... of the screen • Some wide screen programs are filmed in standby or hibernation mode. Poor Picture • Adjust the resolution (see page 52). • Verify the PC is not in aspect ratios that came with your DVD (or contact your program provider). • Programs in HD...digital sources display a digital broadcasts and DVDs which will remain in effect until you prefer (see image on left and right sides of the TV. General Wide Mode changes automatically • The current Wide Mode setting is automatically replaced with the 4:3 Default setting when you change the ...
Operating Instructions
Page 57
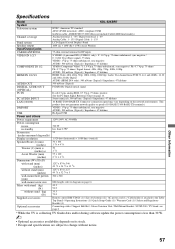
...500 mVrms (Typical) / Impedance: 47 kilohms Hi-Speed USB 120V-240V AC 50/60Hz 320 W less than 0.3W* 52 1,920 dots (horizontal) × 1,080 lines (vertical) 34 × 104 1 3/8 × 4 1/8 30 1... without stand (kg) (lb.) Supplied accessories Optional accessories KDL-52XBR7 NTSC: American TV standard ATSC (8VSB terrestrial): ATSC compliant 8VSB QAM on cable...: ANSI/SCTE 07 2000 (Does not include CableCARD functionality) Analog terrestrial: 2 - 69 / Digital terrestrial: 2 - 69 Analog Cable: 1 - 135 / Digital Cable: 1 - 135 LCD...
...500 mVrms (Typical) / Impedance: 47 kilohms Hi-Speed USB 120V-240V AC 50/60Hz 320 W less than 0.3W* 52 1,920 dots (horizontal) × 1,080 lines (vertical) 34 × 104 1 3/8 × 4 1/8 30 1... without stand (kg) (lb.) Supplied accessories Optional accessories KDL-52XBR7 NTSC: American TV standard ATSC (8VSB terrestrial): ATSC compliant 8VSB QAM on cable...: ANSI/SCTE 07 2000 (Does not include CableCARD functionality) Analog terrestrial: 2 - 69 / Digital terrestrial: 2 - 69 Analog Cable: 1 - 135 / Digital Cable: 1 - 135 LCD...
Operating Instructions
Page 58
... Receiver (IR) 24 INPUT button 22 Installing the TV on a wall 6 J JUMP button 23 L Language 51 LIGHT button 19 Light Sensor Described 24 Setting 52 Logo Illumination 52 M Manage Inputs 50 Motion Enhancer 42 Movie Rating 49...40 Closed Captions (CC) 47 External Inputs 50 General Setup 51 HDMI Settings 50 Initial Setup 52 Network 51 Parental Lock 47 Picture 41 Product Support 40 Screen 44 Sound 43 Sharpness 41 ...42 Color 41 Color Temperature 41 COMPONENT IN jack (1080p/1080i/ 720p/480p/480i) 11 Contact Sony 40 Control for Slideshow 33 Add to Favorites 31, 33 Advanced Settings 42 Analog CC 47 Audio...
... Receiver (IR) 24 INPUT button 22 Installing the TV on a wall 6 J JUMP button 23 L Language 51 LIGHT button 19 Light Sensor Described 24 Setting 52 Logo Illumination 52 M Manage Inputs 50 Motion Enhancer 42 Movie Rating 49...40 Closed Captions (CC) 47 External Inputs 50 General Setup 51 HDMI Settings 50 Initial Setup 52 Network 51 Parental Lock 47 Picture 41 Product Support 40 Screen 44 Sound 43 Sharpness 41 ...42 Color 41 Color Temperature 41 COMPONENT IN jack (1080p/1080i/ 720p/480p/480i) 11 Contact Sony 40 Control for Slideshow 33 Add to Favorites 31, 33 Advanced Settings 42 Analog CC 47 Audio...


