Operating Instructions
Page 1
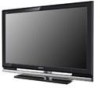
3-297-694-16(1) LCD Digital Color TV Operating Instructions KDL-32XBR6 KDL-40V4100 KDL-40W4100 KDL-37XBR6 KDL-42V4100 KDL-46W4100 KDL-40V4150 KDL-46V4100 KDL-52W4100 KDL-52V4100 KDL-46W4150 © 2008 Sony Corporation
3-297-694-16(1) LCD Digital Color TV Operating Instructions KDL-32XBR6 KDL-40V4100 KDL-40W4100 KDL-37XBR6 KDL-42V4100 KDL-46W4100 KDL-40V4150 KDL-46V4100 KDL-52W4100 KDL-52V4100 KDL-46W4150 © 2008 Sony Corporation
Operating Instructions
Page 2
.... Use with an extension cord, receptacle or other countries. Declaration of Sony Corporation. Gemstar-TV Guide International Inc. KDL-32XBR6 KDL-37XBR6 KDL-40V4150 KDL-40V4100 KDL-40W4100 KDL-42V4100 KDL-46V4100 KDL-46W4100 KDL-46W4150 KDL-52V4100 KDL-52W4100 Sony Wall-Mount Bracket Model No. To Customers Sufficient expertise is a registered mark of Sony Computer Entertainment Inc. and other countries. Patent No. 5,717,422 U.S. "Dolby...
.... Use with an extension cord, receptacle or other countries. Declaration of Sony Corporation. Gemstar-TV Guide International Inc. KDL-32XBR6 KDL-37XBR6 KDL-40V4150 KDL-40V4100 KDL-40W4100 KDL-42V4100 KDL-46V4100 KDL-46W4100 KDL-46W4150 KDL-52V4100 KDL-52W4100 Sony Wall-Mount Bracket Model No. To Customers Sufficient expertise is a registered mark of Sony Computer Entertainment Inc. and other countries. Patent No. 5,717,422 U.S. "Dolby...
Operating Instructions
Page 3
... equipment connection diagrams. Customer Support http://www.sony.com/tvsupport Canada http://www.sony.ca/support On-line Registration United States http://productregistration.sony.com Canada http://www.sonystyle.ca/registration 3 Installing the TV 6 Carrying the TV 6 Preparation for Table-Top Stand 6 Preparation... for HDMI 25 How to Use TV Guide On Screen 26 Using P&P and PIP ...
... equipment connection diagrams. Customer Support http://www.sony.com/tvsupport Canada http://www.sony.ca/support On-line Registration United States http://productregistration.sony.com Canada http://www.sonystyle.ca/registration 3 Installing the TV 6 Carrying the TV 6 Preparation for Table-Top Stand 6 Preparation... for HDMI 25 How to Use TV Guide On Screen 26 Using P&P and PIP ...

Operating Instructions
Page 4
... and standard-definition signals are transmitted with your BRAVIA TV set, a complete HD system requires an HD sound system, a source of your cable or satellite provider for purchasing this Sony BRAVIA® high-definition television. http://www.sony.com/HDTV Canada http://www.sonystyle.ca/hd The ...Four Steps to a Full HD Experience: Set, Sound, Source, and Setup Along with different aspect ratios (the width-to-height ratio of the TV to adjust the...
... and standard-definition signals are transmitted with your BRAVIA TV set, a complete HD system requires an HD sound system, a source of your cable or satellite provider for purchasing this Sony BRAVIA® high-definition television. http://www.sony.com/HDTV Canada http://www.sonystyle.ca/hd The ...Four Steps to a Full HD Experience: Set, Sound, Source, and Setup Along with different aspect ratios (the width-to-height ratio of the TV to adjust the...
Operating Instructions
Page 5
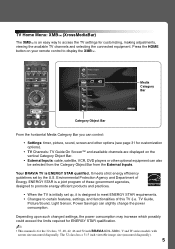
...; (XrossMediaBar) The XMB™ is an easy way to access the TV settings for the 32 class, 37, 40, 42, 46 and 52 inch BRAVIA KDL-XBR6, V and W series models with screen size measured diagonally. TV Guide, Picture/Sound, Light Sensor, Power Savings) can also be selected from...Object Bar. • External Inputs: cable, satellite, VCR, DVD players or other options (see page 31 for customization options). • TV Channels: TV Guide On Screen™ and available channels are displayed on your remote control to certain features, settings, and functionalities of Energy. ENERGY STAR ...
...; (XrossMediaBar) The XMB™ is an easy way to access the TV settings for the 32 class, 37, 40, 42, 46 and 52 inch BRAVIA KDL-XBR6, V and W series models with screen size measured diagonally. TV Guide, Picture/Sound, Light Sensor, Power Savings) can also be selected from...Object Bar. • External Inputs: cable, satellite, VCR, DVD players or other options (see page 31 for customization options). • TV Channels: TV Guide On Screen™ and available channels are displayed on your remote control to certain features, settings, and functionalities of Energy. ENERGY STAR ...
Operating Instructions
Page 6
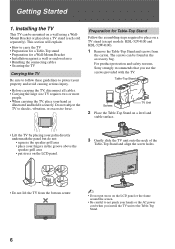
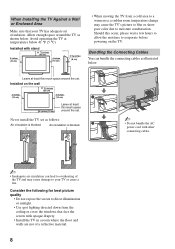
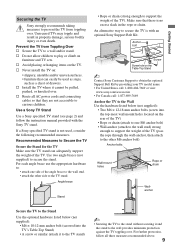
...8226; Bundling the connecting cables • Securing the TV Carrying the TV Be sure to follow these guidelines to shocks, vibration, or excessive force. Table-Top Stand Screws TV Unit 2 Place the Table-Top Stand on the LCD panel or the frame around the screen. • ...Sony strongly recommends that you install the TV unit to the Table-Top Stand. 6 This section will explain: • How to carry the TV • Preparation for a Table-Top stand • Preparation for Table-Top Stand Follow the assembling steps required to place on a TV stand (except models: KDL-52V4100 and KDL-52W4100...
...8226; Bundling the connecting cables • Securing the TV Carrying the TV Be sure to follow these guidelines to shocks, vibration, or excessive force. Table-Top Stand Screws TV Unit 2 Place the Table-Top Stand on the LCD panel or the frame around the screen. • ...Sony strongly recommends that you install the TV unit to the Table-Top Stand. 6 This section will explain: • How to carry the TV • Preparation for a Table-Top stand • Preparation for Table-Top Stand Follow the assembling steps required to place on a TV stand (except models: KDL-52V4100 and KDL-52W4100...
Operating Instructions
Page 7
... model; Shown here with at approximately 1.5 N·m, 15 Kgf·cm. Models KDL-52V4100 and KDL-52W4100 will require detaching the Table-Top stand. • For product protection and safety reasons, Sony strongly recommends that you are 8 mm to wall-mount the TV. (Continued) 7 The supplied M6 screws are designed so that you decided to...
... model; Shown here with at approximately 1.5 N·m, 15 Kgf·cm. Models KDL-52V4100 and KDL-52W4100 will require detaching the Table-Top stand. • For product protection and safety reasons, Sony strongly recommends that you are 8 mm to wall-mount the TV. (Continued) 7 The supplied M6 screws are designed so that you decided to...
Operating Instructions
Page 8
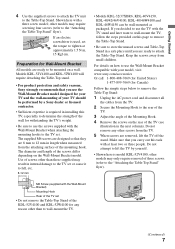
...4 inches (10 cm) 2 3/8 inches (6 cm) • When moving the TV from the ceiling or cover the windows that your TV or cause a fire. Should this much space around the set. Never install the TV set . Avoid operating the TV at least this much space around the set as follows: Air circulation.... • Use spot lighting directed down from a cold area to a warm area, a sudden room temperature change may cause damage to your TV has adequate air circulation. Leave at least this occur, please wait a few hours to allow the moisture to evaporate before powering on the wall ...
...4 inches (10 cm) 2 3/8 inches (6 cm) • When moving the TV from the ceiling or cover the windows that your TV or cause a fire. Should this much space around the set. Never install the TV set . Avoid operating the TV at least this much space around the set as follows: Air circulation.... • Use spot lighting directed down from a cold area to a warm area, a sudden room temperature change may cause damage to your TV has adequate air circulation. Leave at least this occur, please wait a few hours to allow the moisture to evaporate before powering on the wall ...
Operating Instructions
Page 9
... (attach to the wall stud) strong enough to support the weight of the TV). An alternative way to secure the TV is with the Sony TV stand. Use two angle braces (not supplied) to support the weight of the TV (pass the rope through the wall-anchor, then attach to the other side... holes located on : • slippery, unstable and/or uneven surfaces. • furniture that can adequately support the weight of drawers. Use a Sony TV Stand Use a Sony specified TV stand (see page 2) and follow all AC power cords and connecting cables so that there is not used as steps, such as a chest of...
... (attach to the wall stud) strong enough to support the weight of the TV). An alternative way to secure the TV is with the Sony TV stand. Use two angle braces (not supplied) to support the weight of the TV (pass the rope through the wall-anchor, then attach to the other side... holes located on : • slippery, unstable and/or uneven surfaces. • furniture that can adequately support the weight of drawers. Use a Sony TV Stand Use a Sony specified TV stand (see page 2) and follow all AC power cords and connecting cables so that there is not used as steps, such as a chest of...
Operating Instructions
Page 10
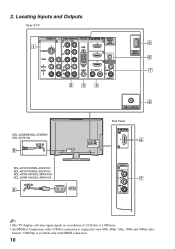
.../1080i/720p/480p/480i) 4 AUDIO OUT R AUDIO L L AUDIO R (VAR/FIX) 23 4 5 DMex/ SERVICE 6 7 KDL-32XBR6/KDL-37XBR6/ KDL-42V4100 9 KDL-40V4150/KDL-40V4100/ KDL-46V4100/KDL-52V4100/ KDL-40W4100/KDL-46W4100/ KDL-52W4100/KDL-46W4150 9 AC IN CABLE / ANTENNA 8 Side Panel IN 4 2 VIDEO IN 2 VIDEO L (MONO) AUDIO R 1 ~ • This TV displays all video input signals in a resolution of 1,920 dots × 1,080 lines...
.../1080i/720p/480p/480i) 4 AUDIO OUT R AUDIO L L AUDIO R (VAR/FIX) 23 4 5 DMex/ SERVICE 6 7 KDL-32XBR6/KDL-37XBR6/ KDL-42V4100 9 KDL-40V4150/KDL-40V4100/ KDL-46V4100/KDL-52V4100/ KDL-40W4100/KDL-46W4100/ KDL-52W4100/KDL-46W4150 9 AC IN CABLE / ANTENNA 8 Side Panel IN 4 2 VIDEO IN 2 VIDEO L (MONO) AUDIO R 1 ~ • This TV displays all video input signals in a resolution of 1,920 dots × 1,080 lines...
Operating Instructions
Page 11
...OUT (OPTICAL) Digital compatible. 7 AUDIO OUT (VAR/ Connects to use an adapter (not supplied). You can FIX) use these outputs to listen to your TV's audio through your stereo system. 8 CABLE/ ANTENNA RF input that can be displayed. ~ • For some Apple Macintosh computers, it may be connected... the composite video and audio output jacks on page 14 for service only unless you have mono equipment, connect its audio output jack to the TV's L (MONO) audio input jack. See "PC Input Signal Reference Chart" on your equipment's component video (YPBPR) and audio (L/R) jacks. If ...
...OUT (OPTICAL) Digital compatible. 7 AUDIO OUT (VAR/ Connects to use an adapter (not supplied). You can FIX) use these outputs to listen to your TV's audio through your stereo system. 8 CABLE/ ANTENNA RF input that can be displayed. ~ • For some Apple Macintosh computers, it may be connected... the composite video and audio output jacks on page 14 for service only unless you have mono equipment, connect its audio output jack to the TV's L (MONO) audio input jack. See "PC Input Signal Reference Chart" on your equipment's component video (YPBPR) and audio (L/R) jacks. If ...
Operating Instructions
Page 12
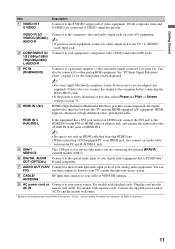
...type of input signal you connect the CABLE/ANTENNA input using a 75-ohm coaxial cable to receive optimum picture quality. Connecting the TV Cable System or VHF/UHF Antenna System You can enjoy high-definition and standarddefinition digital programming (if available in your area) along with... radio frequency interference, resulting in the Channel settings for both cable (QAM and 8VSB) and external VHF/UHF antenna (ATSC). • It is capable of TV VIDEO IN 1 3 S VIDEO VIDEO L (MONO) AUDIO R COMPONENT IN PC IN 1 2 Y RGB PB PR L AUDIO R AUDIO (1080p/1080i/720p/480p/480i) ...
...type of input signal you connect the CABLE/ANTENNA input using a 75-ohm coaxial cable to receive optimum picture quality. Connecting the TV Cable System or VHF/UHF Antenna System You can enjoy high-definition and standarddefinition digital programming (if available in your area) along with... radio frequency interference, resulting in the Channel settings for both cable (QAM and 8VSB) and external VHF/UHF antenna (ATSC). • It is capable of TV VIDEO IN 1 3 S VIDEO VIDEO L (MONO) AUDIO R COMPONENT IN PC IN 1 2 Y RGB PB PR L AUDIO R AUDIO (1080p/1080i/720p/480p/480i) ...
Operating Instructions
Page 13
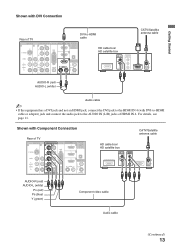
Getting Started Shown with DVI Connection Rear of TV VIDEO IN 1 3 S VIDEO VIDEO L (MONO) AUDIO R DVI-to-HDMI cable COMPONENT IN PC IN 1 2 Y RGB PB IN DIGITAL 1 AUDIO OUT (OPTICAL) 3 PR L AUDIO R AUDIO (1080p/... cable Audio cable ~ • If the equipment has a DVI jack and not an HDMI jack, connect the DVI jack to the AUDIO IN (L/R) jacks of TV VIDEO IN 1 3 S VIDEO VIDEO L (MONO) AUDIO R COMPONENT IN PC IN 1 2 Y RGB PB IN DIGITAL 1 AUDIO OUT (OPTICAL) 3 PR L AUDIO R AUDIO (1080p/1080i/720p/480p/480i...
Getting Started Shown with DVI Connection Rear of TV VIDEO IN 1 3 S VIDEO VIDEO L (MONO) AUDIO R DVI-to-HDMI cable COMPONENT IN PC IN 1 2 Y RGB PB IN DIGITAL 1 AUDIO OUT (OPTICAL) 3 PR L AUDIO R AUDIO (1080p/... cable Audio cable ~ • If the equipment has a DVI jack and not an HDMI jack, connect the DVI jack to the AUDIO IN (L/R) jacks of TV VIDEO IN 1 3 S VIDEO VIDEO L (MONO) AUDIO R COMPONENT IN PC IN 1 2 Y RGB PB IN DIGITAL 1 AUDIO OUT (OPTICAL) 3 PR L AUDIO R AUDIO (1080p/1080i/720p/480p/480i...
Operating Instructions
Page 14
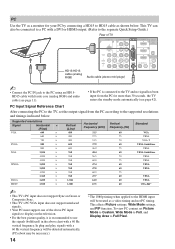
...content set the output signal from the PC for your PC by connecting a HD15 to HD15 cable as a video timing and not PC timing. This TV can also be treated as shown below . This affects Picture settings, Wide Mode settings, and PIP function. PC Input Signal Reference Chart After connecting ...the PC to the TV, set Picture Mode to Custom, Wide Mode to Full, and Display Area to use the signals (boldfaced) in the above chart with ferrite core (...
...content set the output signal from the PC for your PC by connecting a HD15 to HD15 cable as a video timing and not PC timing. This TV can also be treated as shown below . This affects Picture settings, Wide Mode settings, and PIP function. PC Input Signal Reference Chart After connecting ...the PC to the TV, set Picture Mode to Custom, Wide Mode to Full, and Display Area to use the signals (boldfaced) in the above chart with ferrite core (...

Operating Instructions
Page 15
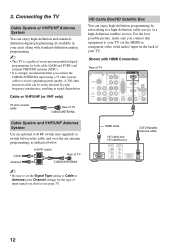
Camcorder 15 Getting Started Other Equipment Personal computer Blu-ray Disc Player/ "PS3" Digital DVD satellite player receiver Digital cable box Audio system Rear of TV VIDEO IN 1 3 S VIDEO VIDEO L (MONO) AUDIO R COMPONENT IN PC IN 1 2 Y RGB PB IN DIGITAL 1 AUDIO OUT (OPTICAL) 3 PR L AUDIO R AUDIO (1080p/1080i/720p/480p/480i) 4 ... Digital recorder Analog Digital audio audio equipment equipment (A/V Receiver/Home Theater) ~ • Refer to the Quick Setup Guide (supplied) when connecting other equipment to your TV.
Camcorder 15 Getting Started Other Equipment Personal computer Blu-ray Disc Player/ "PS3" Digital DVD satellite player receiver Digital cable box Audio system Rear of TV VIDEO IN 1 3 S VIDEO VIDEO L (MONO) AUDIO R COMPONENT IN PC IN 1 2 Y RGB PB IN DIGITAL 1 AUDIO OUT (OPTICAL) 3 PR L AUDIO R AUDIO (1080p/1080i/720p/480p/480i) 4 ... Digital recorder Analog Digital audio audio equipment equipment (A/V Receiver/Home Theater) ~ • Refer to the Quick Setup Guide (supplied) when connecting other equipment to your TV.
Operating Instructions
Page 16
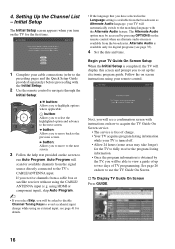
... Press GUIDE. 16 Initial Setup Step 1 of 6 Initial Setup is turned off. • Allow 24 hours (some areas may be accessed by the TV, you to navigate through the Initial Setup: V/v button: Allows you will scan for the first time. Initial Setup Step 6 of 6 Please select a... language. Highlight a choice and press to begin the TV Guide setup. Auto Program will be asked to disable Channel Tuning Keys to avoid accidental input change while using HDMI or component input), skip Auto...
... Press GUIDE. 16 Initial Setup Step 1 of 6 Initial Setup is turned off. • Allow 24 hours (some areas may be accessed by the TV, you to navigate through the Initial Setup: V/v button: Allows you will scan for the first time. Initial Setup Step 6 of 6 Please select a... language. Highlight a choice and press to begin the TV Guide setup. Auto Program will be asked to disable Channel Tuning Keys to avoid accidental input change while using HDMI or component input), skip Auto...
Operating Instructions
Page 17
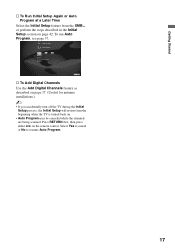
...cancel or No to resume Auto Program. 17 Press RETURN first, then press either B/b on the remote control. HDMI Settings General Setup Settings Initial Setup TV s To Add Digital Channels Use the Add Digital Channels feature as described on page 37. (Useful for antenna installations.) ~ • If you ...accidentally turn off the TV during the Initial Setup process, the Initial Setup will restart from the XMB™ or perform the steps described in the Initial Setup section on...
...cancel or No to resume Auto Program. 17 Press RETURN first, then press either B/b on the remote control. HDMI Settings General Setup Settings Initial Setup TV s To Add Digital Channels Use the Add Digital Channels feature as described on page 37. (Useful for antenna installations.) ~ • If you ...accidentally turn off the TV during the Initial Setup process, the Initial Setup will restart from the XMB™ or perform the steps described in the Initial Setup section on...

Operating Instructions
Page 18
... Point your remote control directly at the IR sensor located on your batteries and make sure that no objects are correctly inserted. Operating the TV Inserting Batteries into the Remote Control Insert two size AA batteries (supplied) by matching e and E on the next page. 18... the remote control. Push to the diagram inside the battery compartment of the TV operate the same as the corresponding buttons on your TV. • Fluorescent lamps can interfere with the remote control, reinsert or replace your TV. • Make sure that they are blocking the path between the remote ...
... Point your remote control directly at the IR sensor located on your batteries and make sure that no objects are correctly inserted. Operating the TV Inserting Batteries into the Remote Control Insert two size AA batteries (supplied) by matching e and E on the next page. 18... the remote control. Push to the diagram inside the battery compartment of the TV operate the same as the corresponding buttons on your TV. • Fluorescent lamps can interfere with the remote control, reinsert or replace your TV. • Make sure that they are blocking the path between the remote ...
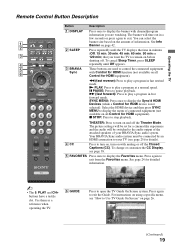
Operating Instructions
Page 19
... MENU: Press once to pause playback. Press again to exit the Guide. Press again to exit from the Favorites menu. x STOP: Press to open the TV Guide On Screen system. Your BRAVIA Sync audio system must be connected by an HDMI connection to your BRAVIA Sync audio system. Select the HDMI... experience and the audio will time out in fast forward mode. For instructions on using a specific menu, see "How to Use TV Guide On Screen" on the amount of your TV (see page 38. 5 FAVORITES Press once to display the Favorites menu. You can select the 1 banner size based on page ...
... MENU: Press once to pause playback. Press again to exit the Guide. Press again to exit from the Favorites menu. x STOP: Press to open the TV Guide On Screen system. Your BRAVIA Sync audio system must be connected by an HDMI connection to your BRAVIA Sync audio system. Select the HDMI... experience and the audio will time out in fast forward mode. For instructions on using a specific menu, see "How to Use TV Guide On Screen" on the amount of your TV (see page 38. 5 FAVORITES Press once to display the Favorites menu. You can select the 1 banner size based on page ...

Operating Instructions
Page 20
See your dealer or www.sony.com/bravia for more information. Press to fill the screen with the frozen...move focus/highlight. Press to access features in all regions. Product Support Clock/Timers Settings Sound Screen qg Channel TV qh 9 DMex Press to select/ confirm an item. 20 Press again or press VOL + to mute the ...sound. qd MUTING Press to 0 restore the sound. Press repeatedly to display the list of External Inputs and TV mode. Freeze qs Current Frozen program picture Press the V/v/B/b to a different location on setting up the External Inputs...
See your dealer or www.sony.com/bravia for more information. Press to fill the screen with the frozen...move focus/highlight. Press to access features in all regions. Product Support Clock/Timers Settings Sound Screen qg Channel TV qh 9 DMex Press to select/ confirm an item. 20 Press again or press VOL + to mute the ...sound. qd MUTING Press to 0 restore the sound. Press repeatedly to display the list of External Inputs and TV mode. Freeze qs Current Frozen program picture Press the V/v/B/b to a different location on setting up the External Inputs...


